Panasonic SC-XH150 Operating Manual
Hide thumbs
Also See for SC-XH150:
- Owner's manual (26 pages) ,
- Operating instructions manual (30 pages)
Table of Contents
Advertisement
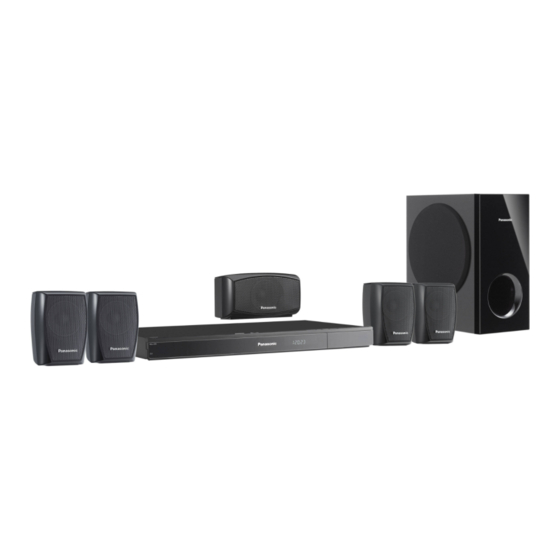
The illustration shows SC-PT70.
Obrázek představuje model SC-PT70.
Na rysunku przedstawiono model SC-PT70.
Dear customer
Thank you for purchasing this product. For optimum performance and safety, please read these instructions carefully.
Before connecting, operating or adjusting this product, please read the instructions completely.
Please keep this manual for future reference.
The illustrations shown may differ from your unit.
Region number
The player plays DVD-Video marked with labels containing the region number "4" or "ALL".
Example:
4
ALL
[GN]
2
3
4
Operating Instructions
DVD Home Theater Sound System
Model No.
SC-XH150
RQT9534-1B
Advertisement
Table of Contents

Related Manuals for Panasonic SC-XH150


Summary of Contents for Panasonic SC-XH150
-
Page 1: Operating Instructions
Obrázek představuje model SC-PT70. Na rysunku przedstawiono model SC-PT70. Operating Instructions DVD Home Theater Sound System SC-XH150 Model No. Dear customer Thank you for purchasing this product. For optimum performance and safety, please read these instructions carefully. Before connecting, operating or adjusting this product, please read the instructions completely. -
Page 2: Accessories
Accessories System SC-XH150 Main unit SA-XH150 Speaker Front speakers SB-HF270 Please check and identify the supplied system Center speaker SB-HC270 accessories. Surround speakers SB-HS270 Subwoofer SB-HW270 ∏ 1 Remote control Operations in these instructions are described mainly with the (N2QAYB000624) remote control, but you can perform the operations on the ∏... - Page 3 INPUT 10 10 MUTE CANCEL EXT-IN iPod RADIO SEARCH SEARCH PLAY SKIP SLOW SKIP PAUSE STOP FUNCTIONS EXIT PLAY MODE RETURN –REPEAT SOUND SURROUND W.SRD FL DISPLAY...
-
Page 4: Control Reference Guide
≥ To confirm the remaining time, press and hold the button again. < TV operations POWER-SAVING FEATURES Aim the remote control at the Panasonic TV and press the button. The main unit is designed to conserve its power [TV, Í]: Turn the TV on/off consumption and save energy. -
Page 5: Table Of Contents
TABLE OF CONTENTS Getting Started Playing Discs Accessories ........2 Basic play. -
Page 6: Step 1 Positioning
step 1 Positioning step 2 Connections How you set up your speakers can affect the bass and the sound field. Turn off all equipment before connection and read the appropriate Note the following points: operating instructions. ≥ Place speakers on flat secure bases. Do not connect the AC mains lead until all other ≥... -
Page 7: Audio And Video Connections
(not supplied) This connection provides the best picture and audio quality. VIERA Link “HDAVI Control” If your Panasonic TV is VIERA Link compatible, you can operate your TV DIGITAL AUDIO synchronising with home theater operations or vice versa HDMI AV OUT IN OPTICAL 14, Linked operations with the TV). -
Page 8: Step 3 Ac Mains Lead Connection
step 3 AC mains lead connection step 5 Easy setup The Easy setup screen assists you in making necessary settings. To household mains socket Preparation Turn on your TV and select the appropriate video input mode AC IN (e.g. VIDEO 1, AV 1, HDMI, etc.) to suit the connection to this unit. ≥... -
Page 9: Listening To The Radio
Listening to the radio Using the START menu You can select desired source, change the settings, access playback/ Presetting stations automatically menus, etc., by using the START menu. Press [START]B to show the START menu. Up to 30 stations can be set. ≥... -
Page 10: Listening To The Tv Or Other Device's Audio From This
Be sure to select the device’s (STB, etc.) input channel on the TV when making the setting. The device must be connected to the Panasonic TV via an HDMI cable and to this unit with an optical digital audio cable. -
Page 11: Selecting Sound Mode
Basic play Selecting sound mode Press [SOUND]: to select a sound mode. Preparation Each time you press the button: To display the picture, turn on your TV and change its video input mode Equaliser (e.g. VIDEO 1, AV 1, HDMI, etc.) to suit the connection to this unit. SUBW LVL: Subwoofer Level Press [Í]1 to turn on the unit. -
Page 12: Playing From The Selected Item
Other modes of play [DVD-V] Show a disc top menu: [TOP MENU]7 [DVD-V] Show a disc menu: [MENU]C Return to previous screen: [RETURN]D Program and Random play [VCD] (with playback control) Show a disc menu: [RETURN]D [CD] [MP3] [JPEG] [DivX] Turn PBC function on/off: [MENU]C Preparation Main unit display: [FL DISPLAY]E... -
Page 13: Repeat Play
Repeat play Play Speed This works only when the elapsed play time can be displayed. It also works with all JPEG content. [DVD-V] To change play speed During play, press and hold [–REPEAT]9, to show the – from “k0.6” to “k1.4” (in 0.1-unit steps) repeat mode. -
Page 14: Linked Operations With The Tv (Viera Link "Hdavi Control Tm ")
VIERA Link “HDAVI Control” is a convenient function that offers linked menu) operations of this unit, and a Panasonic TV (VIERA) under “HDAVI ≥ When you switch the TV input to TV tuner mode or the STB input Control”. You can use this function by connecting the equipment with channel, this unit will automatically switch to “AUX”... -
Page 15: Easy Control Only With Viera Remote Control
e.g. Easy control only with VIERA remote control (For “HDAVI Control 2 or later”) You can control the playback menus of this unit with the TV’s remote control. When operating the TV’s remote control, refer to the below illustration for operation buttons. -
Page 16: Playing From An Usb Device
To use the iPod touch/iPhone features Basic controls (For music and videos only) 1 Press the Home button on the iPod touch/iPhone. Button Function 2 Select the iPod touch/iPhone features on the touch screen to operate. [1 PLAY]5 Play [∫ STOP]5, [; PAUSE]5 Pause When the iPhone receives a call while connected to this unit, playback, etc. -
Page 17: Changing The Player Settings
Changing the player settings Time Delay When connected with a Plasma display, adjust if you notice the audio is out of sync with the video. Press [DVD]4 to select “DVD/CD”. ≥ 0ms/Auto ≥ 20ms ≥ 40ms ≥ 60ms ≥ 80ms ≥... -
Page 18: Speaker Settings
Others menu Speaker Settings Select the delay time of the speakers. DivX Registration [DivX] (Effective only when “Surround layout (Recommended)” mode is selected Display the unit’s registration code. in “Speaker layout” ( 8, Easy setup).) You need this registration code to purchase and play DivX Video-on- (Center and surround speakers only) Demand (VOD) content ( 19). -
Page 19: Divx Information
DivX information Media that can be played Commercial discs ABOUT DIVX VIDEO: DivX is a digital video format created by DivX, Inc. This is an official DivX Type of media/ ® Remarks Indicated as Logo Certified device that plays DivX video. Visit divx.com for more ®... -
Page 20: Maintenance
Video systems Speaker installation option This unit can play PAL and NTSC, but the “TV System” ( 17) of this unit must match the system of your TV. Attaching to a wall You can attach all of the speakers (except subwoofer) to a wall. Depending on the PAL video on the disc, the image may not be displayed correctly on an NTSC TV. -
Page 21: Troubleshooting Guide
Troubleshooting guide “LOADING” ≥ The iPod/iPhone is not ready. Wait for this display to disappear. ≥ Disconnect the iPod/iPhone, and then reconnect it firmly. ( Before requesting service, make the following checks. If you are in doubt about some of the check points, or if the solutions indicated in the General operation following guide do not solve the problem, consult your dealer for instructions. - Page 22 Play does not start. Menu is not displayed correctly. ≥ If playing DivX VOD content, refer to the homepage where you Restore the zoom ratio to “Normal”. (“Zoom” in Menu 2) ( purchased the DivX VOD content. (Example: http://vod.divx.com) [DivX] ≥...
-
Page 23: Specifications
VIDEO SECTION Specifications Video system PAL, NTSC Composite video output Output level 1 Vp-p (75 ≠) AMPLIFIER SECTION Terminal Pin jack (1 system) RMS Output Power: Dolby Digital Mode HDMI AV output Front Ch 160 W per channel (3 ≠), 1 kHz, 10 % THD Terminal 19-pin type A connector Surround Ch... -
Page 24: Licenses
Do not use a DC power source. Check the source carefully when setting the unit up on a ship or other places where DC is used. HDAVI Control is a trademark of Panasonic Corporation. AC mains lead protection “DVD Logo” is a trademark of DVD Format/Logo Licensing Ensure the AC mains lead is connected correctly and not damaged. - Page 26 Panasonic Corporation Web Site: http://panasonic.net RQT9534-1B C Panasonic Corporation 2011 F0111AH1021...