
Related Manuals for Husqvarna 132R


Summary of Contents for Husqvarna 132R
- Page 1 132R/142R Operator's Manual Read through the Operator‘s Manual carefully and understand the content before using the machine. 101 90 48-26...
-
Page 2: Symbol Explanation
SYMBOL EXPLANATION Symbols • Always wear approved protective WARNING! Clearing saws, gloves. brushcutters and trimmers can be dangerous! Careless or incorrect use can result in serious or fatal injury to the operator or others. • Use anti-slip and stable boots. Read through the Operator‘s Manual carefully and understand the content before using the machine. -
Page 3: Table Of Contents
Adjusting the harness and brush cutter ......12 Basic clearing techniques ............ 13 WHAT IS WHAT? What is what on the brush cutter 132R? ......15 What is what on the brush cutter 142R? ......16 ASSEMBLY Main body assembling ............17 Assembling the handlebars .......... -
Page 4: Safety Instructions
SAFETY INSTRUCTIONS Personal protective equipment The machine‘s safety equipment IMPORTANT INFORMATION This section describes the machine‘s safety equipment, its function and how checks and maintenance are carried out to • Incorrect or careless use of a brush cutter, ensure that it operates correctly. (See the chapter “What is brushcutter or trimmer can turn it into a dangerous what“... - Page 5 The use of incorrectly wound cord or blunt, incorrect cutting equipment (incorrect type or incorrectly 132R sharpened, see section “Filing the blade”) increases the level of vibration. The machine’s vibration damping system reduces the transfer of vibrations between the engine unit/ 3.
- Page 6 SAFETY INSTRUCTIONS 6. Muffler 7. Cutting equipment The muffler is designed to give the lowest possible noise 1) Clearing blades are level and to direct the intended for cutting wood. engine‘s exhaust fumes away from the operator. In countries that have a warm and dry climate the risk of fire is obvious.
-
Page 7: Control, Maintenance And Service Of The Machine's Safety Equipment
SAFETY INSTRUCTIONS Control, maintenance and service of • See section "Start". Start the machine and apply full the machine‘s safety equipment throttle. Release the throttle and check that the IMPORTANT INFORMATION cutting equipment stops and remains at a standstill. • All service and repairs to the machine require If the cutting equipment special training. - Page 8 4. Vibration damping system • Check the vibration damping element regularly for material 142R cracks and distortion. • Check that the vibration damping element is undamaged and securely 132R attached. – English...
- Page 9 SAFETY INSTRUCTIONS 6. Cutting equipment 7. Quick-release This section describes how through correct maintenance and • Check that the harness through using the right type of cutting equipment you can: straps are correctly • Reduce the machine‘s tendency to kickback positioned.
-
Page 10: Cutting Equipment
SAFETY INSTRUCTIONS Cutting equipment Trimmer head • Only use a trimmer head IMPORTANT INFORMATION and trimmer cord that is The section describes how through correct mainte- recommended. These nance and through using the right type of cutting have been tested by the equipment you can reduce the machine‘s tendency to manufacturer to suit a kickback, obtain maximum clearing capacity and... -
Page 11: General Safety Instructions
SAFETY INSTRUCTIONS General safety instructions Fuel safety IMPORTANT INFORMATION • Always use a fuel container • The machine is only designed for trimming grass, with an anti-spill valve. brush cutting and/or forestry clearing. • The only accessories to be used with the engine •... -
Page 12: General Working Instructions
SAFETY INSTRUCTIONS General working instructions Adjusting the harness and brush cutter IMPORTANT INFORMATION WARNING! When working with the brush cutter it • This section covers basic safety precautions for should always be hooked in the harness. If working with brushcutters and trimmers. this is not done, you cannot control the brush cutter safely and this can result in •... -
Page 13: Basic Clearing Techniques
SAFETY INSTRUCTIONS Basic clearing techniques Grass clearing using a grass blade • Always drop to idling speed after each working operation. • A blade is used for all Longer periods running at full throttle without loading the types of high or thick engine (that is without resistance, which the engine feels grass. - Page 14 SAFETY INSTRUCTIONS Grass clearing Trimming • The trimmer is ideal to using the trimmer cut grass that is difficult head and plastic to reach using a normal knives lawn mower. Keep the cord parallel to the • Hold the trimmer head ground when cutting.
-
Page 15: What Is What
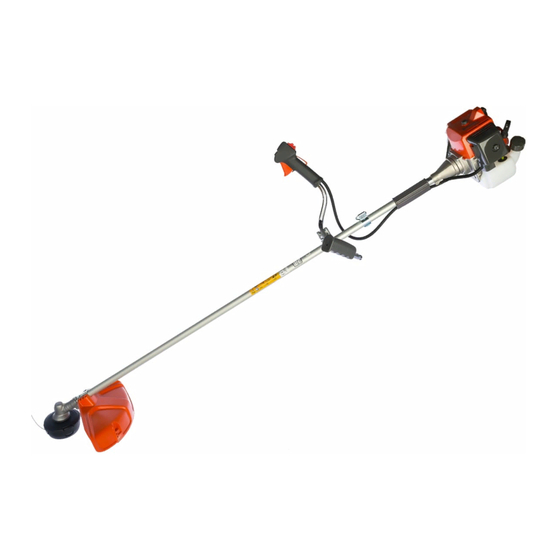
WHAT IS WHAT? What is what on the brushcutter 132R? Blade Clutch cover Grease filler cap Locking nut Angle gear Support flange Blade guard Support cup Tube Drive disc Locking button for start throttle Handle bar adjustment Throttle trigger Socket spanner Stop switch Operator‘s Manual... -
Page 16: What Is What On The Brushcutter 142R
WHAT IS WHAT? What is what on the brushcutter 142R? Blade Locking nut Grease filler cap Support flange Angle gear Support cup Blade guard Drive disc Tube Handle bar adjustment Locking button for start throttle Socket spanner Throttle trigger Operator‘s Manual Stop switch Transport guard Throttle trigger lock... -
Page 17: Assembly
ASSEMBLY Main body assembling Assembly of the blade and trimmer head Connect the engine (A) to It is extremely important the tube (B) with four screws that the disc drive’s/support (C). flange’s guide engages correctly in the cutting equipment’s centre hole when assembling the cutting equipment. -
Page 18: Assembling The Blade Guard And Grass Blade
(132R) • Fit the guard (A) intended for use with the trimmer head. Secure using four bolts • 132R: The guard (A) is (L) and the support plate (M) as shown in the fitted using 4 screws (L) as diagram. -
Page 19: Assembling The Spray Guard (142R)
ASSEMBLY Assembling the spray guard (142R) Cable adjustment (Install the cord cutter and guard extension to the spray • Throttle cable should be paralleled to flexible shaft. In case guard.) of twisting, they should be restored by parallel. • Throttle cable should be adjusted under the bended flexible 1) Fasten the cord cutter shaft. -
Page 20: Adjusting The Harness And Brush Cutter
ASSEMBLY Adjusting the harness and brush cutter WARNING! When working with the brush cutter it should always be hooked in the harness. If this is not done, you cannot control the brush cutter safely and this can result in injury to yourself or someone else. Never use a harness with a defective quick release catch. -
Page 21: Fuel Handling
Mixing ratio 1:50 (2%). • If Husqvarna two-stroke oil is not available you can use a high quality two-stroke oil intended for air cooled engines. Gasolin Oil • Öl Contact your dealer when selecting an oil. -
Page 22: Start And Stop
START AND STOP Cold engine Control before starting IGNITION: Set the stop switch to the start position. For reasons of safety follow CHOKE: Set the choke these recommendations! control in the choke posi- tion. • Check the blade to ensure AIR PURGE: Prime with that no cracks have formed fuel by pressing the dia-... -
Page 23: Maintenance
MAINTENANCE Carburettor Muffler Your Husqvarna product has been designed and manufac- NOTE! tured to specifications that reduce harmful emissions. Some mufflers are fitted with a catalytic converter. See “Techni- After your unit has been run 8-10 tanks of fuel the engine cal data”... -
Page 24: Cooling System
The cooling system consists that the angle gear is filled to 3/4 with grease. Use 1. An air intake on the Husqvarna special grease. starter unit. Normally, the grease does 2. Cooling fins on the not need to be changed flywheel. -
Page 25: Filing The Grass Blade
MAINTENANCE Filing the grass blade WARNING! Always stop the engine before starting work on any part of the cutting equipment. This continues to rotate even after the throttle has been released. Ensure that the cutting equipment has stopped completely and remove the cable from the spark plug before you start to work on it. -
Page 26: Maintenance Schedule
MAINTENANCE Maintenance schedule Weekly maintenance Below follows some general maintenance instructions. 1. Check the starter, the If you need further information please contact your service starter cord and the return workshop. spring. Daily maintenance 2. Make sure that the vibration damping 1. -
Page 27: Technical Data
1,0/2,11 Weight Weight without fuel, cutting tool and guard, kg/lbs 6,1/13,4 7,7/16,9 Type Cutting attachment guard Art No. Approved accessories 132R 531 00 78-34 Grass 255-4 Grass blade Type Cutting attachment guard Art No. Approved accessories 142R 531 00 77-01... - Page 28 2000W21...