Motorola MBP15 User Manual
Digital baby monitor
Hide thumbs
Also See for MBP15:
- Quick manual (2 pages) ,
- User manual (32 pages) ,
- User manual (34 pages)

Related Manuals for Motorola MBP15


Summary of Contents for Motorola MBP15
- Page 1 USER’S GUIDE MBP15 DIGITAL BABY MONITOR USER’S GUIDE The features described in this user’s guide are subject to modifications without prior notice. V 0.1...
- Page 2 Welcome... to your new Motorola Digital Baby Monitor! Thank you for purchasing the MBP15. This baby monitor uses digital communication which ensures that you can hear your baby clearly without any distracting noise or interference. Please retain your original dated sales receipt for your records. For warranty service of your Motorola product, you will need to provide a copy of your dated sales receipt to confirm warranty status.
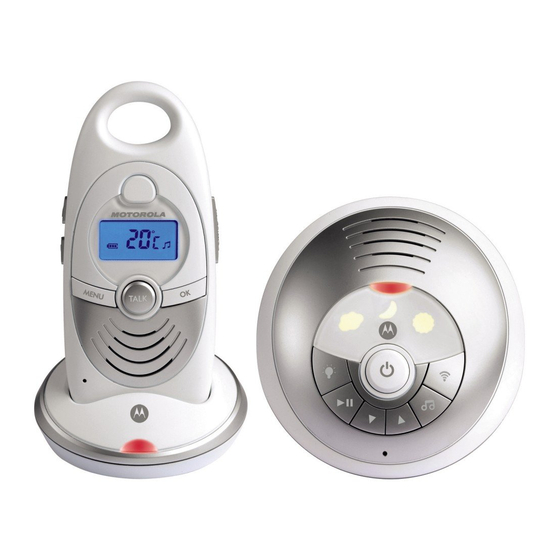
- Page 3 Overview of your Parent unit TALK 1. Volume indicator LEDs 2. Power On/Off button 3. Push to talk button (Talk to baby) 4. Confirm button 5. Speaker 6. Desktop charger 7. Charging LED 8. Menu button 9. Link indicator LED 10.
-
Page 4: Lcd Display
Overview of your Baby unit 27. Thermo sensor 28. Battery cover screw 29. Battery cover 30. Power adapter LCD Display connector 17. On/Off button 18. Paging button 19. Power LED 20. Play/Pause button 21. Lullaby button 22. Microphone 23. Volume up button 24. -
Page 5: Table Of Contents
Baby unit power supply ...8 Parent unit battery Installation ...8 Parent unit power supply ...9 Link ...10 Registration ...11 Paging ...11 3. Using the MBP15 ... 12 Volume adjustment...12 3.1.1 Parent unit ...12 3.1.2 Baby unit ...12 Talk to your baby ...12 Menu operation...12... -
Page 6: Safety Instructions
1. Safety Instructions WARNING This baby monitor is compliant with all relevant standards regarding electromagnetic fields and is, when handled as described in the User’s Guide, safe to use. Therefore, always read the instructions in this User’s Guide carefully before using the device. •... -
Page 7: Getting Started
2. Getting started Baby unit battery Installation The baby unit can be used either with 3 AA size batteries (non- rechargeable batteries recommended) or the household AC mains. The baby unit has no charging function! 90° MAX IMPORTANT The non-rechargeable batteries for the Baby unit are not supplied with your product. -
Page 8: Baby Unit Power Supply
Baby unit power supply 1. Connect the small plug of the power adapter to the power connector on the baby unit and the other end of the adapter to the mains socket (230V/50Hz). NOTE Only use the enclosed adapter (6V DC / 300mA). 2. -
Page 9: Parent Unit Power Supply
2. Using a screwdriver, turn the screw on the back of the parent unit 90 degrees in a counterclockwise direction. Remove the battery cover. NOTE Do not try to rotate the screw further than the position 3. Install the enclosed 2 AAA rechargeable batteries following the polarity as shown. -
Page 10: Link
2. Place the parent unit on the charger. The red charging light illuminates. NOTE It takes about 15 hours to charge the unit. 3. Press . The LCD display will illuminate. 4. Press and hold Link NOTE Do not place the baby unit or cables in the cot or within arm's reach of the baby (the unit should be at least 1 metre away). -
Page 11: Registration
Registration The baby monitor is already pre-registered upon your purchase. You do not need to re-register it again unless the baby unit loses its link with the parent unit. To re-register your baby monitor, follow the procedure below: 1. Switch off the baby unit mains power and remove the small power plug from the baby unit. -
Page 12: Using The Mbp15
3. Using the MBP15 Volume adjustment 3.1.1 Parent unit There are 5 volume levels on the parent unit, and a • Press to increase the volume level. • Press to decrease the volume level. NOTE Volume Off When is displayed, the sound detected (such as baby’s cries) is indicated by the LEDs near the top of the unit. - Page 13 Menu map Main Menu Night Light Lullaby Sensitivity Sound Alert Temperature Clock Feed Time Language Using the MBP15 Sub menu 1 Sub menu 2 On? / Off? Play? / Stop? Select New Twinkle Silent Night Minuet in G Danny Boy...
-
Page 14: Night Light
The baby unit will remember the last set volume level (see “3.1 Volume adjustment”). If you press on the parent unit, the lullaby will stop automatically. Night Light is displayed. Night Light is displayed. Lullaby is displayed. Select New Off? Play All to play Stop Using the MBP15... -
Page 15: Local Activation
4. Press to confirm. Press to exit the menu. TIPS To deactivate Sound alert, follow the same steps, but select Using the MBP15 Night Light is displayed. Sensitivity is displayed. Volume Off , a beep can be emitted to alert Night Light is displayed. -
Page 16: Sound Alert Volume
If you have set the alert tone to on, you will also be alerted by a warning beep when the limit is exceeded. Night Light is displayed. Sound Alert is displayed. Volume is displayed. Night Light is displayed. Temperature is displayed. is displayed. High and the Using the MBP15... -
Page 17: Temperature Alert
5. Press to confirm. Press to go back one level or exit the menu. TIPS To set the unit to ºC, follow the same steps, but select Using the MBP15 Night Light is displayed. Temperature is displayed. Temp Alert is displayed. -
Page 18: Clock
To set the unit to 24 hour clock format, follow the same steps, but select Night Light is displayed. Clock is displayed. is displayed. is displayed. is displayed. Night Light is displayed. Clock is displayed. Hour Format is displayed. is displayed. 24Hrs? Using the MBP15... -
Page 19: Feed Time
7. Press 8. Press to select the minute interval. 9. Press to confirm. Press to go back one level or exit the menu. Using the MBP15 is displayed. Feed Time is displayed. is displayed. is displayed. is displayed. Feed Time is displayed. -
Page 20: Set Alarm
Press to exit the menu. is displayed. Feed time is displayed. Alarm is displayed. Night Light is displayed. Feed Time is displayed. Alarm is displayed. Volume is displayed. Night Light is displayed. Language is displayed Off? Using the MBP15... -
Page 21: Disposal Of The Device (Environment)
4. Disposal of the device (environment) At the end of the product lifecycle, you should not dispose of this product with normal household waste, but take the product to a collection point for the recycling of electrical and electronic equipment. The symbol on the product, user’s guide and/or box indicates this. -
Page 22: Cleaning
5. Cleaning Clean the MBP15 with a slightly damp cloth or with an anti-static cloth. Never use cleaning agents or abrasive solvents. Cleaning and care • Do not clean any part of the product with thinners or other solvents and chemicals this may cause permanent damage to the product —... -
Page 23: Help
6. Help Charging is not scrolling when the parent unit is placed on the charger pod • Bad battery contact - move the parent unit slightly. • Dirty contact - Clean the battery contacts on the parent unit and charger pod with a cloth moistened with alcohol. •... - Page 24 Interference Noise interference on your parent unit • Your baby and parent units may be too close. Move them further away from each other. • Make sure there is at least 1 metre between the 2 units to avoid feedback howling. •...
-
Page 25: General Information
Subject to the exclusions and limitations contained below, Binatone Electronics International LTD. warrants the Motorola branded consumer products that it manufactures (“Products”) and the Motorola branded or certified accessories sold for use with these Products that it manufactures (“Accessories”) to be free from defects in materials and workmanship under normal consumer usage for the period(s) outlined below. - Page 26 REFUND AS PROVIDED UNDER THIS EXPRESS LIMITED WARRANTY IS THE EXCLUSIVE REMEDY OF THE CONSUMER, AND IS PROVIDED IN LIEU OF ALL WARRANTIES AND MOTOROLA AND BINATONE ELECTRONICS INTERNATIONAL LTD. MAKES NO OTHER WARRANTIES OR CONDITIONS, EXPRESS OF IMPLIED. IN NO EVENT SHALL MOTOROLA OR BINATONE ELECTRONICS INTERNATIONAL LTD.
- Page 27 ACCESSORIES AND BINATONE ELECTRONICS INTERNATIONAL LTD. SHALL UNDER NO CIRCUMSTANCES BE LIABLE FOR ANY CLAIMS OR DEMANDS MADE BY ANY THIRD PARTY OR MADE BY YOU ON BEHALF OF ANY THIRD PARTY TO THE FULL EXTENT THESE DAMAGES OR CLAIMS MAY BE DISCLAIMED BY LAW. Some states, countries or jurisdictions do not allow the limitation or exclusion of incidental or consequential damages, or limitation on the length of an implied warranty, so the above limitations or exclusions may...
- Page 28 Accessories for commercial purposes or subjecting the Product or Accessory to abnormal usage or conditions; or (e) other acts or omissions which are not the fault or neglect of Motorola or Binatone Electronics International LTD., are excluded from coverage. Use of Non-Motorola branded Products and Accessories. Defects or...
- Page 29 You will receive instructions on how to ship the Products or Accessories, the shipment of which shall be at your own risk and expense, to a BINATONE ELECTRONICS INTERNATIONAL LTD. Authorised Repair Centre. To obtain service, you must include: (a) a copy of your receipt, bill of sale or other comparable proof of purchase of the Products or Accessories showing the date of purchase;...
-
Page 30: Technical Specifications
Technical Specifications Frequency range Operating range Electrical power 1.88GHz to 1.9GHz; (bandwidth = 20MHz) Extended range up to 950 feet* *Based on unobstructed line of sight. Actual range will vary depending on surroundings. Parent unit: 2 AAA 600mAh NiMH rechargeable batteries (Model: GPI battery = 60AAAHC;... - Page 31 Motorola...
- Page 32 MOTOROLA and the Stylized M Logo, and other Motorola trademarks and trade dress are owned by Motorola, Inc. and are used under license from Motorola, Inc. MOTOROLA and the Stylized M Logo are registered in the US Patent &...