Motorola HT1250.LS+ User Manual
Hide thumbs
Also See for HT1250.LS+:
- User manual (116 pages) ,
- Service manual (103 pages) ,
- Basic service manual (67 pages)

Related Manuals for Motorola HT1250.LS+


Summary of Contents for Motorola HT1250.LS+
- Page 1 Professional Series Two-Way Radio User Guide Séries professionnelles Guide de l'utilisateur de radio bidirectionnelle HT1250•LS+ VHF/UHF...
-
Page 3: Table Of Contents
Push-to-Talk (PTT) Button ..13 CONTENTS Microphone ..... 13 Menu Keys ..... 13 Contents. - Page 4 Selecting a Conventional Zone and PassPort Trunking ....42 Channel ......31 Seamless Roaming .
- Page 5 Sending an Emergency Alert E ..58 Phone......71 (Conventional and LTR modes Only) .
- Page 6 Setting the Clock or Alarm ... . 92 Ear Microphone System... . . 101 Integrated Microphone/Receiver ..101 Warranty .
-
Page 7: Computer Software Copyrights
COPYRIGHTS directly or by implication, estoppel, or otherwise, any license under the copyrights, The Motorola products described in this patents or patent applications of Motorola, manual may include copyrighted Motorola except for the normal non-exclusive license to... -
Page 8: Safety
Before using this product, read the RF energy awareness information and operating instructions in the Product Safety and RF Exposure booklet enclosed with your radio (Motorola Publication part number 6881095C98) to ensure compliance with RF energy exposure limits. English... -
Page 9: Introduction
Trunked INTRODUCTION sites together to form a single system. This offers users an extended communication Welcome to Motorola’s HT Series family of radio coverage area. In addition, users with ™ users. This user guide supports HT1250•LS+ PassPort-enabled radios can seamlessly roam radios. -
Page 10: Conventional Radio Systems
CONVENTIONAL RADIO SYSTEMS Radio Wide Features • 14-Character Alphanumeric Display Conventional radio systems typically refer to • 7 Programmable Feature Buttons unit-to-unit communications through a single • Up to 15 PassPort and/or LTR Zones with channel. Conventional systems also allow up to 16 Talkgroups per Zone radio users to extend communication coverage •... -
Page 11: Ltr Zone Features
• User-initiated Roam Request LTR Zone Features • Primary Auto Group Scan and PassPort • MDC-1200 Signaling Group Scan - Call Alert - Radio Check • Roam (Site) Lock - Selective Call - PTT-ID • Push-To-Talk (PTT) ID Aliasing - Emergency Alert* - Call List •... -
Page 12: Conventional Zone Features
Conventional Zone Features • Monitor and Sticky Permanent Monitor • System Scan with two Priority Levels • MDC-1200 Signaling** **Not available in all models. Please check with your - Call Alert - Radio Check dealer for feature availability. - Selective Call - PTT-ID - Emergency Alert - Call List Name/... -
Page 13: Radio Overview
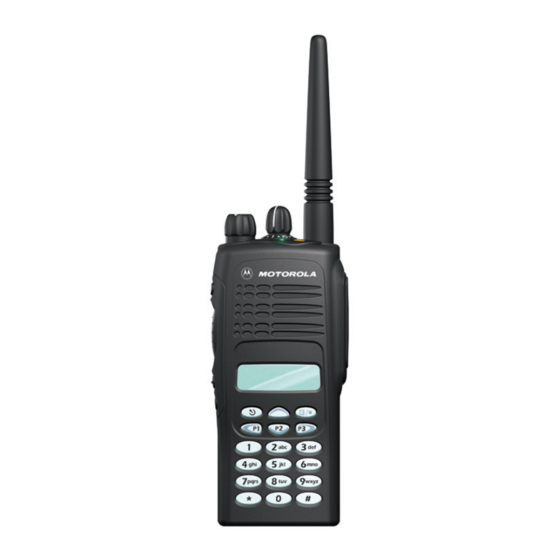
RADIO OVERVIEW PARTS OF YOUR RADIO HT1250•LS+ Full Keypad Model Zone Selector Knob Top Button (D) (Programmable) On/Off/Volume Knob LED Indicator Side Button 1 (A) (Programmable) Microphone Display Push-to-Talk (PTT) Button Menu Keys (P1, P2, P3) (Programmable) Side Button 2 (B) (Programmable) Keypad Side... -
Page 14: Ht1250•Ls+ Limited Keypad Model
HT1250•LS+ Limited Keypad Model Channel Selector Knob Top Button (D) (Programmable) On/Off/Volume Knob LED Indicator Side Button 1 (A) (Programmable) Microphone Push-to-Talk (PTT) LCD Screen Button Menu Keys (P1, P2, P3) Side Button 2 (B) (Programmable) (Programmable) Side Button 3 (C) (Programmable) English... -
Page 15: On/Off/Volume Knob
On/Off/Volume Knob LED Color Indicates Single • Group Selective Call received Turns your radio on or off, and adjusts your blinking (Trunked operation only). radio’s volume. yellow • Individual Selective Call or Call Zone Selector Knob Alert (PassPort operation only). Switches your radio to different Trunked and Momentary Your radio has powered up... -
Page 16: Keypad Keys
Menu/Select Key ) Left Key < Used to enter Menu mode. When in Menu Used as a backspace key when editing Radio mode, also used to make menu selections. Call, Scan, and Phone lists. This key can also be programmed to activate a radio feature (see Exit Key ( page 18). - Page 17 Entering Characters Using the Keypad Number of Times Key is Pressed < > & Á Ç à á ç È É Ê è é ê Í ì í Ñ Ó Ô ò ó ô ö Ú ù ú ´ ´ ’...
-
Page 18: Display
Display Symbol Indication An Emergency Siren is being sounded or an Emergency Emergency Alarm is being sent. Call Received A Selective Call or Call Alert has been received (LTR Call Received trunked and Conventional (LTR/Conv.) operation only). The top two screen rows display menu and radio status information: Incoming Call/ A Selective Call or Call Alert... - Page 19 Symbol Indication Symbol Indication Indicates activity on a Priority The number of bars (0 – 4) 1 talkgroup or channel during shown indicates the charge Battery Level System Scan. remaining in your battery. Priority 1 Scan • blinking) Shows the time (12-hour or 24-hour).
-
Page 20: Programmable Buttons
Programmable Buttons The table on page 19 summarizes the programmable features available along with Your dealer can program several of your the page number where the feature is radio’s buttons as shortcuts to many of your explained. radio’s features. Ask your dealer to write down, in the “Button” Programmable buttons include: column, the names of the programmable •... - Page 21 Programmable Features Feature Indicator Short Press Long Press Hold Down Page Button Check the Battery Gauge – – battery’s charge Color status. Edit Scan List – Add, delete or prioritize talkgroups and – channels. Initiate Emergency Cancel Emergency §† Emergency –...
- Page 22 Programmable Features Feature Indicator Short Press Long Press Hold Down Page Button Toggle the transmit power level between Power Level – † high and low. † LED Color Directly access the Radio Call menu. ‡§ – Radio Call Directly access one of the first 3 ‡§...
- Page 23 Programmable Features Feature Indicator Short Press Long Press Hold Down Page Button † Selective Call Directly access the Radio Call List. – – (One-Touch Button) † Call Alert LED Color Send a Call Alert – (Preprogrammed Button) † Call Alert Directly access the Radio Call List.
- Page 24 Programmable Features Feature Indicator Short Press Long Press Hold Down Page Button Voice Storage Record/ Playback recorded Record voice memos. – – Playback messages. † Voice Storage Playback Exit Voice Storage Play Back mode. – – Exit † Voice Storage Playback Delete recorded messages.
-
Page 25: Audio Indicators For Programmable Buttons
AUDIO INDICATORS FOR Button High-Low Tone Low-High Tone PROGRAMMABLE BUTTONS Scan Stop scan Start scan In addition to having visual indicators, some Power Level High power Low power programmable buttons use tones to indicate selected selected one of two modes: Squelch (no Normal squelch Tight squelch visual indicator) -
Page 26: Getting Started
GETTING STARTED LED Color Battery/Charger Status BATTERY INFORMATION Blinking yellow Battery in charger, not in rapid-charge mode but waiting to Charging the Battery be charged. If a battery is new or its charge level is very † Battery 90% (or more) Blinking green low, you need to charge it before use. -
Page 27: Battery Charge Status
Battery Charge Status Battery chargers will only charge the Motorola- authorized batteries listed below. Other You can check your battery’s charge status in batteries may not charge. two ways: Part No. Description • The charge status is shown by the P status indicator symbol on the display. -
Page 28: Attaching The Battery
Attaching the Battery Removing the Battery Battery Latches 1 Turn off your radio (see page 29). 1 Fit the extensions at the bottom of the battery into the bottom slots on your radio. 2 Slide both battery latches downward. 2 Press the top part of the battery toward your 3 Pull the top part of the battery away from your radio until you hear a click. -
Page 29: Accessory Information
ACCESSORY INFORMATION Removing the Antenna Attaching the Antenna Turn the antenna counterclockwise to Turn the antenna clockwise to attach it. remove it. English... -
Page 30: Attaching The Belt Clip
Attaching the Belt Clip Removing the Belt Clip Belt Clip Tab 1 Use a key to press the belt clip tab away from 1 Align the grooves of the belt clip with those of the battery. the battery. 2 Slide the belt clip upward to remove it. 2 Press the belt clip downward until you hear a click. -
Page 31: Attaching The Side Connector Cover
TURNING YOUR RADIO ON OR OFF Attaching the Side Connector Cover Antenna Loop Slot Thumbscrew Turn the On/Off/ Turn the On/Off/ Volume knob clockwise. Volume knob 1 Place the loop (attached to the side connector counterclockwise If power-up is cover) over the antenna; then slide it until you hear a click. -
Page 32: Adjusting The Volume
ADJUSTING THE VOLUME To select a Trunked zone and Talkgroup: Turn the On/Off/Volume Control knob 1 Use the Zone Selector knob to select the clockwise to increase the volume or appropriate Trunked zone. counterclockwise to decrease the volume. until you see the desired –or–... -
Page 33: Selecting A Conventional Zone And Channel
SELECTING A CONVENTIONAL 2 Press and hold the PTT button. ZONE AND CHANNEL –or– Press and release the PTT button and wait Up to a total of 16 conventional channels, in three seconds. one or more conventional zones, can be •... -
Page 34: Receiving A Trunked Or Conventional
REPEATER OR TALKAROUND J 2 Press the PTT button and speak clearly into MODE the microphone. The LED indicator lights steady red while the call is being sent. Note: This feature is available only with Conventional operation. 3 Release the PTT button to listen. Talkaround mode enables you to communicate with another radio when: RECEIVING A TRUNKED OR... -
Page 35: Call Light
HOME CHANNEL REVERT to select Rptr/Talkarnd The Home Channel Revert feature allows you until to instantly access your favorite Trunked Rptr/Talkarnd talkgroup or Conventional channel at the touch or until Talkarnd Mode of a button. To activate Home Channel Revert: to confirm your selection. -
Page 36: Passport Signaling
Sending a Selective Call using the PASSPORT SIGNALING Preprogrammed Button • Press the preprogrammed Selective Call Selective Call and Call Alert are available in button (see page 20). Proceed to Step 4. the HT1250•LS+ radio using the PassPort –or– protocol. As such, no third party can hear the conversation of two users engaged in a Sending a Selective Call through the Menu Selective Call. - Page 37 then press the first letter of the If the Selective Call cannot be established, desired alias using the DTMF keys to start an alphabetical search. (Full keypad model only.) you see: No Acknowledge –or– for 5 seconds. The LED indicator turns off. If all channels are busy while attempting a Enter the ID number of the radio you wish to Selective Call,...
-
Page 38: Sending A Selective Call Using The One-Touch Button
Call Ended you see: you see: No Acknowledge and a tone sounds (if preprogrammed by your for 5 seconds. The LED indicator turns off. dealer). • If all channels are busy while attempting a Selective Call, Sending a Selective Call using the One- Touch Button you see: System Busy... -
Page 39: Receiving A Selective Call F
Receiving a Selective Call F and a tone sounds (if preprogrammed by your dealer). 1 When you receive a Selective Call: • The blinks and, if preprogrammed by your dealer, the LED indicator lights steady yellow. You see: Incoming Call followed by the preprogrammed alias or ID of the calling radio. -
Page 40: Call Alert
CALL ALERT If the unit has not been engaged in a You can alert another person by sending a Call Call Alert after power- Alert to a particular radio in three different Select User up, you see: ways: • Using a preprogrammed button. to locate the desired alias or ID in the Radio Call List. - Page 41 5 Press the PTT button to send the Call Alert. and will hear a delayed busy tone as long as the PTT button is pressed. • While the Call Alert is being established blinks and the LED indicator blinks If the PTT button is kept pressed and the red momentarily.
-
Page 42: Sending A Call Alert Using The One-Touch Button
Sending a Call Alert using the One-Touch for 5 seconds. The LED indicator turns off. Button • If all channels are busy while attempting a Call Alert, 1 Press and hold the preprogrammed One- touch button. you see: System Busy •... -
Page 43: Receiving A Call Alert F
Receiving a Call Alert F 1 When you receive a Call Alert: • The blinks and, if preprogrammed by your dealer, the LED indicator lights steady yellow. You see: Incoming Page followed by the preprogrammed alias or ID of the calling radio. •... -
Page 44: Passport Trunking
you with optimal audio quality throughout your PASSPORT TRUNKING communications. ® PassPort is an enhanced, wide-area trunking Initial Registration protocol developed by Trident Micro Systems. Your HT1250•LS+ radio needs to register on Up to 128 Trunked sites can be linked together the PassPort system before communication to form one PassPort system, which means with your talkgroup can begin. -
Page 45: Roaming And Registering Between Sites
Roaming and Registering between Sites 3 The display shows the TLKGRP ALIAS Once initial registration with the PassPort selected Talkgroup Alias (if system has occurred, your radio constantly preprogrammed). monitors the RSSI to ensure an acceptable signal level is maintained (as programmed by Note: If your radio performs a more extensive your dealer). -
Page 46: Site/Min View
SITE/MIN VIEW 2 When your radio has successfully registered to a new site in the PassPort There may be circumstances when you want to System, XXX indicates the site number you view the number of the PassPort site on which see: you are registered as well as your Mobile REG SITE XXX... -
Page 47: Ptt Id Alias
the roaming process. This feature is called Note: This message can still be activated Roam Request. even if your radio is not registered. To Start a Roam Request: PTT ID ALIAS Press the preprogrammed Roam Request button (see page 18). Your HT1250•LS+ radio supports the display of the Alias of the calling radio when receiving a When your radio is searching for a new site or... -
Page 48: Home Site Revert
You see: This can occur under the following Cncl Roam Req circumstances: • When registration to a site with a higher Note: Your radio then attempts to return to RSSI than your current site is unavailable. the previously registered site. •... -
Page 49: Roam Lock
ROAM LOCK • The radio sounds a “Low-High” tone upon successful PassPort System registration. Because of the RSSI (Received Signal The XXX number indicates the site within Strength Indication) feature, the HT1250•LS+ the PassPort system on which you have radio automatically roams to a different site registered. -
Page 50: To Deactivate Roam Lock
PASSPORT PRIMARY TALKGROUP 2 You see. TLKGRP ALIAS This is the first talkgroup preprogrammed in your list. Per definition, it always has the Alternating with: Roam Locked highest-level priority among all other preprogrammed talkgroups, also called at one second secondary talkgroups. As such, any intervals. -
Page 51: Site/Talkgroup Restriction
SITE/TALKGROUP RESTRICTION neighbor list of sites) and attempts to register there. (Access Privileges by MIN) What you see: The HT1250•LS+ portable radio offers two “access privilege” features called Site and For 3 seconds: SiteRestrict Talkgroup Restriction. These features, however, can only be enabled or disabled then: Searching through the PassPort infrastucture (if the... -
Page 52: Group Restriction
TROUBLESHOOTING Group Restriction The registration and roaming process is While in PassPort zones, your radio may unaffected for "non-restricted" radios. display specific messages to indicate you However, when a radio is talkgroup-restricted should contact your dealer for assistance. from all unrestricted affiliated sites in the system (except the home site where it is Message What it Means... -
Page 53: Radio Calls
RADIO CALLS You see: Name xxxx Note: Available in LTR and Conventional Selective Call alternating with: modes only based on model feature set of your HT1250•LS+ radio. Please Note: For DTMF radio models, if you press check with your dealer. any digit on the keypad (#1-9), the display shows the corresponding In LTR Trunked mode, Radio Call... -
Page 54: Receiving A Selective Callf
–or– to return to Selective Call –or– to enter Menu mode. Hold down to exit Menu mode. until Radio Call Radio Call to select RECEIVING A SELECTIVE CALL until Selective Call When you Receive a Selective Call • The display shows F and the to select Selective Call preprogrammed name or ID of the calling... -
Page 55: Sending A Call Alert Page
SENDING A CALL ALERT PAGE –or– You can alert another person by sending a Call 1 Press the preprogrammed Speed Call button. Alert page. You see the Alias (if To Send a Call Alert Page preprogrammed) or Press the preprogrammed Radio Call button Name xxxx ID of the last called (see page 20) and proceed to step 4:... -
Page 56: Receiving A Call Alert
The LED lights a steady yellow. to return to Call Alert –or– to locate the desired ID in the Hold down to exit Menu mode. Radio Call list. –or– RECEIVING A CALL ALERT PAGE Enter the ID number of the radio you want to page. -
Page 57: Radio Check
RADIO CHECK You see Call In Prog Radio Check allows you to determine if a radio 8 If the Radio Check is received by the target is within the range of the Trunked or radio, you see Acknowledge Conventional system and turned on, without disturbing the user of that radio. -
Page 58: Sending A Status
SENDING A STATUS to locate the desired status in the preprogrammed list. This feature gives you the ability to send a status update to the base. The Status feature –or– makes more efficient use of the channel when using the enhanced keypad microphone only, enter the number of the status you wish compared to voice transmissions. -
Page 59: Sending A Message
SENDING A MESSAGE Press the PTT button. This feature gives you the ability to send and You see Msg In Prog receive preprogrammed messages. Data messages make more efficient use of channels Note: If the radio is not able to send the compared to voice transmissions. -
Page 60: Receiving A Message
RECEIVING A MESSAGE The display shows E when your radio is in the Emergency Alert state. When your radio receives a message: Note: In Conventional mode, Emergency • You hear two alert tones. Alerts have priority over all other calls. •... -
Page 61: Editing A Radio Call Listk
EDITING A RADIO CALL LIST to select Edit Entry? Your radio has a Radio Call list that contains the names and radio IDs of several talkgroups until you locate the desired or individuals. The ID numbers in the Radio entry. Call List are programmed by your dealer, and cannot be changed from your radio. -
Page 62: Name And Call Tone Tagging
NAME AND CALL TONE TAGGING to confirm the selection. You can program your radio to sound a until you see and hear the tone particular alert tone when a specific user is you want to use for this name. calling (name tone tagging), or when receiving a particular type of radio call (call tone to confirm the selection. - Page 63 until you see the call type you want to tag. to confirm the selection. until you see and hear the tone you want to use for this type of call. to confirm the selection. You see Call Tone Set to return to Call Tone Tag –or–...
-
Page 64: Scan
or channel appears and remains on the display SCAN until scanning resumes. Your dealer can program the amount of time you can respond Your radio is equipped with the Scan feature, (or “TALKBACK”) to the caller before your which allows you to search for, lock onto, and radio resumes scanning. -
Page 65: Passport Group Scang
Note: This feature is automatically enabled in Note: PassPort Group Scan is not available your radio and not through the radio when registered on an affiliated (non- menu or through a preprogrammed scan home) site. button. If you switch to another PassPort zone, PASSPORT GROUP SCAN LTR, or Conventional zone while your radio is scanning, scanning resumes... -
Page 66: Auto Group Scang
programmed by your dealer with Auto until Pass Grp Scan Group Scan and Talkgroup 4 is selected, your radio automatically scans talkgroups 1, Pass Grp Scan to select 3, and 4, and skips Talkgroup 2. You see the current scan status. To start Auto Group Scan: Select a talkgroup that has been programmed until... -
Page 67: All Group Scang
ALL GROUP SCAN To start or stop All Group Scan Operation through the menu: (LTR TRUNKED OPERATION ONLY) to enter Menu mode. With All Group Scan, your radio scans all talkgroups within the selected LTR Trunked All Group Scan until zone. -
Page 68: Deleting A Nuisance Channel Or Talkgroup
When System Scan is enabled: Sys Scan Off? –or– • The display shows G. to confirm your selection. • The LED indicator blinks green during System Scan operation; it stops blinking Notes: when your radio switches to an active • In conventional zones only, if there is talkgroup or channel. -
Page 69: Editing A Scan List
EDITING A SCAN LIST To temporarily Delete a Nuisance Channel/ Talkgroup: Note: This feature is applicable to PassPort Group Scan or System Scan operation 1 While your radio’s receiving activity is on the only. nuisance channel, press and hold the Scan button until you hear a high-pitched tone One Scan list is assigned to each of the 16 (valid key press). -
Page 70: View A Scan List
VIEW A SCAN LIST ADDING OR DELETING TALKGROUPS OR CHANNELS To view Talkgroups or Channels in a Scan list: IN A SCAN LIST to enter Menu mode. To add or delete Talkgroups or Channels in a Scan list: until Program Lists to enter Menu mode. -
Page 71: Prioritizing A Talkgroup Or Channel In A Scan List
PRIORITIZING A TALKGROUP OR until you see the talkgroup or CHANNEL IN A SCAN LIST channel you want to add or delete. Note: You cannot delete the Primary Note: This feature is available with System talkgroup from a Scan List in Scan operation only. - Page 72 and indicates the activity with a short until you see the talkgroup or tone. channel you want to prioritize. Setting Priority Talkgroups or Channels to prioritize that talkgroup or channel. To set a Priority Talkgroup or Channel: to return to Edit Priority? to enter Menu mode.
-
Page 73: Phone
PHONE to enter Menu mode. –or– Your HT1250•LS+ radio allows you to place Press the preprogrammed Phone button, and and receive telephone calls through Trunked skip to step 5. and Conventional systems (depending on –or– phone line availability). Telephone calls Press and release the Speed Dial button to through a repeater allow only one person to use the speed dial feature. -
Page 74: Making A Phone Call Dthrough A Conventional System
MAKING A PHONE CALL 5 Press and Release the PTT button. THROUGH A CONVENTIONAL • If phone access is successful, a dial tone SYSTEM sounds. To initiate a Phone Call: • If phone access is unsuccessful, a low-pitched alternating tone sounds. Press the preprogrammed Phone button, and Disconnect the call (see step 8) and try skip to step 5. - Page 75 (For Conventional operation with auto access Note: To redial the last number dialed (if not only). You hear a series of tones, indicating using Speed Dial), press and release that an access code is being sent the PTT button immediately after the automatically, and see your access code: access code is sent.
-
Page 76: Receiving A Phone Call Dthrough A Trunked Or Conventional System
11 To disconnect the call and exit Phone mode, 2 Press the PTT button to answer the phone press and hold . The display no longer call. Press the PTT button to talk; release it to shows listen. 3 To disconnect the phone call and exit Phone RECEIVING A PHONE CALL and Menu mode, press and hold THROUGH A TRUNKED OR... - Page 77 until to store the phone number. Program Lists You see Entry Saved to select Program Lists Add Entry? to return to until Phone List Hold down to exit Menu mode. to select Phone List To delete an Entry from the Phone List: until Add Entry? to enter Menu mode.
- Page 78 10 You see to select the entry. Delete? again to confirm the deletion. until Edit Name? (to edit the name), You see Entry Deleted or until Edit Number? to return to (to edit the phone Delete Entry? number), –or– or until Hold down to exit Menu mode.
-
Page 79: Voice Storage
VOICE STORAGE Number of Equal Slot Length Length Slots (Seconds) Voice Storage is standard in HT1250•LS+ radios. Please check with your dealer for compatibility. The Voice Storage feature enables your radio to perform seven types of voice related functions: • Incoming Call Recording When recording calls, keep in mind these time •... -
Page 80: Incoming Call Recording
If a voice storage A confirmation tone sounds, indicating that your radio has started recording. record function is requested, the Your radio continues to record the call until the display message slot is full or until you release the Memory Full preprogrammed Record/Playback button. -
Page 81: Voice Memo Recording
Voice Storage until Press to stop recording. –or– to select Voice Storage Go to step 1 again to continue recording in the next available slot. until Record Note: Five seconds before the message slot ends, to select Record you see: Time Left XX (where XX = until... - Page 82 Important Note: To record a Voice Memo using the menu: To record properly, incoming calls cannot be to enter Menu mode. received while a voice memo is being recorded. until Voice Storage To record a Voice Memo using the Preprogrammed Record/Playback Button to select Voice Storage 1 Press and hold the preprogrammed Record/...
-
Page 83: Recorded Message Playback
9 Press to stop recording. • The first Playing Msg XXX message plays, –or– and the display Repeat steps 7 and 8 to store additional shows (XXX = messages. the message number) RECORDED MESSAGE PLAYBACK 2 To advance to the next message at any time Your HT1250•LS+ radio allows you to list, during Play back, press and release the select, and Playback previously recorded... -
Page 84: Recorded Message Delete
Playback button (see page 22) or your radio’s to select Playback menu. Note: You can delete messages only one at a time. 001 12:00A 005 until To delete a Message using the to select Preprogrammed Delete Playback Button: 001 12:00A 005 Press and release the preprogrammed Record/Playback button (see page 22). -
Page 85: Recorded Message Transmission
Delete to select When finished transmitting your message, press the Record/Playback button again to stop transmitting. to select the desired message. 7 Press to delete the selected message. to select the another message to be deleted. Go to step 7. –or–... -
Page 86: Automatic Message Reply: "When Available
AUTOMATIC MESSAGE REPLY: To record a Message “WHEN AVAILABLE” until Recorded Msg (LTR TRUNKED AND CONVENTIONAL OPERATION ONLY) to select The Automatic Message Reply feature allows Recorded Msg you to transmit a recorded message to a caller Note: You see Recording when your radio receives an MDC Selective call. - Page 87 To disable the Automatic Message Reply feature to enter Menu mode. until Utilities Utilities to select until When Available to select When Available AutoReply Off? until AutoReply Off? to select English...
-
Page 88: Audio/Tone Settings
AUDIO/TONE SETTINGS You can customize the audio and tone feature settings on your radio as follows: to enter Menu mode. until Audio/Tones to select Audio/Tones until you see the feature you want to change (see the table on the following page). - Page 89 Audio/Tone Settings Feature What it Does Settings Makes the volume level of the audio and alert tones Alert Vol Lvl Ind Alert Off independent. If turned on, it makes the alert tones follow Ind Alert On your radio’s default settings; if turned off, the alert tones are sounded at the setting determined by the position of the volume knob.
-
Page 90: Utilities
UTILITIES You can customize some of your radio’s feature as follows: to enter Menu mode. until Utilities to select Utilities until you see the feature you want to change (see table on the following page). to select the feature. You see the feature’s current setting. - Page 91 Utilities Features Feature What it Does Settings § Sets radio squelch to normal or tight (see page 91). Sqlch Tight Squelch Sqlch Normal Changes your radio’s power level to high, low, or auto Power Level Power High (see page 91). Power Low Power Auto Sets the time, or turns the clock on or off (see page 92).
- Page 92 Utilities Features Feature What it Does Settings Transmits a recorded message to a caller when your ‡ § Auto reply on When Available radio receives an MDC Selective call. Auto reply off Record msg Review msg In LTR Trunked and Conventional operation, displays –...
-
Page 93: Setting Tight Or Normal Squelch
SETTING TIGHT OR NORMAL to select Squelch SQUELCH until Sqlch Tight? (CONVENTIONAL OPERATION ONLY) Use this feature to filter out nuisance –or– (unwanted) calls and/or background noise. Sqlch Normal? until However, tightening squelch could cause calls from remote locations to be filtered out as well. to confirm the selection. -
Page 94: Setting The Clock Or Alarm
Note: A message received from a nearby until Power High? radio might change your radio’s power level to low. This may cause radios that or until Power Low? are farther away not to receive your transmissions. Power Auto? or until In PassPort mode, the power level is to confirm the selection. - Page 95 to select Set Time? 8 When a setting is blinking, you can change it with Hour (AM or PM) 3:05 PM Minutes (AM/PM or 24 hr) Note: You cannot select “24 hr” for Reminder Alarm < > to move to the previous or next setting.
-
Page 96: Warranty
MOTOROLA does not Product Accessories One (1) Year warrant the installation, maintenance or service of the Product. Motorola, at its option, will at no charge either repair the Product (with new or reconditioned parts), replace it (with a new English... - Page 97 MOTOROLA cannot be responsible in any DURATION OF THIS LIMITED way for any ancillary equipment not WARRANTY. IN NO EVENT SHALL furnished by MOTOROLA which is MOTOROLA BE LIABLE FOR DAMAGES attached to or used in connection with the IN EXCESS OF THE PURCHASE PRICE...
- Page 98 G) Rechargeable batteries if: service. You can also call Motorola at any of the seals on the battery 1-800-927-2744 US/Canada. enclosure of cells are broken or show evidence of tampering.
- Page 99 Product such claim; or any parts thereof. B) that MOTOROLA will have sole control of the Laws in the United States and other countries defense of such suit and all negotiations for preserve for MOTOROLA certain exclusive rights its settlement or compromise;...
- Page 100 Motorola software. MOTOROLA software may be used in only the Product in which the software was originally embodied and such software in such Product may not be replaced, copied, distributed, modified in any way, or used to produce any derivative thereof.
-
Page 101: Accessories
BMS Battery Adapter (For Ni-Cad and NiMH Batteries) HLN9694_ Leather DTMF Case, Standard Battery with Swivel WPLN4107_R Motorola Conditioning Charger Kit (includes 7.2 Volt base, removable HLN9701_ Nylon Case, with Belt Loop – Fits all adapter plate and transformer, 60 Batteries... -
Page 102: Headsets And Accessories
Muff Headset with Noise Cancelling Adapter Plate) Microphone and in line PTT. FM Approved WPPN4082_R Adapter Plate Only (for Motorola Conditioning Charger) AARMN4020_ Heavy Duty Muff Headset with Noise Cancelling Microphone and PTT on RLN4814_ Vehicular Mounting Bracket (for use... -
Page 103: Microphones
ENMN4012_ Ultra Lightweight, Behind the Head, 0180358B38 Finger Push to Talk Switch for Ear Headset with Streamlined Boom Microphone System – FM Approved Microphone 0180300E83 Body Switch Push to Talk for Ear ENMN4013_ Flexible Ear Receiver (Flexible Earloop Microphone System and Speaker that Rests External to the AARMN4045_ Ear Microphone Interface Module PTT or Ear) -
Page 104: Earpiece
EARPIECE NTN8821_ CommPort Maintenance Kit - includes Replacement Ear Tubes (qty. 10), Windscreens (qty. 2) and Microphone AARLN4885_ Receive Only Foam Earbud with 3.5 mm Seal Strips (qty. 10) plug - (for use with AAHMN9053, AAHMN8054, and AAHMN9057) – FM NTN8986_ Adhesive Pads (qty. -
Page 105: Adapters
RLN4941_ Receive-Only Earpiece with translucent AARKN4075_ Programming cable (includes internal Rib) tube, rubber eartip, and 3.5 mm plug (for 0180305G54 Shop battery eliminator cable. Requires use with AAHMN9053, AAHMN9054, and RLN4510A (7.5 volt source) AAHMN9057) RLN4510_ 7.5 Volt Universal Battery Eliminator RLN4922_ Completely Discrete Earpiece Kit –... -
Page 106: Antennas
ANTENNAS PMAD4012_ VHF 136 – 155 MHz 9 cm, Stubby PMAD4013_ VHF 155 – 174 MHz 9 cm, Stubby PMAD4014_ VHF 136 – 155 MHz 14 cm, Standard Length PMAD4015_ VHF 155 – 174 MHz 14 cm, Standard Length PMAD4023_ VHF 150 –... - Page 107 Selecting a Trunked Zone and Talkgroup Turn Zone Selector knob to appropriate trunked zone. HT1250•LS+ Radio Sending a Trunked Call Press PTT. If trunked system access was successful, the LED lights a steady red; Quick Reference Card if access was unsuccessful, the LED blinks red; a low pitched tone sounds. Speak clearly into microphone.
-
Page 108: Menu Navigation Chart
Menu Navigation Chart Available in PassPort trunked zones only Available in PassPort signaling only (Refer to Menu Navigation guidelines – ‡ Available in LTR trunked zones only lower, left-hand corner of this page) § Available in conventional zones only Rptr/ LTR /Con (LTR) All Voice... - Page 109 Microphone ..... . . 14 TABLE DES MATIÉRES Touches de menu ....14 Touches du clavier .
- Page 110 Sélection d'une zone ou d'un canal Commutation PassPort ... . . 46 conventionnel..... . . 34 Itinérance transparente .
- Page 111 Réception d’un message....63 Appels téléphoniques D sur un système Envoi d'un signal d'urgence E ..64 conventionnel .
- Page 112 Accessoires ..... 112 Accessoires de transport ....112 Étuis.
-
Page 113: Droit D'auteur Et Copie Du Logiciel
DU LOGICIEL en vertu des droits d'auteur, des droits de brevets ou d'une demande de brevet pour tout Les produits Motorola décrits dans le présent achat d'un produit Motorola, à l'exception d'une guide peuvent inclure des logiciels Motorola licence d'utilisation normale et non exclusive protégés en vertu de la loi sur le droit d'auteur... -
Page 114: Sécurité
Sécurité du produit et consignes relatives RESPECT DES NORMES à l’exposition à l’énergie électromagnétique livré avec votre radio (Numéro de publication RELATIVES À L’EXPOSITION À Motorola 6881095C98) pour assurer le respect L’ÉNERGIE ÉLECTROMAGNÉTIQUE des limites d’exposition à l’énergie Avant d’utiliser ce produit, électromagnétique. -
Page 115: Introduction
Systèmes partagés PassPort Bienvenue aux utilisateurs de radios de la famille Conçu par Trident Micro Systems, PassPort HT de Motorola. Le présent guide couvre les est un protocole évolué à commutation radios HT1250•LS+ . Ces radios allient une... -
Page 116: Systèmes Radio Conventionnels
Dans les systèmes de transmission partagée, message afin de vérifier que le système n’est un relais est utilisé seulement pour la durée pas actuellement occupé. d’une transmission unique. Une fois la FONCTIONS DE LA RADIO transmission accomplie, ce relais est à la disposition des autres utilisateurs. -
Page 117: Fonctions De La Zone Passport
• Jusqu’à 16 ou 32 canaux conventionnels • Affichage des sites enregistrés et de (selon la capacité du modèle) l’identité du mobile • Demande d'itinérance de l’émetteur • Accentuation audio de la fréquence X-Pand • Balayage automatique des principaux groupes et balayage des groupes de •... -
Page 118: Fonctions De La Zone Ltr
Fonctions de la zone LTR Fonctions de la zone conventionnelle • Signalisation MDC -1200 • Signalisation MDC –1200** - Avis d’appel - Verific. Radio - Avis d’appel - Verific. Radio - Appel sélectif - Bouton de - Appel sélectif - Bouton de - Signal d’urgence* conversation- - Signal d’urgence... -
Page 119: Aperçu De La Radio
APERÇU DE LA RADIO PIÈCES DE LA RADIO HT1250•LS+ Modèle à clavier complet Réglage du sélecteur Bouton supérieur de Zone (Programmable) Bouton Marche/ Arrêt/Volume Voyant DEL Bouton latéral 1 (A) (Programmable) Microphone Affichage Bouton de Touches de menu conversation (P1, P2, P3) (PTT) (Programmable) Bouton latéral 2 (B) -
Page 120: Ht1250•Ls+ Modèle À Clavier Limité
HT1250•LS+ Modèle à clavier limité Réglage du sélecteur Bouton supérieur de Zone (Programmable) Bouton Marche/ Arrêt/Volume Voyant DEL Bouton latéral 1 (A) (Programmable) Microphone Bouton de Affichage conversation (PTT) Touches de menu (P1, P2, P3) (Programmable) Bouton latéral 2 (B) (Programmable) Bouton latéral 3 (C) (Programmable) - Page 121 Bouton Marche/Arrêt/Volume Couleur du Indique voyant DEL Permet de mettre la radio sous tension ou hors tension et d’en régler le volume. Rouge Votre radio tente d’accéder à un clignotant système partagé (le bouton de Bouton de réglage du sélecteur de Zone conversation est enclenché), ou Permet à...
-
Page 122: Bouton De Conversation
Bouton de conversation Touche Menu/Sélection ) Appuyez sur le bouton de conversation et Sert à passer au mode Menu. Une fois en maintenez-le enfoncé pour parler; relâchez-le mode Menu, utilisez cette touche pour pour écouter. sélectionner les options de menu. Microphone Touche d’option Quitter ( Lorsque vous envoyez un message, tenez la... -
Page 123: Touches Du Clavier
Touche d’option Droite > Ces touches servent à ? • Composer un numéro de téléphone. Cette touche est utilisée pour déplacer le curseur vers la droite ou pour insérer une • Entrer un numéro d’identification de radio espace lorsque vous modifiez les listes spécifique lorsque vous faites un appel d’appels, de balayages et de numéros de sélectif ou un avis d’appel... - Page 124 Saisie de caractères à l’aide du clavier Nombre d’appuis sur une touche Touches < > & Á Ç à á ç È É Ê è é ê Í ì í Ñ Ó Ô ò ó ô ö Ú ù ú Espace ’...
-
Page 125: Affichage
Affichage Symbole Indication Le mode Téléphone est sélectionné. Téléphone Une sirène d’urgence se fait Appel reçu entendre ou un signal Urgence d’urgence est en cours de transmission. Les deux lignes supérieures de l’écran Appel sélectif ou avis d’appel affichent les informations d’état du menu et de reçu (opération partagée LTR et Appel reçu la radio :... - Page 126 Symbole Indication Symbole Indication Le voyant DEL vert clignote • Le voyant DEL vert est pour indiquer l'activation de la allumé pour indiquer Balayage Priorité 2 fonction Balayage du l’activité d’un groupe ou Balayage système, Balayage PassPort d’un canal en priorité 2 •...
-
Page 127: Touches Programmables
Grâce à la programmation, chaque bouton Symbole Indication peut donner accès à un maximum de deux fonctions. Selon le type de bouton, procédez The number of bars (0–4) comme suit: shown indicates the charge Niveau de la remaining in your battery. pile –... - Page 128 Votre détaillant peut également indiquer si la touche est à appui de courte durée (SP-Short press) ou à appui de longue durée (LP-Long press). Communiquez avec votre détaillant pour obtenir la liste complète des fonctionnalités de votre radio. Français...
- Page 129 Fonctions programmables Appui de courte Appui de longue Touche Fonction Page Touche durée durée enclenchée Indicateur de niveau de Couleur – – Vérifie l’état de la pile du voyant charge de la pile. Modifier la liste de – Ajouter, supprimer ou établir l’ordre de –...
- Page 130 Fonctions programmables Appui de courte Appui de longue Touche Fonction Page Touche durée durée enclenchée Permet de quitter le Permet d’activer le Surveillance – § Surveillance mode de mode de continue des surveillance surveillance canaux permanente. permanente. Téléphone Permet d'accéder directement au mode –...
- Page 131 Fonctions programmables Appui de courte Appui de longue Touche Fonction Page Touche durée durée enclenchée Permet de basculer entre l’utilisation d’un – § Rptr/Directe relais conventionnel et la transmission † directe à une autre radio. Demande d'itinérance* Recherche Permet de lancer Fonction d’itinérance –...
- Page 132 Fonctions programmables Appui de courte Appui de longue Touche Fonction Page Touche durée durée enclenchée Avis d’appel* – Permet d'accéder directement à la liste – (bouton direct) † des appels radio. Balayer/Supprimer canal Permet d’activer ou Supprimer un canal – importun de désactiver la importun pendant le...
- Page 133 Fonctions programmables Appui de courte Appui de longue Touche Fonction Page Touche durée durée enclenchée – Permet d'accéder directement au menu – ‡§ État † Messages. Mémorisation/Lecture – Lecture des Enregistrement des – des enregistrements messages messages vocaux. vocaux enregistrés. Quitter le mode Lecture –...
-
Page 134: Indicateurs Sonores Pour Les Touches Programmables
INDICATEURS SONORES POUR Tonalité aiguë- Tonalité basse- Touche LES TOUCHES PROGRAMMABLES basse aiguë Balayage Désactiver Activer Outre les indicateurs visuels, certaines balayage balayage touches programmables utilisent des tonalités Niv. Puissance Puissance Puissance pour distinguer deux modes : élevée basse sélectionnée sélectionnée Tonalité... -
Page 135: Mise En Route
MISE EN ROUTE Couleur du État de la pile/du chargeur voyant DEL INFORMATIONS SUR LA PILE Vert clignotant La mise sous tension du simple chargeur s'est bien déroulée. Recharge de la pile Rouge clignotant* Impossible de recharger la pile Si la pile est neuve ou si son niveau est très ou problème de contact. -
Page 136: État De Charge De La Pile
État de charge de la pile Les chargeurs de pile chargent uniquement les piles autorisées par Motorola qui sont Vous pouvez vérifier l’état de charge de votre répertoriées ci-dessous. D’autres piles sont pile de deux façons : susceptibles de ne pas se charger. -
Page 137: Installation De La Pile
Installation de la pile Retrait de la pile Loquets de la pile 1 Éteignez votre radio (voir page 32). 1 Insérez les extrémités de la pile dans les fentes inférieures de votre radio. 2 Faites glisser les deux loquets de la pile vers le bas. -
Page 138: Informations Sur Les Accessoires
INFORMATIONS SUR LES ACCESSOIRES Retrait de l’antenne Installation de l’antenne Vissez l’antenne dans le sens horaire pour la Dévissez l’antenne dans le sens antihoraire fixer à la radio. pour la retirer. Français... -
Page 139: Installation De L'agrafe De Ceinture
Installation de l’agrafe de ceinture Retrait de l’agrafe de ceinture Support de l’agrafe de ceinture 1 Alignez les rainures de l’agrafe de ceinture 1 À l'aide d'une clé, appuyez sur le support de sur celles de la pile. l’agrafe de ceinture pour le retirer de la pile. 2 Exercez une pression vers le bas sur l’agrafe 2 Faites glisser l'agrafe de ceinture vers le haut de ceinture, jusqu’à... -
Page 140: Installation Du Couvercle Du Connecteur Latéral
ACTIVATION OU DÉSACTIVATION Installation du couvercle du connecteur latéral DE VOTRE RADIO Antenne Boucle Fente MARCHE ARRÊT Faites tourner le bouton Faites tourner le Marche/Arrêt/Volume dans bouton Marche/ Vis à oreilles le sens horaire. Arrêt/Volume 1 Placez la boucle (fixée au couvercle du dans le sens Lorsque la mise sous tension antihoraire jusqu’à... -
Page 141: Réglage Du Volume
RÉGLAGE DU VOLUME Pour sélectionner une zone ou un groupe de conversation partagé : Pour augmenter le volume, faites tourner le bouton Marche/Arrêt/Volume dans le sens 1 Utilisez le bouton du Sélecteur de zone afin horaire, ou dans le sens antihoraire pour de sélectionner la zone partagée appropriée. -
Page 142: Sélection D'une Zone Ou D'un Canal Conventionnel
SÉLECTION D'UNE ZONE OU D'UN 2 Appuyez sur le bouton de conversation et CANAL CONVENTIONNEL maintenez-le enfoncé. –ou– Vous pouvez mémoriser jusqu'à 16 canaux Appuyez sur le bouton de conversation et conventionnels sur votre radio, dans une zone relâchez-le, puis patientez trois secondes. conventionnelle ou plus, comme suit : •... -
Page 143: Réception D'un Appel Partagé Ou D'un Appel Conventionnel
programmées par votre 4 Écoutez pour tout signe d'activité vocale. Le détaillant). voyant DEL rouge clignotant s'allume lorsque vous recevez un appel. 1 Maintenez la radio en position Remarque : Le numéro d’identification du verticale et placez-la à environ mobile (XXXX) ou l’alias (s’il 2,5 à... -
Page 144: Voyant D'appel
VOYANT D’APPEL Remarque : L’écran affiche J lorsque le mode Intercommunication est (OPÉRATION PARTAGÉE SEULEMENT) sélectionné. Le voyant d'appel vous signale la réception Pour sélectionner le mode Relais ou le mode d'un appel entrant d'un groupe de conversation Intercommunication : particulier (tel que programmé... -
Page 145: Retour Au Canal D'origine
RETOUR AU CANAL D'ORIGINE La fonction Retour au canal d'origine vous permet d'accéder instantanément à votre groupe de conversation partagé ou canal conventionnel préféré en appuyant sur une seule touche. Pour activer la fonction Retour au canal d’origine : Appuyez sur la touche Retour au canal d’origine préprogrammée (voir page 21). -
Page 146: Signalement Passport
Envoi d’un appel sélectif à l’aide de la SIGNALEMENT PASSPORT touche préprogrammée • Appuyez sur la touche Appel sélectif Appel sélectif et Avis d’appel sont disponibles préprogrammée (voir page 23). Passez à dans la radio HT1250•LS+ à l’aide du l'étape 4. protocole PassPort. - Page 147 pour mémoriser l’alias ou le 5 Appuyez sur le bouton de conversation pour numéro d’identification désiré dans le envoyer l’appel sélectif. répertoire radio. • Pendant l’établissement de l’appel sélectif, clignote et le voyant DEL rouge clignote –ou– momentanément. • Une tonalité d’autorisation d’émission se puis appuyez sur la première fait entendre.
-
Page 148: Envoi D'un Appel Sélectif À L'aide Du Bouton Direct
Envoi d’un appel sélectif à l’aide du bouton et une tonalité d’occupation retardée se fait direct entendre tant que vous appuyez sur le bouton de conversation. 1 Appuyez sur lebouton direct préprogrammé Si vous continuez à appuyer sur le bouton et maintenez-le enfoncé. - Page 149 pendant 5 secondes. Le voyant DEL pour mettre fin à l’appel sélectif. s’éteint. Si l’appel sélectif s’est terminé • Si tous les canaux sont occupés lors de la prématurément, tentative d’établissement d’un appel sélectif, l’écran affiche : Appel terminé l’écran affiche : Système occupé...
-
Page 150: Réception D'un Appel Sélectif F
Réception d’un appel sélectif F l’écran affiche : Appel terminé 1 Lorsque vous recevez un Appel sélectif : et une tonalité se fait entendre (lorsqu’elle • Le clignote et, lorsque préprogrammé est préprogrammée par votre détaillant). par votre détaillant, le voyant DEL jaune continu s’allume. -
Page 151: Envoi D'un Avis D'appel À L'aide Du Menu
Envoi d’un avis d’appel à l’aide du menu –ou– pour passer au mode Menu. Entrez le numéro d’identification de la radio que vous désirez téléavertir. (Modèle à clavier Avis d’appel complet uniquement.) jusqu’à –ou– pour Avis d’appel sélectionner Appuyez sur l’astérisque (*) et sur la touche DTMF (0 à... -
Page 152: Envoi D'un Avis D'appel À L'aide Du
direct pendant 5 secondes. Le voyant DEL s’éteint. 1 Appuyez sur lebouton direct préprogrammé et maintenez-le enfoncé. • Si tous les canaux sont occupés lors de la tentative d’établissement d’un avis d’appel, • Le voyant DEL jaune continu s’allume. l’écran affiche : Système occupé... -
Page 153: Réception D'un Avis D'appel F
Réception d’un Avis d’appel F pendant 5 secondes. Le voyant DEL s’éteint. 1 Lorsque vous recevez un Avis d’appel : • Si tous les canaux sont occupés lors de la • Le F clignote et, lorsque préprogrammé tentative d’établissement d’un avis d’appel, par votre détaillant, le voyant DEL jaune l’écran affiche : continu s’allume. -
Page 154: Commutation Passport
IISR des sites contigus au sein du réseau. COMMUTATION PASSPORT Ainsi, la radio HT1250•LS+ peut naviguer rapidement jusqu’au site présentant le signal le PassPort est un protocole évolué à plus puissant afin de vous offrir une qualité commutation automatique de canaux à longue audio optimale pour vos communications. -
Page 155: Itinérance Et Inscription Entre Les Sites
2 L’écran affiche l’alias 5 Dès l’inscription à un ALIAS DE ZONE de la zone Passport site, l’alias du groupe sélectionnée (lorsqu’il de conversation est préprogrammé). PassPort sélectionné s’affiche et demeure à VOTRE GROUPE 3 L’écran affiche l’alias l’écran. VOTRE GROUPE du groupe sélectionné... -
Page 156: Affichage Du Site/Nim
Remarque : Ce message s’affiche jusqu’à Pour de plus amples renseignements sur ce que l’inscription soit réussie. les restrictions de site et de groupe, Pour de plus amples veuillez consulter page 53. renseignements sur la restriction de site, veuillez AFFICHAGE DU SITE/NIM contacter votre détaillant. -
Page 157: Alias Id De Bouton De Conversation
DEMANDE D'ITINÉRANCE L’écran affiche l’ID du site d’origine (NSO) et le numéro d’identification du mobile (NIM). où Grâce à la fonction IISR, votre radio XXX indique le numéro ASID et YYYY indique HT1250•LS+ passe automatiquement à un site e NIM. affilié... -
Page 158: Retour Au Site D'origine
Pour annuler une Demande d'itinérance La radio peut émettre une tonalité d’erreur de manipulation, puis Appuyez à nouveau sur la touche Demande l’écran affiche : Itinér non disp d'itinérance préprogrammée (voir page 23) et maintenez-la enfoncée. Cela peut se produire dans les circonstances suivantes : L’écran affiche : Dem itiné... -
Page 159: Verrouillage D'itinérance
Lorsque la radio Remarque : s’inscrit sur son site • La radio doit être actuellement inscrite sur d’origine PassPort, un site affilié. Nº empl enreg l’écran affiche : • Si pour quelque raison que ce soit la radio ne peut s’enregistrer sur son site d’origine, •... -
Page 160: Pour Activer Le Verrouillage D'itinérance
Pour activer le verrouillage d’itinérance Remarque : Une fois désactivée, la radio utilise le critère d’itinérance programmé dans la radio. Appuyez sur la touche Verrouillage d'itinérance préprogrammable (voir GROUPE DE CONVERSATION page 23). PRINCIPAL PASSPORT 2 À l’écran : Il s’agit du premier groupe de conversation VOTRE GROUPE préprogrammé... -
Page 161: Restriction De Site/Groupe
de ce groupe dans le logiciel de Restriction de site programmation. Le processus d’inscription et d’itinérance n’est Remarque : Veuillez consulter votre détaillant pas affecté pour les radios « non restreintes ». local pour plus d’informations. Toutefois, si un certain site affilié dans le système est restreint pour une radio, elle ne RESTRICTION DE SITE/GROUPE peut s’y inscrire et tente immédiatement de... -
Page 162: Restriction De Groupe
Restriction de groupe Si la radio ne prend pas cette fonction en Le processus d’inscription et d’itinérance n’est charge ou si le pas affecté pour les radios « non restreintes ». système ne reçoit Cependant, lorsqu’une radio se voit attribuer pas d’accusé... -
Page 163: Dépannage
DÉPANNAGE Lorsqu’elle se trouve dans des zones Passport, votre radio peut afficher des messages spécifiques pour indiquer que vous devriez communiquer avec votre détaillant pour obtenir de l’aide. Message Signification « ID de groupe Votre détaillant doit vérifier la non valide » programmation des groupes de conversation de votre radio ou du système PassPort. -
Page 164: Appels Radio
– ou– APPELS RADIO 1 Appuyez sur la touche Appel d’un membre Remarque : Offert pour les modes correspondant au membre que vous désirez conventionnel et LTR selon les appeler. fonctions du modèle de votre radio HT1250•LS+. Veuillez L’écran affiche : Nom xxxx consulter votre détaillant. - Page 165 Le voyant DEL jaune permanent s’allume L’écran affiche l’alias (lorsqu’il est pour localiser le numéro Nom xxxx préprogrammé) ou d’identification désiré dans le répertoire de l’ID de la dernière radios. entrée appelée. –ou– Remarque : Pour les modèles de radio Entrez le numéro d’identification de la radio DTMF, si vous appuyez sur un que vous désirez appeler (modèles à...
-
Page 166: Réception D'un Appel Sélectiff
RÉCEPTION D’UN APPEL SÉLECTIF Pour envoyer un Avis d’appel : Appuyez sur la touche Appel radio Lorsque vous recevez un Appel sélectif : préprogrammée (voir page 22) et passez à • L’écran affiche le symbole F ainsi que le l’étape 4. nom ou le numéro d’identification –... - Page 167 – ou– Avis d’appel jusqu’à 1 Appuyez sur le bouton Composition abrégée préprogrammé. pour Avis d’appel sélectionner L’écran affiche l’alias (lorsqu’il est Le voyant DEL jaune continu s’allume. Nom xxxx préprogrammé) ou l’ID de la dernière pour localiser le numéro entrée appelée.
-
Page 168: Réception D'un Avis D'appelf
• Le voyant DEL jaune clignote à une reprise 8 Si l’Avis d’appel est reçu par la radio en pour un appel de groupe ou à deux reprises question, l’écran pour un appel individuel. affiche : Confirmation Pour répondre à l’avis d’appel, appuyez sur le Si l’avis d’appel bouton de conversation;... -
Page 169: Envoi D'un Message D'état
8 Lorsque la radio ciblée reçoit la Vérification Appel Radio jusqu’à radio, vous pouvez visualiser : Confirmation pour Appel Radio sélectionner Lorsque la Radio n’est pas reçue, l’écran affiche Verific. Radio Pas de Confirm jusqu’à pour revenir à Verific. Radio –ou–... -
Page 170: Envoi D'un Message
jusqu’à Remarque : Si votre radio est incapable de État transmettre le message d’état pour ou si elle ne reçoit pas État sélectionner d’accusé de réception lorsque vous en attendez un, l’écran pour localiser le message affiche : d’état désiré dans le répertoire Pas de Confirm préprogrammé. -
Page 171: Réception D'un Message
jusqu’à Message Remarque : Si la radio est incapable de transmettre le pour Message message et qu’aucun sélectionner accusé de réception n’est attendu, l’écran affiche pour localiser le message désiré dans le répertoire préprogrammé. Aucun canal –ou– lorsque vous utilisez le microphone à clavier RÉCEPTION D’UN MESSAGE amélioré... -
Page 172: Envoi D'un Signal D'urgencee
ENVOI D'UN SIGNAL D'URGENCE délai prédéterminé). Pour activer l'Alerte d'urgence, appuyez sur la (MODES CONVENTIONNEL ET LTR touche Urgence pré-programmée. UNIQUEMENT) En cas d’urgence, vous chercherez à attirer Pour annuler l’Alerte d’urgence, appuyez sur le rapidement l’attention des autres utilisateurs bouton préprogrammé... -
Page 173: Identification Des Noms Et Des Tonalités D'appel
Pour modifier une entrée du répertoire : 10 Utilisez les touches du clavier pour modifier l’entrée (page 15). pour passer au mode Menu. pour Sauvegardé Changer Listes enregistrer vos jusqu’à modifications. pour Changer Listes pour revenir à ModifierEntrée? sélectionner –ou– Maintenez la touche enfoncée pour Liste... - Page 174 Vous pouvez faire votre sélection parmi sept À l’écran : TonSélectionné tonalités (voir page 98). pour revenir à Ton d'Identité Pour identifier un utilisateur particulier : –ou– pour passer au mode Menu. Maintenez la touche enfoncée pour quitter le mode Menu. Audio/Tons jusqu’à...
- Page 175 jusqu’à ce vous visualisiez et entendiez la tonalité que vous voulez utiliser pour identifier ce type d’appel. pour confirmer la sélection. À l’écran : TonSélectionné pour revenir à Ton d’Appel –ou– Maintenez la touche enfoncée pour quitter le mode Menu. Français...
-
Page 176: Balayage
RÉPONSE BALAYAGE Si une activité est détectée lors d'un balayage, celui-ci est interrompu et le groupe de Votre radio est dotée d'une fonction balayage conversation ou le canal actif s’affiche à l’écran qui vous permet de rechercher, de joindre et jusqu’à... -
Page 177: Balayage De Groupes Passportg
Remarque : Cette fonction est Remarque : La fonction Balayage de groupes automatiquement activée dans PassPort n’est pas disponible votre radio et non pas par le biais lorsque le site où vous êtes inscrit du menu ou d’une touche de est enregistré... -
Page 178: Balayage Automatique De Groupesg
BALAYAGE AUTOMATIQUE DE Pour désactiver la fonction Balayage de groupes PassPort : GROUPES Appuyez de nouveau sur la touche Balayage (Opérations partagées LTR seulement) préprogrammée. La fonction Balayage automatique de groupes Pour activer ou désactiver la fonction Balayage balaie automatiquement les groupes de de groupes PassPort à... -
Page 179: Balayage Automatique De Tous Les Groupesg
BALAYAGE AUTOMATIQUE DE des groupes 1, 3 et 4 et escamotera le groupe 2. TOUS LES GROUPES Pour activer le balayage automatique de (Opérations partagées LTR seulement) groupes : La fonction Balayage de tous les groupes Sélectionnez un groupe de conversation balaie tous les groupes de conversation au programmé... -
Page 180: Balayage Du Systèmeg
–ou– conventionnelles, tels que programmés par votre détaillant. Vous pouvez programmer Pour activer ou désactiver la fonction Balayage jusqu'à 16 groupes de conversation ou canaux de tous les groupes à l’aide du menu : conventionnels différents dans chaque liste de balayage. -
Page 181: Suppression D'un Canal Ou D'un Groupe De Conversation Importun
–ou– Remarque : Procédez comme suit : • Dans les zones conventionnelles uniquement, s’il y a de l’activité sur un pour passer au mode Menu. canal non prioritaire, la radio déconnecte Balayage du l’utilisateur de la conversation en cours et jusqu’à... -
Page 182: Modification D'une Liste De Balayage
préprogrammé pour supprimer provisoirement Remarque : En mode PassPort, le groupe le groupe ou le canal de la liste de balayage. peut également être réintégré en faisant défiler la liste de balayage Pour supprimer provisoirement un Canal/ ou en changeant le groupe de Groupe de conversation importun : conversation ou la zone actuellement sélectionné. -
Page 183: Afficher Une Liste De Balayage
Remarque : En mode PassPort, vous ne Balayage pouvez établir l’ordre de priorité jusqu’à des groupes de conversation. Votre radio ne peut recevoir d’appels lorsque Remarque : Une seule liste de balayage est disponible par mode de vous modifiez une liste de balayage. L’écran fonctionnement. - Page 184 BALAYAGE pour confirmer votre sélection. Pour ajouter ou supprimer des groupes de jusqu’à ce que s’affiche le conversation ou des canaux dans une liste de groupe de conversation ou le canal que vous balayage : désirez ajouter ou supprimer. Remarque : Vous ne pouvez pas supprimer pour passer au mode Menu.
-
Page 185: Classer Par Ordre De Priorité Un Groupe Ou Un Canal Dans Une Liste De Balayage
pour revenir à Canal de priorité Séquence du balayage Ajouter entrée? –ou– → → → Canal 2 Effacer Entrée? Cnl2 Cnl1 Cnl2 Cnl3 (Priorité 1) → → → → Maintenez la touche enfoncée pour Cnl2 Cnl4 Cnl2 quitter le mode Menu. …Cnl1 →... - Page 186 jusqu’à ce que s’affiche le Changer Listes jusqu’à canal ou le groupe de conversation pour lequel vous voulez établir la priorité. pour Changer Listes sélectionner pour classer ce groupe ou ce canal par ordre de priorité. Balayage jusqu’à pour revenir à Priorité? –ou–...
-
Page 187: Téléphone
Pour faire un appel téléphonique : TÉLÉPHONE 1 Sélectionnez une zone et un groupe de conversation partagés programmés pour le Votre radio HT1250•LS+ vous permet de faire mode Téléphone. et de recevoir des appels téléphoniques par pour passer au mode Menu. l’entremise des systèmes partagés et –ou–... - Page 188 + ou appuyez + ou ? Téléphone sur ? pour XXX-XXX-XXXX jusqu’à sélectionner un ) pour numéro dans le Téléphone confirmer répertoire téléphonique. L’écran affiche D lorsque vous êtes en Appuyez de nouveau sur le bouton de mode Téléphone. conversation et relâchez-le pour envoyer Appuyez sur le bouton de conversation le numéro.
-
Page 189: Appels Téléphoniques Dsur Un Système Conventionnel
APPELS TÉLÉPHONIQUES indiquant qu’un code d’accès est envoyé UN SYSTÈME CONVENTIONNEL automatiquement, puis ce dernier s’affiche à l’écran : Pour faire un appel téléphonique : –ou– Appuyez sur la touche Téléphone Entrez votre code d’accès à l’aide des préprogrammée et passez à l’étape 5. touches du clavier. - Page 190 a Appuyez sur la touche de Composition Appuyez sur le bouton de conversation abrégée préprogrammée et relâchez-la et relâchez-le, s’il y a lieu. (reportez-vous à l’étape 6) pour utiliser la Maintenez votre radio en position fonction de composition abrégée. verticale et placez le microphone à b Appuyez sur les touches (1 à...
-
Page 191: Réception D'un Appel D Sur Un Système Partagé Ou Conventionnel
RÉCEPTION D’UN APPEL D SUR UN Appuyez sur le bouton de conversation SYSTÈME PARTAGÉ OU pour répondre à l’appel. Appuyez sur le CONVENTIONNEL bouton de conversation et maintenez-le enfoncé pour parler; relâchez-le pour Pour recevoir un appel : écouter. + ou appuyez sur ? pour Pour mettre fin à... - Page 192 L’écran affiche K lorsque vous modifiez le ) pour mémoriser un nom. répertoire téléphonique. À l’écran : Pour ajouter une entrée au répertoire No. Téléphone téléphonique : Composez le numéro de téléphone à l’aide des touches du clavier. Vous pouvez ) pour passer au mode Menu.
- Page 193 Pour supprimer une entrée du répertoire À l’écran : téléphonique : Supprimer? ) pour passer au mode Menu. ) de nouveau pour confirmer la + ou ? suppression. Changer Listes jusqu’à À l’écran : Entrée Effacée ) pour Changer Listes ( pour revenir à...
- Page 194 ) pour Répertoire Modif #Mémoire? sélectionner ou jusqu'à téléphonique (pour modifier la position dans le + ou ? répertoire téléphonique). ModifierEntrée? jusqu’à ) pour confirmer votre sélection. ) pour Utilisez les touches du clavier pour ModifierEntrée? sélectionner modifier l’entrée (voir page 16), –...
-
Page 195: Messagerie Vocale
créneaux de temps offerts avec la radio MESSAGERIE VOCALE HT1250•LS+ : Nombre de La messagerie vocale est une fonction standard Durée des créneaux de des radios HT1250•LS+. Veuillez consulter créneaux (en temps votre détaillant pour la compatibilité. secondes) équivalents La fonction Messagerie vocale permet à votre radio d’effectuer sept types d’opérations reliées à... -
Page 196: Enregistrement Des Appels Entrants
Pour enregistrer les appels entrants selon une • Lorsque tous les créneaux contiennent sélection préalable : au moins un message enregistré, un signal d’avis se fait entendre. Appuyez sur la touche Enregistrement/ Lecture préprogrammée et maintenez-la Lors de la demande d’une fonction enfoncée (voir page 19) pendant la d'enregistrement vocal, l’écran réception de l’appel. - Page 197 partagés et conventionnels et appels entrants ) pour sélectionnés MDC. Appels reçus sélectionner Cette fonction s'avère utile pour connaître l’activité d’un canal pendant votre absence. 8 L’écran clignote Appels reçus continuellement, sauf Remarque : Cette fonction ne peut être lorsqu’un appel est activée en mode Balayage.
-
Page 198: Enregistrement Des Messages Vocaux
Pour enregistrer un message vocal à l’aide de Remarque : Le signal d’avis « messagerie la touche Enregistrement/Lecture vocale pleine » se fait entendre préprogrammée lorsque le créneau est plein et que la fonction est interrompue. Appuyez sur la touche Enregistrement/ Lecture préprogrammée et maintenez-la À... -
Page 199: Lecture Des Messages Enregistrés
Pour enregistrer un message vocal à l’aide du Sans appuyer sur le bouton de menu : conversation, parlez clairement dans le microphone pour enregistrer votre ) pour passer au mode Menu. message. Votre radio enregistre votre message jusqu’à ce que le créneau soit + ou ? Messagerie plein ou jusqu’à... - Page 200 Remarque : La fonction Lecture des Pour quitter/annuler le mode Lecture, messages enregistrés ne peut appuyez et relâchez la touche Quitter être activée pendant la réception Lecture préprogrammée (voir page 25). d’un appel. En outre, votre radio –ou– ne reçoit aucun appel lorsque Appuyez sur ( pour interrompre la lecture.
-
Page 201: Suppression Des Messages Enregistrés
Remarque : Vous ne pouvez supprimer qu’un ) pour seul message à la fois. sélectionne Pour supprimer un message à l’aide de la 001 24:00 005 touche Supprimer lecture préprogrammée : Appuyez sur la touche Nº de message Enregistrement/Lecture Marquage Durée (en secondes) de l'heure préprogrammée, puis relâchez-la (voir... -
Page 202: Transmission Des Messages Enregistrés
TRANSMISSION DES MESSAGES + ou ? Messagerie ENREGISTRÉS jusqu’à Vocale Cette fonction vous permet de transmettre un message enregistré à un autre utilisateur ) pour Messagerie radio. sélectionner Vocale Pour transmettre un message enregistré : + ou ? Appuyez sur le bouton de conversation Supprimer jusqu’à... -
Page 203: Réponse Automatique Aux Messages : « Réponse Auto
RÉPONSE AUTOMATIQUE AUX + ou ? MESSAGES : « RÉPONSE AUTO. » Activ.RépAuto? jusqu’à (OPÉRATION PARTAGÉE LTR ET ) pour CONVENTIONNELLE SEULEMENT) Activ.RépAuto? sélectionner La fonction de réponse automatique vous permet de transmettre un message enregistré à un appelant lorsque votre radio reçoit un Pour enregistrer un message appel sélectif MDC. - Page 204 Pour quitter ou annuler l’enregistrement, + ou ? Sans RépAuto? appuyez sur (. jusqu’à Lorsque la fonction Réponse ) pour automatique aux messages est activée, Sans RépAuto? sélectionner le message enregistré est automatiquement transmis à chaque fois que votre radio reçoit un appel individuel. Pour désactiver la fonction Réponse automatique aux messages: ) pour passer au mode Menu.
-
Page 205: Paramètres Audio/Tonalité
PARAMÈTRES AUDIO/ + ou ? jusqu’à ce que la fonction TONALITÉ que vous voulez modifier s’affiche (voir le tableau de la page suivante). Suivez les directives ci-dessous pour ) pour sélectionner la fonction. La personnaliser les paramètres audio et tonalité configuration actuelle de la fonction de votre radio : s’affiche. - Page 206 Paramètres audio/tonalité Fonction Capacité Réglages Cette option permet de régler l’intensité du volume Volume Alerte Vol.avecBouton du son et du signal de façon autonome. Lorsque Vol.sansBouton cette option est activée, les tonalités d’avis se conforment aux paramètres par défaut de votre radio;...
- Page 207 Paramètres audio/tonalité Fonction Capacité Réglages Offre la même qualité audio pour les canaux de X?Pand Avec X?Pand 12,5 kHz et de 25 kHz. Sans X?Pand Cette fonction permet d’activer ou de désactiver les Tons Clavier Avec Tons tonalités des touches du clavier, à l’exception des Sans Tons touches programmables (voir page 19).
-
Page 208: Fonctions Auxiliaires
FONCTIONS AUXILIAIRES + ou ? jusqu’à ce que la fonction que vous voulez modifier s’affiche (voir le tableau de la page suivante). Vous pouvez personnaliser certaines fonctions de votre radio comme suit : ) pour sélectionner la fonction. La configuration actuelle de la fonction ) pour passer au mode Menu. - Page 209 Fonctions auxiliaires Fonction Capacité Réglages Règle le niveau de puissance de votre radio, soit Niv. Puissance Haute supérieur, faible ou automatique (voir page 103). Basse Automatique Règle l’heure, ou encore active ou désactive Horloge Avec Horloge l’horloge (voir page 105). Sans Horloge Régler Heure Règle, ou encore active ou désactive l’alarme...
- Page 210 Fonctions auxiliaires Fonction Capacité Réglages Cette fonction permet de transmettre un message Réponse Auto. Activ. RépAuto enregistré à un appelant lorsque votre radio reçoit ‡ § Sans RépAuto un appel sélectif MDC. Enregistrer msg Écouter msg – Lors d’opérations partagées LTR et Version du conventionnelle, affiche le numéro de version de logiciel...
-
Page 211: Réglage Silencieux Ou Normal Du Bruit De Fond
RÉGLAGE SILENCIEUX OU + ou ? Silencieux NORMAL DU BRUIT DE FOND jusqu’à (OPÉRATION CONVENTIONNELLE ) pour Silencieux SEULEMENT) sélectionner Utilisez cette fonction pour filtrer les appels importuns (indésirables) et/ou le bruit de fond. + ou ? Cependant, le réglage silencieux peut Rég. - Page 212 (opération conventionnelle seulement) ) pour Fonctions Aux. règle automatiquement le niveau de sélectionner puissance optimal en fonction de l'intensité du signal reçu. Si le signal reçu est faible, + ou ? Niv. Puissance le niveau de transmission est réglé au jusqu’à...
-
Page 213: Réglage De L'horloge/De L'alarme
RÉGLAGE DE L’HORLOGE/DE Lorsqu’un paramètre clignote, vous L’ALARME pouvez le modifier à l’aide des touches + ou ?. Pour régler l’horloge/l’alarme : Heure (AM ou PM) 3:05 PM ) pour passer au mode Menu. Minutes AM/PM ou 24 h + ou ? Fonctions Aux. -
Page 214: Garantie
MOTOROLA. garantit les produits de Cette garantie limitée expresse est télécommunications (le « Produit ») accordée par MOTOROLA à l’acheteur ou fabriqués par Motorola contre tout défaut à l’utilisateur final d’origine seulement et de matériel ou de fabrication dans des ne peut être ni transférée ni assignée à... - Page 215 à l’égard de tout OU IMPLICITE, Y COMPRIS, SANS S’Y équipement ou accessoire qui n’est pas LIMITER, LES GARANTIES IMPLICITES fourni par MOTOROLA et qui est branché DE QUALITÉ MARCHANDE ET DE sur le Produit ou utilisé conjointement avec CONVENANCE POUR UN USAGE celui-ci, du fonctionnement du Produit PARTICULIER ET ELLE SE LIMITE À...
- Page 216 à un centre de service LIMITATION QUANT AUX DOMMAGES autorisé. Les réparations sous garantie CONSÉCUTIFS OU INDIRECTS, NI seront effectuées par Motorola à l’un de AUCUNE LIMITE SUR LA DURÉE D’UNE ses centres de service autorisés. Dans GARANTIE IMPLICITE, DE SORTE QUE certains cas, il est plus facile d’obtenir les...
- Page 217 Les égratignures et autres dommages d’un équipement quelconque non fourni par superficiels qui ne nuisent pas au Motorola) et qui ont un effet négatif sur le fonctionnement du Produit. rendement du Produit ou qui nuisent à K) L’usure et le vieillissement normaux et l’inspection ou à...
- Page 218 équipement ou logiciel qui n’est pas fourni que toute négociation en vue de tout par MOTOROLA et qui est rattaché au Produit ou règlement ou compromis; et utilisé conjointement avec ce dernier. Ce qui C) Si le Produit ou les pièces devaient faire...
- Page 219 à rebours, d’un quelconque logiciel MOTOROLA n’est permise. Aucune licence n’est accordée pour inférence, estoppel ou autre en vertu des droits de brevets ou des droits d’auteur de MOTOROLA ou de tiers.
-
Page 220: Accessoires
HLN9946_ Étui en cuir pour le clavier doté d’une ACCESSOIRES agrafe de ceinture HLN9998_ Étui en cuir à pivot pour le clavier ACCESSOIRES DE TRANSPORT HLN9945_ Étui en cuir pour le clavier doté d’une agrafe de ceinture HLN9714_ Agrafe de ceinture à ressort de 6,5 cm HLN9955_ Étui en cuir à... -
Page 221: Casques Et Accessoires
110 V) AARMN4017_ Casque d’écoute ultra-léger – Homologué WPPN4065_R Chargeur de conditionnement par la FM Motorola. Base pour quatre stations (fonctionnement VOX seulement sur les seulement. 110 V (nécessite un canaux conventionnels) adaptateur) AARMN4032_ Casque d’écoute de poids moyen... -
Page 222: Microphones
RMN4051_ Casque d’écoute bidirectionnel pour ENMN4013_ Récepteur écouteur souple (support casque de sécurité, noir – taux de profilé et haut-parleur souples qui réduction du bruit = 22 dB (nécessite reposent sur l’oreille) l’accessoire RKN4097) ENMN4016_ Casque d’écoute moyen de gamme fixé RMN4052_ Casque d’écoute à... -
Page 223: Système De Microphone Auriculaire
SYSTÈME DE MICROPHONE MICROPHONE-RÉCEPTEUR AURICULAIRE INTÉGRÉ La technologie acoustique de ce dispositif ne Microphone auriculaire, noir (pour des BDN6677_ niveaux de bruit allant jusqu’à 95 dB) – dépend pas de la stimulation pour transmettre nécessite un module d’interface la communication. BDN6678_ Microphone auriculaire beige (pour des NTN1722_... -
Page 224: Écouteur
ÉCOUTEUR NTN8988_ Languettes profilées (paquet de 10) pour un maintien sûr à l’oreille AARLN4885_ Sonde microphonique moussée de NKN6525_ Câble PTT de remplacement s’attachant réception seule dotée d’une prise de 3,5 sur le côté pour le NTN1737 mm - (pour les accessoires AAHMN9053, NKN6508_ Câble de remplacement pour l’accessoire AAHMN8054 et AAHMN9057) –... -
Page 225: Adaptateurs
AARMN4028_ Écouteur avec bouton de réglage du 3080384G15 Adaptateur pour allume-cigarettes volume (noir) – Homologué FM RLN4853_ Adaptateur 10 à 20 broches RLN4941_ Écouteur de réception seule doté d’un AARKN4073_ Câble de clonage tube translucide avec embout de AARKN4074_ Câble de programmation/d’essai (boîtier caoutchouc et prise de 3,5 mm (pour les RIB requis) accessoires AAHMN9053, AAHMN9054 et... -
Page 226: Antennes
HNN4002 PMAE4007_ Antenne à ondes décimétriques (UHF), Pile 1800 mAH NiMh, 7,5 V Impres - À 490 – 527 MHz sécurité intrinsèque (FM) PMAE4008_ Antenne fouet à ondes décimétriques HNN4003 Pile 2000 mAH ions de lithium, 7,5 V (UHF), 465 – 527 MHz Impres ANTENNES PMAD4012_... - Page 227 Sélection d'une zone ou d'un groupe de conversation partagé Réglez le bouton dusélecteur de Zone sur la zone partagée appropriée. HT1250•LS+ Radio Envoi d’un appel partagé Appuyez sur le bouton de conversation . Si l’accès au système partagé est réussi, la Carte de référence rapide DEL rouge continu s’illumine;...
- Page 228 Plan du menu de navigation Offerte dans les zones partagées PassPort seulement Disponible en signalement PassPort seulement (Reportez-vous aux directives du menu de navigation – ‡ Offerte dans les zones partagées LTR seulement dans le coin inférieur gauche de cette page) §...
- Page 230 MOTOROLA and the Stylized M Logo are registered in the U.S. Patent and Trademark Office. All other product or service names are the property of their respective owners. © Motorola, Inc. 2002 – 2004, 2007, 2009, 2010. MOTOROLA et le logo stylisé M sont homologués au Patent and Trademark Office des Etats-Unis.