Panasonic LUMIX DMC-GF1K Operating Instructions Manual
Digital camera/lens kit
Hide thumbs
Also See for LUMIX DMC-GF1K:
- Operating instructions manual (228 pages) ,
- Instrucciones de funcionamiento (200 pages) ,
- Operating instructions manual (204 pages)

Related Manuals for Panasonic LUMIX DMC-GF1K


Summary of Contents for Panasonic LUMIX DMC-GF1K
-
Page 1: Operating Instructions
Operating Instructions Digital Camera/Lens Kit DMC-GF1C Model No. DMC-GF1K Before use, please read these instructions completely. VQT2G62... -
Page 2: Information For Your Safety
Dear Customer, We would like to take this opportunity to thank you for purchasing this Panasonic Digital Camera. Please read these Operating Instructions carefully and keep them handy for future reference. Please note that the actual controls and components, menu items, etc. of your Digital Camera may look somewhat different from those shown in the illustrations in these Operating Instructions. - Page 3 • Do not place your hands inside the mount of the digital camera body. Since the sensor unit is a precision apparatus, it may cause a malfunction or damage. ∫ About Condensation (When the lens or the Viewfinder is fogged up) •...
- Page 4 -If you see this symbol- Information on Disposal in other Countries outside the European Union This symbol is only valid in the European Union. If you wish to discard this product, please contact your local authorities or dealer and ask for the correct method of disposal.
-
Page 5: Table Of Contents
Contents Information for Your Safety ... 2 Before Use Standard Accessories ...8 Names of the Components ... 10 Removing the Hot Shoe Cover ... 13 Operating the Rear Dial ... 13 About the Lens... 14 Preparation Attaching/Detaching the Lens ... 16 Attaching the Lens Hood...18 Attaching the Shoulder Strap ...19 Charging the Battery ...20... - Page 6 • Setting the colour temperature ... 78 • Finely adjusting the white balance... 79 • White Balance Bracket ... 79 Setting the Light Sensitivity ... 80 Change tone of the colour for the picture to be taken (Film Mode)... 82 •...
- Page 7 Advanced (Playback) Playing Back Motion Pictures/ Pictures with Audio ...132 • Motion pictures... 132 • Pictures with audio... 133 Using the [PLAYBACK] mode menu... 134 • [SLIDE SHOW]... 134 • [PLAYBACK MODE] ... 136 • Ü [FAVORITE] ... 137 • [TITLE EDIT] ...138 •...
-
Page 8: Before Use
Check that all the accessories are included before using the camera. Product numbers correct as of September 2009. These may be subject to change. Digital Camera Body (This is referred to as camera body in these operating instructions.) Interchangeable Lens “LUMIX G 20 mm/F1.7ASPH.”... - Page 9 DMC-GF1C H-H020 VYF3260 DMC-GF1K H-FS014045 VYC0981 DMW-BLB13E DE-A49C VFC4459 VFC4315 VFC4460 VYF3201 VFC4315 K2CJ29A00002 K1HA08CD0020 VKF4385 VYF3287 Before Use VFC4456 K1HA08AD0003 VQT2G62...
-
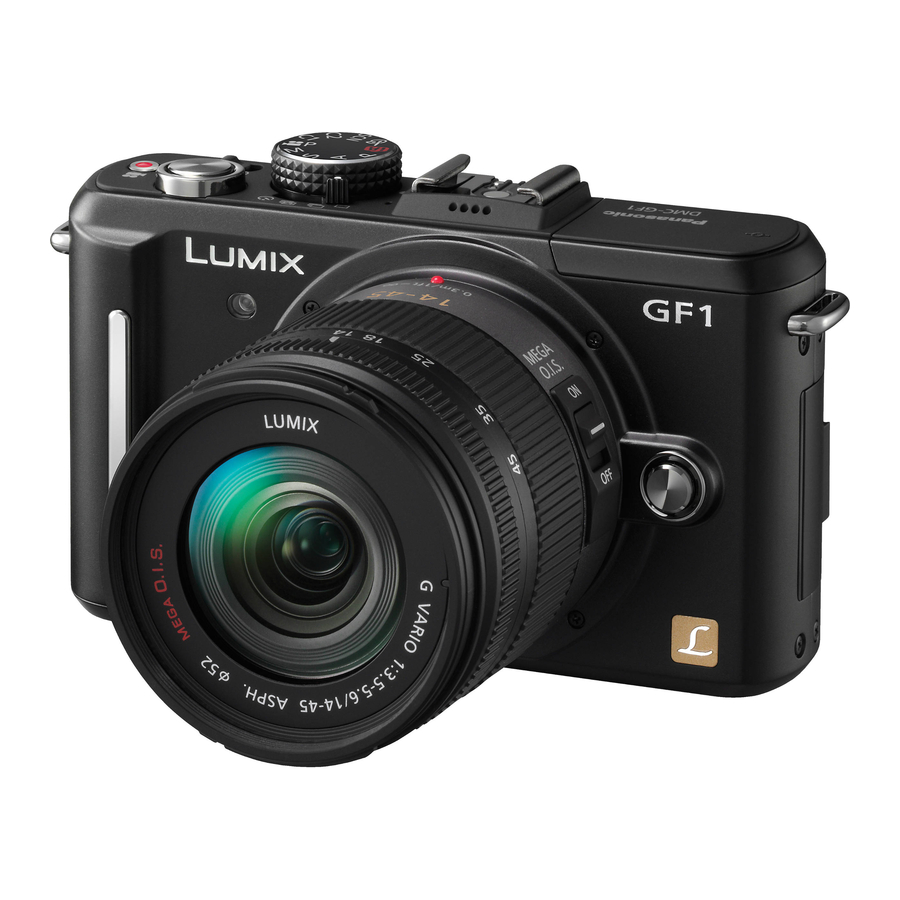
Page 10: Names Of The Components
Before Use Names of the Components ∫ Camera body Self-timer indicator (P70) AF assist lamp (P129) Sensor Flash (P60) Lens fitting mark (P16) Mount Lens lock pin Lens release button (P17) Rear dial is described as follows in these operating instructions. e.g.: Rotating left or right •... - Page 11 In these operating instructions, the cursor buttons are described as shown in the figure below or described with 3/4/2/1. e.g.: When you press the 4 (down) button MENU /SET 19 Focus distance reference mark (P75) 20 Speaker (P133) 21 Drive mode lever Single (P45): Burst (P66): Auto Bracket (P68):...
- Page 12 Before Use 34 Card/Battery door (P24) 35 Release lever (P24) 36 Tripod receptacle (P175) • When you use a tripod, make sure the tripod is stable when the camera is attached to it. ∫ Lens H-H020 (LUMIX G 20 mm/F1.7 ASPH.) 37 Lens surface 38 Focus ring (P74) 39 Contact point...
-
Page 13: Removing The Hot Shoe Cover
Removing the Hot Shoe Cover The camera comes with a hot shoe cover attached to the hot shoe. To use the Optional External Viewfinder (P162) or External Flash (P164), please remove the hot shoe cover. Press the hot shoe cover release button and pull the shoe cover in the direction of the arrow. -
Page 14: About The Lens
Before Use About the Lens This unit can use the dedicated lenses compatible with the Micro Four Thirds lens mount specification (Micro Four Thirds mount). Select a lens that matches the scene being recorded and your use of the pictures. ∫... - Page 15 ¢6 Auto focus is activated only when the shutter button is pressed halfway. The sound of Auto Focus Operation may be recorded at this time. ¢7 The sound of aperture operation may be recorded. Refer to catalogues/Web pages for most current information regarding compatible lenses. http://panasonic.jp/support/global/cs/dsc/ (This Site is English only.) when recording still pictures Auto...
-
Page 16: Preparation
Preparation Preparation Attaching/Detaching the Lens • Check that the camera is turned off. • Close the flash. Turn the lens rear cap A and the body cap B in the direction of the arrow to detach them. • Do not put your hands inside the mount. Align the lens fitting marks C (red marks) on the camera body and the lens and then rotate the lens in the direction... -
Page 17: Attach The Lens Cap
∫ Optical Image Stabilizer The Optical Image Stabilizer function is set for activation when the lens is attached to the camera body. A lens which supports the stabilizer function is required. – The 20 mm/F1.7 interchangeable lens supplied with the DMC-GF1C does not support the stabilizer function. -
Page 18: Attaching The Lens Hood
Preparation Attaching the Lens Hood In bright sunlight or backlight, the lens hood will minimise lens flare and ghosting. The lens hood cuts off excess lighting and improves the picture quality. • The 20 mm/F1.7 interchangeable lens supplied with the DMC-GF1C does not have a lens hood. -
Page 19: Attaching The Shoulder Strap
Attaching the Shoulder Strap • We recommend attaching the shoulder strap when using the camera to prevent it from dropping. Pass the shoulder strap through the shoulder strap eyelet on the camera body. A: Shoulder strap eyelet Pass the end of the shoulder strap through the ring in the direction of the arrow and then pass it through the stopper. -
Page 20: Charging The Battery
Panasonic products and batteries manufactured by other companies and certified by Panasonic. (Batteries which do not support this function cannot be used). Panasonic cannot in any way guarantee the quality, performance or safety of batteries which have been manufactured by other companies and are not genuine Panasonic products. -
Page 21: Approximate Operating Time And Number Of Recordable Pictures
• CIPA is an abbreviation of [Camera & Imaging Products Association]. • Temperature: 23 oC/Humidity: 50% when LCD monitor is on. • Using a Panasonic SD Memory Card (512 MB). • Using the supplied battery. • Starting recording 30 seconds after the camera is turned on. - Page 22 Preparation • Turning the camera off every 10 recordings and leaving it until the temperature of the battery decreases. The number of recordable pictures varies depending on the recording interval time. If the recording interval time becomes longer, the number of recordable pictures decreases. •...
- Page 23 Note • The operating times and number of recordable pictures will differ according to the environment and the operating conditions. For example, in the following cases, the operating times shorten and the number of recordable pictures is reduced. – In low-temperature environments, such as on ski slopes. –...
-
Page 24: Inserting And Removing The Card (Optional)/The Battery
Battery • Check that this unit is turned off. • Close the flash. • We recommend using a Panasonic card. Slide the release lever in the direction of the arrow and open the card/battery door. • Always use genuine Panasonic batteries (DMW-BLB13E). -
Page 25: About The Card
• It is recommended to use a card with SD Speed Class ¢ SD speed class is the speed standard regarding continuous writing. • Please confirm the latest information on the following website. http://panasonic.jp/support/global/cs/dsc/ (This Site is English only.) Note •... -
Page 26: Setting Date/Time (Clock Set)
Preparation Setting Date/Time (Clock Set) • The clock is not set when the camera is shipped. Turn the camera on. A [MENU/SET] button Press [MENU/SET]. Press 2/1 to select the items (year, month, day, hour, minute, display sequence or time display format), and press 3/4 to set. -
Page 27: Setting The Menu
• Once a charged battery has been installed for 24 hours, the clock setting is maintained for 3 months using the built-in clock battery even without the battery. Note • The clock is displayed when [DISPLAY] is pressed several times during recording. •... -
Page 28: Setting Menu Items
Preparation This section describes how to select the [REC] mode menu settings, and the same setting can be used for the [MOTION PICTURE] mode menu, [CUSTOM MENU] menu, [SETUP] menu, [MY MENU] menu and [PLAYBACK] mode menu as well. • If you set [MENU RESUME] (P130) in the [CUSTOM MENU] menu to [ON], the screen shows the last selected menu item when the camera was turned off. - Page 29 Press 3/4 or rotate the rear dial to select [I.EXPOSURE]. • Select the item at the very bottom, and press 4 or rotate the rear dial right to move to the next screen. Press 1 or the rear dial. • Depending on the item, its setting may not appear or it may be displayed in a different way.
-
Page 30: Setting The Quick Menu
Preparation Setting the Quick Menu By using the Quick Menu, some of the menu settings can be easily found. • The features that can be adjusted using Quick Menu are determined by the mode or a display style the camera is in. Press [Q.MENU] to display the Quick Menu in recording status. -
Page 31: About The Setup Menu
Perform these settings if you need to. About the Setup Menu [CLOCK SET], [ECONOMY] and [AUTO REVIEW] are important items. Check their settings before using them. • In the Intelligent Auto Mode, only [CLOCK SET], [WORLD TIME], [BEEP] and [LANGUAGE] can be set. - Page 32 Preparation • Press the shutter button halfway or turn the camera off and on to cancel [POWER SAVE]. • [POWER SAVE] is set to [5MIN.] in the Intelligent Auto Mode. • [POWER SAVE] is fixed to [2MIN.] when [AUTO LCD OFF] is set to [15SEC.] or [30SEC.]. •...
- Page 33 Brightness, colour, or red or blue tint of the LCD monitor/optional [MONITOR]/ [VIEWFINDER] external viewfinder is adjusted. • Adjust the brightness of the screen with 3/4, contrast and saturation with 2/1 or the rear dial. • When [DISPLAY] is pressed in screen shown right, it will switch to the colour adjustment screen.
- Page 34 Preparation Reset the file number of the next recording to 0001. v [NO.RESET] • The folder number is updated and the file number starts from 0001. (P157) • A folder number between 100 and 999 can be assigned. When the folder number reaches 999, the number cannot be reset. We recommend formatting the card (P36) after saving the data on a PC or elsewhere.
- Page 35 Set the format for the HDMI output when playing back on the HDMI compatible high definition TV connected with this unit using the HDMI mini cable (optional). [AUTO]: The output resolution is automatically set based on the information from the connected TV. [1080i]: [HDMI MODE] The interlace method with 1080 available scan lines is used for...
- Page 36 Preparation Set the language displayed on the screen. ~ [LANGUAGE] [ENGLISH]/[DEUTSCH]/[FRANÇAIS]/[ESPAÑOL]/[ITALIANO]/ [¢] • If you set a different language by mistake, select [~] from the menu icons to set the desired language. The card is formatted. Formatting permanently deletes all data on your memory [FORMAT] card.
-
Page 37: Holding And Using Your Camera
Holding and using your camera A AF assist lamp • Do not cover the flash or the AF assist lamp with your fingers or other objects. • Hold the camera gently with both hands, keep your arms still at your side and stand with your feet slightly apart. •... -
Page 38: Basic
Basic Mode switching Basic Selecting the [REC] mode, and record still pictures or motion pictures Turn the camera on. A Shutter button B Motion picture button C [AF/MF] button D [(] button • The status indicator 2 lights when you turn this unit on 1. -
Page 39: Setting [Afs] Or [Afc]
∫ Advanced Aperture-Priority AE mode (P84) The shutter speed is automatically determined by the aperture value you set. Shutter-Priority AE mode (P85) The aperture value is automatically determined by the shutter speed you set. Manual Exposure mode (P86) The exposure is adjusted by the aperture value and the shutter speed which are manually adjusted. -
Page 40: Taking A Still Picture
Basic Press the shutter button halfway to focus. Press the shutter button fully (push it in further), and take the picture. ∫ For more details, refer to the explanation of each recording mode. Press the motion picture button to start the recording. Press the motion picture button again to stop the recording. -
Page 41: Taking Pictures Using The Automatic Function (Intelligent Auto Mode)
ñ [REC] mode: Taking pictures using the automatic function : Intelligent Auto Mode) ñ The camera will set the most appropriate settings to match the subject and the recording conditions so we recommend this mode for beginners or those who want to leave the settings to the camera and take pictures easily. -
Page 42: Scene Detection
Basic ∫ When taking pictures using the zoom (P49) ∫ To adjust the exposure and take pictures at times when the image appears too dark (P65) ∫ When taking pictures with Manual Focus (P74) ∫ When recording motion pictures (P98) ∫... -
Page 43: Af Tracking Function
It is possible to set the focus and exposure to the specified subject. Focus and exposure will keep following the subject automatically even if it moves. Press 2. • [ ] is displayed in the lower left of the screen. •... - Page 44 Basic [AF MODE] (P71) [WHITE BALANCE] (P77) [AWB] [SENSITIVITY] (P80) [METERING MODE] (P120) [RED-EYE REMOVAL] (P119) [I.EXPOSURE] (P121) [COLOR SPACE] (P123) [LONG SHTR NR] (P121) [PRE AF] (P128) [FOCUS PRIORITY] (P129) [AF ASSIST LAMP] (P129) [ON] • In recording motion pictures, the settings of the following items are fixed. Item [AF MODE] (P71) [WHITE BALANCE] (P77) [AWB]...
-
Page 45: Taking Pictures With Your Favourite Settings (Programme Ae Mode)
³ [REC] mode: Taking pictures with your favourite settings : Programme AE mode) The camera automatically sets the shutter speed and the aperture value according to the brightness of the subject. You can take pictures with greater freedom by changing various settings in [REC] menu. •... -
Page 46: Fix The Focus By Pressing The Shutter Button Halfway (Afs)
Basic Fix the focus by pressing the shutter button halfway (AFS) Press [AF/MF] to set [AFS]. • “AFS” is an abbreviation of “Auto Focus Single”. The focus is adjusted when you press the shutter button halfway. • Normally use the [AFS]. •... -
Page 47: Focusing
Align the subject to the screen, and then press the shutter button halfway. A Focus indication B AF area (normal) C AF area (when using the digital zoom or when it is dark) ¢1 D Aperture value ¢1 E Shutter speed F ISO sensitivity It will flash in red when appropriate exposure is not achieved. -
Page 48: Programme Shift
Basic In Programme AE mode, you can change the preset aperture value and shutter speed without changing the exposure. This is called Programme Shift. You can make the background more blurred by decreasing the aperture value or record a moving subject more dynamically by slowing the shutter speed when taking a picture in Programme AE mode. -
Page 49: Taking Pictures With The Zoom
[REC] mode: Taking Pictures with the Zoom Using the Optical Zoom/Using the Extra Optical zoom (EZ)/ You can zoom-in to make people and objects appear closer or zoom-out to record landscapes in wide angle. • The 20 mm/F1.7 interchangeable lens supplied with the DMC-GF1C does not support the zoom ring function. -
Page 50: Playing Back Pictures
Basic Note • “EZ” is an abbreviation of “Extra Optical Zoom”. • If you use the zoom function after focusing on the subject, focus on the subject again. • When using the digital zoom, [STABILIZER] (Only available when a lens that supports the stabilizer function is attached) may not be effective. -
Page 51: Changing The Information Displayed On The Playback Screen
Changing the Information Displayed on the playback screen Press [DISPLAY] to switch the monitor screen. A [DISPLAY] button • When the menu screen appears, the [DISPLAY] button is not activated. During Playback Zoom (P53), while playing back motion pictures (P132) and during a slide show (P134), you can only select “Normal display B”... -
Page 52: Displaying Pictures By Recording Date (Calendar Playback)
Basic Displaying Pictures by Recording Date (Calendar Playback) You can display pictures by recording date. Rotate the rear dial left to display the calendar screen. Press 3/4/2/1 to select the date to be played back. 3/4: Select the month 2/1: Select the date •... -
Page 53: Using The Playback Zoom
Rotate the rear dial right. 1k>2k>4k>8k>16k • When you rotate the rear dial left after enlarging the picture, the magnification becomes lower. • When you change the magnification, the zoom position indication A appears for about 1 second, and the position of the enlarged section can be moved by pressing 3/4/2/1. -
Page 54: Deleting Pictures
Basic Deleting Pictures Once deleted, pictures cannot be recovered. Press [(]. Select the picture to be deleted, and then press [‚]. A [(] button B [DISPLAY] button ‚ ] button Press 2 to select [YES] and then press [MENU/SET]. To delete multiple pictures (up to 50) or all the pictures Press [‚]. - Page 55 ∫ When [DELETE ALL] has been selected with the [FAVORITE] (P137) setting The selection screen is displayed again. Select [DELETE ALL] or [ALL DELETE EXCEPTÜ], press 3 to select [YES] and delete the pictures. ([ALL DELETE EXCEPTÜ] cannot be selected if no pictures have been set as [FAVORITE].) Note •...
-
Page 56: Advanced (Recording Pictures)
Advanced (Recording pictures) Advanced (Recording pictures) Switching the display of the LCD Monitor/Optional External Viewfinder Switching the displayed information Press [DISPLAY] to change. A [DISPLAY] button • When the menu screen appears, the [DISPLAY] button is not activated. With the [LCD DISP.STYLE] (P126) of the [CUSTOM MENU] menu, you can choose the displayed screen on the LCD monitor to display in [ (viewfinder style). - Page 57 Optional external viewfinder display (P162) With the [LVF DISP.STYLE] (P131) of the [CUSTOM MENU] menu, you can choose the displayed screen on the Optional External Viewfinder (P162) to display in [ style) or [ ] (LCD monitor style). When [ ] is set ¢1 A Normal display...
- Page 58 Advanced (Recording pictures) ∫ Recording guide line When you align the subject on the horizontal and vertical guide lines or the cross point of these lines, you can take pictures with well-designed composition by viewing the size, the slope and the balance of the subject. This is used when dividing the entire screen into 3k3 for taking pictures with a well-balanced composition.
-
Page 59: About The Histogram
∫ About the Histogram A histogram is a graph that displays brightness along the horizontal axis (black to white) and the number of pixels at each brightness level on the vertical axis. It allows you to easily check a picture’s exposure. Examples of histogram 1 Properly Exposed 2 Under Exposed... -
Page 60: Taking Pictures Using The Built-In Flash
Advanced (Recording pictures) [REC] mode: Taking Pictures using the Built-in Flash A To open the flash B To close the flash Press the flash until it clicks. • Be sure to close the flash when not in use. • The flash setting is fixed to [Œ] while the flash is closed. - Page 61 When taking pictures against a dark background landscape, this feature will slow the shutter speed when the flash is activated. Dark background landscape will appear brighter. : Slow sync. • Use this when you take pictures of people in front of a dark background. •...
- Page 62 Advanced (Recording pictures) ¢ When [‡] is selected, [ brightness. • The flash setting may change if the recording mode is changed. Set the flash setting again if necessary. • The flash setting is memorised even if the camera is turned off. However, the Scene Mode flash setting is reset to the initial setting when the Scene Mode is changed.
-
Page 63: Adjust The Flash Output
Note • Do not bring the flash too close to objects or close the flash while it is activated. The objects may be discoloured by its heat or lighting. • Do not close the flash soon after the flash is activated prior to taking pictures due to AUTO/ Red-Eye Reduction etc. -
Page 64: Setting To The 2Nd Curtain Synchro
Advanced (Recording pictures) Setting to the 2nd Curtain Synchro Applicable modes: 2nd curtain synchro activates the flash just before the shutter closes when taking pictures of moving objects such as cars using a slow shutter speed. Select [FLASH SYNCHRO] in the [REC] mode menu. -
Page 65: Compensating The Exposure
[REC] mode: Compensating the Exposure Use this function when you cannot achieve appropriate exposure due to the difference in brightness between the subject and the background. Look at the following examples. Under exposed Compensate the exposure towards positive. Press the rear dial to switch to Exposure Compensation operation. Rotate the rear dial to compensate the exposure. -
Page 66: Taking Pictures Using Burst Mode
Advanced (Recording pictures) [REC] mode: Taking Pictures using Burst Mode Pictures are taken continuously while the shutter button is pressed. Select the ones you really like from among the pictures you have taken. Set the drive mode lever to [ Focus on the subject and take a picture. - Page 67 ∫ Focusing in Burst Mode The focus changes depending on the setting for [FOCUS PRIORITY] (P129) in the [CUSTOM MENU] menu and the focus mode setting. Focus mode ¢1 ¢1 When subject is dark, the focus is fixed on the first picture. ¢2 The burst speed may become slower because the camera is continuously focusing on the subject.
-
Page 68: Taking Pictures Using Auto Bracket
Advanced (Recording pictures) [REC] mode: Taking Pictures using Auto Bracket Maximum of 7 pictures will be recorded with different exposure settings following the Exposure Compensation range every time the shutter button is pressed. You can select the picture with the desired exposure among different exposures. With Auto Bracket [STEP]: [3•1/3], [SEQUENCE]: [0/s/r] 1st picture... - Page 69 Press 3/4 to select the setting and then press [MENU/SET]. Item [3•1/3] (3 pictures) [3•2/3] (3 pictures) [5•1/3] (5 pictures) [STEP] [5•2/3] (5 pictures) [7•1/3] (7 pictures) [7•2/3] (7 pictures) Press [MENU/SET] twice to close the menu. • You can also press the shutter button halfway to close the menu. Note •...
-
Page 70: Taking Pictures With The Self-Timer
Advanced (Recording pictures) [REC] mode: Taking Pictures with the Self-timer Set the drive mode lever to [ë]. Press the shutter button halfway to focus and then press it fully to take the picture. A When self-timer is set to [ •... -
Page 71: Setting The Method Used To Focus (Af Mode)
[REC] mode: Setting the method used to focus This allows the focusing method that suits the positions and number of the subjects to be selected. Select the mode that matches the recording conditions and the composition. Press [AF/MF] to set [AFS] or [AFC]. •... -
Page 72: Setting Up [ ] (Af Tracking)
Advanced (Recording pictures) • It is not possible to set [š] in the following cases. – [FOOD], [NIGHT SCENERY] and [ILLUMINATIONS] in the Scene Mode. • The [AF MODE] is fixed to [Ø] when using the digital zoom. • AF area will be fixed to a small point in [PERIPHERAL DEFOCUS] in Scene Mode. ∫... -
Page 73: Setting The Af Area
• AF Tracking will not operate when it has failed to AF track. AF mode will be switched to [Ø] in that case. • [FACE RECOG.] does not work when AF tracking is active. • In the following cases, [ ] operates as [Ø] –... -
Page 74: Taking Pictures With Manual Focus
Advanced (Recording pictures) [REC] mode: Taking Pictures with Manual Focus Use this function when you want to fix the focus or when the distance between the lens and the subject is determined and you do not want to activate auto focus. Press [AF/MF] to set [MF]. -
Page 75: Fixing The Focus And The Exposure (Af/Ae Lock)
∫ About the focus distance reference mark The focus distance reference mark is a mark used to measure the focus distance. Use this when taking pictures with Manual Focus or taking close-up pictures. A Focus distance reference mark (With the flash is closed) B Focus distance reference line (When 20 mm/F1.7 C 20 cm... - Page 76 Advanced (Recording pictures) While pressing [AF/AE LOCK], move the camera as you compose the picture. B AE lock indication Press the shutter button halfway to focus on the subject and then press it fully. ∫ Fixing the focus or the focus/the exposure Select [AF/AE LOCK] in the [CUSTOM MENU] menu.
-
Page 77: Adjusting The White Balance
[REC] mode: Adjusting the White Balance In sunlight, under incandescent lights or in other such conditions where the colour of white takes on a reddish or bluish tinge, this item adjusts to the colour of white which is closest to what is seen by the eye in accordance with the light source. Press 1 ( Press 2/1 to select the white balance and then press [MENU/SET] to set. -
Page 78: Setting The White Balance Manually
Advanced (Recording pictures) Note • The optimal white balance will differ depending on the type of halogen lighting being recorded under so use [AWB], [ ] or [ • The white balance might not be adjusted for a subject that the flash cannot reach when the flash is used. -
Page 79: Finely Adjusting The White Balance
Finely adjusting the white balance [ You can finely adjust the white balance when you cannot acquire the desired hue by setting the white balance. Select the white balance and then press 4. Press 3/4/2/1 to adjust the white balance and then press [MENU/SET]. -
Page 80: Setting The Light Sensitivity
Advanced (Recording pictures) Note • [ ] is displayed in white balance icon in the LCD monitor/optional external viewfinder when the White Balance Bracket is set. • The White Balance Bracket setting is released when the power has been turned off (including power save mode). - Page 81 ¢ When the [ISO LIMIT SET] of [REC] mode menu (P121) is set to anything except [OFF], it is set automatically within the value set in [ISO LIMIT SET]. It is set as following when the [ISO LIMIT SET] is set to [OFF]. •...
-
Page 82: Change Tone Of The Colour For The Picture To Be Taken (Film Mode)
Advanced (Recording pictures) [REC] mode: Change tone of the colour for the picture to be taken (Film Mode) [You can only select [STANDARD] and [STANDARD] ( Just as each type of film for film cameras has its own colour tone and contrast characteristics, Film Mode allows you to select up to 9 different “digital films”, colour tones, in the same way as you would select different films for film cameras. -
Page 83: Adjusting Each Film Mode To The Desired Setting
Adjusting each Film Mode to the desired setting Press 2/1 to select a film. Press 3/4 to select an item and 2/1 to adjust. • You can also use the rear dial to adjust. • Registered settings are memorised even if the camera is turned off. -
Page 84: Taking Pictures By Specifying The Aperture/Shutter Speed
Advanced (Recording pictures) Press 2/1 to select [MULTI FILM]. Select either [MULTI FILM 1], [MULTI FILM 2], or [MULTI FILM 3] with 3/4, and then select the film to be set for each with 2/1. • You can also use the rear dial to set. •... -
Page 85: Shutter-Priority Ae
When you want to take a sharp picture of a fast moving subject, set with a faster shutter speed. When you want to create a trail effect, set to a slower shutter speed. Set the mode dial to [ Rotate the rear dial to set the shutter speed. -
Page 86: Taking Picture By Setting The Exposure Manually
Advanced (Recording pictures) ² [REC] mode: Taking picture by setting the exposure manually Determine the exposure by manually setting the aperture value and the shutter speed. The Manual Exposure Assistance appears on the lower portion of the screen to indicate the exposure. - Page 87 ∫ Manual Exposure Assistance The exposure is adequate. Set to faster shutter speed or larger aperture value. Set to slower shutter speed or smaller aperture value. • The manual exposure assistance is an approximation. We recommend checking the pictures on the playback screen. ∫...
-
Page 88: Confirm The Effects Of Aperture And Shutter Speed (Preview Mode)
Advanced (Recording pictures) [REC] mode: Confirm the effects of aperture and shutter speed (Preview Mode) You can check the depth of field (effective focus range) before taking a picture by closing the leaf shutter to the aperture value you set. Press [ ] A (preview button). -
Page 89: Taking Pictures That Match The Scene Being Recorded (Scene Mode)
¿ [REC] mode: Taking pictures that match the scene being recorded : Scene mode) When you select a scene mode to match the subject and recording situation, the camera sets the optimal exposure and hue to obtain the desired picture. Set the mode dial to [ Press 3/4/2/1 to select the scene mode. -
Page 90: [Soft Skin]
Advanced (Recording pictures) When taking pictures of people outdoors during the daytime, this mode enables the texture of their skin to appear even softer than with [PORTRAIT]. (It is effective when taking pictures of people from the chest up.) ∫ Technique for Soft Skin Mode To make this mode more effective: 1 Rotate the zoom ring as far as possible to Tele. -
Page 91: [Flower]
Flowers outdoors are recorded with natural colours in macro settings. The guide lines are displayed. (P58) ∫ Technique for Flower Mode • We recommend using a tripod and the self-timer. • We recommend setting the flash to [Œ] when you take pictures at close range. Note •... -
Page 92: [Night Scenery]
Advanced (Recording pictures) Note • During Motion Picture Recording, low light settings are used, which will provide better pictures in dimly lit rooms or at nightfall. • Open the flash. (You can set to [ • The shutter may remain closed after taking the picture. This is due to signal processing and is not a malfunction. -
Page 93: Í [Pet]
∫ Birthday/Name setting Press 3/4 to select [AGE] or [NAME] and then press 1. Press 3/4 to select [SET] and then press [MENU/SET]. Enter the birthday or name. Birthday: 2/1: Select the items (year/month/day). 3/4: Setting. [MENU/SET]: Exit. Name: For details on how to enter characters, read the [TITLE EDIT] section on P138. -
Page 94: Ï [Sunset]
Advanced (Recording pictures) ∫ Technique for Party mode • Open the flash. (You can set to [ • We recommend using a tripod and the self-timer for taking pictures. Note • The initial setting for [AF MODE] is [š]. Select this when you want to take pictures of a sunset view. This allows you to take vivid pictures of the red colour of the sun. -
Page 95: Adjusting The Custom Settings To Achieve Desired Effects
Press [MENU/SET] to set. • You can also press the shutter button halfway to set. • Recording screen is displayed. ∫ Readjust the My Colour settings Return to above step by pressing rear dial or one of 3/4/2/1. • [Fn BUTTON SET] (P31) or [AF MODE] (P71) cannot be set with 4/2. Make the setting with the Quick Menu (P30). -
Page 96: Registering Personal Menu Settings (Registering Custom Settings)
Advanced (Recording pictures) Press [MENU/SET] to set. • You can also press the shutter button halfway to set. • Recording screen is displayed. ∫ Return [CUSTOM] settings to default Select [RESET] in above step Press 2 to select [YES] and press [MENU/SET]. •... -
Page 97: Taking Pictures In Custom Mode
[REC] mode: Taking pictures in Custom mode You can select one of your own custom settings saved with [CUST. SET MEM.] to suit the picture-taking conditions. Initial setting of the Programme AE mode is registered as the custom settings initially. Set the mode dial to [ A Display custom settings. -
Page 98: Recording Motion Picture
Advanced (Recording pictures) [REC] mode: Advanced (Recording pictures) Recording Motion Picture You can record motion pictures in high-definition format compliant with the AVCHD standard or in Motion JPEG format. Sound is recorded in mono. The functions available when recording motion pictures differ according to the lens you are using, and the operational sound of the zoom may be recorded Refer to page 15 for details. - Page 99 • The 20 mm/F1.7 interchangeable lens included in the DMC-GF1C utilises a lens drive system to realise a compact and bright F1.7 lens. As a result, sound and vibration may occur during focus operation, but this is not a malfunction. •...
-
Page 100: Changing [Rec Mode] And [Rec Quality]
Advanced (Recording pictures) – [FACE RECOG.]/[EX. OPT. ZOOM]/[ISO LIMIT SET]/[DIRECT AF AREA] • It is recommended to use a fully charged battery or AC adaptor (P167) when recording motion pictures. • If while recording motion pictures using the AC adaptor (P167) the power supply is cut off due to a power cut or if the AC adaptor is disconnected etc., the motion picture being recorded will not be recorded. - Page 101 Press 3/4 to select the item and then press [MENU/SET]. Recording format Select this format to record HD (high definition) video for [AVCHD Lite] playback on your HDTV using an HDMI connection. Select this format to record standard definition video for playback on your PC.
- Page 102 • Sound from motion pictures (When [REC MODE] is set to [MOTION JPEG]) or pictures with audio recorded by this camera cannot be played back by older models of Panasonic digital cameras (LUMIX) launched before July 2008. VQT2G62 Item...
-
Page 103: [Continuous Af]
You can set the camera to always maintain the focus or fix the focus. Select [CONTINUOUS AF] from the [MOTION PICTURE] mode menu, and press 1. (P28) Press 3/4 to select the item and then press [MENU/SET]. Press [MENU/SET] to close the menu. •... -
Page 104: Recording Motion Pictures With The Desired Settings (Motion Picture P Mode)
Advanced (Recording pictures) [REC] mode: Recording motion pictures with the desired settings : Motion Picture P mode) You can set the degree of peripheral defocus created by the exposure compensation or the aperture setting and record motion pictures. Set the mode dial to [ Set the Focus Mode (P98) Press the rear dial to change the settings screen. - Page 105 Note • The [AF MODE] is automatically set to [Ø] when you switch the recording mode to Motion Picture P Mode while the [AF MODE] is set to [ • ISO sensitivity will be fixed to [AUTO]. • [ REC AREA] (P130) is fixed to [ •...
-
Page 106: Taking A Picture With Face Recognition Function
Advanced (Recording pictures) [REC] mode: Taking a picture with Face Recognition function Face Recognition is a function which finds a face resembling a registered face and prioritises focus and exposure automatically. Even if the person is located towards the back or on the end of a line in a group photo, the camera can still take a clear picture. To use the Face Recognition function, set the [FACE RECOG.] in the [REC] Mode menu to [ON], and register the face images of the people to recognise. -
Page 107: Face Settings
You can register information such as names and birthdays for face images of up to 6 people. Registration can be facilitated by taking multiple face images of each person. (up to 3 pictures/registration) ∫ Point of recording when registering the face images •... - Page 108 Advanced (Recording pictures) Select [FACE RECOG.] on the [REC] Mode menu and then press 1. (P28) Press 3/4 to select [MEMORY] and then press [MENU/SET]. • If 6 people have already been registered, the list of registered people will appear. Press 3/4/2/1 to select the person to be replaced and press [MENU/SET].
- Page 109 Change the information for a registered person You can add a picture to the information of the registered people, replace or delete the pictures which have already been registered, and information such as names and register priority. Select [FACE RECOG.] from the [REC] Mode menu, and then press 1.
-
Page 110: Auto Registration
Advanced (Recording pictures) When [AUTO REGISTRATION] is set to [ON] in step registered person” (P109) while [FACE RECOG.] in the [REC] Mode menu is set to [ON], the registration screen will display automatically after taking a picture of a face that has a high number of appearances. -
Page 111: Sensitivity
Changing the sensitivity of Face Recognition. Select [FACE RECOG.] from the [REC] Mode menu, and then press 1. (P28) Press 4 to select [SET] and then press [MENU/SET]. Press 4 to select [SENSITIVITY] and then press [MENU/SET]. Press 3/4 to select [HIGH] Item Set when recognition is difficult. -
Page 112: Useful Functions At Travel Destinations
Advanced (Recording pictures) [REC] mode: Useful Functions at Travel Destinations Recording which Day of the Vacation You Take the Picture For details on the [SETUP] menu settings, refer to P28. If you set the departure date or the travel destination of the vacation in advance, the number of days that have passed since the departure date (which day of the vacation it is) is recorded when you take the picture. - Page 113 Press 4 to select [LOCATION] and then press 1. Press 4 to select [SET] and then press [MENU/SET]. Enter the location. • For details on how to enter characters, read the [TITLE EDIT] section on P138. Press [MENU/SET] twice to close the menu. Take a picture.
-
Page 114: Recording Dates/Times At Overseas Travel Destinations (World Time)
Advanced (Recording pictures) Recording Dates/Times at Overseas Travel Destinations (World Time) For details on the [SETUP] menu settings, refer to P28. You can display the local times at the travel destinations and record them on the pictures you take. • Select [CLOCK SET] to set the current date and time in advance. (P26) Select [WORLD TIME] from the [SETUP] menu, and then press 1. -
Page 115: Using The [Rec] Mode Menu
Note • Return the setting to [HOME] when the vacation is finished by performing steps • If [HOME] is already set, change only the travel destination, and use. • If you cannot find the travel destination in the areas displayed on the screen, set by the time difference from the home area. -
Page 116: [Aspect Ratio]
Advanced (Recording pictures) For details on [REC] mode menu settings, refer to P28. This allows you to select the aspect ratio of the pictures to suit printing or the playback method. Applicable modes: [X]: [ASPECT RATIO] of a 4:3 TV [Y]: [ASPECT RATIO] of a 35 mm film camera [W]: [ASPECT RATIO] of a high-definition TV, etc. -
Page 117: [Picture Size]
For details on [REC] mode menu settings, refer to P28. Set the number of pixels. The higher the numbers of pixels, the finer the detail of the pictures will appear even when they are printed onto large sheets. Applicable modes: ∫... -
Page 118: A [Quality]
Advanced (Recording pictures) For details on [REC] mode menu settings, refer to P28. Set the compression rate at which the pictures are to be stored. Applicable modes: [A]: Fine (when giving priority to the picture quality) [›]: Standard (when using the standard picture quality and increasing the number of pictures to be recorded without changing the number of pixels) ]: RAWiFine (In addition to the [RAW] settings, a fine-equivalent JPEG image is simultaneously created.) -
Page 119: [Flash]
[MODE1]: Jitter is always compensated during [REC] mode. [MODE2]: The jitter is compensated for when the shutter button is pressed. [MODE3]: Camera shake is corrected for up/down movements. This mode is ideal for panning (a method of taking pictures which involves turning the camera to track the movements of a subject which continues to move in a fixed direction). -
Page 120: [Flash Synchro]
Advanced (Recording pictures) For details on [REC] mode menu settings, refer to P28. You can set to the 2nd curtain synchro. Applicable modes: [1ST]/[2ND] Note • Refer to P64 for details. For details on [REC] mode menu settings, refer to P28. You can adjust the flash output. -
Page 121: [I.exposure] (Intelligent Exposure Adjustment)
[I.EXPOSURE] (Intelligent exposure adjustment) For details on [REC] mode menu settings, refer to P28. Contrast and exposure will be adjusted automatically when there is a big difference in brightness between the background and subject, to bring the image close to how you see. Applicable modes: [OFF]/[LOW]/[STANDARD]/[HIGH] Note... -
Page 122: [Iso Increments]
Advanced (Recording pictures) For details on [REC] mode menu settings, refer to P28. ISO sensitivity settings between [ISO100] and [ISO3200] are changed for every 1/3 EV. Applicable modes: [1/3 EV]: [100]/[125]/[160]/[200]/[250]/[320]/[400]/[500]/[640]/[800]/[1000]/[1250]/ [1600]/[2000]/[2500]/[3200] [1 EV]: [100]/[200]/[400]/[800]/[1600]/[3200] Note • When the setting is changed from [1/3 EV] to [1 EV], ISO sensitivity will be set to value closest to the value set during the [1/3 EV]. -
Page 123: [Auto Bracket]
For details on [REC] mode menu settings, refer to P28. You can set the compensation range of the exposure and the bracket order. Applicable modes: [STEP]: [3•1/3]/[3•2/3]/[5•1/3]/[5•2/3]/[7•1/3]/[7•2/3] [SEQUENCE]: [0/j/i]/[j/0/i] Note • Refer to P68 for details. For details on [REC] mode menu settings, refer to P28. You can set the time for the self-timer. -
Page 124: B [Audio Rec.]
• Sound from motion pictures (When [REC MODE] is set to [MOTION JPEG]) or pictures with audio recorded by this camera cannot be played back by older models of Panasonic digital camera (LUMIX) launched before July 2008. • [AUDIO REC.] cannot be set in the following cases. -
Page 125: Using The [Motion Picture] Mode Menu
Using the [MOTION PICTURE] Mode Menu • [METERING MODE], [I.EXPOSURE], and [DIGITAL ZOOM] are common to both the [REC] mode menu and [MOTION PICTURE] mode menu. Changing these settings in one of these menus is reflected in other menu. – For details, refer to the explanation for the corresponding setting in [REC] mode menu. For details on [MOTION PICTURE] mode menu settings, refer to P28. -
Page 126: [Wind Cut]
Advanced (Recording pictures) For details on [MOTION PICTURE] mode menu settings, refer to P28. This reduces the wind noise in the audio recording. Applicable modes: [OFF]/[LOW]/[STANDARD]/[HIGH] Note • Refer to P103 for details. Perform these settings if you need to. Using the [CUSTOM MENU] •... - Page 127 Select whether or not to display the exposure meter when the mode dial is switched to [OFF] [ON]: [EXPO.METER] This will set what will be fixed by the [AF/AE LOCK] button when taking a picture with fixed focus or exposure. [AE]: [AF/AE LOCK] [AF]:...
- Page 128 Advanced (Recording pictures) [PREVIEW HOLD] [PRE AF] About [ ] and [ ] will adjust the focus automatically when the jitter of the camera gets small. [ adjust the focus at all times (continuous AF operation). The camera will adjust the focus automatically, and the focus adjustment when the shutter button is pressed becomes faster.
- Page 129 It will set so no picture can be taken when it is out of focus. [OFF]: [FOCUS PRIORITY] [ON]: • If you set [OFF], be careful as the picture may not be properly focused even if [AFS] or [AFC] in Focus Mode is set.
- Page 130 Advanced (Recording pictures) REC AREA] • The recording area indicated is a guide line. [REMAINING DISP.] BUTTON] [DIAL GUIDE] • It will display dial operation guide to the screen that is possible to perform Exposure Compensation, Programme Shift, aperture setting, or shutter speed setting when set to [ON].
- Page 131 Dust reduction to blow off the debris and dust that have affixed to [SENSOR CLEANING] the rear of the imaging device is performed. • Dust reduction function will operate automatically when the camera is turned on, but you can use this function when you see dust. (P172) It is possible to setup so the shutter will not operate when there is no lens on the unit.
-
Page 132: Advanced (Playback)
• This unit was designed to play motion pictures and still pictures with audio using the QuickTime Motion JPEG and AVCHD Lite formats that were taken with this model (only). • Only [AVCHD Lite] motion pictures recorded with this unit and Panasonic digital cameras (LUMIX) can be played back with this unit as AVCHD Lite format. -
Page 133: Pictures With Audio
Press 2/1 to select a picture with the audio icon [ and then press 3 to play back. A Audio icon • Refer to [AUDIO REC.] (P124) and [AUDIO DUB.] (P147) for information about how to create still pictures with audio. Note •... -
Page 134: Using The [Playback] Mode Menu
“favourite” pictures, or pictures registered with face recognition as a slide show. To best enjoy this feature it’s recommended that you connect your digital camera to your TV set. Select [SLIDE SHOW] on the [PLAYBACK] mode menu. (P28) Press 3/4 to select the item and then press [MENU/SET]. - Page 135 Press 4 to finish the slide show. • Normal playback resumes after the slide show finishes. ∫ Operations performed during slide show The cursor displayed during playback is the same as 3/4/2/1. • The menu screen is restored when [‚] is pressed. A Play/Pause B Stop ¢...
-
Page 136: [Playback Mode]
Advanced (Playback) Playback in [NORMAL PLAY], [PICTURE PLAY], [AVCHD Lite PLAY], [MOTION JPEG PLAY], [CATEGORY PLAY] or [FAVORITE PLAY] can be selected. Select [PLAYBACK MODE] on the [PLAYBACK] mode menu. (P28) Press 3/4 to select the item and then press [MENU/SET]. -
Page 137: Ü [Favorite]
You can do the following if a mark has been added to pictures and they have been set as favourites. • Play back the pictures set as favourites only as a slide show. • Play back only the pictures set as favourites. ([FAVORITE PLAY]) •... -
Page 138: [Title Edit]
Advanced (Playback) You can add text (comments) to pictures. After text has been registered, it can be included in prints using [TEXT STAMP] (P139). (Only alphabetic characters and symbols can be entered.) Names set in [BABY1]/[BABY2] and [PET] in Scene Mode or [LOCATION] in Travel Date are also recorded as the titles. -
Page 139: [Text Stamp]
∫ Delete the title [SINGLE] setting In step , delete all the texts, select [EXIT], and press [MENU/SET]. Press [‚]. Press [MENU/SET] to close the menu. [MULTI] setting Select [EXIT] without entering text in step Press [MENU/SET] to close the menu. Note •... - Page 140 Advanced (Playback) Press 3/4/2/1 to select [SHOOTING DATE], [AGE], [TRAVEL DATE] or [TITLE] and then press [MENU/SET] to set each item. [SHOOTING DATE] [W/OTIME]: Stamp the year, month and date. [WITHTIME]: Stamp the year, month, day, hour and minutes. [AGE] (P92) If this is set to [ON], [AGE] is stamped on the pictures.
-
Page 141: Q [Resize] Reducing The Picture Size (Number Of Pixels)
Q [RESIZE] Reducing the picture size (number of pixels) We recommend resizing to [S] if you want to attach a picture to an e-mail or use it on a website. (Pictures set to the minimum number of pixels for [ASPECT RATIO] cannot be further reduced in size.) Select [RESIZE] on the [PLAYBACK] mode menu. -
Page 142: [Trimming]
Advanced (Playback) You can enlarge and then clip the important part of the recorded picture. Select [TRIMMING] on the [PLAYBACK] mode menu. (P28) Press 2/1 to select the picture, and then press [MENU/SET]. Use the rear dial and press 3/4/2/1 to select the parts to be trimmed. -
Page 143: [Aspect Conv.]
You can convert pictures taken with a [W] aspect ratio to a [Y], a [X] or a [ ratio. Select [ASPECT CONV.] on the [PLAYBACK] mode menu. (P28) Press 3/4 to select [Y], [X] or [ press [MENU/SET]. Press 2/1 to select a picture taken with [W] aspect ratio, and then press [MENU/SET]. -
Page 144: N [Rotate]/M [Rotate Disp.]
Advanced (Playback) This mode allows you to automatically display pictures vertically if they were recorded holding the camera vertically or rotate pictures manually in 90o steps. Rotate (The picture is rotated manually) Select [ROTATE] on the [PLAYBACK] mode menu. (P28) •... -
Page 145: [Print Set]
DPOF “Digital Print Order Format” is a system that allows the user to select which pictures to print, how many copies of each picture to print and whether or not to print the recording date on the pictures when using a DPOF compatible photo printer or photo printing store. For details, ask at your photo printing store. -
Page 146: P [Protect]
Advanced (Playback) Note • The number of prints can be set from 0 to 999. • With a printer supporting PictBridge, the date print settings of the printer may take precedence so check if this is the case. • It may not be possible to use the print settings with other equipment. In this case, cancel all the settings, and reset the settings. -
Page 147: B [Audio Dub.]
• Sound from motion pictures (When [REC MODE] is set to [MOTION JPEG]) or pictures with audio recorded by this camera cannot be played back by older models of Panasonic digital cameras (LUMIX) launched before July 2008. B [AUDIO DUB.]... -
Page 148: [Face Rec Edit]
Advanced (Playback) You can clear and replace all information relating to face recognition in selected images. Select [FACE REC EDIT] on the [PLAYBACK] Mode menu. (P28) Press 3/4 to select [REPLACE] or [DELETE] and then press [MENU/SET]. Press 2/1 to select the picture and then press [MENU/SET]. -
Page 149: Connecting To Other Equipment
Connecting to other equipment Playing Back Pictures on a TV Screen Playing back pictures using the AV cable (supplied) Preparations: Set the [TV ASPECT]. (P34) Turn this unit and the TV off. 1 Yellow: to the video input socket 2 White: to the audio input socket A Align the marks, and insert. -
Page 150: Playing Back Pictures On A Tv With An Sd Memory Card Slot
• Depending on the TV model, pictures may not be displayed on the full screen. • Motion pictures recorded with [AVCHD Lite] can be played back on Panasonic TVs (VIERA) with the AVCHD logo mark. In all other cases, connect the camera to the TV using the AV cable (supplied) and play back the motion picture. - Page 151 Playback using VIERA Link (HDMI) (HDAVI Control™) What is the VIERA Link? • This function allows you to use your remote control for the Panasonic TV for easy operations when this unit has been connected to a VIERA Link compatible device using a HDMI mini cable (optional) for automatic linked operations.
- Page 152 Connecting to other equipment Operate with the remote control for the TV. Panasonic TV compatible with VIERA Link ¢ The shape of the remote control varies depending on the region. Operate following the TV guide displayed on screen. ∫ Usable functions Operate with the remote control for the TV.
-
Page 153: Automatic Input Switching
• If you are unsure whether or not the TV you are using are compatible with VIERA Link, read the operating instructions for the devices. • Available linked operations between this unit and a Panasonic TV is different depending on the types of Panasonic TVs even if they are compatible with VIERA Link. Refer to the operating instructions of the TV for the operations that support on the TV. -
Page 154: Saving The Recorded Still Pictures And Motion Pictures
Connecting to other equipment Saving the recorded still pictures and motion pictures Methods to export still pictures and motion pictures to other devices will vary depending on the file format. (JPEG, RAW, AVCHD Lite, or Motion JPEG). Here are a few suggestions. Copy the playback image using an AV cable File formats that can be used: [AVCHD Lite], [Motion JPEG] Copy images played back with this unit to DVD disc, hard disk, or video using a DVD... -
Page 155: Copying To A Pc
File formats that can be used: [JPEG], [RAW]/[AVCHD Lite], [Motion JPEG] It is possible to acquire still pictures and motion pictures recorded in [AVCHD Lite] or [MOTION JPEG] formats, or create standard quality DVD video which is not high definition from the motion picture that was recorded as [AVCHD Lite], using the software “PHOTOfunSTUDIO 4.0 HD Edition”... - Page 156 Connecting to other equipment Acquiring of still pictures and [MOTION JPEG] motion pictures (other than [AVCHD Lite] motion pictures) Preparations: Turn on the camera and the PC. A USB connection cable (supplied) • Check the directions of the connectors, and plug them straight in or unplug them straight out. (Otherwise the connectors may be bent out of shape which may cause malfunction.) B Align the marks, and insert.
- Page 157 • Proceed with the hardware removal using “Safely Remove Hardware” on the task tray of the PC. If the icon is not displayed, check that [ACCESS] is not displayed on the LCD monitor of the digital camera before removing the hardware. Note •...
-
Page 158: Printing The Pictures
Connecting to other equipment Printing the Pictures If you connect the camera to a printer supporting PictBridge, you can select the pictures to be printed out and instruct that printing be started on the camera’s LCD monitor. Preparations: Turn on the camera and the printer. Perform the print quality and other settings at the printer before printing the pictures. -
Page 159: Selecting A Single Picture And Printing It
Selecting a single picture and printing it Press 2/1 to select the picture and then press [MENU/SET]. • The message disappears in about 2 seconds. Press 3 to select [PRINT START] and then press [MENU/SET]. • Refer to P160 for the items which can be set before starting to print the pictures. -
Page 160: Print Settings
Connecting to other equipment Select and set the items both on the screen in step “Selecting a single picture and printing it” and in step “Selecting multiple pictures and printing them” procedures. • When you want to print pictures on a paper size or a layout which is not supported by the camera, set [PAPER SIZE] or [PAGE LAYOUT] to [{] and then set the paper size or the layout on the printer. - Page 161 [4qk6q] 101.6 mmk152.4 mm [8qk10q] 203.2 mmk254 mm [LETTER] 216 mmk279.4 mm [CARD SIZE] 54 mmk85.6 mm • Paper sizes not supported by the printer will not be displayed. [PAGE LAYOUT] (Layouts for printing that can be set with this unit) Item Settings on the printer are prioritised.
-
Page 162: Others
• You can switch between LCD (LCD monitor) display and LVF (Viewfinder) display. • Switching via the [LVF/LCD] button will be maintained even when the power of the digital camera is turned [OFF]. ∫ To remove the optional external viewfinder... - Page 163 ∫ Diopter adjustment Adjust the diopter to suit your vision so that you can see the Viewfinder clearly. Look at the display on the Viewfinder and rotate the diopter adjustment dial to where the screen is clearest. A diopter adjustment dial B [LVF/LCD] ∫...
-
Page 164: Using An External Flash (Optional)
Others Others Using an external flash (optional) After attaching the external flash, the effective range will be increased when compared to the camera’s built in flash. Preparations: • Turn off the camera and close the built-in flash. • Remove the hot shoe cover that is attached to the camera. ∫... -
Page 165: Using The Protector/Filter (Optional)
• If you use commercially available external flashes with communication functions other than the dedicated one, they may not operate normally or they may be damaged. Do not use them. • Even if the external flash is turned off, the camera may enter the external flash mode when the external flash is attached. -
Page 166: Using The Remote Shutter (Optional)
Others “Neutral Density” • It is recommended to use the MC protector (DMW-LMC46; optional), the ND filter (DMW-LND46; optional), or the PL filter (DMW-LPL46; optional) with the 20 mm/F1.7 lens included in DMC-GF1C. • It is recommended to use the MC protector (DMW-LMC52; optional), the ND filter (DMW-LND52;... -
Page 167: Using The Ac Adaptor
Note • Do not use any other AC cables except the supplied one. • Do not use any other cables except a genuine Panasonic DC cable (DMW-DCC3; optional). If you use other DC cables, it may cause a malfunction. • The camera becomes warm during use. This is not a malfunction. -
Page 168: Screen Display/Optional External Viewfinder
Others • It is recommended to use a fully charged battery or AC adaptor when recording motion pictures. • If while recording motion pictures using the AC adaptor the power supply is cut off due to a power cut or if the AC adaptor is disconnected etc., the motion picture being recorded will not be recorded. - Page 169 ∫ In recording (after settings) 26 Flash output adjustment (P63) 27 2nd curtain synchro (P64) 28 Audio recording (P124) 29 Extra Optical Zoom (P49, 122) 30 Histogram (P59) 31 Travel date (P112) AF tracking operation (P43, 72) 32 Available recording time 33 White Balance Fine Adjustment (P79) 34 White Balance Bracket (P79) 35 My Colour Mode adjustment (P94)
- Page 170 Others ∫ In playback Playback mode (P50) Film Mode (P82) Protected picture (P146) Number of prints (P145) REC MODE (P100)/Recording quality (P100) Picture size (P117) Quality (P118) LCD mode (P33) Battery indication (P21) 10 Picture number/Total pictures 11 Elapsed playback time (P132): 12 Motion picture recording time (P132): 8m30s...
-
Page 171: Cautions For Use
Cautions for Use In the event of abnormal operation (e.g. if the unit emits smoke or an unusual smell), immediately stop operating the unit and consult the Panasonic Customer Care Centre on 132600. Take care not to drop or knock the unit or put a lot of pressure on it. - Page 172 Others ∫ About dirt on the image sensor This camera features an interchangeable lens system so dirt may get inside the camera body when changing lenses. Depending on the recording conditions, dirt on the image sensor may appear on the recorded picture. Do not change lenses where there is a lot of dust, and always attach the body cap when a lens is not attached to the camera, so that dirt or dust does not get inside the camera body.
- Page 173 • Do not press the lens with excessive force. • Do not leave the camera with the lens facing the sun as rays of light from the sun may cause it to malfunction. Also, be careful when placing the camera outside or near a window. •...
- Page 174 • Information including personal information may be altered or vanish due to erroneous operation, effect of static electricity, accident, malfunction, repair, or other handlings. Please note in advance that Panasonic is not liable in any way for any direct or indirect damage from the alteration or vanishing of information or personal information.
-
Page 175: Message Display
• Recorded data may be damaged or lost if the camera breaks down due to inappropriate handling. Panasonic will not be liable for any damage suffered due to loss of recorded data. • When you use a tripod, make sure the tripod is stable when this unit is attached to it. - Page 176 Others [CANNOT BE SET ON THIS PICTURE] • [TITLE EDIT], [TEXT STAMP] or [PRINT SET] cannot be set for pictures not based on the DCF standard. [MEMORY CARD ERROR FORMAT THIS CARD?] • This card has a format which is not recognised by the camera. >...
- Page 177 [THIS BATTERY CANNOT BE USED] • The battery cannot be recognised by the camera. > Use a genuine Panasonic battery. If this message is displayed even when a genuine Panasonic battery is used, contact the dealer or your nearest Service Centre.
-
Page 178: Troubleshooting
Others Troubleshooting First, try out the following procedures (P178–186). If the problem is not resolved, it may be improved by selecting [RESET] (P34) on the [SETUP] menu. The camera cannot be operated even when it is turned on. • The battery is not inserted correctly. (P24) •... - Page 179 The picture cannot be recorded. • Is the Mode Dial correctly set? • Is the card inserted? • Is there any memory remaining on the card? > Delete the pictures which are not necessary to increase the available memory. (P54) The shutter will not operate immediately when the shutter button is pressed.
- Page 180 Others The recorded picture looks rough. Noise appears on the picture. • Is the ISO sensitivity high or the shutter speed slow? (ISO sensitivity is set to [AUTO] when the camera is shipped. Therefore, when taking pictures indoors etc. noise will appear.) >...
- Page 181 > If motion picture recording stops during use of a card of at least “10MB/s” or if you use a card that has been formatted on a PC or other equipment, the data-writing speed is lower. In such cases, we recommend that you make a backup of the data and then format (P36) the card in this unit.
- Page 182 Others LCD monitor/optional external viewfinder The LCD monitor turns off although the camera is turned on. • The LCD monitor turns off when [AUTO LCD OFF] (P31) is selected for the [ECONOMY] mode. [This does not happen when using the AC adaptor (P167).] If the remaining battery power is low, it may take longer for the flash to be charged, and the time during which the LCD monitor is turned off may become longer.
- Page 183 • Is this a non-standard picture, a picture which has been edited using a PC or a picture which was taken by another make of digital camera? • Did you remove the battery immediately after picture-taking or did you take the picture using a battery with a low remaining charge? >...
- Page 184 > Connect the camera to the TV with the AV cable (supplied), or with the HDMI mini cable (optional), and then play back the motion pictures on the camera. (P149, 150) > Motion pictures recorded in [AVCHD Lite] can be played back on Panasonic televisions (VIERA) with the AVCHD logo.
- Page 185 The ends of the pictures are cut at printing. > When using a printer with a trimming or borderless printing function, cancel this function before printing. (For details, refer to the operating instructions for the printer.) > When you order photo studios to print pictures, ask the photo studio if the pictures can be printed with both ends.
- Page 186 Others The file numbers are recorded in ascending order. • If the battery was inserted or removed without first turning the camera’s power off, the folder and file numbers for the pictures taken will not be stored in the memory. When the power is then turned back on and pictures are taken, they may be stored under file numbers which should have been assigned to previous pictures.
-
Page 187: Available Recording Time
Others Number of Recordable Pictures and Available Recording Time • The number of recordable pictures and the available recording time are an approximation. (These vary depending on the recording conditions and the type of card.) • The number of recordable pictures and the available recording time varies depending on the subjects. - Page 188 Others Aspect ratio Picture size Quality 32 MB 64 MB 128 MB 256 MB 512 MB 1 GB Card 2 GB 1220 4 GB 2410 6 GB 3660 8 GB 4910 12 GB 7400 16 GB 9880 32 GB 19820 Aspect ratio Picture size Quality...
- Page 189 Aspect ratio Picture size Quality 32 MB 64 MB 128 MB 256 MB 512 MB 1 GB Card 2 GB 4 GB 6 GB 1060 8 GB 1420 12 GB 2150 16 GB 2870 32 GB 5760 Aspect ratio Picture size Quality 32 MB 64 MB...
- Page 190 Others Aspect ratio Picture size Quality 32 MB 64 MB 128 MB 256 MB 512 MB 1 GB Card 2 GB 4 GB 1720 6 GB 2620 8 GB 3500 12 GB 5290 16 GB 7050 32 GB 14160 Aspect ratio Quality 32 MB 64 MB...
- Page 191 ∫ Available recording time (when recording motion pictures) File format Recording quality setting 32 MB 64 MB Cannot be guaranteed in 128 MB 256 MB 512 MB 3 min 45 s 1 GB 7 min 20 s 2 GB 15 min Card 20 s 4 GB...
-
Page 192: Specifications
Others Specifications Digital Camera Body (DMC-GF1): Power Source: Power Consumption: Camera effective pixels: 12,100,000 pixels Image sensor: Digital zoom: Extra Optical Zoom: (Except for the maximum picture size for each aspect ratio) Focus: Shutter system: Burst recording Burst speed: Number of recordable... - Page 193 Flash: Built-in pop up flash GN 6 equivalent (ISO100 · m) Flash range: Approx. 40 cm to 7.0 m (When the 20 mm/F1.7 lens included in DMC-GF1C is mounted, [ISO AUTO] is set) Flash range: Approx. 1.0 m to 3.4 m (When the 14 –...
- Page 194 Operating temperature: 0 o C to 40 o C Operating humidity: AC Adaptor (Panasonic DE-A49C): Information for your safety Input: Output: Battery Pack (lithium-ion) (Panasonic DMW-BLB13E): Information for your safety Voltage/capacity : VQT2G62 NTSC/PAL Composite (Switched by menu) Audio line output (monaural) φ...
- Page 195 Interchangeable Lens (H-H020) “LUMIX G 20 mm/F1.7 ASPH.” Focal length: f=20 mm (35 mm film camera equivalent: 40 mm) Aperture type: 7 leaf shutters/iris diaphragm/circular diaphragm Aperture range: F1.7 Minimum aperture value: Lens construction: 7 elements in 5 groups (2 non-spherical lenses) In focus distance: 20 cm to ¶...
- Page 196 SDHC Logo is a trademark. • The “AVCHD”, “AVCHD Lite” and the “AVCHD”, • “AVCHD Lite” logo are trademarks of Panasonic Corporation and Sony Corporation. Manufactured under license from Dolby Laboratories. • Dolby and the double-D symbol are trademarks of Dolby Laboratories.