Table of Contents
Advertisement
Owner's Manual
Thank you for purchasing this Yamaha Digital Piano!
We recommend that you read this manual carefully so that you can fully take advantage of the advanced and
convenient functions of the instrument. We also recommend that you keep this manual in a safe and handy place
for future reference.
Before using the instrument, be sure to read "PRECAUTIONS" on pages 5–6.
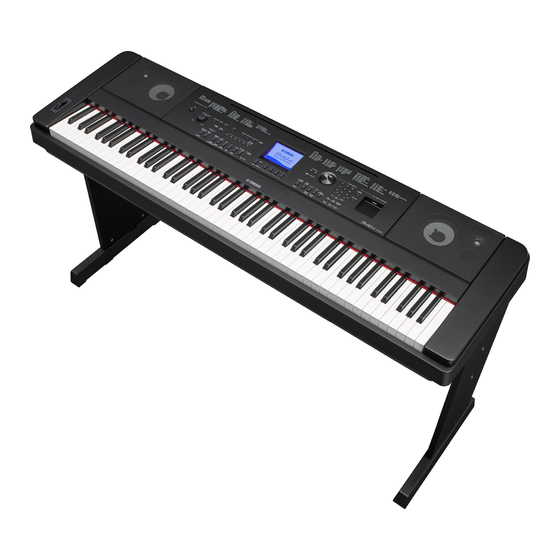
Keyboard Stand Assembly
For information on assembling the keyboard stand, refer to the instructions
on page 12 of this manual.
EN
Advertisement
Table of Contents

Related Manuals for Yamaha Portable Grand DGX-660


Summary of Contents for Yamaha Portable Grand DGX-660
- Page 1 Owner’s Manual Thank you for purchasing this Yamaha Digital Piano! We recommend that you read this manual carefully so that you can fully take advantage of the advanced and convenient functions of the instrument. We also recommend that you keep this manual in a safe and handy place for future reference.
-
Page 2: Special Message Section
This product should be used only with the components supplied and as regulated by the laws in your area. Note: Check with any or; a cart, rack, or stand that is recommended by Yamaha. If a retailer of household type batteries in your area for battery dis- cart, etc., is used, please observe all safety markings and instruc-... - Page 3 Yamaha Corporation of America or its subsidiaries. devices. Compliance with FCC regulations does not guarantee * This applies only to products distributed by YAMAHA CORPORATION OF AMERICA. (class B) DGX-660...
-
Page 4: Important Safety Instructions
(1) this device may not cause harmful interference, and (2) this device must accept any interference received, including interference that may cause undesired operation. (fcc_sengen) CAN ICES-3 (B)/NMB-3(B) • This applies only to products distributed by Yamaha Canada Music Ltd. • Ceci ne s’applique qu’aux produits distribués par Yamaha Canada Musique Ltée. (can_b_01) Explanation of Graphical Symbols... - Page 5 For AC adaptor WARNING CAUTION • This AC adaptor is designed for use with only Yamaha electronic instruments. Do • When setting up, make sure that the AC outlet is easily accessible. If some not use for any other purpose.
- Page 6 Yamaha cannot be held responsible for damage caused by improper use or modifications to the instrument, or data that is lost or destroyed. Always turn the power off when the instrument is not in use.
-
Page 7: Saving Data
• This product incorporates and bundles contents in which Yamaha owns copyrights or with respect to which Yamaha has license to use others' copyrights. Due to copyright laws and other relevant laws, you are NOT allowed to distribute media in which these contents are saved or recorded and remain virtually the same or very similar to those in the product. -
Page 8: About Manuals
Includes instructions on connecting this instrument to a computer, and operations related to transfer- ring files and MIDI data. To obtain these manuals, access the Yamaha Downloads, enter the model name for searching the desired files. Yamaha Downloads http://download.yamaha.com/ Online Material (for Yamaha Online members) Song Book (only in English, French, German and Spanish) Contains music scores for the preset Songs (excluding the Over View Demo Song and Songs 1–11) of... -
Page 9: Table Of Contents
Table of Contents About Manuals ..............8 Reference Included Accessories ............8 Compatible Format............10 Handy Performance Features Special Features Selecting a Reverb Type..........53 Selecting a Chorus Type..........53 Selecting a DSP Type ............54 Setting Up Panel Sustain ..............55 Pitch Controls—Transpose ..........55 Keyboard Stand Assembly Pitch Controls—Tuning ..........56 Pitch Controls—the PITCH BEND wheel .......56 Panel Controls and Terminals... -
Page 10: Compatible Format
XF file containing lyric data is played. Style File Format Guitar Edition “SFF (Style File Format)” is an original Style file format by Yamaha which uses a unique conver- sion system to provide high-quality automatic accompaniment based on a wide range of chord types. -
Page 11: Special Features
Amazingly Realistic and Dynamic Sounds Page 27 Yamaha’s authentic Voices (especially the highly acclaimed Live!, Sweet! and Cool! Voices) deliver incredibly natural and dynamic sound—with all the nuances of the original instrument, from delicate to powerful. Play Along with Styles Page 32 The DGX-660 also has complete and fully automatic accompaniment features with the Styles. -
Page 12: Setting Up
Setting Up Keyboard Stand Assembly CAUTION Read these cautions carefully before you assemble or use the keyboard stand. These cautions are to promote safe use of the stand and to prevent injury and damage from occurring to you and others. By fol- lowing these cautions carefully, your keyboard stand will provide you with safe and prolonged use. - Page 13 Keyboard Stand Assembly Metal bracket Metal bracket Metal bracket Metal bracket 3 x 8 mm 3 x 8 mm roundhead roundhead screws screws Attach the metal brackets. Attach the metal brackets to the top of the side boards, using the screws as shown.
- Page 14 Keyboard Stand Assembly Attach the back board. Attach the back board, using the screws . Check the back-to-front orientation for the side boards. Make sure the non-colored surface is facing down. 6 x 30 mm roundhead screws CAUTION • Be careful not to drop the back board or touch the sharp metal fittings.
- Page 15 Keyboard Stand Assembly Install the keyboard to the stand. Fix the keyboard to the angle brackets, using the screws 5 x 16 mm roundhead screws Post-assembly checklist Once you’ve assembled the stand, check the following points: • Are there any parts left over? ...
-
Page 16: Panel Controls And Terminals
Panel Controls and Terminals Front Panel Song category list Style category list Front Panel !4 STYLE ] (Standby/On) switch..... page 18 w [MASTER VOLUME] control ....page 19 [ACMP ON/OFF] button....page 32 e [DEMO/BGM] button ....pages 38, 66 [INTRO/ENDING/rit.] button ..... -
Page 17: Rear Panel
Panel Controls and Terminals Display (page 23) Voice category list Music Database category list !7 !8 @7 @8 @9 Rear Panel Rear Panel #2 CONTRAST knob .........page 23 #9 MIC INPUT jack ........page 69 #3 USB TO HOST terminal..pages 74, 76, 77 $0 DC IN jack .......... -
Page 18: Setting Up
Setting Up Power Requirements For the Power Adaptor with a Removable Plug WARNING Do not remove the plug from the power adaptor. If the • Use the specified adaptor (page 91) only. Using the wrong adaptor can result in damage to the instrument or over- plug is removed accidentally, slide the plug into place heating. -
Page 19: Setting The Volume
Setting Up Setting the Volume To adjust the volume level of the entire keyboard CAUTION sound, use the MASTER VOLUME control located at • Do not use the instrument for a long period of time at a high or uncomfortable volume level, since this can cause the left of the panel. -
Page 20: Connecting Headphones Or External Audio Equipment (Phones/Output Jack)
Setting Up Connecting Headphones or External Audio Equipment (PHONES/OUTPUT Jack) CAUTION • Before connecting the instrument to other electronic com- ponents, turn off the power of all the components. Also, before turning any components on or off, make sure to set all volume levels to minimum (0). -
Page 21: Connecting A Footswitch (Sustain Jack)
Setting Up Connecting a Footswitch (SUSTAIN Jack) Assigning specific functions to the pedal The function of the footswitch or the foot pedal con- nected to SUSTAIN jack can be changed from its default setting (Sustain). Press the [FUNCTION] button, press the CATE- GORY [r] or [f] button repeatedly until “Assign- The sustain function lets you produce a natural sustain able Pedal”... -
Page 22: Connecting A Pedal Unit (Pedal Unit Jack)
Setting Up Connecting a Pedal Unit (PEDAL UNIT jack) This jack is for connecting an LP-7A/LP-7AWH pedal unit (sold separately). When connecting the pedal unit, make sure to also assemble the unit on the sup- plied keyboard stand. NOTE • Make sure that power is off when connecting or disconnect- ing the pedal unit. -
Page 23: Main Display
MAIN Display When the power is turned on, the MAIN display automatically appears. This display shows the basic settings of the instrument, including the current Voice, Style, Song, Audio and other settings. To Return to the MAIN Display You can return to the MAIN display from any other display by pressing the [EXIT] button. CONTRAST knob Adjust the CONTRAST knob on the rear panel of the instrument for optimum display legibility. -
Page 24: Basic Controls
Basic Controls Before operating the instrument, it may be helpful to familiarize yourself with the basic controls below that are used to select items and change values. Dial CATEGORY buttons Rotate the dial clockwise to increase the value, or Use these buttons to jump to the first Voice, Style, or counterclockwise to decrease the value. -
Page 25: Basic Guide
Enjoying Piano Performance (Piano Room) Basic Guide The Piano Room function is for those who want to simply, conveniently, and fully enjoy playing the instrument as a piano. No matter what settings you’ve made from the panel, you can instantly call up the optimum settings for piano performance with a single but- ton press. -
Page 26: Recording Your Performance As Audio In The Piano Room
Enjoying Piano Performance (Piano Room) NOTE Recording your Performance • A moving series of dots (…) appear in the display when as Audio in the Piano Room recording setup takes a long time. If this happens, wait to play the keyboard until the dots are gone and the STOP button in the display flashes. -
Page 27: Try Playing A Variety Of Instrument Voices
Try Playing a Variety of Instrument Voices In addition to the wonderfully realistic piano sounds, you can select and play other musical instrument Voices, such as organ, guitar, bass, strings, sax, trumpet, drums and percussion, and even sound effects. Play the keyboard. Selecting a Main Voice This procedure selects the Main Voice for playing on the keyboard. -
Page 28: Layering Two Voices-Dual Voice
Try Playing a Variety of Instrument Voices Layering Two Voices—Dual Playing a Split Voice in the Left Voice Hand area In addition to the Main Voice, you can layer a differ- By dividing the keyboard into two separate areas, you ent Voice over the entire keyboard as a “Dual Voice.”... -
Page 29: Setting The Time Signature
Try Playing a Variety of Instrument Voices Setting the Time Signature Using the Metronome Here, we’ll set a time signature of 3/4 as an example. The instrument features a built-in metronome (a NOTE device that keeps an accurate tempo), convenient for •... - Page 30 Try Playing a Variety of Instrument Voices Rotate the dial to select “4.” Setting the Bell sound This allows you to select whether the click sound has a bell accent, or plays only a click sound. Press the [FUNCTION] button. Confirm the setting by playing the Met- Use the CATEGORY [r] or [f] button ronome.
-
Page 31: Adding Harmony
Try Playing a Variety of Instrument Voices Adding Harmony How to sound each Harmony Type You can add harmony notes to the Main Voice. Harmony type 01 to 10, 13 Press the [HARMONY ON/OFF] button to turn Harmony on. Press the right-hand keys while playing chords in the auto accompaniment range of the keyboard when the Auto Accompaniment is on (page 32). -
Page 32: Playing Styles
Playing Styles The instrument features a variety of accompaniment and rhythmic backing patterns (called “Styles”) in a variety of different musical genres including pop, jazz, and many others. Each Style features Auto Accompaniment, letting you produce automatic accompaniment playback simply by playing “chords” with your left hand. This lets you automatically recreate the sound of a full band or orchestra —... -
Page 33: Using The Music Database
Playing Styles Press the [SYNC START] button to turn You can add intro, ending and rhythm variations to Style playback by using “Sections.” For details, Synchro Start on. refer to page 61. Flashes when Synchro Start is on. Using the Music Database If you have difficulty finding and selecting the desired Style and Voice, use this feature. -
Page 34: Chords
Playing Styles Chords For users who are unfamiliar with chords, this chart shows the notes of common chords. Since there are many useful chords and many different ways to use them musically, refer to commercially available chord books for further details. ... -
Page 35: Using The Smart Chord Feature
Playing Styles Using the Smart Chord feature If you want to fully enjoy playing in various Styles but don’t know how to play the appropriate chords, Smart Chord is very useful. This function lets you control Styles with just a single finger as long as you know the key of your playing music, even if you don’t know any chord fingering such as major, minor, diminished and so on. - Page 36 Playing Styles TYPE Page: According to the music score or the This page provides five Types of music genres chord progression of your performance, which determine the specific chord assignment for play only the root key with the left hand. each scale note in the Auto Accompaniment Pressing a key will start playback of the Style.
-
Page 37: Calling Up Optimum Styles For Your Performance (Style Recommender)
Playing Styles Calling up Optimum Styles for Example 2: Play the following rhythm in Your Performance the special Drum section of the key- board. (Style Recommender) Snare This convenient function “recommends” optimum Styles for your performance, based on the rhythm you Kick play for one or two measures. -
Page 38: Playing Songs And Audio Files
Playing Songs and Audio Files There are two kinds of data that can be recorded and played back on this instrument: Songs and Audio files. Not only can you play back a Song or Audio file and listen to it, but you can also play the keyboard along with Song or Audio file playback. -
Page 39: Playing Back A Song Or Audio File
Playing Songs and Audio Files Playing Back a Song or Audio SONG SELECT display File SONG AUDIO Before using a USB flash drive, be sure to read “Pre- cautions when using the USB TO DEVICE terminal” on page 80. If you want to play back a Song or Audio file on a USB flash drive, connect a USB flash drive to the USB TO DEVICE termi- nal. -
Page 40: Fast Forward, Rewind, And Pause
Playing Songs and Audio Files When playback reaches to the point you Fast Forward, Rewind, and want to specify as the end point, press Pause the [A-B REPEAT] button again to set the B point. SONG AUDIO The specified A-B section of the Song will now play repeatedly. -
Page 41: Displaying The Song Score
Playing Songs and Audio Files Displaying the Song Score Displaying the Lyrics AUDIO AUDIO SONG SONG You can view the music notation (score) of the When the selected Song contains lyric data, you can selected Song. view it on the instrument’s display during playback. Select a Song (steps 1–3 on page 39). -
Page 42: Using The Song Lesson Feature
Using the Song Lesson Feature You can use the selected Song for a left-hand, right-hand, or both-hands lesson. Try practicing with these three Song Lesson types. Three Types of Song Lesson Practicing with Song Lesson Lesson 1—Waiting Select the desired Song for your lesson (page 39). -
Page 43: Making Practice Perfect-Repeat & Learn
Using the Song Lesson Feature Press the desired LESSON START but- When Lesson playback reaches the end, ton, [WAITING], [YOUR TEMPO] or check your evaluation Grade on the dis- [MINUS ONE] to start playback of the play. Song Lesson. Your performance will be evaluated in four levels: OK, Good, Very Good, or Excellent. -
Page 44: Recording Your Performance
Recording Your Performance This instrument allows you to record your performance in the following two methods. • Song recording (MIDI recording) With this method, recorded performances are saved to the instrument as a User Song, in SMF (format 0) MIDI file. - Page 45 Recording Your Performance Press the [+] (YES) button to save the NOTE Song. • You can use the Metronome while recording although the met- ronome sound will not be recorded. After pressing the [REC] The Song will be stored as a MIDI file to Song button, set the Time Signature and start Metronome before number 101–105.
-
Page 46: Recording To A Specified Track
Recording Your Performance Recording to a Specified Track AUDIO SONG With Song Recording, you can create a Song consist- Press and hold ing of six tracks (1–5 and A) by recording your per- formance to each track one by one. In recording a To record your keyboard performance, specify piano piece, for example, you can record the right- from [1] to [5]. - Page 47 Recording Your Performance Play the keyboard to start Recording. Record your performance to another track by repeating steps 2–6. In step 2, select a track which has no recorded data. Play the keyboard while listening to the already recorded data. You can record to each track [1]–[5] using differ- ent Voices.
-
Page 48: Clearing A User Song
Recording Your Performance Clearing a User Song Clearing a Specified Track from a User Song AUDIO SONG SONG AUDIO You can clear all tracks of a User Song. This lets you clear individual tracks from a User Song. Press the [SONG/AUDIO] button, and then select the User Song (101 to 105) to Press the [SONG/AUDIO] button, and be cleared. -
Page 49: Audio Recording
Recording Your Performance Press the [REC] button to be ready for Audio Recording recording. AUDIO SONG Before recording, make the necessary settings such as Voice/Style selection and the AUX IN and MIC INPUT connections (if you want to record with the input sound via AUX IN and MIC INPUT jacks). -
Page 50: Memorizing Your Favorite Panel Settings
Memorizing Your Favorite Panel Settings This instrument has a Registration Memory feature that lets you memorize your favor- ite settings for easy recall whenever they’re needed. Up to 32 complete setups can be saved (eight banks of four setups each). 8 Banks Up to 32 presets (eight banks of four each) can... -
Page 51: Recalling Panel Settings From The Registration Memory
Memorizing Your Favorite Panel Settings Recalling Panel Settings from Settings that are Saved to the Registration Memory the Registration Memory Style settings* Style number, Auto Accompaniment on/off, Split Point, Style Press and release the [BANK] button to settings (Main A/B), Style Volume, Tempo, Chord Fingering, Smart Chord on/off, Smart Chord Setting call up a Bank number on the display. -
Page 52: Backup Parameters And Initialization
Backup Parameters and Initialization Backup Parameters Initialization The following data will be maintained even if the This function erases the Backup data described above power is turned off and can be transferred then saved and Song/Style data, then restores all the default fac- to a computer via Musicsoft Downloader as a single tory settings. -
Page 53: Reference
Reference Handy Performance Features Selecting a Reverb Type Selecting a Chorus Type The Reverb effect lets you play with a rich concert The Chorus effect creates a thick sound that is similar hall type ambience. Although selecting a Style or to many of the same Voices being played in unison. -
Page 54: Selecting A Dsp Type
Handy Performance Features Selecting a DSP Type Use the dial to turn DSP on. DSP is an abbreviation of Digital Signal Processing. These range from reverb-like ambience effects to dis- Press the [EXIT] button to return to the MAIN tortion and other dynamic processing tools that let you display in order to check the DSP on/off status. -
Page 55: Panel Sustain
Handy Performance Features Panel Sustain Pitch Controls—Transpose This function adds sustain to the keyboard voices. Use The overall pitch of the instrument (except for the it when you want to add sustain to the voices at all Voices with name “*** Kit”) can be shifted up or times, regardless of footswitch operation. -
Page 56: Pitch Controls-Tuning
Handy Performance Features Pitch Controls—Tuning Pitch Controls—the PITCH BEND wheel The overall tuning of the instrument (except for the Voices with name “*** Kit”) can be shifted up or The PITCH BEND wheel can be used to add smooth down between 415.3 Hz and 466.2 Hz in approxi- pitch variations to notes you play on the keyboard. -
Page 57: Touch Response Sensitivity
Handy Performance Features Touch Response Sensitivity Selecting an EQ Setting for the Best Sound The keyboard of this instrument is equipped with a Touch Response feature that lets you dynamically and Five different master equalizer (EQ) settings are pro- expressively control the level of the Voices according vided to give you the best possible sound. -
Page 58: Setting The Output Gain Level
Handy Performance Features Setting the Output Gain Level Speaker On/Off Setting Output gain level for the PHONES/OUTPUT jack can You can set whether the sound of this instrument is be switched among three values: one suitable for a always output from its built-in speaker or not when a headphone and the other two for a connected external plug is inserted to the PHONES/OUTPUT jack. -
Page 59: Intelligent Acoustic Control (Iac)
Handy Performance Features Intelligent Acoustic Control (IAC) Setting IAC Depth IAC is a function which automatically adjusts and controls the sound quality according to the overall You can adjust the depth of the IAC effect. volume of the instrument. Even when the volume is low, it permits both low sounds and high sounds to be Press the [FUNCTION] button. -
Page 60: Voice Settings
Voice Settings Selecting a Dual Voice Voice Editing Hold down the [DUAL ON/OFF] button For each of the Main, Dual and Split Voices, you can edit the parameters such as volume, octave and depth for longer than a second to call up the of the Reverb and Chorus, allowing you to create new, “VOICE SELECT (DUAL)”... -
Page 61: Style (Auto Accompaniment) Functions
Style (Auto Accompaniment) Functions Style Variations—Sections Each Style consists of “Sections” that allow you to vary the arrangement of the accompaniment to match the per- formance you are playing. Intro Main Ending Fill-in Intro This is used for the beginning of the performance. When the Intro finishes, Style playback shifts to the Main section. - Page 62 Style (Auto Accompaniment) Functions Press the [MAIN/AUTO FILL] button to select Main A or Main B. Press the [INTRO/ENDING/rit.] button. The Section switches to the Ending. When the Ending is finished, Style playback stops automati- cally. You can have the Ending gradually slow Current Section down (ritardando) by pressing the [INTRO/END- ING/rit.] button again while the Ending is playing...
-
Page 63: Changing The Tempo
Style (Auto Accompaniment) Functions Changing the Tempo Adjusting the Volume of the Style A Style can be played at any tempo you desire—fast You can adjust the volume balance between Style or slow. playback and keyboard performance. Press the [TEMPO/TAP] button to call up Press the [FUNCTION] button. -
Page 64: Setting The Split Point
Style (Auto Accompaniment) Functions Setting the Split Point Setting the Chord Fingering The point on the keyboard that separates the left-hand There are three different Fingering Types which let range and the right-hand range of the keyboard is you specify the chord type for Style playback or use called the “Split Point.”... -
Page 65: Looking Up Chords Using The Chord Dictionary
Style (Auto Accompaniment) Functions Looking Up Chords Using the Chord Dictionary The Dictionary function is useful when you know the name of a certain chord and want to quickly learn how to play it. Playing range Chord Type range Chord Root range Highest key Press and hold the [MINUS ONE] button Notation of chord... -
Page 66: Song And Audio Settings
Song and Audio Settings Background Music (BGM) Playback Press the [DEMO/BGM] button to start playback. With the default setting, pressing the [DEMO/BGM] To stop playback, press the [DEMO/BGM] button button will play back only Overview Demo Song again. repeatedly. This setting can be changed so that, for example, all internal Songs are played, or all Songs and Audio files on a USB flash drive are played back, letting you use the instrument as a background music... -
Page 67: Tempo Setting Of The Song
Song and Audio Settings Tempo Setting of the Song Audio Volume This operation is same as that of the Style. Refer to NOTE page 63. • Audio volume can be adjusted while an Audio file is selected. Tap Start Press the [FUNCTION] button. This operation is same as that of the Style. -
Page 68: Changing The Voice Of The Song
Song and Audio Settings Changing the Voice of the Song Specifying the Channel for the Lesson Part You can change the Voice of Track 1 or 2 in the cur- rent Preset Song temporarily to any other desired When using external Songs (only SMF format 0 and Voice. -
Page 69: Connecting A Microphone And Singing Along With Your Performance
Connecting a Microphone and Singing Along with Your Performance By connecting a microphone to the MIC INPUT jack (standard 1/4” phone jack), you can enjoy singing along with your keyboard performance or with Song playback. The instrument outputs your vocals through the built-in speakers. You can enjoy the three preset settings by just selecting one of them according to the particular circumstances and your personal preferences, or you can create your own desired settings and save them. -
Page 70: Selecting A Preset Setting
Connecting a Microphone and Singing Along with Your Performance Selecting a Preset Setting Making and Saving the Micro- phone Settings Press the [MIC SETTING] button once or twice to call up the MIC SETTING 1 dis- This section explains how to make and save the play. -
Page 71: Calling Up The Microphone Settings Saved To User
Connecting a Microphone and Singing Along with Your Performance MIC SETTING 1 display Press the [EXECUTE] button to save the MIC ON/ settings. Turns the microphone sound on or off. OFF* The save confirmation message will appear on the INPUT Indicates the input level. -
Page 72: The Functions
The Functions The “Functions” provide access to a range of detailed instrument parameters such as Tuning, Split Point, Voices and Effects. Take a look at the Function List (pages 73–75). When you find the desired Function you want to change, follow the instructions below. Find the desired item in the Function Use the dial, the [+] and [-] buttons, or List on pages 73–75. -
Page 73: Function List
The Functions Function List Category Function Range/Settings Default Value Description Style Volume 000–127 Refer to page 63. Song Volume 000–127 Refer to page 67. Audio Volume 000–127 Determines the volume of the Audio file. Volume Wireless LAN 000–127 Determines the volume of the Wireless LAN Audio. Volume Determines the volume of the sound input via the AUX IN AUX IN Level... - Page 74 The Functions Category Function Range/Settings Default Value Description Reverb Type 01–42 Refer to page 53. Chorus Type 01–45 Refer to page 53. ON/OFF Refer to page 54. DSP Type 001–239 Refer to page 54. Damper Resonance ON/OFF Refer to page 21. Sustain ON/OFF Refer to page 55.
- Page 75 The Functions Category Function Range/Settings Default Value Description Time Signature - 1–60 Determines the time signature of the Metronome. Numerator Time Signature - 2/4/8/16 Determines the length of each metronome beat. Metronome Denominator (page 29) Determines whether a bell accent will be sounded (ON) or Bell ON/OFF not (OFF).
-
Page 76: Connections - Using Your Instrument With Other Devices
Connections – Using Your Instrument with Other Devices – To see where the connectors are located on the instrument, refer to pages 16, 17. CAUTION • Before connecting the instrument to other electronic components, turn off the power of all the components. Also, before turn- ing any components on or off, make sure to set all volume levels to minimum (0). -
Page 77: Connecting To An Iphone/Ipad (Usb To Device, Usb To Host Terminals)
“Airplane Mode” to “ON” then set “Wi-Fi” to “ON” on your iPhone/iPad in order to avoid noise caused by communication. • Certain applications may not be supported in your area. Please check with your Yamaha dealer. DGX-660 Owner’s Manual... - Page 78 Connections – Using Your Instrument with Other Devices – Use the CATEGORY [r] or [f] button Infrastructure Mode to select “Wireless LAN.” Network list NOTE Network list Select your personal network from this list to con- • When “Wireless LAN” cannot be found even though the nect automatically, or input the desired one manu- USB wireless LAN adaptor has been connected, turn the ally.
- Page 79 Connections – Using Your Instrument with Other Devices – Access Point Mode DETAIL Set detailed parameters from the pages below. Page 1/2: For setting the IP address and other related parameters. Page 2/2: For entering the Host name or show- ing MAC address, etc.
-
Page 80: Usb Flash Drive Operations
USB flash drive. The instrument does not necessarily support all commercially available USB devices. Yamaha can- Maximum number of USB flash drive allowed Only one USB flash drive can be connected to the not guarantee operation of USB devices that you purchase. -
Page 81: Connecting A Usb Flash Drive
USB Flash Drive Operations Connecting a USB Flash Drive Calling up the FILE CONTROL display Pressing the [FILE CONTROL] button while the USB Connect a USB flash drive to the USB flash drive is connected to the USB TO DEVICE termi- TO DEVICE terminal, being careful to nal calls up the FILE CONTROL display. -
Page 82: Formatting A Usb Flash Drive
USB Flash Drive Operations Formatting a USB Flash Drive Press the [EXIT] button to exit from the The Format operation lets you prepare commercially available USB flash drive for use with this instrument. FILE CONTROL display. NOTICE • If a USB flash drive that contains data is formatted as described below, the data will be erased. -
Page 83: Saving A Registration Memory To Usb Flash Drive
USB Flash Drive Operations Saving a Registration Memory to USB Flash Drive Change the file name as necessary. This operation saves a Registration Memory to a USB flash drive device. The file name will have a “.usr” Entering Characters extension which does not appear in the instrument’s The [-] button moves the cursor to the left, and the display. -
Page 84: Saving A User Song To Usb Flash Drive
USB Flash Drive Operations Saving a User Song to USB Flash Drive Press the [EXECUTE] button. This operation saves a User Song (Song numbers 101–105) to USB flash drive. A cursor will appear below the first character in the file name. Press the [FILE CONTROL] button to call up the FILE CONTROL display. -
Page 85: Converting A User Song To An Audio File
USB Flash Drive Operations Converting a User Song to an Audio file Press the [EXECUTE] button. This operation converts a User Song (Song numbers 101–105) to an Audio file and saves the file to the A confirmation message will appear. To cancel the USB flash drive. -
Page 86: Loading Files From A Usb Flash Drive
USB Flash Drive Operations Loading Files from a USB Flash Drive Press the [EXECUTE] button again, or Registration Memory, Style file and Song file (SMF) residing on a USB flash drive can be loaded into the the [+] (YES) button to execute the Load instrument. -
Page 87: Deleting Files From A Usb Flash Drive
USB Flash Drive Operations Deleting files from a USB Flash Deleting User Data from the Drive Instrument This procedure deletes Registration Memory, Style This procedure deletes User Song files as well as file, Song file and Audio file from a USB flash drive. Style and Song files loaded or transferred from an external device such as a computer. -
Page 88: Appendix
Appendix Troubleshooting For the Instrument Problem Possible Cause and Solution When the instrument is turned on or off, a popping This is normal and indicates that the instrument is receiving electrical sound is temporarily produced. power. The power is automatically turned off. This is normal and due to the Auto Power Off function. -
Page 89: Messages
Messages LCD Message Comment Access error! Indicates the failure in reading or writing from/to the media or the flash memory. Clearing all memory... Displayed while erasing all data in the flash memory. Never turn the power off during data transmission. Data Error! Displayed when the Song or Style contains illegal data. -
Page 90: Specifications
WAV (44.1 kHz, 16 bit, stereo) Recorder/Player Data Format Recording WAV (44.1 kHz, 16 bit, stereo) Registration Number of Buttons 4 (x 8 banks) Memory Yamaha Education Suite Waiting, Your tempo, Minus one, Repeat & Learn, Chord Lesson (Y.E.S.) Dictionary Demo Functions Metronome Tempo... - Page 91 • Wireless MIDI Adaptor: UD-BT01 * The contents of this manual apply to the latest specifications as of the printing date. To obtain the latest manual, access the Yamaha website then download the manual file. Since specifications, equipment or separately sold accessories may not be the same in every locale, please check with your Yamaha dealer.
-
Page 92: Index
Index Symbols Functions ........72 [-] and [+] buttons Random Playback ......24 ......66 Recording (Audio) ...... 49 Half Pedal ........22 Recording (Piano Room) .... 26 Harmony ........31 A-B Repeat ........40 Recording (Song Track) ..... 46 Headphones ........20 Access Point mode .... - Page 93 IMPORTANT NOTICE FOR THE UNITED KINGDOM Connecting the Plug and Cord IMPORTANT. The wires in this mains lead are coloured in accordance with the following code: BLUE : NEUTRAL BROWN : LIVE As the colours of the wires in the mains lead of this apparatus may not correspond with the coloured makings identifying the terminals in your plug proceed as follows: The wire which is coloured BLUE must be connected to the terminal...
- Page 95 For details of products, please contact your nearest Yamaha representative or the authorized distributor listed below. MALTA CYPRUS NORTH AMERICA Olimpus Music Ltd. Nakas Music Cyprus Ltd. CANADA Valletta Road, Mosta MST9010, Malta Nikis Ave 2k Yamaha Canada Music Ltd.
- Page 96 Yamaha Global Site http://www.yamaha.com/ Yamaha Downloads http://download.yamaha.com/ Manual Development Department © 2015 Yamaha Corporation Published 10/2015 POGR*.*-**A0 Printed in Indonesia ZS39130...