Yamaha MZ300 Owner's Manual
Hide thumbs
Also See for MZ300:
- Service manual (20 pages) ,
- Owner's manual (140 pages) ,
- Service manual (118 pages)

Related Manuals for Yamaha MZ300


Summary of Contents for Yamaha MZ300
- Page 1 Multi-Purpose Engine OWNER’S MANUAL Read this manual carefully before operating this machine. MZ300 LIT-19626-01-80 7VB-F8199-10...
- Page 2 Read this manual carefully before operating this machine. This manual should stay with this machine if it is sold.
-
Page 3: Lit-19626
INTRODUCTION Congratulations on your purchase of your new Yamaha. This manual will provide you with a good basic understanding of the operation and maintenance of this machine. If you have any questions regarding the operation or maintenance of your machine, please consult a Yamaha dealer. - Page 4 If there is any question concerning this man- ual, please consult a Yamaha dealer. A TIP provides key information to make 9 This manual should be considered a procedures easier or clearer.
-
Page 5: Table Of Contents
DESCRIPTION ........6 EXHAUST EMISSION CONTROL CONTROL FUNCTION ......7 SYSTEM AND COMPONENTS ... 34 Engine switch ........7 Yamaha Motor Corporation USA, Spark Ignited Small Off-Road Oil warning light (red) ......7 Equipment (SORE) Limited and Fuel tank cap ........7 EPA Emissions Warranty .... -
Page 6: Safety Information
SAFETY INFORMATION 9 Do not allow children to operate the multi-purpose engine. 9 Do not place any obstacles on the multi-purpose engine. Exhaust fumes are poisonous 9 Never operate the engine in a closed area or it may cause unconsciousness and death within a short time. -
Page 7: Engine And Muffler May Be Hot
9 When refueling, do not place the fuel tank cap near the muffler. 9 Take care not to spill fuel. 9 When operating or transporting the machine, be sure it is kept upright. If it tilts, fuel may leak from the carburetor or fuel tank. -
Page 8: Electric Shock Prevention
9 Do not operate the engine with a dust cover or other objects covering it. 9 When covering the multi-purpose engine, be sure to do so only after the engine and muffler have completely cooled down. Electric shock prevention 9 Never operate the engine in rain or snow. 9 Never touch the machine with wet hands or elec- trical shock will occur. -
Page 9: Location Of Important Labels
LOCATION OF IMPORTANT LABELS Please read the following labels carefully before oper- ating this machine. Maintain or replace safety and instruction labels, as necessary. 1 MZ300A 7CN-F4162-40 2 MZ300A – 4 –... - Page 10 2 MZ300K This spark ignition system meets all re- quirements of the Canadian Interference Causing Equipment Regulations. Ce système d'allumage respecte toutes les exigences sur le matériel brouilleur du Canada. 7CC-H2377-50 – 5 –...
-
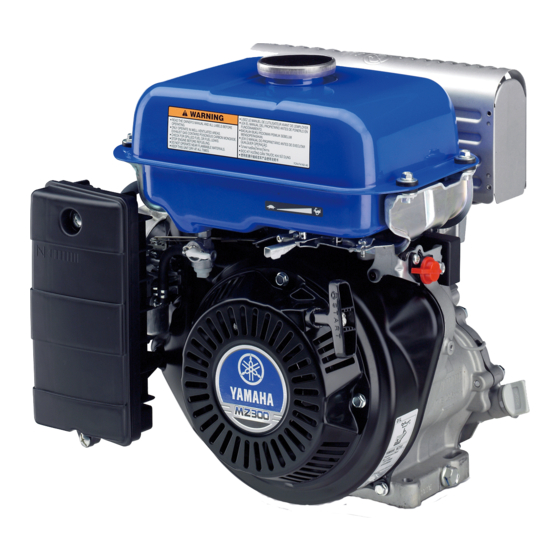
Page 11: Description
DESCRIPTION 1 Fuel tank cap 2 Fuel tank 3 Throttle lever 4 Recoil starter handle 5 Fuel cock lever 6 Fuel cock cup 7 Air filter case cover 8 Choke lever 9 Spark plug 0 Muffler q Oil warning light (red) w Engine switch e Oil filler cap r Oil drain bolt... -
Page 12: Control Function
CONTROL FUNCTION Engine switch The engine switch controls the ignition system. 1 “ON” Ignition circuit is switched on. The engine can be started. 2 “OFF” Ignition circuit is switched off. The engine will not run. Oil warning light (red) When the oil level falls below the lower level, the oil warning light comes on and then the engine stops automatically. -
Page 13: Fuel Cock Lever
Fuel cock lever The fuel cock supplies fuel from the fuel tank to the carburetor. The fuel cock has two positions. 1 ON With the lever in this position, fuel flows to the carbu- retor. Normal using is done with the lever in this posi- tion. -
Page 14: Throttle Lever
Throttle lever Throttle lever controls the engine speed. 1 “ ” Lever position to idle the engine. Decrease engine speed. 2 “ ” Increase engine speed. – 9 –... -
Page 15: Preparation
PREPARATION Fuel WARNING 9 Fuel is highly flammable and poisonous. Check “SAFETY INFORMATION” (See page 1) carefully before filling. 9 Do not fill the fuel above the red line, other- wise it may overflow when the fuel warms up and expands. 9 After fill the fuel, make sure the fuel tank cap is tightened securely. - Page 16 Fuel tank capacity: Total: 5.5 L (1.45 US gal, 1.21 Imp gal) Your Yamaha engine has been designed to use regu- lar unleaded gasoline with a pump octane number ((R + M)/2) of 86 or higher, or research octane number of 91 or higher.
-
Page 17: Engine Oil
Engine oil NOTICE The multi-purpose engine has been shipped with- out engine oil. Do not start the engine until you have filled it with the sufficient engine oil. 1. Place the multi-purpose engine on a level surface. 2. Remove the oil filler cap. 1 Oil filler cap 3. -
Page 18: Pre-Operation Check
9 Check oil level in engine. 9 If necessary, add recommended oil to specified level. 9 Check multi-purpose engine for oil leakage. The point where abnormality was recognized by 9 Check operation. 9 If necessary, consult a Yamaha dealer. – 13 –... -
Page 19: Operation
OPERATION WARNING Never operate the engine in a closed area or it may cause unconsciousness and death within a short time. Operate the engine in a well ventilated area. NOTICE The multi-purpose engine has been shipped with- out engine oil. Do not start the engine until you have filled it with the sufficient engine oil. - Page 20 4. Turn the engine switch to “ON”. 3 “ON” 5. Pull the recoil starter slowly until it is engaged, then pull it briskly. 6. After the engine starts, warm up the engine enough so that the engine does not stop when the choke lever is returned to the original position.
-
Page 21: Stopping The Engine
Stopping the engine 1. Move the throttle lever fully to “ ” 2. Turn the engine switch to “OFF”. 1 “OFF” 3. Turn the fuel cock lever to OFF. 2 OFF – 16 –... -
Page 22: Periodic Maintenance
WARNING If you are not familiar with maintenance work, have a Yamaha dealer do it for you. Maintenance chart WARNING Stop the engine before starting maintenance work. - Page 23 *1·····The air filter element needs to be cleaned more frequently when using in unusually wet or dusty areas. ·····Since these items require special tools, data and technical skills, have a Yamaha dealer per- form the service. – 18 –...
-
Page 24: Spark Plug Inspection
Spark plug inspection The spark plug is an important engine component, which should be checked periodically. 1. Remove the spark plug cap and the spark plug. 2. Check for discoloration and remove the carbon. The porcelain insulator around the center elec- trode of spark plug should be a medium-to-light tan color. -
Page 25: Carburetor Adjustment
Carburetor adjustment The carburetor is a vital part of the engine. Adjusting should be left to a Yamaha dealer with the professional knowledge, specialized data, and equipment to do so properly. Engine oil replacement WARNING Avoid draining the engine oil immediately after stopping the engine. - Page 26 6. Add engine oil to the correct level. 5 Correct Level NOTICE Be sure no foreign material enters the crankcase. 700-006a 0˚C 25˚C Recommended engine oil: YAMALUBE 4 (10W-40), A YAMALUBE 4 (10W-40) SAE 10W-30 or 10W-40 SAE #30 D SAE 10W C SAE #20 B SAE #30 SAE #20...
-
Page 27: Air Filter
Air filter 1. Remove the screws, and then remove the air filter case cover. 1 Screw 2 Air filter case cover 2. Remove the foam element. 3 Foam element 3. Wash the foam element in solvent and dry it. WARNING Never use solvent while smoking or in the vicinity of an open flame. -
Page 28: Spark Arrester
Spark arrester WARNING The engine and muffler will be very hot after the engine has been run. Avoid touching the engine and muffler while they are still hot with any part of your body or clothing during inspection or repair. 1. - Page 29 6. Install the spark arrester. Align the spark arrester lump with the hole in the muf- fler pipe. 3 Spark arrester lump 4 Hole 7. Install the screw, and then tighten the screw. – 24 –...
-
Page 30: Fuel Cock
Fuel cock WARNING Never use the gasoline while smoking or in the vicinity of an open flame. 1. Stop the engine. 2. Turn the fuel cock lever to OFF. 1 OFF 3. Remove the fuel cock cup, gasket and fuel strain- 2 Fuel cock cup 3 Gasket 4 Fuel strainer... -
Page 31: Fuel Tank Filter
Fuel tank filter WARNING Never use the gasoline while smoking or in the vicinity of an open flame. 1. Remove the fuel tank cap and fuel tank filter. 1 Fuel tank cap 2 Fuel tank filter 2. Clean the fuel tank filter with gasoline. Replace it if damaged. -
Page 32: Storage
STORAGE Long term storage of your machine will require some preventive procedures to guard against deterioration. Drain the fuel 1. Turn the engine switch to “OFF”. 1 “OFF” 2. Remove the fuel tank cap and fuel tank filter. Extract the fuel from the fuel tank into an approved gasoline container using a commercially available hand siphon. - Page 33 5. Start the engine and leave it run until it stops. The engine stops in approx. 20 mins. time by run- ning out of fuel. Duration of the running engine depends on the amount of the fuel left in the tank. 6.
-
Page 34: Engine
Engine Perform the following steps to protect the cylinder, pis- ton ring, etc. from corrosion. 1. Remove the spark plug, pour about one table- spoon of SAE 10W-30 or 20W-40 motor oil into the spark plug hole and reinstall the spark plug. Recoil start the engine by turning over several times (with ignition off) to coat the cylinder walls with oil. -
Page 35: Troubleshooting
2 Engine switch to “ON” and pull the recoil starter. 2 “ON” Poor spark 2 Spark plug dirty with carbon or wet ..Remove carbon or wipe spark plug dry. 2 Faulty ignition system ..Consult a Yamaha deal- – 30 –... - Page 36 Clean the spark hand while testing. adjust gap. plug. Does not spark Clean Check the following. O Clogged 9 Fuel line clogging replace. S Engine does not start. 9 Air filter element clogging. Consult a Yamaha dealer. – 31 –...
-
Page 37: Specifications
SPECIFICATIONS Dimensions Unit MZ300A MZ300K Overall length mm (in) 387 (15.24) 404 (15.91) Overall width mm (in) 426 (16.77) 416 (16.38) Overall height mm (in) 464 (18.27) 294.5 (11.59) Dry weight kg (lb) 26 (57) 21 (46) Engine Unit MZ300A MZ300K Type Air cooled 4-stroke gasoline... -
Page 38: Consumer Information
PRI-I.D. NUMBER: Record your Primary I.D., and serial num- bers in the spaces provided, to assist you MODEL in ordering spare parts from a Yamaha dealer. PRI-I.D. Also record and keep these I.D. numbers in a separate place in case your machine SERIAL No. -
Page 39: Exhaust Emission Control System And Components
ROAD ENGINES. The acronyms conform to the latest version of the SAE’s recommended practice docu- ment J1930, “Diagnostic Acronyms, Terms, and Definitions For Electrical/Electronic System”. It is recommended that these items be serviced by a Yamaha dealer. – 34 –... -
Page 40: Yamaha Motor Corporation Usa
Small Off Road Engines, hereafter called SORE engines, purchased from an authorized Yamaha SORE engine dealer in the continental United States and Canada will be free from defects in material and workmanship for the period of time stated herein, subject to certain stated limitations. - Page 41 An approved Yamaha SORE engine repair station may be found by phoning 1-866-788- 7398 (USA citizen) 1-866-788-7397 (Canadian citizen) Warranty Transfer: To transfer the warranty from the original purchaser to any subsequent purchaser(s), please contact 1-866-788-7398 (USA citizen) 1-866-788-7397 (Canadian citizen) to find out the necessary procedures. In no case will the warranty be extended beyond the original period.
-
Page 42: Yamaha Outdoor Power
Yamaha cannot deny warranty solely for the lack of receipts. As the outdoor power equipment owner, you should however be aware that Yamaha may deny you warranty coverage if your outdoor power equipment or the part has failed due to abuse, neglect, improper maintenance or unapproved modifications. -
Page 43: Yamaha Motor Corporation
MANUFACTURER’S WARRANTY COVERAGE The 2008 and later SORE engines are warranted for two years. If any emissions-related part on your engine is defective, the part will be repaired or replaced by Yamaha. OWNER’S WARRANTY RESPONSIBILITIES • As the SORE engine owner, you are responsible for the performance of the required maintenance listed in your owner’s manual. - Page 44 Designed, built, and equipped so as to conform, at the time of sale, with all applicable regulations adopted by the California Air Resources Board, and All warranted parts are free from defects in material and workmanship for the warranty period of the SORE engine or the period prior to the first scheduled replacement point of the warranted part as required by the maintenance schedule, if applicable, whichever is less.
- Page 45 (8) Throughout the emissions warranty period defined in Subsection (b)(2), the manufacturer must maintain a supply of warranted parts sufficient to meet the expected demand for such parts. (9) Any replacement part may be used in the performance of any warranty maintenance or repairs and must be provided without charge to the owner.
- Page 46 Yamaha Motor Corporation, U.S.A. will repair or replace any warranted part deemed defective by Yamaha during the scope of the warranty without charge to the owner, including parts, labor, and diagnosis. This work must be done at an authorized Yamaha dealer.
- Page 47 (see your Owner’s Manual). Use of parts which are not qualitatively equivalent to genuine Yamaha parts, improper service, or lack of required maintenance which causes failure of a warranted part may constitute abuse and/or improper service, thereby invalidating warranty liability hereunder.
- Page 50 PRINTED IN CHINA 2012.08×1 !