Table of Contents
Advertisement
Quick Links
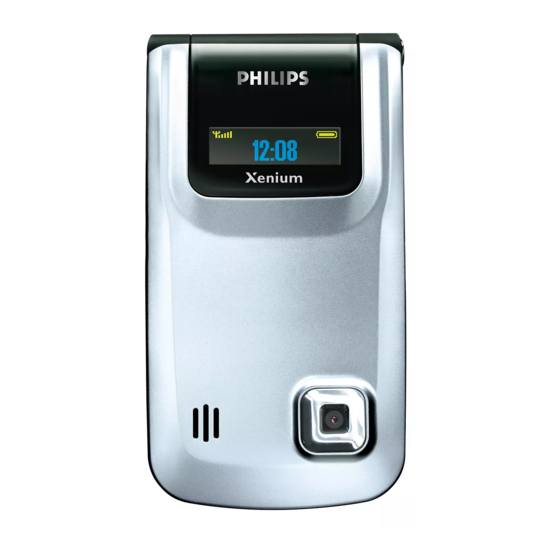
Discover Your Phone
Loudspeaker
Navigation keys
Left softkey
Volume side keys
Pick up key
Micro SD card
slot
How to...
Switch the phone
On/Off
Camera lens
Enter your PIN
code
262K Color
TFT LCD
Make a call
End a call
Answer a call
Right softkey
Hang up, cancel
Activate/deactivate
and on/off key
the loudspeaker
Silent an incoming
Alphanumeric
keypad
call
Mini USB
connector for
headset, charger,
and data cable
Microphone
)
Long press
.
Enter your PIN code using
,
the keypad and press
to confirm.
Enter the phone number
using the keypad and press
(
.
)
Press
.
When the phone rings, press
(
.
When there is an incoming
(
call, long press
.
When the phone rings, press
c
or the volume side keys.
C
or
Advertisement
Table of Contents

Related Manuals for Philips Xenium CT9A9R


Summary of Contents for Philips Xenium CT9A9R
-
Page 1: Discover Your Phone
Discover Your Phone Loudspeaker Navigation keys Left softkey Volume side keys Pick up key Micro SD card slot How to... Switch the phone On/Off Camera lens Enter your PIN code 262K Color TFT LCD Make a call End a call Answer a call Right softkey Hang up, cancel... - Page 2 Reject a call When the phone rings, press or long press the volume side keys. Adjust the Press up or down volume conversation side keys to adjust the volume volume during a call. Set the ringer When the phone is in idle volume mode, long press volume side keys to adjust the ring...
-
Page 3: Main Menu
Softkeys The left and right soft keys ( at the top of keypad area. Pressing the soft keys allows you to select the option displayed on the screen directly above them, including options during a call. The functions of the soft keys change according to the current context. -
Page 4: How To Use This Manual
Press Back to return to the previous menu. How to use this manual This user manual strives to provide you with concise and complete information regarding your Philips XRazr phone. The current section presents an Discover your phone... -
Page 5: Table Of Contents
1. Getting Started ... 7 Inserting the SIM card ... 7 Switching on the phone ... 9 Switching off the phone ... 9 Charging the battery ... 9 Setting Hotkeys ... 10 2. Calling ... 11 Make a call ... 11 Make an international call ... - Page 6 MMS (network dependent) ... 37 Inbox ... 38 Outbox ... 39 My favourites ... 40 Draft ... 42 SIM archive ... 42 Templates ... 42 Voice mailbox ... 42 Cell broadcast ... 43 Message Settings ... 44 9. My Files ...
- Page 7 Troubleshooting ... 83 Philips Authentic Accessories ... 85 Trademark Declaration ... 86 SPECIFIC ABSORPTION RATE INFORMATION ... 87 Limited warranty ... 89 Declaration of conformity ... 92...
-
Page 8: Getting Started
1. Getting Started Please read the safety instructions in the “Precautions” section before use. Before you start using your phone, you must insert a valid SIM card supplied by your GSM operator or retailer. The SIM card contains your subscription information, your mobile telephone number, and a small quantity of memory in which you can store phone numbers and messages (for more information,... - Page 9 Insert the SIM card Make sure that the clipped corner of the SIM card is facing the correct direction (clipped corner at upper left) and the metallic contacts are facing downwards. Slide the SIM card into the card slot until it stops. When you remove your SIM card from its holder, make sure that you smoothen the edges, otherwise you may have difficulty sliding the card into the SIM...
-
Page 10: Switching On The Phone
When the phone is switched on without a SIM card, users can access the main menu by pressing or make SOS emergency number via Switching on the phone To switch on the phone, long-press the Enter the PIN code if required (the 4 to 8 digit secret code of your SIM card). -
Page 11: Setting Hotkeys
The battery symbol indicates the state of charge. During charging, the charge indicators will scroll; it takes around 2.5 hours to fully charge the battery. When all the scroll bars are steady, the battery is fully charged. You can then disconnect the charger. Depending on the network and condition of use, talk time and stand-by time can go up to 8.5 hours* and 30 days* respectively. -
Page 12: Calling
2. Calling Make a call You can make a call only when the network name appears on the screen. If there is no network name on the screen, you need to reregister. From the idle screen In idle mode, enter the phone number using the keypad. -
Page 13: Call Handsfree
Call handsfree For your own comfort and safety, ensure you move the phone away from your ear when calling handsfree, especially when increasing the volume. In idle mode, enter the phone number using the keypad or select a contact in the phonebook. Press Options then select and press... -
Page 14: Handling A Second Call
There is no limit to the length of the recording; the recording will stop only when you press the recording, when there is insufficient memory, or when the call has ended. Other options during a call Press Options to be able to perform the following tasks while a call is ongoing: •... -
Page 15: Fotocall
Fotocall This feature allows you to link a contact in your phonebook to a photo you have taken using the Camera function, or a picture you have downloaded via WAP or data cable. During a call, if the other party's name card is linked to a picture, the incoming call background will display the corresponding picture. -
Page 16: Text And Number Entry
3. Text and number entry Input method Your mobile phone supports several input methods, which include: • T9 Pinyin: Enter chinese characters with T9 Pinyin; • T9 Traditional Chinese Zhuyin: Enter Traditional Chinese characters with T9 Zhuyin; • T9 Stroke: Enter Chinese characters with T9 wubi and stroke components;... -
Page 17: Entering Symbols
or deactivate T9. Short press punctuations or long press to select input language. Entering symbols In any input mode, press to open/close symbols input screen. If the symbols occupy more than one screen, press to scroll up/down the pages. press ok to confirm the symbol input. Shift case Press to shift case in the English input editor. -
Page 18: Basic Text Input
Short press to clear a letter, long Clear press to clear all entries. Shift case, select input mode. Long press to turn on/off T9 feature. Short press to activate/deactivate punctuation mode, long press to select input language. Example: How to enter the word “Home” 4 6 6 3 Press , the screen display the... -
Page 19: Pinyin Input
Pinyin Input Press and select Pinyin input mode. Each Pinyin letter is represented by one of the numeric keys as shown below: (Note that Pinyin input mode is solely meant for the input of Simplified Chinese characters. You cannot input Traditional Chinese characters). PQRS Mode The general steps of using Pinyin input method are as... -
Page 20: Zhuyin Input
For example, to input the character 『王』 , with the 9 2 6 4 Pinyin letters『wang』, press > to select the desired pinyin combination for 『wang』 , then press to confirm combination. After that, you may press a number key to enter the intonation of the character (1-1 tone, 2-2 tone, 3-3 tone, 4-4 tone) to narrow down the candidate characters selection range. -
Page 21: Stroke Input
ㄕㄖㄙㄥ When the zhuyin combination appears on the input < > row, press to move the selection box over the zhuyin combination and press selection mode. Selection < > Press to move the selection box left or right, and press to scroll list. - Page 22 The basic steps of Stroke input are as follows: 1. Enter strokes (excluding 3 and 7) Clear < > 2. Select from candidate list ( scroll list) 3. Confirm selection 4. Select and enter association character, or return to step 1 to enter new strokes. 5.
-
Page 23: Entertainment
4. Entertainment This section describes the games and additional tools installed on your mobile phone. Some of the features described here are dependent on the configuration of your mobile phone, the country in which you purchased your mobile phone, and/or your service provider. -
Page 24: Browser
Philips is not liable to give prior notification nor shall it bear any consequences for any failures arising from changes of configuration made by you or by the network operator. - Page 25 To add a new bookmark: Go to Press to enter the main Bookmark menu menu from idle mode and select Browser Select Add Bookmark Press OK. Add a new Enter the bookmark the new bookmark and press Save. Press between the input boxes. To edit a bookmark: Go to Press...
-
Page 26: Push Inbox
WAP browser immediately. Otherwise, you need to re-configure the settings. Philips is not liable to give prior notification nor shall it bear any consequences for failures arising from changes in configuration made by you or by the network operator, or changes in WAP address or contents made by the Internet content provider. -
Page 27: Music
6. Music This feature allows you to download music from the network, save the audio files, edit your playlist, and play music. The phone supports audio files in MP3 and AAC format. However, only MP3 format is supported with the Bluetooth headset. Tracks This feature allows you to play downloaded music in your... -
Page 28: Playlists
Playlists The stored playlists are displayed on the screen. To create a new playlist, select playlist name and press . Then use playlist, press , and then press and select the tracks you want to add in the playlist playlist by pressing . -
Page 29: Settings
Open options menu. Options Return to previous menu. Back Press to carry out the following operations: Options Play/Pause the selected audio file. Play/Pause Open the playlist, select a playlist Add to playlist and add the selected file to the playlist. Play mode Shuffle: Repeat: None,... -
Page 30: Using The Volume Side Keys
Using the volume side keys When the flip of the phone is closed, you can use the volume side keys to proceed to the following operations: Operation Short press: Turn the volume up Long press: Select previous track Short press: Turn the volume down Long press: Select next track Music... -
Page 31: Camera
7. Camera Your mobile phone features a digital camera that allows you to take pictures and record short videos, store them in your phone, use them as wallpaper or send them to your friends. Please ensure that the camera lens is clean before you take pictures, as small dust particles can strongly affect the picture quality. - Page 32 Camera option menu When the camera mode is activated and before a picture is taken, you can change a number of settings by pressing Options. Options Description Exit from Camera mode and switch Switch to to Video mode. Video In the viewfinder mode, you can switch from Camera to Video mode <...
-
Page 33: Video Mode
Photo Preview Option Menu Once you have activated the camera, simply press to take a picture. The picture is automatically saved and displayed on the screen. You can press to carry out the following operations: Options Description Send the picture: Send Bluetooth, or Send via... - Page 34 < > Adjust Press brightness Brightness level is -3 to +3. Default level is 0. Record a Press key once. Press twice to stop video recording. The video will be automatically saved and stored in My Files > Videos. If a memory card is inserted, the video will be saved in the memory card by default.
- Page 35 Advanced Storage location: Memory card Default name: Modify the default name of the video Mute: If you select On, sound will not be recorded. Video length: MMS Length Unlimited. If you select MMS, the size of the recorded video will be smaller than the currently specified maximum MMS size.
- Page 36 Delete the recorded video. Delete Return to video mode to record a new Record new video clip. When there is not enough memory space, you will not be able to save the recorded video and you will be prompted with a warning message. Camera...
-
Page 37: Messages
8. Messages SMS (Short Message Service) is a service that lets you to send text messages to another party. You can use the SMS menu on the phone to send messages to another mobile phone or a device that is capable of receiving SMS. -
Page 38: Mms (Network Dependent)
MMS (network dependent) Your phone allows you to send and receive multimedia messages, known as MMS, which features text, pictures, sound and video clips. MMS can comprise one or several slides. Whether you send it to an e-mail address or to another mobile phone, the MMS will be played as a slide show. -
Page 39: Inbox
Set play time of the MMS slides. The Pages timing default value is 3 seconds. Save the MMS. Save When there is more than one page, you can press to view the different pages of the MMS. At the same time, the title bar at the top of the screen will display the current page you are viewing and the total number of pages in your MMS. -
Page 40: Outbox
You can select several messages one Select multiple by one or all at once. You can press to select/cancel the operations on multiple messages. Checkboxes will be marked on the left of the selected message. Press the selected messages, or you can move them to 5. -
Page 41: My Favourites
4. Press to select a message. When a message is selected, its contents will be displayed on the screen. When you press Options, you can carry out the following operations: View the selected message. View Resend the message to the recipient. Resend When you select Forward, the contents Forward... - Page 42 Options Description View the selected message. View Reply The sender’s number will be used as the destination number automatically and the message editor will be activated. Enter your reply and send the message. When you select Forward, the Forward contents of the selected message will appear in the message editor.
-
Page 43: Draft
Extract the sender’s number from the Dial message and dial the number. Draft This menu lists the messages that were created and saved but were not sent, and messages that were automatically saved before you were able to save or send them when you exit from the message editor. -
Page 44: Cell Broadcast
You can forward your calls to your voice mailbox (the phone number for callers to leave a message) via the Call forwarding feature. Call voice mail When you receive a voice mail, the phone will send you an alert. You can then call your voice mailbox number to retrieve your voice mail. -
Page 45: Message Settings
Message Settings Select > Messages Message settings list of SMS accounts. Press Options SMS settings. Serivce center number This menu allows you to save and edit the SMS service center number of your home network. If the service center number is empty, you will not be able to send any SMS. - Page 46 Priority This option allows you to set the priority level of your MMS. You can set Low, Normal (default) or High. Delivery report You can press Change to set this option When set to On, a report will be sent to notify you if the MMS has been delivered to the recipient.
-
Page 47: My Files
9. My Files This menu allows you to store the files in different folders (Pictures, Videos, Sounds, more efficient management of files in your phone and the memory card. In addition, you can obtain information regarding your phone and memory card, such as number of files, memory utilised, percentage of memory utilised via the Memory status... -
Page 48: Videos
Delete the selected picture. Delete If you select this option, the screen Slide show will display the full screen view of all the pictures in the form of slideshow every 4 seconds. Press any key to exit from the slide show mode. You can select to view the pictures in Change view List... - Page 49 Options Description Play or pause the selected video. Play/Pause Select to pause Send the selected file: Send bluetooth Send via Copy: Copy the selected file to Advanced another folder. Cut: Similar to copy, but the original file will be deleted. Rename: Modify the name of the selected file.
-
Page 50: Sounds
Sounds When you enter this menu, the audios which you have stored or downloaded via MMS, WAP, BT or USB will be displayed in a list. Select My files > Sounds and press menu. Press to carry out the following Options operations to a selected file: Options... -
Page 51: Tools
10. Tools Calendar This menu displays the calendar. You can select Day view, Week view or Month view. You can create new appointment, view appointments list, delete or modify appointments in the calendar. The calendar stores the alarm date and time of every event. If the current date and time correspond with the date and time of the event, the phone will emit an alarm (if needed), and the screen will display a prompt to... -
Page 52: Alarm
Repeat method The phone provides the following repeat methods: and annually. once, daily, weekly, monthly Press to carry out the following operations Options to a selected file: Options Description To view the details. View To edit the event and make Edit modifications. -
Page 53: Calculator
When the set alarm time is reached, the alarm will ring even if your phone is switched off. Press any key to disable the alarm and the mobile phone will be switched off automatically. If you have downloaded your own ring tones and have selected such a ring tone to be the alarm alert, then after you set the alarm and switched off the phone, the alert tone will be changed back to the original factory settings. -
Page 54: Stop Watch
Local settings To set the local time zone. The screen displays a world map with the current date and time. A vertical highlight in orange indicates the current zone on the map, and a text bar shows the display with ‘GMT’ and the current cities. -
Page 55: Unit Converter
To stop countdown, press Pause, to reset, press > and you can exit the menu by pressing Options reset Back. When the set time is up, the alert will start to ring and the ring type is the same with the alarm. The count-down timer will switch on automatically and emit an alarm at the end of the count-down even if your phone is switched off. -
Page 56: Lifestyle Application
Lifestyle Application Discount Manager This menu allows you to calculate the discounted price of an item. The calculation for discounted price varies according to the language settings. When the current language setting is Chinese, the method of calculation is: Original $*(Discount rate/10) When the current language setting is English, the method of calculation is: Original $*(100-Discount rate)/100... - Page 57 If the date of the shopping list is close to the current system date (1 day limit), then the shopping list will be moved to the top of the list and indicated with a red icon. For example, if today is 5 October and the date of the shopping list is 6 October, and the system date of your phone is 5 October, the list will be moved to the top of the list.
- Page 58 Enter the menu. The screen displays a list of items you have already added to the list. If the list is empty, you will be prompted to create it. Press to create a list. Press Back If a list has been created, press a product.
- Page 59 The screen displays a list of cards which you have added. If the list is empty, you will be prompted to create it. Press information. Press to exit. Back If the card information has been created, the screen will display the list of card issuers and the type of card will be indicated on the left of the card list.
- Page 60 When you have finished, press save the card information. Please note that except for note and phone number fields, the rest of the input boxes are mandatory and cannot be left empty. BMI-Body Mass Index BMI is the recommended method for measurement of overweight in adults.
- Page 61 After you have done the calculation, press to clear the input boxes and the calculation Reset results, so that you can perform another calculation. Basal Metabolic Rate (BMR) Basal Metabolic Rate is the minimal calorie requirement required to sustain life in a resting or sleeping individual that is not subject to the influence of stress, hunger, muscular activities, ambient temperature and health conditions.
-
Page 62: Contacts
11. Contacts This menu allows you to manage the names, addresses, and telephone numbers of your friends, family, and colleagues. Your mobile phone has two storage areas for your contacts: the SIM phonebook and the onboard phonebook. Your phone can store up to 500 contacts. - Page 63 Most of the fields are free-text, which means you can enter alphanumeric data using the text entry functions of your mobile phone (for more information on text entry, see “Text and number entry” on page 15). Phonebook Options In the phonebook, you can display the details of a contact by selecting it and pressing view/edit more details: Options...
-
Page 64: View Groups
View groups feature allows you to organize your View groups contacts so that you can associate images and/or ringtones with a group of contacts and send messages to all the members of the group. You can create up to 10 group lists and each group list can store up to 100 contacts. -
Page 65: Quick Call
Quick call This feature allows you to set your 4 preferred or most frequently dialled numbers. You can then quickly call one of them by selecting the corresponding icon or picture on the screen, thereby eliminating the need to enter and browse the contact list. You may edit a list of quick calls. -
Page 66: Profiles
12. Profiles Your mobile phone has been preconfigured with the following modes: • Personal (default) • Car • Home • Meeting • Silent You can activate and modify all the modes, except Flight mode and Silent mode. These 2 modes can only be activated and viewed. -
Page 67: Profile Selection
Meeting Ring volume Ringtones Alert type Key sound Backlight level Outdoors Ring volume Ringtones Alert type Key sound Backlight level Silent Ring volume Ringtones Alert type Key sound Backlight level Profile selection Silence To select a different profile: Default Go to Profiles Vibra menu... -
Page 68: Connectivity
13. Connectivity Bluetooth Your phone supports Bluetooth wireless technology, allowing connection to a compatible Bluetooth device. To ensure interoperability between other Bluetooth devices, please manufacturers of other devices. The Bluetooth connection can be subjected to interference from obstructions such as walls or other electronic devices. To use Bluetooth connection, the device with which you want to establish a connection must support Bluetooth function. -
Page 69: Usb Function
When searching for a device, you are presented with a list of any devices discovered within the range of your Bluetooth-enabled phone. As soon as you select a device and a connection is made, you are prompted to enter a passkey in order to pair with the device. This passkey is supplied by the manufacturer of the other Bluetooth device. -
Page 70: Calls
14. Calls Most options described in this chapter are operator and/or subscription dependent and require either a PIN2 code or a phone code. For more information on PIN codes, see “Security” on page 73. Call list This menu provides you with a list of calls you have missed, answered and made. - Page 71 Turn Any key Any key answer answer When this option is turned on, you can answer calls by pressing any keys except for the Select or Off. The default setting is Minute reminder every 45 seconds in China and off for other countries.
- Page 72 Set the following call divert options: Call divert All voice calls, If out of reply, busy. • When All voice calls incoming calls will be diverted to the pre-set number without any reminder. • When If out of reach incoming calls will be diverted to the pre-set number when the user is not connected to the network.
-
Page 73: Settings
15. Settings You can configure your mobile phone to best suit your usage preference. You can configure the following settings: General, Sounds, Display, and Connectivity. Enter the menu Press menu from idle mode and select Settings. < Select a settings Press menu Enter the menu... - Page 74 time: Press Time & date Display or Off. When you select On, the time information will be displayed in idle screen. zone: Go to local settings to Time change the time zone. time: Set the time. date: Set the date. format: Set the time format as Time 24 hours...
-
Page 75: Display
Only buttons assigned as shortcut keys. “ “ ”, “ ” and “ been pre-assigned for quick access to the enter the “+” symbol, access voice mailbox, change language settings activate respectively. Set the default storage location of the Default camera, video recorder and sound storage recorder:... -
Page 76: Sounds
Sounds You can set your phone to operate with different sound profiles. For details, see “Profiles” on page 65. Options Description You can select Alert type Ring or None. Vibrate then ring Select the ringtone for Calls, Alarm, Ringtones Calendar, Messages, and Select from 10 volume levels. - Page 77 Preferred Network Preferred network list is stored in the SIM card. It specifies the priority by which your phone will register to the available network during automatic registration. In idle mode, press to enter the main menu. Select > Settings Connectivity >...
-
Page 78: Icons & Symbols
Icons & Symbols In idle mode, several icons and symbols can be simultaneously displayed on the sub-display and main screen. The status, network and battery icons are displayed all the time. The rest of the icons are displayed if the feature is available, and not displayed if the feature is unavailable. - Page 79 Bluetooth - Feature is activated. Camera multiple - Indicates camera multiple is on. Camera night - Indicates camera night mode is on. Camera timer - Indicates camera timer is on. Capture - Indicates OK to capture photo Camera zoom - Indicates zoom feature of the camera is on.
-
Page 80: Precautions
Precautions Radio Waves Your cellular mobile phone is a low power radio transmitter and receiver. When it is operating, it sends and receives radio waves. The radio waves carry your voice or data signal to a base station that is connected to the telephone network. -
Page 81: Always Switch Off Your Phone
Telecommunications Terminal Equipment Directive 1999/5/EC. Always switch off your phone... Inadequately protected or sensitive electronic equipment may be affected by radio energy. This interference can lead to accidents. Before boarding an aircraft and/or when packing the phone in your luggage: the use of mobile phones in an aircraft may be dangerous for the operation of the aircraft, disrupt the mobile phones network and may be illegal. -
Page 82: Improved Performance
Philips phone null and void. The use of an incorrect type of battery may also cause an explosion. -
Page 83: Environmental Care
40° C. Environmental care following Philips has marked the battery and packaging with standard symbols designed to promote the recycling and appropriate disposal of your eventual waste. Remember to observe the local regulations... -
Page 84: Troubleshooting
Your battery seems to over heat You might be using a charger that was not intended for your phone. Make sure you always use the Philips authentic accessory shipped with your phone. Your phone doesn’t display the phone numbers of incoming calls This feature is network and subscription dependent. - Page 85 The display shows INSERT SIM Check that the SIM card has been inserted in the right position. If the problem remains, your SIM card may be damaged. Contact your operator. When attempting to use a feature in the menu, the mobile displays NOT ALLOWED Some features are network dependent.
-
Page 86: Philips Authentic Accessories
Additional accessories may also be provided or sold separately. Package contents may therefore vary. To maximise the performance of your Philips mobile phone and not to void the warranty, always purchase Philips Authentic Accessories that are specially designed for use with your phone. -
Page 87: Trademark Declaration
Trademark Declaration JAVA is a trademark of Sun Microsystems, Inc. ® is a trademark of Tegic Communications Inc. Tegic Euro. Pat. App. 0842463 Bluetooth™ is a trade-mark owned by telefonaktiebolaget L M Ericsson, Sweden and licensed to Philips. -
Page 88: Specific Absorption Rate Information
While there may be differences between the SAR levels of various phones and at various positions, they all meet the international protection standards for exposure to radio waves. The highest SAR value for this Philips CT9A9R model phone when tested for compliance against the standard was 0.161W/kg for ICNIRP recommendation and 0.223 W/kg for IEEE Std 1528. - Page 89 FCC for mobile phone used by the general public is 1,6W/kg averaged over one gram of tissue for the head. The highest FCC SAR value for this Philips CT9A9R model phone when tested for compliance against FCC requirements was 0.284 W/kg.
-
Page 90: Limited Warranty
The limited warranty for original Philips rechargeable battery extends for six (6) months from the date of purchase. 3. What Will Philips Do if The Product is Not Free From Material Defects in Materials and Workmanship During The Limited Warranty... - Page 91 Normal wear and tear or Force Majeure. 5. How Do You Get Warranty Service? Return the Product to an authorized service center of Philips. You may contact the local Philips office for the location of the nearest authorized service center.
- Page 92 OF ANY LIMITED REMEDY. This limited warranty represents the complete and exclusive agreement between the Consumer and Philips with respect to this cellular Product and it supercedes all prior agreements between the parties, oral or written, and all other communications between the parties relating to the subject matter of this limited warranty.
-
Page 93: Declaration Of Conformity
Declaration of conformity Philips Electronics Hong Kong Ltd Business Group Mobile Phone 5/F, Philips Electronics Building 5 Science Park Avenue Shatin New Territories Hong Kong declare under our sole responsibility that the product CT9A9R Cellular Mobile Radio GSM 900/1800/1900 TAC number : 35381201...