Table of Contents
Advertisement
Available languages
Available languages
Quick Links
Advertisement
Table of Contents

Related Manuals for Electrolux EKM4000R


Summary of Contents for Electrolux EKM4000R
- Page 1 Kitchen machine EKM4000R/EKM4000T...
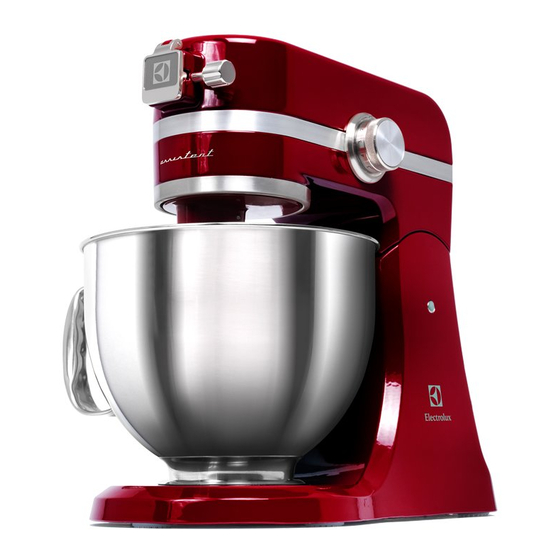
- Page 2 Components 組件圖示 구성 부품 组件图示 A. 電機頭(可傾斜) A. 모터 헤드 (기울임 가능) A. Motor head (tiltable) A. 电机头(可倾斜) B. 调速旋钮 B. 選速開關 B. 속도 선택기 B. Speed selector C. LED 電源指示燈 C. LED 전원 표시등 C. LED power indicator light C.
-
Page 3: Safety Advice
• Keep the appliance and its power cord out of reach of children. Children should be supervised to ensure that they do not play with the appliance. • Cleaning and user maintenance shall not be performed by children without supervision. • The appliance can only be connected to a power supply which voltage and frequency comply with the specifications on the rating plate. • Never use or pick up the appliance if – the power cord is damaged, or – the housing is damaged. • If the appliance or its power cord is damaged, it must be replaced by the Electrolux or its service agent in order to avoid hazard. • Do not immerse the appliance, its power cord or plug in water or any liquid. • Do not use or place the appliance near edge of the table or counter, near hot gas, stove, electric burner or heated oven. • Always place the appliance on a flat, level and dry surface. • Always switch off the appliance and disconnect it from the power supply if it is left unattended and before changing of accessories, cleaning or maintenance. •... -
Page 4: Getting Started
Getting started 1. Before using the appliance for the 2. Place the appliance on a flat surface. 3. Move speed selector (B) to “OFF“. first time: Unplug the appliance. Place the stainless steel bowl (H,T) Tilting the motor head (A) up: The whisk (I), meat grinder (O)* and Move the tilt head locking lever (N) on the bowl clamping plate (G). -
Page 5: Other Functions
Getting started 7. LED working light (K) and LED 8. Note: If the speed selector (B) power indicator light (C): If the is already turned on before the appliance is plugged in and a speed is appliance is plugged in, both the LED selected, a blue LED lights up around power indicator light (C) and the LED the speed selector (B). - Page 6 Using the meat grinder* 1. Using the meat grinder (O)* : Insert 2. Open the attachment hub lid on the 3. Place the food tray over the grinder the grind screw into the grinder housing. Cut raw meat into small kitchen machine.
-
Page 7: Cleaning And Care
Cleaning and Care 1. Unplug the appliance. 2. Do not use abrasive cleaners or scouring pads when cleaning the The whisk (I), meat grinder (O)* and slicer/shredder (P)* should only be appliance. washed by hand in warm soapy water. The bowl (H,T), flat beater (Q) and dough hook (R) are dishwasher-proof. Clean the motor unit with a damp cloth. - Page 8 Recipes Whisking function quanitities and Processing Times Ingredients Quantity Time Speed Cream 200 - 600 g 60~80s 8~10 Egg white 120 - 240 g At least 100s 8~10 Beating function quantities and Processing Times (mixing light dough (e.g: cake dough)) Recipe Ingredients Quantity...
-
Page 9: Troubleshooting
Accessories Accessory Purpose Dough hook (R) For dough kneading to make bread and pizzas (Note to adjust the amount of liquid in your dough recipe accordingly) Flat beater (Q) For mixing pastry, cake/cookie batter, mashing potatoes Whisk (I) For whipping cream, egg whites and to make mayonnaise Troubleshooting Symptoms Possible causes Solution The motor slows down Amount of dough may exceed maximum Remove half and process in two batches. during operation. - Page 10 说明书 首次使用本电器前,请仔细阅读下列说明。 保留此说明书以便将来参考。 安全建议 • 本电器不可由肢体伤残、感觉或精神障碍以及缺乏相关经验和知识的人员(包括儿童)使用,除非有负责其安 全的人员对其进行看管或指导。 • 把电器及其电源线放在儿童接触不到的地方。应对儿童加以看管,确保他们不将本产品作为玩具。 • 除非在有人监管的情况下,否则儿童不应清洁或维护本电器。 • 本电器只能连接电压和频率均符合铭牌上规定的电源。 • 在下列情况下,请勿使用或者拿起本电器: – 电源线受损,或 – 外壳受损。 • 如果本电器或电源线受损,必须由 Electrolux 或维修代理进行更换,以免发生危险。 • 请勿将本电器、其电源线或插头浸泡在水中或任何其他液体中。 • 请勿于靠近桌面边缘或操作台边缘的位置使用或放置本电器,请勿于靠近热气体、火炉、电炉或加热的烤炉的 位置使用或放置本电器。 • 务必将本电器放置在一个平坦、平稳的干燥水平表面上。 • 如果没有人看管本电器以及在更换附件、清洁或维护之前,务必关闭本电器电源并断开其电源供应。 • 在更换附件或进行清洗或维修前,应确保电机已完全停下,且电源已被切断。 • 应避免接触任何运动部件。电器工作过程中,请勿把手或其他器具伸进本电器内,以避免对人员造成严重伤害 或损坏本电器的风险。 • 接触锋利的刀片、倒空搅拌杯和清洗本电器时应格外小心。 • 当不锈钢搅拌杯没有正确放置时,切勿在本电器上使用任何附件。 •...
- Page 11 使用说明 1. 首次使用本电器之前:应首先拔掉 2. 将本电器放在一个平坦的表面。 3. 将调速旋钮 (B) 设置为“关”。将不 锈钢搅拌碗 (H) 放到搅拌碗底座 (G) 其电源插头。 将电机头向上倾斜: 搅打器 (I)、绞肉器* (O) 和切片/切丝 用一只手将倾斜头锁杆 (N) 移到 上。顺时针转动不锈钢搅拌碗以便 器* (P) 只能用温肥皂水进行手洗。不 “ ”位置,用另一只手将电机 锁紧。注意:如果不锈钢搅拌碗没 锈钢搅拌碗、平搅器和搅面钩可用 头 (A) 向上倾斜。当电机头处于合 有锁紧,请切勿在本电器上使用搅 洗碗机进行清洗。用一块湿布将电 适的向上倾斜位置时便会锁住。注 打器 (I)、平搅器 (Q) 或搅面钩 (R) 等 机擦干净。注意:切勿将电机浸入...
- Page 12 使用说明 7. LED 节能灯 (K) 和 LED 电源指示灯 8. 注:如果在插上电源插头之前,调 (C):当插上电源并选择速度档位 速旋钮 (B) 已经打开,则 LED 电源指 后,调速旋钮 (B) 旁边的蓝色 LED 节 示灯 (C) 和 LED 节能灯 (K) 将开始闪 烁,以提醒您调速旋钮 (B) 已经处于 能灯将自动点亮。 此外,电器工作区上方的电源指示 打开位置。将调速旋钮 (B) 旋转到“ 灯也将自动点亮。当调速旋钮 (B) 旋 关”后,这两盏灯将停止闪烁,然 转到“关”时,LED 节能灯...
- Page 13 使用绞肉器* (O) 1. 使用绞肉器* (O):将绞肉杆插入绞 2. 打开该款厨房电器上的附件安装孔 3. 将食物盘放在绞肉器外壳上。将生 肉器外壳中。将绞刀放到位于绞肉 盖。将附件的传动轴安装到该款厨 肉切成小块后放入食物盘中。插上 电源插头,然后将调速旋钮 (B) 旋转 杆末端的方轴上。将绞板(普通/ 房电器上的附件安装孔内。 粗齿)放到绞刀上。手动上紧固定 必要时可来回转动附件。旋紧附件 到期望的速度档位(建议速度:6-8 安装孔旋钮 (M),直到附件完全固 圈,直到绞肉器 (O)* 已固定。 档)。用推压器将肉喂入进料槽。 注:请勿将固定圈上得过紧。 定。 注意:禁止将手指或其他器具伸入 注意:刀片与镶嵌件非常锋利! 注意:安装附件之前,应先关掉电 进料槽内。 源开关并拔下电源插头。 注:肉中不应含有骨或肉皮。 使用切片/切丝器* 1. 使用切片/切丝器* (P):选择一把 2. 将切片/切丝器* (P) 安装到附件安装 3.
- Page 14 清洁和保养 1. 首先拔掉电源插头。 2. 清洗本电器时不得使用研磨去污的 搅打器 (I)、绞肉器* (O) 和切片/切丝 擦洗工具或钢丝绒。 器* (P) 只能用温肥皂水进行手洗。 不锈钢搅拌碗 (H) (T)、平搅器 (Q) 和 搅面钩 (R) 可用洗碗机清洗。 用一块湿布将电机擦干净。 注意:切勿将电机浸入水中! 清洗 后应将所有部件充分晾干。 *具体规格依型号而异...
- Page 15 食谱 搅拌功能的配料量及加工时间 配料 数量 时间 速度 奶油 200 - 600g 60~80s 8~10 档 120 - 240g 至少 100s 8~10 档 蛋清 搅打功能的配料量及加工时间(搅拌软面团,例如蛋糕面团) 食谱 配料 数量 时间 速度 300 g 面粉 150 g 人造奶油 中档速度 200~230s 海绵蛋糕 (溶化状态) (5~6 档) 170 g 糖...
- Page 16 附件 附件 用途 搅面钩 (R) 做面包或披萨时用于将面团揉搅均匀(注意应相应地调整面团 配方中的加水量) 平搅器 (Q) 用于搅拌油酥面团、蛋糕糊/曲奇面糊和打土豆泥 拌打器 (I) 用于搅打奶油、蛋清和制作蛋黄酱 故障排除 故障现象 可能原因 解决方法 在运行过程中电机变慢 加入的面团量可能超过最大容量。 拿出一半,分两次加工。 多加一些面粉,1 次加 1 汤匙,直至电机速 面团中加水太多,粘在了搅拌杯一侧。 度变快。将粘在杯侧的面团清理掉后再进行 加工。 电机不工作。 未接通电源。 开机前确保本电器的电源插头已插入插座。 本电器在使用过程中出现振 橡胶防滑垫湿滑。 确认本电器底部的防滑垫清洁、干燥。 动/移动。 在处理体积较重的食物(例如大块面团、奶 拿出一半,分两次加工。 酪)时,这属于正常现象。 搅拌速度过快。 降低搅拌速度,然后再逐渐提高速度。 附件安装轴 (J) 的高度不合适。 调整附件安装轴...
- Page 17 – 本機外殼損壞。 • 切勿將本機浸泡在水中或任何液體中。 • 請勿在靠近桌子邊緣或檯面邊緣的位置使用或放置本機,請勿在靠近熱氣體、爐灶、電爐、或加熱的烤爐的位 置使用或放置本機。 • 請務必將本機放置在平坦且平穩的乾燥表面上。 • 如果本機無人看管,以及在更換附件,清潔或保養之前,務必關閉本機電源並中斷其電源供應。 • 在更換附件,清洗或保養之前,應確保電機完全停下,且電源已被切斷。 • 應避免接觸任何運動部件。電器工作過程中,請勿把手或其他器具伸進本機內,以避免對人員造成嚴重傷害或 損壞本機的風險。 • 接觸鋒利的刀片、倒空攪拌杯和清洗本機時應格外小心。 • 當不銹鋼攪拌杯沒有處於正確位置時,切勿在本機上使用任何附件。 • 在使用本機時,應確保一切鬆散的東西和您的衣物/首飾均遠離本機。 • 切勿讓正在工作的電器離開您的視線範圍。 • 將滾燙液體倒入本機時,請務必小心,液體可能會因突然冒出的蒸汽而從本機噴出。 • 請勿攪拌滾燙液體(最高 90 度)。 • 請勿使用本機攪拌油漆。這是危險操作,可能導致爆炸。 • 請勿將電源線懸掛在桌子或檯面邊緣,或接觸熱的表面。 • 請勿使用由伊萊克斯( Electrolux)推薦以外的其他製造商製造、或並非由伊萊克斯(Electrolux)出售的附件 或零件;因為可能會造成人員傷害。 • 本機僅供室內使用。 • 本機僅供家庭使用。任何不當使用所導致的損壞,伊萊克斯(Electrolux)將不負任何責任。...
- Page 18 使用說明 1. 首次使用本機之前:應首先拔掉其 2. 將本機放在平坦的表面。將電機頭 3. 將選速開關 (B) 旋至“關閉”。將 不銹鋼攪拌杯 (H) 放到攪拌杯座 (G) 電源插頭。 朝上傾斜: 攪打器 (I)、絞肉器* (O) 和切片/切絲 用一隻手將傾斜頭鎖杆 (N) 移到 上。順時針轉動不銹鋼攪拌杯以便 器* (P) 只能用溫肥皂水進行手洗。 “ “,用另一隻手將電機頭 (A) 向 鎖緊。注意:當不銹鋼攪拌杯沒有 不銹鋼攪拌杯、平攪器和攪面鉤可 上傾斜。當電機頭處於合適的向上 鎖緊時,切勿在本機上使用攪打器 用洗碗機清洗。 傾斜位置時便會鎖住。注意:手和 (I)、平攪器 (Q) 或攪面鉤 (R) 等 用一塊濕布將電機擦乾淨。...
- Page 19 使用說明 7. LED 節能燈 (K) 和 LED 電源指示燈 8. 注:如果在插上電源插頭之前,選 (C):當插上電源並選擇速度檔位 速開關 (B) 已經打開,則 LED 電源指 後,選速開關 (B) 旁邊的藍色 LED 節 示燈 (C) 和 LED 節能燈 (K) 將開始閃 爍,以提醒您選速開關 (B) 已經處於 能燈將自動點亮。 此外,本機工作區上方的電源指示 打開位置。將選速開關 (B) 旋轉至 燈也將自動點亮。當選速開關 (B) 被 “關閉”後,這兩盞燈將停止閃 旋到“關閉”時,LED 節能燈...
- Page 20 使用絞肉器* (O) 1. 使用絞肉器* (O):將絞肉杆插入絞 2. 打開該款廚房電器上的附件安裝孔 3. 將食物盤放在絞肉器外殼上。將生 肉器外殼中。將絞刀放到位於絞肉 蓋。將附件的傳動軸安裝到該款廚 肉切成小塊後放入食物盤中。插上 電源插頭,然後將選速開關 (B) 旋轉 杆末端的方軸上。將絞板(普通/ 房電器上的附件安裝孔內。 粗齒)放到絞刀上。手動上緊固定 必要時可來回轉動附件。上緊附件 至期望的速度檔位(建議速度:6-8 安裝孔旋鈕 (M) ,直到附件完全固 圈,直至絞肉器 (O)* 已固定。 檔)。用推壓器將肉喂入進料槽。 注:請勿將固定圈上得過緊。 定。 注意:禁止將手指或其他器具伸入 注意:刀片與鑲嵌件非常鋒利! 注意:安裝附件前,應先關掉電源 進料槽內。 開關並拔下電源插頭。 注:肉中不應含有帶骨肉或肉皮。 使用切片/切絲器* 1. 使用切片/切絲器* (P): 2. 將切片/切絲器* (P) 安裝到附件安裝 3.
- Page 21 清潔和保養 1. 首先拔掉電源插頭。 2. 清洗本機時不得研磨去汙的擦洗工 攪打器 (I)、絞肉器* (O) 和切片/切絲 具或鋼絲絨。 器* (P) 只能用溫肥皂水進行手洗。 不銹鋼攪拌杯 (H) (T)、平攪器 (Q) 和 攪面鉤 (R) 可用洗碗機清洗。 用一塊濕布將電機擦乾淨。 注意:切勿將電機浸入水中!清洗 後應將所有部件充分晾乾。...
- Page 22 食譜 攪拌功能之配料量及加工時間 配料 數量 時間 速度 奶油 200 - 600g 60~80s 8~10 120 - 240g 至少 100s 8~10 蛋清 攪打功能之配料量及加工時間(攪拌軟麵團,例如蛋糕麵團) 食譜 配料 數量 時間 速度 300 g 麵粉 150 g 人造奶油 中檔速度 (溶化狀態) 200~230s 海綿蛋糕 (5~6 檔) 糖 170 g 發酵粉...
- Page 23 附件 附件 用途 攪面鉤 (R) 做麵包或披薩時用於將麵團揉攪均勻(注意應相應地調整麵團 配方中的加水量) 平攪器 (Q) 用於攪拌油酥麵團、蛋糕糊/曲奇麵糊和打土豆泥 拌打器 (I) 用於攪打奶油、蛋清和製作蛋黃醬 故障排除 故障現象 可能原因 解決方法 在運行過程中電機變慢 加入的麵團量可能超過最大容量。 拿出一半,分兩次加工。 多加一些麵粉,1 次加 1 湯匙,直至電機速 麵團中加水太多,粘在了攪拌杯一側。 度變快。將粘在杯側的麵團清理掉後再進行 加工。 電機不工作。 未接通電源。 開機前確保本機的電源插頭已插入插座。 本機在使用過程中出現振 橡膠防滑墊濕滑。 確認本機底部的防滑墊清潔、乾燥。 動/移動。 在處理體積較重的食物(例如大塊麵團、奶 拿出一半,分兩次加工。 酪)時,這屬正常現象。 攪拌速度過快。 降低攪拌速度,然後再逐漸提高速度。 附件安裝軸 (J) 的高度不合適。 調整附件安裝軸...
- Page 24 다음과 같은 경우에는 제품을 사용하거나 집지 마십시오. – 전원 코드가 손상된 경우 또는 – 하우징이 손상된 경우. • 제품 또는 전원 코드가 손상된 경우 위험 방지를 위해 Electrolux 또는 서비스 대리점을 통해 교체해야 합니다. • 물이나 다른 액체에 제품을 담그지 마십시오. •...
- Page 25 시작하기 1. 제품을 처음으로 사용하기 전에: 2. 평평한 표면에 기기를 배치합니다. 3. 속도 선택기(B)를 “OFF“로 기기의 플러그를 뽑습니다. 모터 헤드를 위로 기울이기: 이동시킵니다. 스테인리스강 보울 거품기 (I), 고기분쇄기* (O) 및 (H)을 용기 고정판(G) 위에 놓습니다. 한 손으로 경사 헤드 잠금 레버(N) 슬라이서/강판* (P)는 따뜻한 를...
- Page 26 시작하기 7. LED 작업등(K) 및 LED 전원 표시등 8. 참고: 기기에 전원을 연결하기 전에 (C): 기기의 전원이 연결되어 속도 선택기(B)가 이미 켜져 있는 경우에는 LED 전원 표시등(C)과 LED 있고 속도 선택기가 선택되어 있는 경우에는 속도 선택기(B) 작업등(K)이 깜박이면서 속도 선택기 주위의...
- Page 27 고기분쇄기 (O)의 사용 1. 고기분쇄기 (O)의 사용 : 갈기 나사를 2. 기기의 부착물 허브를 엽니다. 3. 그라인더 하우징 위에 음식 트레이를 그라인더 하우징에 삽입합니다. 부착물의 전원 샤프트를 기기의 놓습니다. 생고기를 작은 조각으로 나이프를 갈기 나사 끝에 있는 사각 부착물 허브 소켓에 장착합니다. 잘라...
- Page 28 청소 및 관리 1. 기기의 플러그를 뽑습니다. 2. 제품을 청소할 때는 연마제 또는 거품기(I), 고기분쇄기(O) 및 닦는 패드를 사용하지 마십시오. 슬라이서/강판*(P)는 따뜻한 비눗물로 손으로만 세척해야 합니다. 용기(H) (T), 플랫 혼합기(Q) 및 반죽기 용기(R)는 식기 세척기에서 세척이 가능합니다. 젖은 천으로 모터 장치를 청소합니다. 주의: 모터 장치를 물에 담그지 마십시오! 모든...
- Page 29 레서피 거품기 기능 분량 및 가공 시간 재료 양 시간 속도 200 - 600g 60~80초 8~10 크림 120 - 240g 8~10 달걀 흰자 최소100초 혼합기 기능 분량 및 가공 시간 (가벼운 밀가루 혼합(e.g: 케이크 밀가루)) 조리법 재료 양 시간 속도 300 g 밀가루...
- Page 30 액세서리 액세서리 용도 반죽기 (R) 빵이나 피자를 만들기 위해 반죽 만들기 (반죽의 액체 양을 적절하게 조절할 수 있습니다) 플랫 혼합기 (Q) 패스트리, 케이크/쿠키 반죽 혼합, 감자 으깨기 거품기 (I) 크림, 달걀 흰자 젓기, 마요네즈 만들기 문제 해결 증상 가능한 원인 해결책 작동 중 모터의 속도가 반죽의...
- Page 31 ส่ ว นประกอบ Bộ phận Komponen A. Đầu mô-tơ (có thể xoay A. หั ว มอเตอร์ (ปรั บ เอี ย งได้ ) A. Badan motor (dapat diangkat) B. ปุ ่ ม เลื อ กความเร็ ว nghiêng) B. Kenop pilihan kecepatan C.
- Page 32 • Pembersihan dan perawatan tidak boleh dilakukan oleh anak-anak kecuali jika mereka diawasi. • Perabot ini hanya boleh dihubungkan ke sumber listrik dengan tegangan dan frekuensi sesuai spesifikasi yang tertera pada pelat rating. • Jangan sekali-kali menggunakan atau mengangkat perabot jika – kabelnya rusak, atau – bodi perabot rusak. • Jika perabot atau kabel rusak, penggantian harus dilakukan oleh Electrolux atau agen servisnya untuk menghindari bahaya. • Jangan merendam perabot atau kabel ke dalam air atau cairan apa pun. • Jangan menggunakan atau menempatkan perabot di dekat tepi meja, di dekat kompor gas, kompor minyak, kompor listrik, atau oven yang panas. • Selalu letakkan perabot di atas permukaan yang datar, rata, dan kering. • Matikan dan cabut kabel dari stopkontak listrik jika perabot ditinggalkan tanpa pengawasan, sebelum mengganti aksesori, membersihkan, atau melakukan perawatan.
- Page 33 Penggunaan 1. Sebelum perabot digunakan untuk 2. Letakkan perabot pada permukaan 3. Putar kenop pilihan kecepatan (B) pertama kalinya: Cabut steker yang datar. Mengangkat badan ke posisi “OFF“. Pasang mangkuk perabot dari stopkontak. motor: baja tahan karat (H) ke dudukan Cucilah aksesori pengocok (I), Geser tuas pengunci kemiringan penjepit mangkuk (G).
- Page 34 Penggunaan 7. Lampu LED pengoperasian (K) dan 8. Catatan: Jika kenop pilihan lampu LED indikator daya (C): Jika kecepatan (B) sudah diputar sebelum steker perabot dicolokkan ke sumber steker perabot dicolokkan ke sumber listrik dan kenop pilihan kecepatan listrik, maka lampu LED indikator daya diputar ke posisi tertentu, lampu (C) dan lampu LED pengoperasian (K) LED biru di sekeliling kenop (B) akan akan berkedip sebagai tanda bahwa...
- Page 35 Menggunakan gilingan daging* (O) 1. Menggunakan gilingan daging * 2. Buka tutup dudukan aksesori pada 3. Pasang baki pada bodi penggiling (O) : Masukkan sekrup ke bodi alat perabot. Masukkan tangkai aksesori daging. Potong-potong daging penggiling. Pasang pisau pada balok ke lubang dudukan aksesori perabot.
- Page 36 Pembersihan dan Perawatan 1. Cabut steker perabot dari stopkontak 2. Jangan menggunakan cairan pembersih yang abrasif atau tapas listrik. Aksesori pengaduk (I), penggiling penggosok yang kasar untuk membersihkan perabot. daging* (O) dan pemotong/ pencacah* (P) harus dicuci secara manual dengan air sabun hangat. Mangkuk (H) (T), pengocok datar (Q) dan pengaduk adonan (R) dapat dimasukkan ke mesin pencuci piring.
- Page 37 Resep Fungsi mengocok krim, jumlah bahan dan waktu proses Bahan-bahan Banyaknya Durasi Kecepatan Krim 200 - 600 g 60~80 detik 8~10 Putih telur 120 - 240 g Minimal 100 detik 8~10 Fungsi membuat adonan, jumlah bahan dan waktu proses (menguleni adonan yang tidak terlalu liat (misalnya: adonan kue)) Resep Bahan-bahan Banyaknya...
- Page 38 Aksesori Aksesori Penggunaan Pengaduk adonan (R) Untuk menguleni adonan seperti roti dan pizza (Catatan: perhatikan jumlah bahan-bahan yang dimasukkan ke dalam resep adonan dengan seksama) Pengocok datar (Q) Untuk mengaduk pastry, mengocok adonan kue/ biskuit, menumbuk kentang Pengocok (I) Untuk membuat whip cream, krim olesan, mengocok putih telur dan membuat mayonais Pemecahan Masalah Gejala Kemungkinan penyebab Solusi Putaran motor melambat...
- Page 39 • อุ ป กรณ์ น ี ้ อ อกแบบมาเพื ่ อ การใช้ ง านในครั ว เรื อ นเท่ า นั ้ น Electrolux จะไม่ ร ั บ ผิ ด ชอบต่ อ ความเสี ย หายใดๆ ที ่ อ าจเกิ ด ขึ ้ น...
- Page 40 เร ิ ่ ม ต ้ น ใช ้ ง ำน 1. ก ่ อ นใช ้ ง ำนอ ุ ป กรณ ์ เ ป ็ น คร ั ้ ง แรก ถอด 2. วางอ ุ ป กรณ ์ บ นพ ื ้ น ราบ เอ ี ย งห ั ว มอเตอร ์ 3.
- Page 41 เร ิ ่ ม ต ้ น ใช ้ ง ำน 7. ไฟ LED แสดงกำรท � ำ งำน (K) และ 8. หมำยเหต ุ : หากหม ุ น ป ุ ่ ม เล ื อ กความเร ็ ว ไฟ LED แสดงสถำนะกำรท � ำ งำน (B) ก...
- Page 42 กำรใช ้ เ คร ื ่ อ งบดเน ื ้ อ * (O) 1. กำรใช ้ เ คร ื ่ อ งบดเน ื ้ อ * (O): สอดสกร ู 2. เป ิ ด ฝำครอบด ุ ม ต ิ ด ต ั ้ ง อ ุ ป กรณ ์ เ สร ิ ม 3.
- Page 43 กำรท � ำ ควำมสะอำดและกำรด ู แ ลร ั ก ษำ 2. ห ้ ำ มใช ้ น � ้ ำ ยำท � ำ ควำมสะอำดท ี ่ ม ี ฤ ทธ ิ ์ 1. ถอดปล ั ๊ ก อ ุ ป กรณ ์ อ อก ห ั ว ต ี อ าหาร (I), เคร...
- Page 44 สู ต รอำหำร ปริ ม ำณส� ำ หรั บ กำรตี แ ละเวลำในกำรเตรี ย มอำหำร ส่ ว นผสม ปริ ม าณ เวลา ความเร็ ว ครี ม 200 - 600 กรั ม 60~80 วิ น าที 8~10 ไข่ ข าว 120 - 240 กรั ม อย่ า งน้ อ ย 100 8~10 วิ...
- Page 45 อุ ป กรณ์ เ สริ ม อุ ป กรณ์ เ สริ ม จุ ด ประสงค์ ตะขอนวดแป้ ง (R) นวดแป้ ง ท� า ขนมปั ง และพิ ซ ซ่ า (ปรั บ ปริ ม าณของเหลวในสู ต รท� า แป้ ง ตามความเหมาะสม) หั ว ตี ร ู ป ใบไม้ (Q) ผสมแป้...
- Page 46 Chỉ sử dụng thiết bị này trong nhà. • Thiết bị này chỉ để sử dụng trong gia đình. Electrolux sẽ không chịu bất kỳ trách nhiệm pháp lý nào về hư hỏng có thể xảy ra do sử dụng không đúng cách hoặc sai mục đích.
- Page 47 Bắt đầu 1. Trước khi sử dụng thiết bị lần 2. Đặt thiết bị trên bề mặt phẳng. 3. Vặn núm điều chỉnh tốc độ (B) tới đầu tiên: Rút phích cắm điện của Nghiêng đầu mô-tơ lên: “OFF” (TẮT). Đặt bát thép không thiết bị...
- Page 48 Bắt đầu 7. Đèn LED báo đang hoạt động (K) 8. Lưu ý: Nếu núm điều chỉnh tốc độ và đèn LED chỉ báo nguồn (C): (B) đã bật sẵn từ trước khi thiết bị Nếu thiết bị được cắm phích cắm được cắm phích cắm, cả...
- Page 49 Sử dụng bộ phận xay thịt* (O) 1. Sử dụng bộ phận xay thịt* (O) : 2. Mở nắp đậy may-ơ gắn phụ kiện 3. Đặt khay đựng thực phẩm lên Lắp vít xay vào vỏ bộ phận xay. Đặt ở...
- Page 50 Vệ Sinh và Bảo Quản 1. Rút phích cắm thiết bị ra. 2. Không sử dụng chất tẩy rửa ăn Chỉ nên rửa cây khuấy (I), bộ phận mòn hoặc miếng chà xát khi làm xay thịt* (O) và bộ phận thái/xé thịt* sạch thiết bị.
- Page 51 Công thức nấu ăn Số lượng trong khâu đánh trứng và Thời Gian Chế Biến Thành phần Số lượng Thời gian Tốc độ 200 - 600g 60~80 giây 8~10 Lòng trắng trứng 120 - 240g Tối thiểu 100 giây 8~10 Số...
- Page 52 Phụ kiện Phụ kiện Mục đích Móc bột nhào (R) Để nhào bột làm bánh mỳ và pizza (Chú ý điều chỉnh lượng chất lỏng trong công thức bột nhào của quý vị cho phù hợp) Bộ phận làm phẳng (Q) Để trộn bột làm bánh ngọt, bột làm bánh nướng, nghiền khoai tây Cây khuấy (I) Để đánh kem, lòng trắng trứng và làm mayonnaise Khắc phục sự cố Hiện tượng Nguyên nhân Cách khắc phục Mô-tô chạy chậm lại trong Lượng bột nhào có thể vượt quá dung lượng Bỏ...
- Page 53 Tel : +(82) 2 6020-2200 Website: www.electrolux.vn Fax: +(82) 2 6020-2271~3 Customer Care Services : +(82) 1566-1238 MALAYSIA Email : homecare@electrolux.co.kr Electrolux Home Appliances Sdn Bhd Website: www.electrolux.co.kr Unit T2-L7, Level 7, Tower 2, Jaya 33 No.3, Jalan Semangat, INDONESIA Seksyen 13...
- Page 54 Share more of our thinking at www.electrolux.com Due to the Electrolux policy of continual product development; specifications, colours and APAC-EKM4000-IFU-AP-2 details of our products and those mentioned in this manual are subject to change without notice.