Haier HD80-A82 User Manual
Heat pump dryer
Hide thumbs
Also See for HD80-A82:
- User manual (45 pages) ,
- User manual (44 pages) ,
- User manual (134 pages)
Table of Contents
Advertisement
Advertisement
Table of Contents

Related Manuals for Haier HD80-A82


Summary of Contents for Haier HD80-A82
- Page 1 User Manual HD80-A82 Heat Pump Dryer...
-
Page 2: Dear Customer
DEAR CUSTOMER Thank you for your purchase of a Haier Instructions showing this icon product. Please read the manual and need special attention for safety instructions carefully and keep safe handling. them for future reference and pass them on to any future owner. -
Page 3: Safety Instructions
The tumble dryer must not be used in a non-stationary location (e.g. a ship). • Do not make any alterations to the tumble dryer, unless authorised to do so by Haier. • In areas which may be subject to infestation by cockroaches or other vermin, pay particular attention to keeping the tumble dryer and its surroundings in a clean condition at all times. - Page 4 select a high temperature. If in doubt, wash the items several times. • Items which contain a large proportion of rubber, foam rubber (latex foam) or rub- ber like materials such as shower caps, waterproof textiles, rubberised articles and items of clothing and pillows with foam rubber filling should not be dried in the tumble dryer.
-
Page 5: Installation
UNPACKING Remove all packaging material includ- ing the polystyrene base. All packaging material should be recycled. 1 Cut the strips. 2 Lift the cover upwards. 3 Remove the protective parts. 4 Remove the base. Ensure that any plastic wrap- pings, bags, etc are kept out of the reach of babies and young children. -
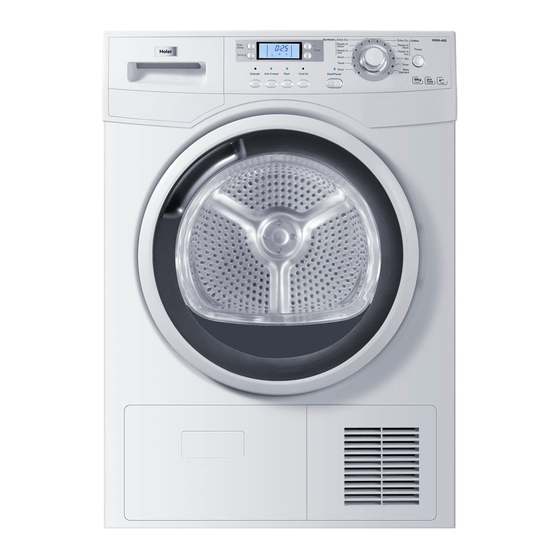
Page 6: Front View
FRONT VIEW The pictures may differ from the appliance you have purchased due to technical improvements. 1 Water tank 3 Service door 2 Tumble dryer door 4 Control panel 6 | English... -
Page 7: Rear View
REAR VIEW 5 Power supply cord 7 Drainage outlet 6 Back plate 8 Adjustable feet English | 7... -
Page 8: Control Panel
CONTROL PANEL 1 Temperature button Set temperature to the desired level. 2 Delayed start button Press button for delayed start. Use the Timer buttons to enter the time (in 1 hour intervals - up to 19 hours) the appliance should be finished in, afterwards press Start/Pause to start the delayed operation. - Page 9 6 Timer buttons Modify the default time to your needs, using the + and - timer buttons. 7 Empty tank indicator Water tank must be emptied. Important: Empty the water tank after each drying cycle. See Empty the water tank sec- tion of the manual.
-
Page 10: Program Modes
PROGRAM MODES DRYING RECOMMENDED MAX. PROGRAM DEGREE LAUNDRY LOAD Extra Dry Extra dry Heavy cotton, sheets, 8 kg gowns Ready to Store *) Ready to wear Cotton, sheets, coats 8 kg Ready to Iron Damp Ordinary cotton 8 kg Extra Dry Extra dry Heavy synthetic 4 kg... -
Page 11: Preparing The Dryer
PREPARING THE DRYER 1 Connect the tumble dryer to a power socket. 2 Make sure the water tank is empty an properly installed. 3 Make sure that the lint filter is clean and properly installed. 4 Make sure that the condenser filter is clean and properly installed. -
Page 12: Loading The Dryer
LOADING THE DRYER 1 Place the laundry evenly in the drum making sure not to overload the dryer. 2 Switch on the tumble dryer by press- ing the Power button. Fabric softeners or similar products should be used as specified in the manufacturer’s instructions. -
Page 13: Load Reference
LOAD REFERENCE Bed sheet (single) Cotton Approx. 800 g Blended fabric clothes Approx. 800 g Jackets Cotton Approx. 800 g Jeans Approx. 800 g Overalls Cotton Approx. 950 g Pyjamas Approx. 200 g Shirts Approx. 300 g Socks Blended fabrics Approx. -
Page 14: End Of Dry Cycle
END OF DRY CYCLE The tumble dryer stops operation auto- matically when a dry cycle is complete. The display shows END. Open the tum- ble dryer door and remove the laundry. If the laundry is not removed the anti- crease program starts automatically. 1 Switch off the tumble dryer by press- ing the Power button for 2 sec. -
Page 15: Lint Filter Cleaning
LINT FILTER CLEANING Clean the lint filter after each dry cycle. 1 Remove the lint filter from the drum. 2 Open up the lint filter. 3 Clean the lint filter form any lint re- siduals. 4 Reinstall the cleaned lint filter in the tumble dryer. -
Page 16: Error Codes
CLEANING & CARE TUMBLE DRYER Wipe the outside of the tuble dryer and the control panel with a damp cloth. Do not use any organic solvent or corrosive agent to avoid damage to the device. DRUM After some operation time, fabric care agents or calcium contained in the water can form an almost invisible film on the inside of the drum. -
Page 17: Troubleshooting
TROUBLESHOOTING Before contacting the customer service, please check the following cir- cumstances: PROBLEM CAUSES SOLUTIONS – ∙ Tumble dryer Poor connection to the Check connection to the fails to operate. power supply. power supply. – ∙ Power failure. Check the power supply. –... -
Page 18: Electric Circuit Diagram
ELECTRIC CIRCUIT DIAGRAM NTC1 NTC2 NTC3 Door switch Heat pump Water level switch Drainage pump Humidity sensor Lamp NTC1 Temperature sensor NTC2 Temperature sensor Motor NTC3 Temperature sensor 18 | English... - Page 20 Haier Europe Trading S.r.l. Via De Cristoforis 12 21100 Varese - Italy + 39 0332 24511 + 39 0332 245146 E-mail het.srl@haiereurope.com...