
Related Manuals for Sony HVO-4000MT


Summary of Contents for Sony HVO-4000MT
- Page 1 4-578-373-11 (1) 2015-11 4K3D Video Recorder Instructions for Use Before operating the unit, please read this manual thoroughly and retain it for future reference. HVO-4000MT © 2015 Sony Corporation...
- Page 2 Serial No. hazardous radiation exposure. Indications for Use/Intended Use The Sony HVO-4000MT 4K, 3D and 2D Video Recorder is intended to record 4K video and still images from endoscopic/laparoscopic camera systems, surgical microscope and other compatible medical imaging systems.
- Page 3 For the customers in the U.S.A. 4 For this particular equipment, all accessory equipment This equipment has been tested and found to comply with connected as noted above, must be connected to mains the limits for a Class A digital device, pursuant to part 15 via an additional isolation transformer conforming of the FCC Rules.
- Page 4 Class A IEC 61000-3-2 Voltage fluctuations/flicker emissions Complies IEC 61000-3-3 Warning If the HVO-4000MT should be used adjacent to or stacked with other equipment, it should be observed to verify normal operation in the configuration in which it will be used.
- Page 5 Guidance and manufacturer’s declaration - electromagnetic immunity The HVO-4000MT is intended for use in the electromagnetic environment specified below. The customer or the user of the HVO-4000MT should assure that it is used in such as environment. IEC 60601 Compliance...
- Page 6 To assess the electromagnetic environment due to fixed RF transmitters, an electromagnetic site survey should be considered. If the measured field strength in the location in which the HVO-4000MT is used exceeds the applicable RF compliance level above, the HVO-4000MT should be observed to verify normal operation.
- Page 7 Recommended separation distances between portable and mobile RF communications equipment and the HVO-4000MT The HVO-4000MT is intended for use in an electromagnetic environment in which radiated RF disturbances are controlled. The customer or the user of the HVO-4000MT can help prevent electromagnetic interference by maintaining...
- Page 8 WARNING on power connection Use a proper power cord for your local power supply. 1 Use the approved Power Cord (3-core mains lead) / Appliance Connector / Plug with earthing-contacts that conforms to the safety regulations of each country if applicable. 2 Use the Power Cord (3-core mains lead) / Appliance Connector / Plug conforming to the proper ratings (Voltage, Ampere).
- Page 9 For the customers in the U.S.A. SONY LIMITED WARRANTY - Please visit http://www.sony.com/psa/warranty for important information and complete terms and conditions of Sony’s limited warranty applicable to this product. For the customers in Canada SONY LIMITED WARRANTY - Please visit http://www.sonybiz.ca/pro/lang/en/ca/article/resources-warranty-product-registration for important information and...
-
Page 10: Table Of Contents
4K Convert Modes ........37 Table of Contents Please Read First ........13 Usage Notes..........15 Chapter 3 Basic Recorder Operations Operation Flow........39 Chapter 1 Overview Step 1: Record......... 40 Step 2: Capture Still Images ....41 Features ...........16 Step 3: Quick Playback ......41 System Configuration Example .....17 Step 4: End Recording ...... - Page 11 Editing the Doctor List ......70 Editing Patient Information ......53 Protecting Recorded Data......54 Sorting the Doctor List........ 70 Deleting Recorded Data ......54 Editing Doctor Settings ....... 70 Viewing Information on Recorded Data ..54 Deleting Doctors ......... 71 Editing Cases ..........
- Page 12 • Sony assumes no responsibility for damages, loss of income, or any claims from a third party arising out of use of the recorder or supplied software.
-
Page 13: Please Read First
Using this unit for video and/or audio recording, or could expose confidential information to third parties. If distribution over the network or otherwise may in some you have any questions in this regard, contact your Sony cases require the permission of the copyright holder of the dealer. - Page 14 On consumable parts When HDD seems to be faulty Even if the HDD is showing signs of malfunction, be sure • The HDD, fan, battery, and BD/DVD drive are to observe all the above precautions. This will prevent consumable parts that will need periodic replacement. further damage from occurring until the problem can be When operating at room temperature, a normal diagnosed and corrected.
-
Page 15: Usage Notes
Use isopropyl alcohol with a concentration of 50% to 70% (v/v) or ethanol with a concentration of 76.9% to 81.4 % (v/v) to clean the surface of the unit. In the event of operating problems If you should experience problems with the unit, contact your Sony dealer. -
Page 16: Chapter 1 Overview
Ch1/Ch2 simultaneous recording For details on playback and editing software, contact The unit is equipped with a Ch1/Ch2 simultaneous your local Sony representative. recording function that automatically performs Ch2 recording (2K) during Ch1 recording (4K). Network file transfer... -
Page 17: System Configuration Example
System Configuration Example Operating room Doctor’s office Hospital network File server Endoscopic device HVO-4000MT Card reader/ barcode reader FS-24 foot switch Record data to up to one external storage media simultaneously. RM-M010 infrared remote control unit Touch panel monitor Printer Caution The FS-24 has an Ingress Protection rating of IPx3. -
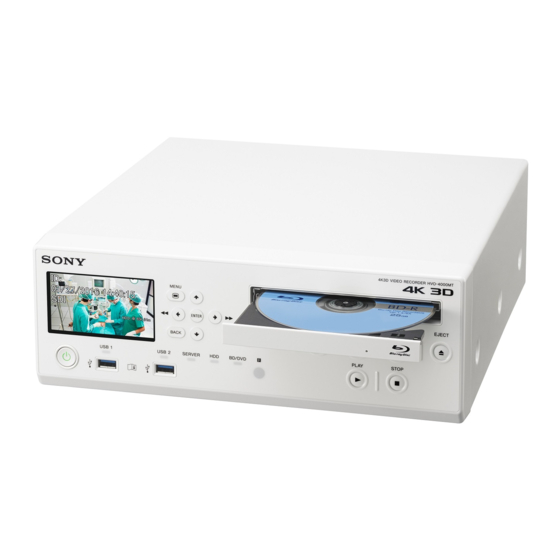
Page 18: Names And Functions Of Parts
Names and Functions of Parts Front Note Do not touch the laser pickup inside the BD drive You can also use this button to rewind during The discharge of static electricity that may result from playback of recorded data. touching the pickup may cause the drive to hang up, v button preventing the ability to write data. -
Page 19: Hdd Indicator
c Disc tray CLOSE FOLDER button Insert discs here. Use this to display the [End Recording] screen which is used to end surgical procedure or examination d Emergency eject hole recordings. If the disc tray does not open when you press the Z For details on use, see “Step 4: End Recording”... -
Page 20: Rear
The indicator indicates the following. Supported USB devices Indicator Status • Use Sony USB media. The main power switch on the rear panel • The connectors do not support all USB devices. is set to the a (off) position. • USB hubs and devices with built-in hubs are not Lit orange Standby mode. - Page 21 Connect USB devices here. Outputs HDMI signals. Note Supported USB devices We recommend using a Sony HDMI cable (not • Use Sony USB media. supplied). • The connectors do not support all USB devices. • USB hubs and devices with built-in hubs are not Equipotential grounding terminal supported.
-
Page 22: Infrared Remote Control Unit (Rm-M010)
Infrared Remote Control Unit (RM- WARNING M010) Using this unit for medical purposes The connectors on this unit are not isolated. Always use USB-compatible external hard drives and USB memory devices that operate solely on the power supplied by the unit. Connecting a device that operates on an AC power supply may result in an influx of leakage currents from the connected device, which may in turn result... - Page 23 Use this to display the [Recording Preparation] To replace the lithium battery screen to start recording a new surgical procedure or Use a Sony CR2025 lithium battery. Do not use any other examination. type of battery with the remote control unit.
-
Page 24: Status Displays
a Patient ID When you dispose of the battery, you must obey the law in the relative area or country. Displays the patient ID. Battery lifetime b Capture counter When the lithium battery output falls, even button presses Displays the number of still images captured. may not operate. -
Page 25: Setting Screens
h Print status Setting Screens Displays the printer status and the remaining number of print sheets. Example: [User Settings] screen The status color indicates the following. Green: Still image printing is in progress. Orange: A print error has occurred. Gray: Status other than the above. Playback status displays a Tabs The setting screens consist of tabs. -
Page 26: Using The On-Screen Keyboard (Text Entry)
Using the On-Screen Keyboard (Text Entry) When text entry is necessary, an on-screen keyboard appears. c [Cancel] Select this button and press the ENTER button to Names and Functions of Parts (On- cancel the settings and close the setting screen. Screen Keyboard) d [Apply] You can display an alphanumeric, symbol, or umlaut... -
Page 27: Handling Discs
Select this and press the ENTER button to cancel text entry and close the on-screen keyboard. h [OK] Use Sony discs. When you select this and press the ENTER button, the text that appears in the entry box is applied and input in the settings screen. -
Page 28: Inserting And Removing Discs
the menu screen. Remove the disc, and insert a compatible disc. To remove a disc Press the Z EJECT button while the unit is turned on. • Do not use solvents such as benzene, thinner, The disc tray opens. commercially available record cleaners, or anti-static spray. -
Page 29: Chapter 2 Preparation
Preparation Chapter Connections Turning the Unit On and Connect a power cord (not supplied) to the AC IN connector on the rear of the unit. To turn on the unit Connect the output signal of the medical equipment to SDI-IN connectors A to D on the rear of the unit. Set the main power switch on the rear panel to the ? (on) position. -
Page 30: Configuring System Settings
Press the 1 (on/standby) switch on the front panel of Configuring System the unit to enter standby mode. The 1 (on/standby) indicator lights orange. Settings Set the main power switch on the rear panel of the unit to the a (off) position. Be sure to configure the system settings before you begin operating the unit. -
Page 31: Configuring Recording Settings (User Settings)
[Function Settings] screen – [Input Detection] tab. Configuring Recording When [Auto] is selected, the automatically detected input signal will be displayed. Settings (User Settings) The default setting is [SDI ] (2D). [Color Gamut] Select the color gamut for the input signal. Configure input signal and image quality settings in the You can select from [BT.709] and [BT.2020]. -
Page 32: Configuring Recording Settings
Configure still image settings in the [Still] area. [Convert Color Gamut] Select the conversion format for the recorded color [Format] depth. Select the still image format (file format). You can select from [Do Not Convert], [Ch1/Ch2 to You can select from [Bitmap], [TIFF], and [JPEG]. BT.709] and [Ch2 to BT.709]. -
Page 33: Configuring Print Settings
Tips Configure print settings for still images. • When [Save Still] is set to [3D], the data will be The unit supports connection and use of the Sony UP- saved in MPF format. DR80MD printer. • When none of the check boxes are selected, [Save Video] and [Save Still] will be blank. -
Page 34: Configuring Other Settings
Display the [Print 1] tab, and configure settings [Orientation] related to print methods and items to be printed. Select the orientation for printing. The default setting is [Portrait]. The name of the currently connected printer appears in the [Printer] box. [Copies] Specify the number of copies to print (1 to 10). -
Page 35: Function Keys
Function Keys When using the unit, you can assign certain functions (recording, playback, etc.) to the function keys (F1 to F12) at the top of a keyboard and perform these functions with a single keystroke. We recommend assigning frequently used functions The [Edit] screen appears. -
Page 36: Other Assignable Functions
• [Record]: Record video and audio. • [Set Chapter]: Insert a chapter separator without saving a still image of the recording. • [Close Folder]: End the recording session. Other Assignable Functions Aside from the factory assigned functions, the following functions can also be assigned to the function keys. •... -
Page 37: 4K Convert Modes
4K Convert Modes The following image conversions are performed when [Cut] and [Downconvert] are selected for [4K Convert Mode]. You can configure the [4K Convert Mode] setting in the [User Settings] screen - [Recording] tab. For details on this setting, see “Configuring Recording Settings” (page 32). [Cut] mode 4K t 4K conversion •... - Page 38 Output image (4096 × 2160) Recorded image Input image (3840 × 2160) (4096 × 2160) Output image (4096 × 2160) HDMI 4K t 2K conversion • The input image is recorded with its height and width reduced to 1/2.1 size and black bars added to the top and bottom (33.5 and 34 pixel height respectively).
-
Page 39: Chapter 3 Basic Recorder Operations
Basic Recorder Operations Chapter Operation Flow If an input signal is interrupted, a chapter separator will be inserted when it is restored. When saving to external media, files will be separated by chapters. This chapter describes how to record and play back videos and capture still images while viewing the display on the front panel of the unit and using only the buttons on the front panel. -
Page 40: Step 1: Record
If the surgical procedure or examination is finished Step 1: Record and you want to end the recording session, proceed to “Step 4: End Recording” (page 42) and perform the recording end procedure. Press the z REC button. z REC button If you press the z REC button again, recording will start again as a new recorded data entry. -
Page 41: Step 2: Capture Still Images
Step 2: Capture Still Step 3: Quick Playback Images Play back data recorded in Step 1. Capture still images from live image transmissions. Press the B PLAY button. Up to 500 still images can be captured for a single recorded data entry. Press the CAPTURE button. -
Page 42: Step 4: End Recording
Step 4: End Recording End the recording session to stop recording to the internal HDD and stop transfer to external media. This operation is referred to as “closing a folder.” Press the x STOP button to stop recording. Press the CLOSE FOLDER button. CLOSE FOLDER button Select [OK] when the confirmation message appears, and press the ENTER button to display the [End... -
Page 43: Chapter 4 Recording And Playback
Recording and Playback Chapter Recording Preparation Before starting to record, enter information regarding the patient of the surgical procedure or examination, configure the storage destination and quality settings for recorded data, and then perform a test recording. You can also register information for multiple patients in Enter patient information. -
Page 44: Using A Hard Keyboard For Patient Information And Data Storage Settings
For details on this setting, see “Doctor List Using a Hard Keyboard for Patient Registration” (page 69). Information and Data Storage [Case] Settings Select the case. When [Keyboard Mode] is set to [Hard Keyboard] in the [System Admin Settings] screen – [Device Settings] screen, you can configure patient information and data The cases must be registered beforehand. -
Page 45: Test Recording
Select [Call List] in the [Recording Preparation] The patient is added to the patient list. screen, and press the ENTER button. The [Patient List] screen appears. Repeat to add any additional patients as necessary. Select the patient to delete, and press the ENTER button to select its check box. -
Page 46: Recording
<uppermost folder of the external media>/<recording For details on how to record via contact switch, contact start date (year, month, day, hour, minute, your local Sony representative. second)_patient ID>/MOVIE/ <uppermost folder of the external media>/<patient ID>/ Note on the auto delete function for <recording start date (year, month, day, hour, minute,... -
Page 47: Capture Still Images
Still images can be captured manually or via contact switch. This section describes manual operations. For details on contact switch controls, contact your local Sony representative. Manual Still Image Capture To capture a still image, press the CAPTURE button at the moment you want to capture the still image. -
Page 48: Using The Ch1/Ch2 Simultaneous
Using the Ch1/Ch2 Playback Simultaneous Recording You can play back the most recent recorded data stored on Function the unit’s internal hard disk via simple controls. You can also play back recorded data from search This function allows automatic Ch2 recording (2K) results. -
Page 49: Image Search
[2D/3D] Image Search Select whether the recorded data is 2D data or 3D data. You can search for recorded data stored on the unit’s internal hard disk. Select [Clear] and press the ENTER button to clear all Use the on-screen keyboard to enter text. specified search conditions. -
Page 50: Playback From The Search Results List
Select the recorded data you want to play back, and press the B PLAY button. The recorded data that is highlighted plays back. Only the highlighted recorded data is played back. To change the type of images for which to display Sorting the Recorded Data List thumbnails, select the [Display] box and press the ENTER button. -
Page 51: Processing Recorded Data
Select [Execute], and press the ENTER button. Processing Recorded The recorded data is sorted according to the specified order. Data You can process recorded data stored on the unit’s internal hard disk in the following ways. • Printing (page 51) •... -
Page 52: Copying To External Media
Select the [Operation] box, and press the ENTER entry. When this limit is exceeded, the “Exch. media button. limit exceeded” message appears on the [Save to] screen. The [Operation] screen appears. If you are copying to a BD/DVD disc or USB Select [Print], and press the ENTER button. -
Page 53: Editing Patient Information
Copying of recorded data starts. Select [Save to], and press the ENTER button. The [Image List] screen appears again. Select [Execute], and press the ENTER button. The [Save to] screen appears. Configure save settings for the recorded data, select [Execute], and press the ENTER button. For details on each setting, see step 6 of “To select data for copying from the [Recording List] screen”... -
Page 54: Protecting Recorded Data
The [Change] screen appears. To remove protection Select [UnProtect] in step 2 of the previous procedure, Edit each item as necessary, select [Change], and and press the ENTER button. Perform the rest of the press the ENTER button. procedure as shown. For details on each setting, see “Patient Information and Data Storage Settings”... - Page 55 For details on displaying the [Recording List] screen, see “Image Search” (page 49). The [Image List] screen appears. Select [Rec Info], and press the ENTER button. The information on the recorded data is displayed. The sizes displayed in the [Recording List] screen indicate total sizes for Ch1 and Ch2.
-
Page 56: Chapter 5 System Administrator Settings
System Administrator Settings Chapter Select [Settings], and press the ENTER button. Displaying the [System The [Settings] screen appears. Admin Settings] Screen Select [System Admin Settings], and press the ENTER button. You can set the initial configurations for various settings in the [System Admin Settings] screen. Configurations in the [System Admin Settings] screen If password protection is enabled, a password entry must be performed by the system administrator. -
Page 57: Language And Time Settings
List of time zones Language and Time Settings Time zone UTC-12:00 International Date Line West UTC-11:00 Coordinated Universal Time-11 Configure the display language and the display format for UTC-10:00 Hawaii the current date and time. UTC-09:00 Alaska Select [Language & Time Settings] in the [System UTC-08:00 Baja California Admin Settings] screen, and press the ENTER... - Page 58 Time zone Time zone UTC+01:00 Belgrade, Bratislava, Budapest, UTC+08:00 Taipei Ljubljana, Prague UTC+08:00 Beijing, Chongqing, Hong Kong SAR, UTC+01:00 West Central Africa Urumqi UTC+02:00 Athens, Bucharest UTC+09:00 Seoul UTC+02:00 Amman UTC+09:00 Yakutsk (RTZ 8) UTC+02:00 Istanbul UTC+09:00 Osaka, Sapporo, Tokyo UTC+02:00 Jerusalem UTC+09:30 Adelaide UTC+02:00 Cairo...
-
Page 59: Function Settings
[Change Patient Info.] Function Settings Select whether to allow changes to patient information at any time. The default setting is [Not Used]. Configure initial settings for patient information, input signals, and other functions. [Input Detection] Tab Select [Function Settings] in the [System Admin Configure the detection method for input signals. -
Page 60: [General 1] Tab
[Auto Live] When you finish configuration, select [Apply] and Select whether to use the auto live function. press the ENTER button. When the auto live function is enabled and you capture a The [Auto Live] tab appears again. still image, the captured image is displayed for the duration specified with the [Duration] setting of [Auto Live Settings]. -
Page 61: [General 2] Tab
Select [Advanced] for [Image List Display], and Use only alphanumeric characters, underscores (_), press the ENTER button. hyphens (-), and spaces. The [Advanced] settings screen appears. [Display Logo] Select whether to display a logo in the [MENU] screen. Configure each setting, select [Apply] and press the The default setting is [Not Used]. -
Page 62: Device Settings
For details on this setting, see “To configure printer settings” (page 63). Tips • The unit can recognize the Sony UP-DR80MD printer automatically. To have the unit recognize UP- DR80MD printers automatically, set the USB port to which the printer will be connected to [No Device] in the device settings. - Page 63 is in progress or while the [Device Settings] screen is Copy the watermark file onto a USB memory device, displayed. and insert the device into a USB port on the unit. • If the USB port to which a card reader is connected is For details on preparing a watermark file, see “To changed while the unit is turned on, the card reader will prepare a watermark file”...
-
Page 64: [Device 2] Tab
Copy the watermark file onto a USB memory device. [Birth Date] Specify the starting position for the date of birth and Create a folder with the following name in the the date format. uppermost directory of the USB memory device, and You can select from [YYYY/MM/DD], [MM/DD/ copy the watermark file. -
Page 65: [Contact Switch] Tab
For details on verifying the setting, see “To configure The default setting is [9600 bps]. system control settings” (page 65). [RS-232C] When [RS-232C] is set to [Monitor], the transmission Specify the device connected to the RS-232C connector. speed is fixed at 38400 bps. The default setting is [No Device]. -
Page 66: Password Settings
Password Settings The pause control of the [Record Video/Pause] function will not operate immediately after recording starts. Wait about 5 seconds before performing the Configure password settings to prevent unauthorized control. changes to the [System Admin Settings]. When password protection is enabled, a password entry The [Contact Switch] tab appears again. -
Page 67: Network Settings
[Check New Password] Network Settings Reenter the new password. The new password is saved. Configure initial settings for the network and server. Select [Network Settings] in the [System Admin Settings] screen, and press the ENTER button. The [Network Settings] screen appears. Select a tab, and press the ENTER button. -
Page 68: [Dns Server] Tab
[IP Address] [Shared] Tab Enter the IP address. Configure the necessary settings for using a server as the [Subnet Mask] storage destination. Enter the subnet mask. [User Name] [Default Gateway] Enter a user name. Enter the IP address for the default gateway. If you are only using a local network and not connecting [Password] to other networks, do not configure this setting. -
Page 69: Doctor List Registration
Select the external storage media that will be used during Doctor List Registration simultaneous recording. You can select from [Not Specified], [Auto-Detect], [BD/ DVD], [USB 1], [USB 2], and [SERVER]. Register doctor names and initial settings for each doctor. The doctor information registered here will be used in the [File Server] Tab doctor lists and default settings that appear in other screens. -
Page 70: [External Media] Tab
For the landscape orientation Editing the Doctor List You can select from 1 image (1 × 1), 2 images (2 × 1), 4 images (2 × 2), 6 images (3 × 2), 8 images (4 × 2), 9 images (3 × 3), 12 images (4 × 3), 15 images (5 × 3), or 18 images (6 ×... -
Page 71: Deleting Doctors
Note Editing Cases If you change the doctor name, you will not be able to use the previous doctor name to search for recorded data attributed to that name. Edit cases and categories for surgical procedures and examinations, and create the list of cases that will be used in the various screens. -
Page 72: Sorting The Case List
To delete a category Select [OK] when the confirmation message appears, and press the ENTER button. Select the category you want to delete in the [Edit Category List] screen, select [Delete], and then press Sorting the Case List the ENTER button. Select [OK] when the confirmation message appears, Select the case you want to reposition in the [Edit and press the ENTER button. -
Page 73: Editing Category Names
Editing Category Names Auto Delete Settings Select the category you want to rename in the [Edit Category List] screen, select [Edit], and then press the Select whether to use the auto delete function, and ENTER button. configure the threshold value that will be used for the function. -
Page 74: Dicom Settings
[Local Station 2] Tab DICOM Settings Configure local station settings. [SOP Class UID] Configure settings that are necessary for DICOM Select [SC] or [VL] for the SOP Class UID. transmissions of still images. The default setting is [SC]. Select [DICOM Settings] in the [System Admin [Character Set] Settings] screen, and press the ENTER button. -
Page 75: Chapter 6 Touch Panel And Mouse
– After applying the setting, the V , v , B , b , ENTER, unit. and MENU buttons on the front panel of the unit and on the infrared remote control unit are disabled. • For details on supported touch panel monitors, contact your local Sony representative. -
Page 76: Screen Displays In Touch Panel / Mouse Mode
Screen Displays in Touch Panel / Mouse Mode The screens that appear in touch panel / mouse mode differ slightly from those that appear in standard mode. This section describes the main differences in the screens and buttons that appear. [MENU] Screen a [Patient Info.] For details on each setting, see “Recording... -
Page 77: [Status] Screen
g [AUDIO] (Audio on/off) n [Input] Use this to record audio. This is enabled when [2D/3D] is set to [Manual] in On (green): Audio is recorded. the [System Admin Settings] screen – [Function Off (gray): Audio recording is stopped. Settings] screen – [Input Detection] tab. When [Auto] is selected, the input signal is automatically h Status button recognized and displayed here. -
Page 78: Still Image Playback Screen
Ch1 video is played back during quick playback. Still Image Playback Screen This screen appears during still image playback. You can play back the still images in sequence using the buttons at the bottom. To play back 3D still images, tap the 3D data button. To playback the left and right 2D still images, tap the [L] and [R] buttons. -
Page 79: Chapter 7 Miscellaneous
Miscellaneous Chapter Error Messages When contacting your local Sony representative, please indicate the error message and error ID. Front panel display Description Solution Error message Error ID SYSTEM ERR. 0100 to Motherboard error Restart the unit. (The unit will restart automatically for 0199 error ID 0600 to 0699 capture board errors.) If the error... - Page 80 Internal HDD warning or error An internal HDD error has occurred. Contact your local Sony representative. ERR.BATTERY – Battery dead The battery is dead. Contact your local Sony representative. WARN.HDD.2 – Corrupted files warning Corrupted files exist on the internal HDD. Perform recovery on the internal HDD.
-
Page 81: Troubleshooting
Be sure to check the following if a problem occurs. If the recovery, the database cannot be recovered. Contact your local Sony representative. problem persists, contact your local Sony representative. • The unit does not turn on when the 1 (on/standby) Note switch is pressed. -
Page 82: Licenses
DICOM Toolkit DCMTK (C) 1993- http://www.sony.net./Products/ Version 2, June 1991 2008, OFFIS e.V. Linux/ Sony will not answer questions Copyright (C) 1989, 1991 Free concerning the data in the source Software Foundation, Inc., 51 code. libjpeg Franklin Street, Fifth Floor, Boston,... -
Page 83: Terms And Conditions For Copying, Distribution And Modification
These restrictions translate to certain contains a notice placed by the You may modify your copy or responsibilities for you if you copyright holder saying it may copies of the Program or any distribute copies of the software, or if be distributed under the terms of portion of it, thus forming a you modify it. - Page 84 themselves, then this License, and its to be distributed under the However, parties who have terms, do not apply to those sections terms of Sections 1 and 2 received copies, or rights, from when you distribute them as separate above on a medium you under this License will not works.
- Page 85 example, if a patent license limitation as if written in the “AS IS” WITHOUT would not permit royalty-free body of this License. WARRANTY OF ANY KIND, redistribution of the Program by EITHER EXPRESSED OR all those who receive copies The Free Software Foundation IMPLIED, INCLUDING, BUT directly or indirectly through may publish revised and/or new...
-
Page 86: End Of Terms And Conditions
You should have received a copy into proprietary programs. If your END OF TERMS of the GNU General Public program is a subroutine library, you License along with this program; may consider it more useful to if not, write to the Free Software permit linking proprietary Foundation, Inc., 51 Franklin applications with the library. -
Page 87: Gnu Lesser General Public License
of free software (and charge for this Therefore, we insist that any patent GNU LESSER service if you wish); that you receive license obtained for a version of the source code or can get it if you want library must be consistent with the GENERAL it;... -
Page 88: Terms And Conditions For Copying, Distribution And Modification
software only, so we use the Lesser (which use some of those functions General Public License. and data) to form executables. You may charge a fee for the physical act of transferring a copy, In other cases, permission to use a The “Library”, below, refers to any and you may at your option offer particular library in non-free... - Page 89 the application does not Public License has appeared, the Library (because it contains supply it, the square root then you can specify that portions of the Library), rather than a function must still compute version instead if you wish.) Do “work that uses the library”.
- Page 90 Library is used in it and that the the version that the work the work based on the Library Library and its use are covered by was made with. and of the other library facilities this License. You must supply a copy Accompany the work with is otherwise permitted, and of this License.
- Page 91 software distribution system which 10. Each time you redistribute the is implemented by public license 14. If you wish to incorporate parts Library (or any work based on practices. Many people have made of the Library into other free the Library), the recipient generous contributions to the wide programs whose distribution automatically receives a license...
-
Page 92: End Of Terms And Conditions
PARTY WHO MAY MODIFY Public License for more END OF TERMS AND/OR REDISTRIBUTE details. THE LIBRARY AS PERMITTED ABOVE, BE You should have received a LIABLE TO YOU FOR copy of the GNU Lesser CONDITIONS DAMAGES, INCLUDING General Public License along ANY GENERAL, SPECIAL, with this library;... -
Page 93: Specifications
Operating Temperature Specifications 5 °C to 40 °C (41 °F to 104 °F) Operating Humidity 20% to 80% (Maximum wet-bulb temperature: 30 °C (86 °F)) (no condensation) Recording Features Operating Pressure Recording Video Format 700 hPa to 1,060 hPa MPEG-4 AVC/H.264 Storage and Transport Temperature Recording Audio Format –20 °C to +60 °C (–4 °F to +140 °F) - Page 94 DURING THE WARRANTY PERIOD OR AFTER EXPIRATION OF THE WARRANTY, OR FOR ANY OTHER REASON WHATSOEVER. • SONY WILL NOT BE LIABLE FOR CLAIMS OF ANY KIND MADE BY USERS OF THIS UNIT OR MADE BY THIRD PARTIES. • SONY WILL NOT BE LIABLE FOR THE LOSS,...
-
Page 95: Index
Index [General] tab 69 Quick playback 41, 48 [General 1] tab 60 [General 2] tab 61 Numerics Reader settings 64 4K Convert Modes 37 Rear panel 20 Hard keyboards 44 Recording 40, 46 HDD indicator 19 Recording list 49, 50 Recording preparation 43 Auto delete function 46, 73 Registering doctors 69... - Page 96 Sony Corporation 1-7-1 Konan Minato-ku Tokyo, 108-0075 Japan...