Logitech BRIO Setup Manual
Hide thumbs
Also See for BRIO:
- User manual ,
- Complete setup manual (176 pages) ,
- Setup manual (90 pages)
Advertisement
Available languages
Available languages
Advertisement
Table of Contents

Related Manuals for Logitech BRIO


Summary of Contents for Logitech BRIO
- Page 1 BRIO Setup Guide | Guide d’installation...
- Page 2 ENGLISH FRANÇAIS ESPAÑOL PORTUGUÊS...
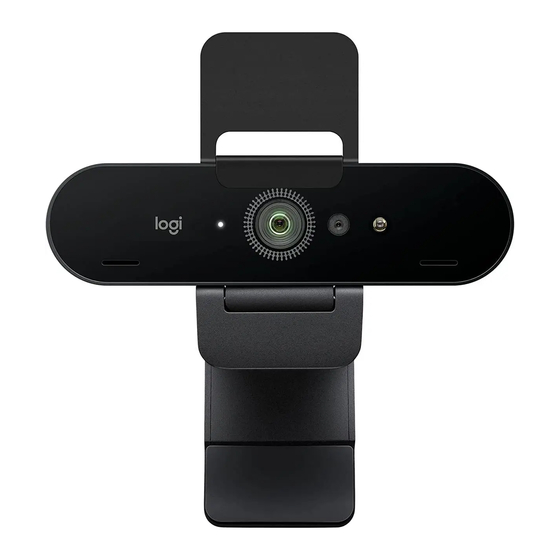
- Page 3 FEATURES 90-degree FOV lens Video streaming LED IR sensor IR LED Mics Privacy shade Removable clip Detachable cable (USB 2.0 or 3.0) Type C compatible Carrying case English...
- Page 4 SET UP YOUR PRODUCT Set up camera on an LCD or on a tripod. Connect cable to camera and a computer. Please give the camera a few seconds to enumerate in the operating system. Note: USB 3.0 required for 4K. Start your video or audio call from your application.
- Page 5 Windows and Mac. Please visit our support website for more details. for download that can enhance your product experience. To enjoy all the benefits of your Logitech product, The camera and IR sensor/LED supports this feature visit www.logitech.com/support/brio and take advantage plug-and-play, following setup in Windows 10.
- Page 6 FONCTIONNALITÉS Lentille champ de vision 90 degrés Témoin lumineux lecture vidéo Capteur IR Témoin lumineux IR Micros Volet de protection Clip détachable Câble détachable (USB 2.0 ou 3.0) Compatible type C Étui de transport Français...
- Page 7 CONFIGURATION DU PRODUIT Montez votre caméra sur un écran LCD ou un trépied. Connectez le câble à la caméra et à l’ordinateur. Patientez quelques secondes en attendant que la caméra s’affiche dans le système d’exploitation. Remarque: USB 3.0 requis pour 4K. Effectuez votre appel vidéo ou audio à...
- Page 8 échéant) d’informations et accéder aux téléchargements. CONSEILS DE DÉPANNAGE Pour obtenir des conseils de dépannage, des informations sur les outils logiciels ainsi qu’un outil de diagnostic facilitant le dépannage de votre dispositif Brio, rendez-vous sur le site ww.logitech.com/support/brio. Français...
- Page 9 COMPONENTES Lente de gran angular (90 grados) LED de streaming de video Sensor IR LED IR Micrófonos Tapa de privacidad Clip extraíble Cable extraíble (USB 2.0 o 3.0) Compatible con tipo C Funda protectora Español...
- Page 10 CONFIGURACIÓN DEL PRODUCTO Coloca la cámara en un monitor LCD o un trípode. Conecta el cable a la cámara y a la computadora. Espera unos segundos mientras el sistema operativo enumera la cámara. Nota: Se requiere USB 3.0 para 4K. Inicia una videoconferencia o una llamada desde la aplicación.
- Page 11 La cámara y el sensor/LED IR son compatibles con esta Para disfrutar de todas las ventajas de tu producto Logitech, visita www.logitech.com/support/brio y usa la amplia función Plug and Play, tras la instalación de Windows 10.
- Page 12 RECURSOS Lente com campo de visão de 90 graus LED de transmissão de vídeos Sensor infravermelho LED infravermelho Microfones Cortina de privacidade Clipe removível Cabo destacável (USB 2.0 ou 3.0) Compatível com tipo C Estojo para transporte Português...
- Page 13 CONFIGURAR O PRODUTO Instale a câmera em um LCD ou em um tripé. Conecte o cabo na câmera e em um computador. Aguarde alguns segundos para que a câmera seja listada no sistema operacional. Observação: USB 3.0 necessário para 4K. Inicie a chamada com vídeo ou áudio no aplicativo.
- Page 14 Para usufruir A câmera e o sensor/LED infravermelho oferecem suporte de todos os benefícios do seu produto Logitech, visite www.logitech.com/support/brio e aproveite a ampla a este recurso plug-and-play, depois da configuração no Windows 10.
- Page 15 © 2017 Logitech. Logitech, Logi and other Logitech marks are owned by Logitech and may be registered. All other trademarks are the property of their respective owners. Microsoft, Windows Vista, Windows, and the Windows logo are trademarks of the Microsoft group of companies. Logitech assumes no responsibility for any errors that may appear in this manual.