Table of Contents
Advertisement
Lapping & Polishing System Logitech PM5 user manual
1. Preliminary remarks
1.1. Emergency stop
In case of emergency, hit the emergency button. The central power and the pump will be stopped. The
supported supplied voltage is single phase AC100V only.
1.2. Warnings
Be sure to read the following remarks.
1.2.1. The PP6 jig (the wafer chuck) cost 4.000.000 JPY. Be very careful not to hit it or drop it. When you
manipulate it with the surface to polish facing down, be sure to hold the central ring with your fingers.
1.2.2. The stainless steel plate and the PP6 jig are very heavy, so be very careful when manipulating them. In
particular, be careful not to pinch your fingers when setting the stainless steel plate on the machine.
1.3. Sample size
4inch wafers or any sample smaller then 4inch wafer can be used.
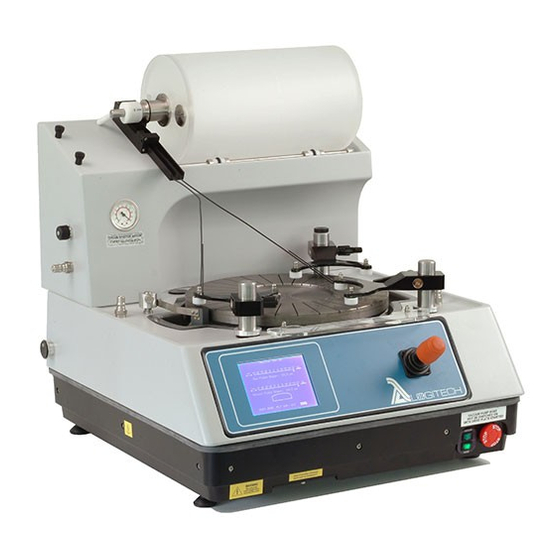
2. Description of the equipment
• PM5: the main body,
• Plate: the stainless steel plate on which the
Polishing cloth is pasted,
• Chemical tank: normally filled with slurry, but here,
we are filling it with water during conditioning,
• Vacuum hose. You can make a leak by unplugging it
from the main body,
• Saucer (black plastic receptacle). It is possible to
remove it after taking out the plate.
Please, leave this manual here. You can find an electronic version in the TakedaCR Wiki:
Fig. 1
• Roller arm pillar: pillar to fix the roller arm
• Roller arm (assembly): jig's guide
• Polishing cloth. It is not necessary to change it each
time.
1 / 7
Eric (Mita Lab) 2017/05/08
http://takeda-cr.t.u-tokyo.ac.jp
Fig. 4
Fig. 5
Advertisement
Table of Contents

Summary of Contents for Logitech PM5
- Page 1 Lapping & Polishing System Logitech PM5 user manual Eric (Mita Lab) 2017/05/08 Please, leave this manual here. You can find an electronic version in the TakedaCR Wiki: http://takeda-cr.t.u-tokyo.ac.jp 1. Preliminary remarks 1.1. Emergency stop In case of emergency, hit the emergency button. The central power and the pump will be stopped. The supported supplied voltage is single phase AC100V only.
- Page 2 Lapping & Polishing System Logitech PM5 user manual 2017/05/08 Fig. 6 • Trap: to prevent the suction of slurry Fig. 2 • Leak valves • PP6 jig: sample holder. Samples are held by vacuum. Be sure to hold up the central ring with your fingers before you put it down, •...
- Page 3 Lapping & Polishing System Logitech PM5 user manual 2017/05/08 Other definitions:. Vacuum pump: it has it's own power switch, • Conditioning ring: used for the polishing cloth conditioning and cleaning, • Pet bottle: used for slurry storage and supply, •...
- Page 4 4.16. Check the thickness of the sample (for instance with dektak), 4.17. Fix the vacuum hose to the jig holder (don't connect yet to the PM5 main body), 4.18. Turn over the jig and put it on the jig holder (Fig. 8), 4.19.
- Page 5 Lapping & Polishing System Logitech PM5 user manual 2017/05/08 more than 10h. 5.1. Be sure that there is a new cloth available. There should be a seal at the backside, 5.2. Peel off the old cloth, 5.3. Peel off about 2cm of the new cloth release paper, 5.4.
- Page 6 Lapping & Polishing System Logitech PM5 user manual 2017/05/08 Fig. 12: Conditioning the cloth with the slurry Fig. 13: Setting the jig on the cloth 7. Lapping 7.1. Shake the slurry (big size slurry, 11.5 μm diameter), 7.2. Put some slurry on the plate, 7.3.
- Page 7 Lapping & Polishing System Logitech PM5 user manual 2017/05/08 9.4. Clean well the ceramic plate with wiper and acetone, 9.5. Let the hotplate cool down and put it away. 10. Clearing up 10.1. In case of lapping, wipe the plate as much as possible in order to remove the slurry, 10.2.