Advertisement
Quick Links
Advertisement

Related Manuals for Dell Wyse 3030 LT


Summary of Contents for Dell Wyse 3030 LT
-
Page 1: User Guide
Dell Wyse 3030 LT User Guide Regulatory Model: N06D Regulatory Type: N06D001... - Page 2 A WARNING indicates a potential for property damage, personal injury, or death. © 2016 - 2018 Dell Inc. or its subsidiaries. All rights reserved. Dell, EMC, and other trademarks are trademarks of Dell Inc. or its subsidiaries. Other trademarks may be trademarks of their respective owners.
-
Page 3: About This Guide
About this guide This guide is intended for Wyse 3030 LT thin clients running either Dell Wyse ThinLinux or Dell Wyse ThinOS. It provides hardware specifications and OS specific configurations to help you work with Wyse 3030 LT thin clients. -
Page 4: Installation And Setup
Accessing thin client BIOS settings on Wyse ThinOS After starting your thin client you will see a Dell logo for a short period of time. During this period you can press and hold the Delete key to enter the BIOS with Fireport as the password to make necessary modifications. For example, you can use the F7 key to use Optimized Defaults (load optimal default values for all the items in the BIOS setup utility). - Page 5 Zero Desktop — Click the System Settings icon on the Zero Toolbar, and then select Remote Connections. Logging on to the Wyse 3030 LT running ThinLinux On your initial configuration, Dell recommends that you connect by using a wired connection by plugging in the network connected Ethernet cable to your thin client.
- Page 6 Multiple monitor configurations Wyse 3030 LT thin clients running ThinOS Depending on your thin client model, connections to monitors can be made using either a DisplayPort, or a proper Dell monitor cables/ splitters/adapters. For information about configuring dual head display settings, see Configuring the Dual Head display setting on ThinOS.
- Page 7 VGA connected monitors supporting ggamma settings, if you feel the default settings are too light. The Gamma Setup tab is disabled once you click Save+Exit. You can enable it again by setting gamma={1-100} ggamma={1-100} bgamma={1-100} in the Resolution INI parameter. For more information, see Dell Wyse ThinOS INI Guide. Displays...
- Page 8 For Swap dual screens, when you set Main Screen to Screen2, an extra check box is displayed at the bottom of the tab that allows you to swap dual screens. If you clear the check box, the Screen1 is usually the left one or the top one in dual display. When you set Main Screen to Screen2, the main screen is changed to the right screen or bottom screen.
- Page 9 Figure 1. Display Settings Select the preferred Resolution from the drop-down list. Select the Rotation type from the drop-down list. • Normal • Right • Left • Upside-down Click the ON/OFF button to switch between dual display and mirror mode in a dual monitor configuration. Click the ON/OFF button to enable the Set as primary option.
-
Page 10: Configuring General Settings
Networks This section describes about the network configurations of Wyse 3030 LT running either ThinOS or ThinLinux. • For network configurations on ThinOS, see Configuring the network settings on ThinOS. • For network configurations on ThinLinux, see Configuring the network settings on ThinLinux. - Page 11 Click the General tab, and use the following guidelines: To set the default gateway, select the type of network interface from the available options. Single Network support—Either wireless or wired network is connected. • ENET—Click this option, if you want set up the Ethernet Wired Network Connection. •...
- Page 12 d Enter the IP address of the WINS Server in the WINS Server box. Use of WINS is optional. Enter the network address of an available WINS name server. WINS allows you to specify remote systems by their host names rather than IP addresses. If a specific IP address (instead of a name) is entered for a connection, it is used to make the connection.
- Page 13 Configuring ENET settings To configure the ENET settings: From the desktop menu, click System Setup, and then click Network Setup. The Network Setup dialog box is displayed. Click the ENET tab, and use the following guidelines: Ethernet Speed—Normally the default (Auto-Detect) should be selected, but another selection can be made if automatic negotiation is not supported by your network equipment.
- Page 14 The following kinds of server names are supported—all examples are based on the Cert Common name company.dell.com NOTE: Using only the FQDN, that is Company.wyse.com does not work. You must use one of the options—note that *.dell.com is the most common option as multiple authentication servers may exist: Servername.dell.com *.dell.com...
- Page 15 g PEAP—If you select the PEAP option, click Properties to open and configure the Authentication Properties dialog box. Be sure to select either EAP_GTC or EAP_MSCHAPv2, and then use the correct Username, Password, and Domain. Validate Server Certificate is optional. NOTE: The server certificate text box for LEAP and PEAP supports a maximum of approximately 127 characters, and supports multiple server names.
- Page 16 b After you configure the SSID connection, the added SSID connection is listed on the page of the WLAN tab. Remove — Use this option, if you want to remove a SSID connection by selecting the SSID connection from the list. d Properties —...
- Page 17 • Wired • Network proxy Figure 3. Network Settings page Configuring wired network connection settings To configure the wired connection settings, perform the following steps: Click the Wired tab. The following attributes are displayed if the network cable is connected to your thin client and wired connection is established.
- Page 18 Parameter Description Username Enter the Username for the network connection. Password Enter the password you want to set for the connection. Ask for this password every time If this check box is selected, you will be prompted to enter the password every time when you connect to the network.
- Page 19 Parameter Description PAC file Select the PAC file from the list or upload your CA certificate stored locally. To upload your PAC file, click the Folder icon, and then choose the certificate from the location where you have stored the certificate. Inner authentication From the drop-down list, select the inner authentication method you want to set.
- Page 20 Parameter Description To upload your CA certificate, click the Folder icon, and then browse to the location where you have stored the certificate. PEAP version Select the PEAP version type you want to use for EAP authentication. The available options are: •...
- Page 21 Parameter Description Address Specifies the Router IP address. Netmask Specifies the Netmask. Netmask is used to divide an IP address into subnets and specify the network's available hosts. Gateway Specifies the IP address of the default Gateway. Metric Specifies the Metric value for the network connection. Use this connection only for resources on its network Select this check box, if you want to allow the wired connection only for resources on its network.
- Page 22 Audio This section provides the information about the Wired audio and Bluetooth audio. Wired audio The wired audio supports the following options: • Combo jack audio (3.5mm jack) • Stereo headphone • Mono microphone NOTE: The audio is also supported through the display port. Bluetooth audio •...
- Page 23 Peripherals Wyse 3030 LT thin client running ThinLinux. On the System Settings page, click the Peripherals icon. The following tabs are displayed on the left pane of the System Settings page. • Keyboard • Mouse • Printers • Sound The following tables describes about the tested peripherals: Topics: •...
- Page 24 Dell C1660w Multifunction Color Printer Dell B1165nfw/B2375dfw Mono Printer Dell B2360D Wyse 3030 LT thin client ThinOS This section describes the tested peripherals of Wyse 3030 LT thin client running ThinOS. The following table describes about the tested peripherals: Peripherals...
- Page 25 Dell Optical Wireless Mouse – WM123 Space Mouse Pro KSI 1700 Keyboard Logitech Media Keyboard K200/Mouse B100 Logitech T400 Zone Touch Mouse Dell Wireless Bluetooth Travel Mouse – WM524 Dell WM713 Bluetooth ThinkPad Compact Bluetooth Keyboard Logitech K480 Bluetooth keyboard Table 6. USB Webcam...
- Page 26 Table 7. Printer Printer Dell B1265dnf Multifunction Laser Printer Dell B2375dnf Mono Laser Multifunction Printer Dell B2360d Laser Printer Table 8. Others Others Elo Touch Screen Serial Prolific USB-to-Serial converter U232-P9V2 Peripherals...
- Page 27 Setting power states Wyse 3030 LT thin client running ThinOS. Use the Shutdown dialog box to select the available option you want: • Classic Desktop — Click Shutdown in the Connect Manager or Desktop Menu. • Zero Desktop — Click the Shutdown icon on the Zero Toolbar.
- Page 28 Software This section describes about establishing and configuring the virtual broker connections for 3030 LT thin clients running either ThinOS or ThinLinux. • For configuring the virtual broker connection on ThinOS, see Configuring the broker setup on ThinOS. • For configuring the virtual broker connection on ThinLinux, see Configuring connections locally on ThinLinux.
- Page 29 Select the Broker type from the drop-down list. If you select None from the list, click either of the following connection protocols: b If you select the Citrix Xen, use the following guidelines: • Select the check box to enable the StoreFront style. •...
- Page 30 If you select the Microsoft, enter the IP address of the Broker Server in the Broker Server box, and then click OK to save the settings. If you select Dell vWorkspace, use the following guidelines: • Broker Server—Enter the IP address of the Broker Server.
- Page 31 • Published Application • Storefront Click Save to save the changes. Configuring and managing VMware connections The VMware connections page enables you to create and manage the View client 3.5 connections. To configure the VMware Settings, complete the following task: Click the + icon to add a new VMware Connection.
- Page 32 Figure 6. VMware login settings Parameter Description Host Enter the host name or IP address or FQDN of the Horizon of the VMware View Server. Port Enter the port number of the host. Protocol From the drop-down list, select the specific protocol. Username Enter the User ID that is used to log in to the remote Horizon server.
- Page 33 Parameter Description Enable NLA Click the ON/OFF button to enable or disable this option. Enable the Network Level Authentication (NLA), if NLA is enabled on your remote computer. Your remote computer requires NLA user authentication before you establish a full Remote Desktop connection and the login screen is displayed.
- Page 34 Parameter Description Small Screen 1024X768 800X600 640X480 Auto-Reconnect after disconnect. Click the ON/OFF button to enable or disable this option. If enabled, the connection is automatically re-established after you disconnect from the session. Delay (seconds) before reconnect. Select the amount of time in seconds to delay the reconnection attempt after a disconnection occurs.
- Page 35 Wyse Management Interface This section describes about the Wyse Management Interface of 3030 LT running either ThinOS or ThinLinux. • For WDA settings on ThinOS, see Configuring the WDA settings on ThinOS. • For WDA settings on ThinLinux, see Configuring the WDA settings on ThinLinux Topics: •...
- Page 36 If the first discovery, for example, the WDM service is not successful, then it seeks for the next priority, for example, CCM service. This continues till a discovery is successful. If all discoveries fail, then it is started again automatically after a fixed time (24 hours). WDM Servers —...
- Page 37 The following is the INI parameter for this feature: WDAService={yes(default),no}Priority ={WDM(default),CCM,“WDM;CCM”,“CCM;WDM”} To configure the CCM settings, do the following: Click CCM, and use the following guidelines. Enable Cloud Client Manager (CCM) — Select the check box to enable the Cloud Client Manager(CCM). Wyse Management Interface...
- Page 38 Group Registration Key — Enter the Group Registration Key as configured by your cloud Client Manager administrator for the desired group. NOTE: If you enable the Cloud Client Manager (CCM ), make sure that you have entered the Group Registration Key and enabled the CCM Advanced Settings.
- Page 39 Figure 8. Wyse Device Agent (CCM) If the device is not registered to a CCM server, the Wyse Device Agent screen shows the registration status as Not Registered. In the CCM Server input box, enter the URL of CCM server you want to connect to. In the MQTT Server input box, enter the IP address or hostname of Message Queue Telemetry Transport (MQTT) server.
- Page 40 NOTE: When INI discovery method is used for registering the device, if you want to unregister the device, you must delete the INI parameters and restart the device first and then unregister the device. Else you have to perform the unregister process twice. For more information, see ThinLinux INI Guide .
-
Page 41: System Specifications
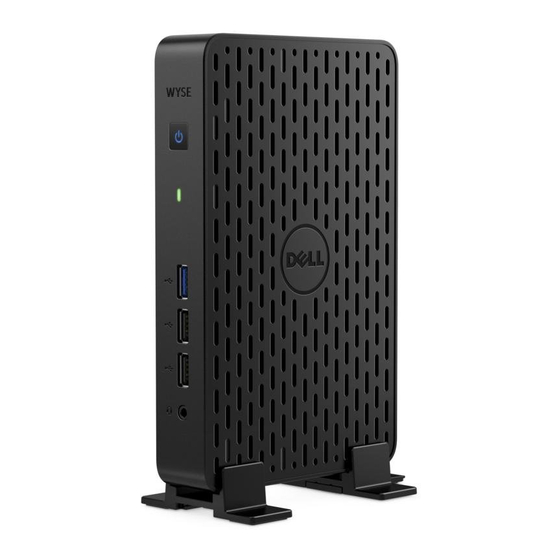
System specifications Table 9. Brand/Sub-brand/Model Number/Chassis description/Series Level/Category Type Feature Specification Dual-core Intel Celeron N2807, 1.58 GHz processor Operating System Wyse ThinOS and Wyse ThinLinux. Memory 4GB Flash eMMC 2GB RAM DDR3L; 1,333 MT/s data transfer rate I/O peripheral support 1x SuperSpeedUSB 3.0 (front), 3 x high-speed USB 2.0 (two front, one rear) 2 x DisplayPort(optional VGA, DVI or HDMI adapter sold separately) - Page 42 Storage is 14 degree Celsius to 140 degree Fahrenheit (-10 to 60 degree Celsius) Humidity 20% to 80% condensing and 10% to 95% non-condensing Regulatory and Environmental For more information on complete listing of declarations and certifications, see Dell’s regulatory and compliance home page at dell.com/regulatory_compliance System specifications...
-
Page 43: Troubleshooting Your System
Troubleshooting your system You can troubleshoot your system using indicators like diagnostic lights, and error messages during the operation of the device. Diagnostic power LED codes Table 10. Diagnostic power LED codes Power LED light status Possible cause Troubleshooting steps Both power LED and activity LED come up At first power apply :No LED light up briefly •...