Table of Contents
Advertisement
Quick Links
Advertisement
Table of Contents

Related Manuals for Dell PowerVault TL1000


Summary of Contents for Dell PowerVault TL1000
- Page 1 Dell PowerVault TL1000 Tape Autoloader User's Guide...
- Page 3 Information in this document is subject to change without notice. Copyright © 2017 Dell Inc. or its subsidiaries. All rights reserved. Dell, EMC, and other trademarks are trademarks of Dell Inc. or its subsidiaries. Other trademarks might be trademarks of their respective owners.
- Page 4 Dell PowerVault TL1000 Tape Autoloader: User's Guide...
-
Page 5: Read This First
Select your product. The support page that lists the various support categories is displayed. 5. For contact details of Dell Global Technical Support: a. Click Global Technical Support. b. The Contact Technical Support page is displayed with details to call, chat, or email the Dell Global Technical Support team. - Page 6 Dell PowerVault TL1000 Tape Autoloader: User's Guide...
-
Page 7: Table Of Contents
. 41 Read this first ... . v Managing user access . . 43 Contacting Dell . Saving the library configuration . 45 Configuring your library with the Operator Panel 45 Figures . - Page 8 Index ....169 cartridges . 100 Troubleshooting ..101 How the library reports problems . 101 viii Dell PowerVault TL1000 Tape Autoloader: User's Guide...
-
Page 9: Figures
Figures 1. TL1000 Tape Autoloader 55. Move cartridge command . . 55 2. Front panel components. 56. Unload command . 55 3. Cartridge Magazine . 57. Clean Drive command . . 56 4. Cartridge magazine (top view) 58. Inventory command . - Page 10 110. Setting the write-protect switch . . 97 113. Front panel LEDs . . 107 111. Double-boxing tape cartridges for shipping 114. Cartridge magazine lock release access hole 112. Checking for gaps in the seams of a cartridge Dell PowerVault TL1000 Tape Autoloader: User's Guide...
-
Page 11: Tables
Tables Class I Laser Product . . xiv Cartridges and VOLSERs compatible with the Data capacity and recording format . Ultrium Tape Drives . 95 Front panel component descriptions. Location of the write-protect switch . . 97 Rear panel component descriptions . Environment for operating, storing, and Ultrium data and cleaning cartridge shipping the LTO Ultrium Tape Cartridge . - Page 12 Dell PowerVault TL1000 Tape Autoloader: User's Guide...
-
Page 13: Safety And Environmental Notices
Safety and environmental notices Safety notices and environmental notices for this product are shown and described. Safety notices Observe the safety notices when this product is used. These safety notices contain danger and caution notices. These notices are sometimes accompanied by symbols that represent the severity of the safety condition. -
Page 14: Laser Safety And Compliance
8. Check the cover of the library for proper fit. It should be in place and secure. 9. Check the product label at the rear of the library to make sure that it matches the voltage at your outlet. Dell PowerVault TL1000 Tape Autoloader: User's Guide... -
Page 15: Rack Safety
Rack safety The following general safety information must be used for all rack mounted devices. DANGER v Always lower the leveling pads on the rack cabinet. v Always install stabilizer brackets on the rack cabinet. v To avoid hazardous conditions because of uneven mechanical loading, always install the heaviest devices in the bottom of the rack cabinet. - Page 16 Pack the rack cabinet in the original packaging material, or equivalent. Also, lower the leveling pads to raise the casters off the pallet and bolt the rack cabinet to the pallet. (R002) Dell PowerVault TL1000 Tape Autoloader: User's Guide...
-
Page 17: Preface
Preface This manual contains information and instructions necessary for the setup, operation, and servicing of the ™ ™ Dell PowerVault TL1000 Tape Library. xvii... - Page 18 Dell PowerVault TL1000 Tape Autoloader: User's Guide...
-
Page 19: Product Description
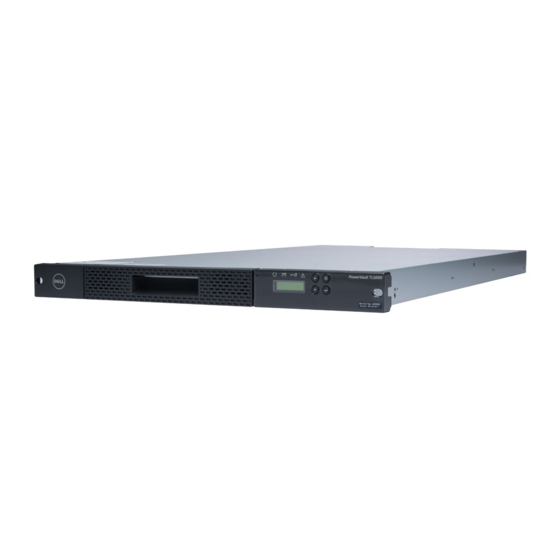
“Supported device drivers” on page 11 Figure 1. TL1000 Tape Autoloader ™ ™ The Dell PowerVault TL1000 Tape Autoloader provides compact, high-capacity, low-cost solutions for simple, unattended data backup. The library has a compact 1U form factor with easy access to tape cartridges with a removable magazine. -
Page 20: Front Panel
For information about the Operator Panel and the Web User Interface, see “User interfaces” on page 13. Control keys The control keys are located to the right of the Operator Panel LCD display on the front of the library. Dell PowerVault TL1000 Tape Autoloader: User's Guide... -
Page 21: Cartridge Magazine
Table 3. Front panel component descriptions (continued) Number Component Description Cartridge magazine The tape library has a single cartridge magazine that can hold up to 9 data cartridges, or 8 data cartridges with a 1-slot I/O station. See Figure 3. Column 5/Tier 1 in the cartridge magazine can be configured as a 1-slot I/O station. -
Page 22: Rear Panel
Figure 4. Cartridge magazine (top view) Rear panel Figure 5. Rear panel components Table 4. Rear panel component descriptions Number Component Description Power connector The library connects to a 110/220 volt ac power supply. Dell PowerVault TL1000 Tape Autoloader: User's Guide... -
Page 23: Bar Code Reader
SAS drives. Data encryption is only supported by LTO Ultrium 4 Data Cartridges and later. Important: Contact your Dell technical sales representative about the availability of Library Managed Encryption (LME). Note: Application Managed Encryption (AME) does not require a key. Library Managed Encryption (LME) is available only by purchasing a library with the Library Managed Encryption enabled at point of sale. -
Page 24: Supported Internet Protocols
TL1000 MIB file is loaded on your SNMP monitoring station. SNMP traps are sent to the SNMP monitoring stations that are defined for your library (see “Configuring SNMP trap notifications” on page 81). Dell PowerVault TL1000 Tape Autoloader: User's Guide... -
Page 25: Network Time Protocol
Network Time Protocol NTP is an Internet standard protocol that assures accurate synchronization of computer clock times in a network of computers. Running as a continuous background client program on a computer, NTP sends periodic time requests to a server, obtaining server time stamps, and with them to adjust the client’s clock. -
Page 26: Logical Unit Number (Lun) Scanning
Note: Each column has a spring-loaded mechanism that pushes a tape cartridge into Tier 1 when it is the only cartridge in that column. A single cartridge in a column takes on the Tier 2 element address even though it is physically in Tier 1. Dell PowerVault TL1000 Tape Autoloader: User's Guide... -
Page 27: Library Specifications
Front Rear Reserved slot Column 5 Column 4 Column 3 Column 2 Column 1 Tier 2 Tier 2 Tier 2 Tier 2 Tier 2 Column 5 Column 4 Column 3 Column 2 Column 1 Drive Tier 1 Tier 1 Tier 1 Tier 1 Tier 1 Accessor... -
Page 28: Product Environment
Keep the library out of printer and copier rooms because of toner and paper dust. Additionally, do not store paper supplies next to the library. v Keep the library away from moving air caused by doorways, open windows, fans, and air conditioners. Dell PowerVault TL1000 Tape Autoloader: User's Guide... -
Page 29: Supported Device Drivers
Ensure that the machine covers are always kept closed to minimize any contamination from airborne particles. Supported device drivers Device drivers enable the drive to interact with various servers. For applications that use device drivers, see the application’s documentation to determine which drivers to use. Note: If you do not have Internet access and you need information about device drivers, contact your sales representative. - Page 30 Dell PowerVault TL1000 Tape Autoloader: User's Guide...
-
Page 31: User Interfaces
User interfaces “Operator Panel” “Web User Interface” on page 17 The library has a local interface, the Operator Panel, and a remote Web User Interface (UI). The Operator Panel is on the front of the library and allows users to work locally on the library. The Web User Interface allows users and administrators to view and perform some library functions from remote sites. -
Page 32: Front Panel Leds
ON as soon as POST allows. When initialization starts, all LEDs turn OFF and the Ready/Activity LED flashes at a rate of approximately 2 seconds per cycle. When the mechanical initialization is complete, the Ready/Activity LED stops flashing and turns ON. Dell PowerVault TL1000 Tape Autoloader: User's Guide... - Page 33 If a library failure occurs, the Ready/Activity LED turns OFF and the Error LED turns ON. The Operator Panel also displays an appropriate error code to help identify the failure. The following are more operational details of LEDs: v The Ready/Activity LED ( 6 in Figure 8 on page 13) turns ON any time the unit is powered ON and functional.
-
Page 34: Library Ready Screen
For example, in Figure 11, the I/O station is enabled. When a configuration setting is changed, the confirmation screen in Figure 12 displays. Press the Enter key to confirm, or Cancel to return to the previous screen. Figure 12. Confirmation screen Dell PowerVault TL1000 Tape Autoloader: User's Guide... -
Page 35: Web User Interface
Web User Interface The Web User Interface Java Applet requires Java 1.5.0 or higher be installed on your host computer for full function, and is best viewed with Internet Explorer 6.0 or higher. Internet Explorer 7.0 or higher is required for IPv6. If your computer does not have Java installed or you must upgrade your installation, download the latest version of the Java Runtime Environment (JRE) for your platform from http://www.java.com/. -
Page 36: Login Page
Figure 15 on page 19 shows the Web User Interface window for a User account, Figure 16 on page 19 shows the window for a Superuser account, and Figure 17 on page 20 shows the window for an Administrator account. Dell PowerVault TL1000 Tape Autoloader: User's Guide... -
Page 37: User Account Window
Figure 15. User account window Figure 16. Superuser account window User interfaces... -
Page 38: Administrator Account Window
Only one administrator user must be assigned the login name admin. User privileges include v Multiple users can be logged in at one time on the Web User Interface. v Any user can be logged in to only one interface at a time. Dell PowerVault TL1000 Tape Autoloader: User's Guide... -
Page 39: Installation And Configuration
Installation and configuration “Choosing a location” “Installing in a rack” on page 22 “Removing the accessor locking screw” on page 27 “Attaching the library to a server” on page 27 “Configuring your library with the Web User “Logging in to the Web User Interface” on page 31 Interface”... -
Page 40: Installing In A Rack
2. Determine the location in your rack for your library to be installed. With a pencil, mark the location on the front vertical rails and rear vertical rails (Figure 18 on page 23) in your rack. Dell PowerVault TL1000 Tape Autoloader: User's Guide... -
Page 41: Rack Mount Screw Locations For Front And Rear
Figure 18. Rack mount screw locations for front and rear vertical rails 3. Place the screws 11 into the left and right brackets. 4. Attach the left 3 and right 4 (Figure 19 on page 24) front brackets to the front of the library chassis with 2 flat-head screws 8 on each side. -
Page 42: Attaching The Front Brackets To The Library Chassis
Important: Do NOT tighten these screws completely. 6. Slide in the rear rails 7 from back to front, to create the rail assemblies. Ensure that the screw holes face outwards (Figure 21 on page 25). Dell PowerVault TL1000 Tape Autoloader: User's Guide... -
Page 43: Creating The Rail Assemblies
Figure 21. Creating the rail assemblies 7. Install the rail assemblies into the rack (Figure 22). Ensure the 3 holes in the front of the unit align with the 1U space marked on the vertical rails in Step 2. Secure the rails to the rack with 4 flat-head screws 9 on each side of the rack. -
Page 44: Securing The Front Of The Library In The Rack
10. Run the SAS cable, power cable, and Ethernet cable through the hook-and-loop fastener strap 12 . Leave enough slack to reach the corresponding connectors, then tighten the strap (Figure 25 on page 27). Dell PowerVault TL1000 Tape Autoloader: User's Guide... -
Page 45: Removing The Accessor Locking Screw
Figure 25. The cables at the rear of the library Note: For information about converting and relocating the library, see “Removal and replacement procedures” on page 113. Removing the accessor locking screw Important: The accessor locking screw prevents the library accessor from moving during shipment and must be removed before the library is powered ON. -
Page 46: Interface Cable Connection
Overheating with potential personal injury or property damage v A fracture that results in internal contacts that are exposed, which might subject the user to a shock hazard To connect a power cord: Dell PowerVault TL1000 Tape Autoloader: User's Guide... -
Page 47: Configuring The Library
1. Plug one end of the power cord or rack PDU power cord into the power connector ( 3 in Figure 27 on page 28) on the rear panel of the library. Note: On rack mount installations, run the rack PDU power cord through the hook-and-loop fastener strap on the right rear bracket, and tighten the strap. - Page 48 If you choose to use the Operator Panel to configure your library, go to “Configuring your library with the Operator Panel” on page 45. Dell PowerVault TL1000 Tape Autoloader: User's Guide...
-
Page 49: Configuring Your Library With The Web User Interface
Configuring your library with the Web User Interface If you choose to use the Web User Interface to configure your library, first enter your library network settings with the Operator Panel (see “Configuring network settings” on page 61). To configure your library with the Web User Interface: 1. -
Page 50: Web User Interface Login Screen
5. On the Web User Interface login screen, enter the administrator login account name and default password. v Account: admin v Password: secure Figure 29. Web User Interface login screen 6. Click Login. Dell PowerVault TL1000 Tape Autoloader: User's Guide... -
Page 51: Checking Firmware Level
Checking firmware level Figure 30. System summary Check the current level of library firmware that is displayed in the System Summary. If an updated level of firmware is available, download and update the library firmware before normal operation starts. See “Updating library and drive firmware”... -
Page 52: Configuring Library Settings
The Auto Cleaning function can be enabled only if there is at least one inactive position in the magazine. If Auto Cleaning is enabled, the inactive positions become cleaning cartridge positions. 3. Click Submit to enable the settings. Dell PowerVault TL1000 Tape Autoloader: User's Guide... -
Page 53: Configuring Network Settings
Physical library settings Figure 32. Cartridge assignment settings To configure the library cartridge assignment settings, complete the following procedure: 1. Expand Configure Library, if necessary, and click Physical in the left navigation pane of the Web User Interface. 2. Select the Library settings. v Library name - Enter a name for your library. -
Page 54: Configuring Date And Time Settings
Note: If you choose to manually set your date and time, you must reset the date and time after the library is power-cycled and after a library reset. Note: When the library is power-cycled, wait 10 seconds after the power is OFF before the library is powered ON again. Dell PowerVault TL1000 Tape Autoloader: User's Guide... -
Page 55: Configuring Encryption Settings
Once the network settings are entered on the Operator Panel, the current date and time can be modified with the Web User Interface. The TL1000 Tape Autoloader communicates with an NTP server with the following conditions: v Client/server basis operation v UDP (User Datagram Protocol) to access the NTP server v Does not use authentication keys v Library polling is every 12 hours... -
Page 56: Library Managed Encryption As A Choice
Figure 35. Application Managed Encryption Important: Contact your Dell technical sales representative about the availability of Library Managed Encryption (LME). Note: Library Managed Encryption (LME) is available only by purchasing a library with the Library Managed Encryption Feature installed. When available, library-managed encryption is only offered for purchase at point of sale on LTO-6 and later TL1000 tape libraries. -
Page 57: Library Managed Encryption Settings
Figure 37. Library Managed Encryption settings To modify the encryption settings: 1. Expand Configure Library, if necessary, and click Encryption in the left navigation pane of the Web User Interface. 2. In the Encryption method: drop-down menu, choose Library Managed Encryption (if the library is purchased with the Library Managed Encryption feature) to enable encryption in your library. -
Page 58: Configuring Email Notifications
4. Enter the email addresses to be notified when an event takes place in the Mail To fields. 5. Select the event level to report in the Mail Event field. 6. Click Test to send a test email message to the enabled addresses. 7. Click Submit to enable the settings. Dell PowerVault TL1000 Tape Autoloader: User's Guide... -
Page 59: Configuring Trap Notifications
Configuring trap notifications Figure 39. Trap notifications Note: This procedure is optional. SNMP notifications are not enabled unless there is a check mark in the SNMP Enabled check box. To disable SNMP notifications, clear the SNMP Enable check box and click Submit. -
Page 60: Trap List Settings
7. Select the event level to report in the Trap event field. 8. Click Test to send a test trap notification to the enabled IP addresses. Dell PowerVault TL1000 Tape Autoloader: User's Guide... -
Page 61: Managing User Access
9. Click Submit to enable the settings. Managing user access Figure 42. User access settings Note: This procedure is optional. Add, modify, or remove users with the following information: v Select action – Add - To add new users. - Enter the user name and password into the dialog box and assign the user's role. Figure 43. -
Page 62: Password Rules Screen
Minimum number of characters - Choose the minimum password length. The factory default value is 8. The maximum password length is 16. v Minimum number of upper case alphabetic characters (A-Z) - Choose the minimum number of uppercase alphabetic characters. The factory default value is 1. Dell PowerVault TL1000 Tape Autoloader: User's Guide... -
Page 63: Saving The Library Configuration
v Minimum number of lower case alphabetic characters (a-z) - Choose the minimum number of lowercase alphabetic characters. The factory default value is 1. v Minimum number of numeric characters (0-9) - Choose the minimum number of numeric characters. The factory default value is 1. v Minimum number of special characters (!@#$%^&*()_+={}|[]\;':"<>?,./) - Choose the minimum number of special characters. -
Page 64: Configuring Network Settings
Press Enter again to apply the setting, or Cancel to reject the setting. d. Press Cancel to backtrack through the menu hierarchy. 8. IPv4/IPv6 Gateway (Default: 0.0.0.0). If DHCP is disabled, set the IP address manually. a. Select Configure Network Settings > Change Gateway. Dell PowerVault TL1000 Tape Autoloader: User's Guide... -
Page 65: Configuring Library Settings
b. Select Set Gateway Address IPv4 to enter the IPv4 gateway address or Set Gateway Address IPv6 to enter the IPv6 gateway address (split over 4 screens). c. Press Enter again to apply the setting, or Cancel to reject the setting. d. -
Page 66: Populating The Library With Cartridges
(see Figure 47 on page 49). Note: Do not rely on the bar code label orientation, if attached, to provide an indication of the correct cartridge orientation. The bar code label is right side up if attached correctly. Dell PowerVault TL1000 Tape Autoloader: User's Guide... -
Page 67: Verifying Library And Drive Operation
Figure 47. Cartridge orientation The Auto Cleaning function can be enabled only if the number of active slots is less than the maximum available slots. The active slots are always enabled starting with the lowest numerical cartridge position number in the magazine. This position is at the drive end of the cartridge magazine. -
Page 68: Taking The Library Online
Support website. Mixing different levels of library and tape drive firmware is not supported and might cause unpredictable results. Dell suggests that you update library and drive firmware when new levels become available. For instructions on updating library and drive firmware, see “Updating library and drive firmware” on page Now you are ready to use your library. -
Page 69: Operations
Operations “The Operator Panel” on Monitoring the Library “Configuration settings” on page 53 page 52 “Current information” on page 53 “Firmware revision” on page 54 Managing the Library “Unlocking the I/O station” on page 54 “Unlocking the cartridge magazine” on page 55 “Moving cartridges”... -
Page 70: The Operator Panel
Figure 48 on page 53 shows the top-level menu tree structure of the Operator Panel on the front of the TL1000 Tape Autoloader. For details on how to select commands and options, see the description in “Operator Panel” on page 13. Dell PowerVault TL1000 Tape Autoloader: User's Guide... -
Page 71: Monitoring The Library
Top Level Configuration Commands Service Move Cartridge Configure Library Unlock I/O Station* View Error Status Unlock Magazine Configure Auto Cleaning Diagnostics Unload Configure Network Settings Commands Clean Drive View Firmware Revision Inventory Configuration Configure Op Panel Settings Telnet Service Port* * For use by technical Move to Ship Position View Settings... -
Page 72: Firmware Revision
Figure 53. I/O station unlocked After the I/O station is closed, wait for the library to complete its inventory before you proceed with normal library operations. Dell PowerVault TL1000 Tape Autoloader: User's Guide... -
Page 73: Unlocking The Cartridge Magazine
Note: A blue release gate in the upper left corner of each column in the cartridge magazine prevents each cartridge from falling out of the front of the magazine. When manually releasing the gate with one hand, position your other hand in front of the column opening to protect cartridges that are ejected by the internal column spring. -
Page 74: Cleaning The Drive Manually
It is sometimes necessary to take the library offline before servicing functions for the library are done. Once these operations are finished, it is necessary to bring the library online. Note: The tape drive is always online, even when the library is offline. Dell PowerVault TL1000 Tape Autoloader: User's Guide... -
Page 75: Powering Down The Library
Powering down the library Before powering OFF the library, ensure that the library is in an idle state with no mechanical movement of the accessor, and all data operations (for example, backup operations, accessing of log files) are complete. Then, power OFF the library with the power switch on the rear panel of the library. Important: If you switch the library power OFF while the library is being accessed, loss of data might occur. -
Page 76: Logging Out Of The Library
Active Slots - The maximum number of active slots that can be set is dependent upon the I/O station configuration and auto cleaning setting. The active cartridge slots always begin with the cartridge position with the lowest cartridge address within the logical library. Dell PowerVault TL1000 Tape Autoloader: User's Guide... -
Page 77: Configuring The Library Access Mode
Configuring the library access mode Configuration Configure Library Configure Library Mode Set Random Mode Set Sequential Mode Configure Loop Mode Enable Loop Mode Disable Loop Mode Configure Autoload Mode Enable Autoload Mode Disable Autoload Mode Figure 66. Library access mode settings Select Configuration >... -
Page 78: Configuring Date And Time Settings
MM/DD/YYYY format, and the time is set in 24-hour HH:MM:SS format. The current date and time is also controlled automatically with a network-based Network Time Protocol (NTP) server. For more information, see “Configuring network settings” on page 61. Dell PowerVault TL1000 Tape Autoloader: User's Guide... -
Page 79: Configuring Network Settings
Configuring network settings Configuration Configure Network Settings Configure Link Speed Set Auto Negotiation Set 10 Base-T Full Set 10 Base-T Half Set 100 Base-T Full Set 100 Base-T Half Configure DHCP Configure DHCP IPv4 Enable DHCP IPv4 Disable DHCP IPv4 Configure DHCP Ipv6 Enable DHCP IPv6 Disable DHCP Ipv6... -
Page 80: Configuring Operator Panel Settings
Use Configuration > Configure Web GUI Settings > Unlock a User Account to unlock a User Account. The password of the user unlocked by Unlock a User Account is automatically changed to secure. Dell PowerVault TL1000 Tape Autoloader: User's Guide... -
Page 81: Setting The Library To Factory Defaults
Setting the library to factory defaults Configuration Set Default Figure 71. Factory default settings Select Configuration > Set Default to reset the library to the factory default settings. See Table 13 on page 29. The date and time must be reset after restoring factory default settings. See “Configuring date and time settings”... -
Page 82: Running Drive Diagnostic Procedures
The result of the test (PASSED or error message) is reported on the Operator Panel. v View the Error Log to check if any errors occur. If an error occurs, see Appendix A, “Error codes,” on page 115 to identify and locate the problem. Dell PowerVault TL1000 Tape Autoloader: User's Guide... -
Page 83: The Web User Interface
The Web User Interface Figure 75 shows all the menu options available from the Web User Interface for the Administrator User account. For information on the menu user access privileges for User, Superuser, and Administrator accounts, see “User interfaces” on page 13. Monitor Library Manage Library Configure Library... -
Page 84: Monitoring The Library
I/O Station status (Open/Closed, when I/O Station is enabled) v Operator Panel LED indicators v Number of cartridges and slot configuration – Cartridge in the drive (0 or 1); Slots value is always “N/A” Dell PowerVault TL1000 Tape Autoloader: User's Guide... -
Page 85: The Library Map
– Number of cartridges in the active slots; Number of active slots – Number of cartridges in the cleaning/inactive slots; Number of cleaning/inactive slots – Number of cartridges in the I/O Station (0 or 1) when enabled; Number of I/O Station slots –... - Page 86 – Product ID – Firmware version – Serial number – Worldwide node name – Encryption capability – Drive event – Cartridge information v Accessor information – Status (OK, Degraded, or Failed) – Accessor event Dell PowerVault TL1000 Tape Autoloader: User's Guide...
-
Page 87: Managing The Library
Managing the library Moving cartridges Figure 78. Move Cartridges screen Use Manage Library > Move Cartridges to move data and cleaning cartridges between the I/O station, storage positions, inactive slots, and tape drive. Move cartridges by clicking and dragging a cartridge from one location to another, or by right-clicking a cartridge and selecting a destination. -
Page 88: Unloading The Drive
It is sometimes necessary to take the library offline before library servicing functions are completed. Once these operations are finished, it is necessary to bring the library back online. Note: The tape drive is always online, even when the library is offline. Dell PowerVault TL1000 Tape Autoloader: User's Guide... -
Page 89: Conducting A Library Inventory
Conducting a library inventory Figure 82. Inventory screen Select Manage Library > Inventory to force the library to run an inventory of the cartridge magazine, accessor, and tape drive to refresh the library map. Conduct an inventory by clicking the Start button. The Inventory Progress bar indicates the process in action. -
Page 90: Configuring The Library Managing User Access
User Name - The user name of a registered user. v Role - The user access level for the registered user. – Users are allowed to monitor the library, but not complete actions that affect the physical library. Dell PowerVault TL1000 Tape Autoloader: User's Guide... -
Page 91: Password Rules Screen
– Superusers are allowed to operate the physical and logical library, but not complete actions that affect the library configuration. – Administrator users are allowed access to the entire physical library and logical library, including configuration. Only one administrator user must be assigned the login name admin. v Password indicates the status of the user's password. -
Page 92: Configuring Physical Library Settings
Click Submit to transfer the settings to the library. A dialog message is displayed when the settings are updated successfully. Click Refresh to read the current settings from the library. Dell PowerVault TL1000 Tape Autoloader: User's Guide... -
Page 93: Configuring Logical Library Settings
Configuring logical library settings Figure 89. Logical library settings screen Select Configure Library > Logical to configure the library access mode for the logical library and the number of active cartridge slots. Configure the library access mode with the following settings: v Library mode - The library mode can be set to Random or Sequential. -
Page 94: Configuring Network Settings
– IPv6 address - Sets the TCP/IPv6 address of the library on the network. – Prefix Length - Decimal value 0 - 128 indicating the number of contiguous, high-order bits comprising the network portion of the address. – Gateway - Allows access outside the local network. Dell PowerVault TL1000 Tape Autoloader: User's Guide... -
Page 95: Configuring Encryption Settings
Click Submit to enable the setting. Figure 91. Application Managed Encryption Important: Contact your Dell technical sales representative about the availability of Library Managed Encryption (LME). Note: Library Managed Encryption (LME) is available only by purchasing a library with the Library Managed Encryption Feature installed. -
Page 96: Application Managed Encryption
2. In the Encryption method: drop-down menu, choose Library Managed Encryption (if library is purchased with the Library Managed Encryption feature) to enable encryption in your library. You can also choose Application Managed Encryption. No further configuration steps are necessary for Application Managed Encryption. Dell PowerVault TL1000 Tape Autoloader: User's Guide... -
Page 97: Configuring Date And Time Settings
3. Encryption policy (library-managed encryption) v Encrypt All (default) - All tape cartridges that are loaded into the tape drive are encrypted. v Internal Label - Selective Encryption - This option is used only for Symantec's Veritas NetBackup. v Internal Label - Encrypt All - This option is used only for Symantec's Veritas NetBackup. 4. -
Page 98: Configuring Email Notifications
Sender address - email message header information v Subject - email message header information v Mail to - email addresses of contacts to be notified of the event v Mail event - Event level notification threshold – Error events Dell PowerVault TL1000 Tape Autoloader: User's Guide... -
Page 99: Configuring Snmp Trap Notifications
SNMP Version 3. The traps that are supported by the TL1000 Tape Autoloader are listed in “Trap definitions (types)” on page 128. Download the SNMP MIB file for this library from www.Dell.com/support. Install the MIB file on your SNMP server. Refer to your server application documentation for instructions. -
Page 100: Saving And Restoring Configuration Settings
IP address. The following flowchart illustrates how VPD data is saved from and restored to a library with cookies. Dell PowerVault TL1000 Tape Autoloader: User's Guide... -
Page 101: Save/Restore Configuration With Cookies
Does Auto Saved VPD Data exist for Library IP Address? VPD Data is Saved Does Library S/N = Auto Saved S/N? VPD Data is Saved Write Auto Saved VPD Data to Library? Auto Saved VPD Data is written to Library Overwrite Auto Saved VPD Data? Auto Saved... -
Page 102: Servicing The Library Operator Interventions
Index number of the event v Date the event occurred v Time the event occurred v Unit in the library where the event occurred v Event level v Description of the event Dell PowerVault TL1000 Tape Autoloader: User's Guide... -
Page 103: Library Logs
Library logs Figure 100. View Library Logs screen Select Service Library > View Library Logs to display a log history summary of errors that occurred. The error log is displayed with sense data information. The summary can be filtered to display errors with specific sense data code types. -
Page 104: Trace Data
(currently stored in flash) and force memory dump data (currently stored in memory and moved to flash). Note: Both file name fields must be entered and the file names must be unique. To download a drive log: Dell PowerVault TL1000 Tape Autoloader: User's Guide... -
Page 105: Downloading Library Logs
1. Take the library offline. 2. For each type of memory dump (normal or forced), click the corresponding Browse button to display a dialog to enter a file name and to select a location to save the drive log. 3. Click Download to download the drive log and save to a file. Downloading library logs Figure 103. - Page 106 2. Use Service Library > Firmware Update and click Browse to locate the library firmware file or the LTO SAS drive firmware file that you downloaded from the Dell web site, then click Update. The Web User Interface indicates that the operation is complete. The result is that the firmware file is successfully moved from the host computer to the library.
-
Page 107: Accessor Statistics
Accessor statistics Figure 106. Usage Statistics screen Select Service Library > Usage Statistics to view statistics information about the movement of the robotics of the library. v Motion counts - Lists the accumulated operation count for all movements, accessor movements, picker movements, and X-axis movements. - Page 108 Dell PowerVault TL1000 Tape Autoloader: User's Guide...
-
Page 109: Media
“Environmental and shipping specifications for tape cartridges” on page 100 To ensure that your Ultrium Tape Drive conforms to Dell's specifications for reliability, use only LTO Ultrium tape cartridges. You might use other LTO-certified data cartridges, but they might not meet the standards of reliability that are established by Dell. -
Page 110: Cartridge Data Capacity And Recording Formats
The cartridge door ( 2 in Figure 107 on page 91) protects the tape from contamination when the cartridge is out of the drive. The tape is attached to a leader pin ( 3 in Figure 107 on page 91) behind Dell PowerVault TL1000 Tape Autoloader: User's Guide... -
Page 111: Cartridge Compatibility
the door. When the cartridge is inserted into the drive, a threading mechanism pulls the pin (and tape) out of the cartridge, across the drive head, and onto a non-removable take-up reel. The head can then read or write data from or to the tape. The write-protect switch ( 4 in Figure 107 on page 91 prevents data from being written to the tape cartridge. -
Page 112: Write Once, Read Many (Worm) Cartridges
To use the WORM capability of your LTO Ultrium generation 7, 6, 5, or 4 drive, you must use a compatible WORM tape cartridge. See “Cartridge compatibility” on page 93 for cartridge and VOLSER compatibility. Dell PowerVault TL1000 Tape Autoloader: User's Guide... -
Page 113: Cleaning Cartridge
Cleaning cartridge An Ultrium Universal Cleaning Cartridge is required to clean the tape drive. The drive itself determines when it must be cleaned and notifies the library. When notified, the library indicates that the drive needs cleaning by turning ON the "Clean Drive" LED on the front panel of the library and posting a message on the library display. -
Page 114: Guidelines For The Use Of Bar Code Labels
0.5 mm (0.02 in.) over the length of the label and have no folds, missing pieces, or smudges. v Do not place other machine-readable labels on other surfaces of the cartridge. They might interfere with the ability of the drive to load the cartridge. Dell PowerVault TL1000 Tape Autoloader: User's Guide... -
Page 115: Write-Protect Switch
Write-Protect switch The position of the write-protect switch on the tape cartridge (see 1 ) determines whether you can write to the tape. If the switch is set to: v The locked position (solid red), data cannot be written to the tape. v The unlocked position (black void), data can be written to the tape. -
Page 116: Ensure Proper Packaging
Maintain the conditions that are described in “Environmental and shipping specifications for tape cartridges” on page 100. Perform a thorough inspection After you purchase a cartridge and before you use it, complete the following steps: v Inspect the cartridge's packaging to determine potential rough handling. Dell PowerVault TL1000 Tape Autoloader: User's Guide... -
Page 117: Handle The Cartridge Carefully
v When a cartridge is inspected, open only the cartridge door. Do not open any other part of the cartridge case. The upper and lower parts of the case are held together with screws. Separating them destroys the usefulness of the cartridge. v Inspect the cartridge for damage before you use or store it. -
Page 118: Environmental And Shipping Specifications For Tape Cartridges
1. The short term or operational storage environment is for storage durations of up to six months. 2. The long term or archival storage environment is for durations of six months up to 10 years. Dell PowerVault TL1000 Tape Autoloader: User's Guide... -
Page 119: Troubleshooting
Note: When power cycling the library, wait 10 seconds after the power is switched OFF before the library is powered ON again. Before you place a service call or inform Dell Technical Support, observe the LEDs on the front panel and error messages on the Operator Panel to determine exactly which part is failing. See “Interpreting front panel LEDs”... -
Page 120: Library Error Message Content
3. Import the cartridge back into the library. 4. Inventory the library. a. If no errors are reported, resume normal library operations. b. If an error is reported, see Appendix A, “Error codes,” on page 115. Dell PowerVault TL1000 Tape Autoloader: User's Guide... -
Page 121: Unlock Magazine
(as if something is blocking the magazine inside the library). 3. If the magazine still cannot be removed from the library, see “Contacting Dell technical support” on page 111. Communication You are experiencing difficulty 1. - Page 122 3. If the library still fails, reset factory defaults. If no errors are reported, resume normal library operations. 4. If the problem persists, see “Contacting Dell technical support” on page 111. You are experiencing a problem 1. Run Library Verify to identify and resolve the with your library and no error problem.
-
Page 123: Isolating Problems
Isolating drive problems 1. Ensure that the drive firmware is at the latest level (visit www.Dell.com/support). 2. Cycle library power. 3. If the drive is experiencing permanent or temporary errors or if the Clean LED is lit on the front panel of the library, clean the drive. -
Page 124: Installation And Configuration Problems
8. Check the Ethernet cable carefully (or try another cable) and, if the cable is connected to a network hub or switch, try a different port. 9. If the Web User Interface is still malfunctioning, refer to “Contacting Dell technical support” on page 111. -
Page 125: Interpreting Front Panel Leds
Review the information in “Installation and configuration” on page 21 to determine whether a step was missed or misread. If you are still experiencing difficulty with installing or configuring your library, see “Contacting Dell technical support” on page 111. Important: Do not disassemble the library. The warranty on your library is voided if the unit is disassembled without the approval of Dell Technical Support. -
Page 126: Reseating Cables
Ethernet cable for connection to a network c. Power supply cable 2. Check and reseat, if necessary, all of the cables that are connected to your library. 3. Verify that there is no damage to any connector pins. Dell PowerVault TL1000 Tape Autoloader: User's Guide... -
Page 127: Emailing Logs
3. Download the current drive log from the Web User Interface by selecting Service Library > Download Drive Logs, click Refresh, and click Download. 4. When requested by Dell, attach the log to an email message and send it to Dell technical support for further diagnosis. - Page 128 Dell PowerVault TL1000 Tape Autoloader: User's Guide...
-
Page 129: Service Procedures
Dell provides online and telephone-based support and service options. Service availability varies by country and product, and some services might not be available in your area. To contact Dell for sales, technical support, or customer service issues follow the steps that are listed: 1. - Page 130 4. Select the appropriate service or support link that is based on your need. 5. Choose the method of contacting Dell that is convenient for you. Dell PowerVault TL1000 Tape Autoloader: User's Guide...
-
Page 131: Removal And Replacement Procedures
Removal and replacement procedures “Required tools” “Replacing a defective cartridge magazine” “Unlocking the cartridge magazine manually” Required tools Installing or relocating the rack mount kit or deskside kit for your library requires the following tool: v #2 Phillips screwdriver Replacing a defective cartridge magazine After your replacement cartridge magazine is received, complete the following steps to replace the defective cartridge magazine. -
Page 132: Cartridge Magazine Lock Release Access Hole
I/O station lock. 4. Remove the cartridge magazine from the front of the library. If the magazine is stuck in the library and does not eject, see “Contacting Dell technical support” on page 111 5. Examine the magazine and cartridges for damage. -
Page 133: Appendix A. Error Codes
If the problem persists, see “Contacting 0003 CHK 0003 (buffer area) error was detected. Dell technical support” on page 111. 1. Observe LEDs. See “Interpreting front panel LEDs” on page 107. 2. Reseat all cables. See “Reseating cables” on page 108. - Page 134 If the problem is corrected, run Library Verify before normal library operations Commands to the Encryption Key 002A resume. Manager over the retry limit. v If the problem persists, see “Contacting Dell technical support” on page 111. Dell PowerVault TL1000 Tape Autoloader: User's Guide...
- Page 135 If the problem is corrected, run Library Verify ACK IU event timeout detected. before normal library operations resume. LDI I/F error. v If the problem persists, see “Contacting Dell technical support” on page 111. 002D Response IU event timeout detected.
- Page 136 Suspect CHK 0070 v If the problem is corrected, run Library the centering sensor. Verify before normal library operations resume. v If the problem persists, see “Contacting Dell technical support” on page 111. Dell PowerVault TL1000 Tape Autoloader: User's Guide...
- Page 137 If the problem is corrected, run Library Verify magazine set sensor. before normal library operations resume. Calibration measurement invalid v If the problem persists, see “Contacting Dell 0072 data error. Suspect the centering CHK 0072 technical support” on page 111.
- Page 138 GET 00B0 CHK 00B0 Verify before normal library operations operation. Suspect the centering resume. sensor, X motor, or P motor. v If the problem persists, see “Contacting Dell technical support” on page 111. Dell PowerVault TL1000 Tape Autoloader: User's Guide...
- Page 139 00B1 CHK 00B1 before normal library operations resume. Suspect the centering sensor, X v If the problem persists, see “Contacting Dell motor, or P motor. technical support” on page 111. 1. If the cartridge remains in the accessor, try to...
- Page 140 00C8 CHK 00C8 centering sensor OFF condition v If the problem persists, see “Contacting Dell could not be detected. Suspect the technical support” on page 111. centering sensor or P motor. Centering calibration error #2.
- Page 141 If the problem is corrected, run Library Verify flash memory. before normal library operations resume. Clear operation not finished v If the problem persists, see “Contacting Dell 00E1 within 10 seconds when clearing a CHK 00E1 technical support” on page 111.
- Page 142 Accessor encoder sensor A error before normal library operations resume. 00F1 CHK 00F1 detected during blink check. v If the problem persists, see “Contacting Dell Suspect the accessor encoder technical support” on page 111. sensor A. Sensor error #3. X encoder sensor error detected...
-
Page 143: Web User Interface Error Messages
0203 Drive disconnected. CHK 0203 library operations resumes. v If the problem persists, see 0205 Drive busy. CHK 0205 “Contacting Dell technical 0206 Command could not be CHK 0206 support” on page 111. executed because drive is not mounted. 020E Drive error detected. - Page 144 Download Drive Logs failure: [****]. "Force Dump" command execution Download Drive Logs failure: [****]. Restore failure. Save/Restore Library serial number is unmatched Writing to cookie was failure. The configuration data was not saved to cookie. Dell PowerVault TL1000 Tape Autoloader: User's Guide...
- Page 145 Table 24. Web user error messages (continued) Title Message Issuing Panel Cleaning Command Error Illegal medium. Clean Drive Source element empty. Clean Drive Destination element full. Clean Drive Drive failure. Clean Drive Prevent medium removal. Clean Drive During import/export element Clean Drive access.
-
Page 146: Trap Definitions (Types)
Change in library operation mode (Library) v Beginning of medium move v Completion of medium move v Library/Drive not ready v Library/Drive to online v Magazine unlock operation v I/O Station unlock operation Dell PowerVault TL1000 Tape Autoloader: User's Guide... -
Page 147: Appendix B. Tapealert Flags
The library 1. Cycle the power supply and try again. Hardware A mechanism is 2. If the problem persists, see “Contacting having trouble with Dell technical support” on page 111. communicating with the tape drive. Library The library Hardware B mechanism has a hardware fault. - Page 148 The library was manually turned offline and is turned offline. unavailable for use. Library Drive Library turned The drive inside the library was taken offline. Offline internal drive This flag is for information purposes only. No offline. action is required. Dell PowerVault TL1000 Tape Autoloader: User's Guide...
-
Page 149: Tapealert Flags Supported By The Ultrium Tape Drive
PSU failure inside The power supply failed inside the library. See the library “Contacting Dell technical support” on page subsystem. 111. C = Critical: Needs immediate action. W = Warning: Action to be taken. I = Information: Information for user. - Page 150 Set when a failure occurs that Unload the tape cartridge, then requires the tape cartridge to be reinsert and restart the operation. If unloaded from the drive. this procedure fails, use different media. Dell PowerVault TL1000 Tape Autoloader: User's Guide...
- Page 151 Drive voltage Set when the drive detects power See “Contacting Dell technical supply voltages that approach or support” on page 111. exceed the specified voltage limits. Predictive failure of Set when a hardware failure of the drive hardware tape drive is predicted.
- Page 152 WORM tape cartridge or write the allowing WORM writes are not data to a non-WORM cartridge. met. Data is appended to WORM media only. Overwrites to WORM media are not allowed. Dell PowerVault TL1000 Tape Autoloader: User's Guide...
-
Page 153: Appendix C. Sense Data
Appendix C. Sense data “Sense Key definitions” “Library sense data” “Tape drive sense data” on page 137 Sense Key definitions Table 28. Sense key definitions Definition No Sense Recovered Error Not Ready Media Error Hardware Error Illegal Request Unit Attention Data Protect Blank Check Reserved... - Page 154 * This code is preserved only in the library log when “FID” or “ATTN DRV” message is received from the tape drive. This code is not reported to the host server. ** This code is preserved only in the library log. This code is not reported to the host server. Dell PowerVault TL1000 Tape Autoloader: User's Guide...
-
Page 155: Tape Drive Sense Data
Tape drive sense data Table 30. Ultrium Tape drive sense data Bit Address or Name Byte Valid Error Code Address Bit Segment Number x'00' Filemark Reserved Sense Key (End of (Incorrect See “Sense Key definitions” on page 135. medium) length indicator Information byte (most significant byte) Information bytes... - Page 156 Cause not reportable - A cartridge is present in the drive, but it is in the process of being unloaded. Becoming Ready - A media access command was received during a front panel initiated load or an immediate reported load command. Dell PowerVault TL1000 Tape Autoloader: User's Guide...
-
Page 157: Ultrium Tape Drive Sense Data - Bytes 12 And 13
Table 31. Ultrium Tape drive sense data - Bytes 12 and 13 (continued) Byte 12 ASC Byte 13 ASCQ Description Initializing Command Required - A cartridge is present in the drive, but is not logically loaded. A Load command is required. Manual Intervention Required - A cartridge is present in the drive but could not be loaded or unloaded without manual intervention. - Page 158 Drive requires cleaning - The drive has detected that a cleaning operation is required to maintain good operation. Bad Code Detected - The data transferred to the drive during a firmware upgrade is corrupt or incompatible with drive hardware. Dell PowerVault TL1000 Tape Autoloader: User's Guide...
- Page 159 Table 31. Ultrium Tape drive sense data - Bytes 12 and 13 (continued) Byte 12 ASC Byte 13 ASCQ Description Sense Key 0 (No Sense) Encryption - Key Translate Encryption - Key Translate EKM Sense Key 3 (Medium Error) Encryption - Encryption feature is not enabled so format/processing is not supported.
- Page 160 It is set to 71h to indicate a deferred error which is not associated with the current command. 2. The segment number (Byte 1) is zero since the Copy, Compare, and Copy and Verify commands are not supported. Dell PowerVault TL1000 Tape Autoloader: User's Guide...
- Page 161 3. The File Mark flag (Byte 2, bit 7) is set if a Space, Read, or Verify command did not complete because a file mark was read. 4. The End of Media (EOM) flag (Byte 2, bit 6) is set if a Write or Write File Marks command completed in the early warning area.
- Page 162 Dell PowerVault TL1000 Tape Autoloader: User's Guide...
-
Page 163: Appendix D. Library Configuration Form
Make a copy of this form, fill it out as you are installing and configuring your library. Update the form each time changes are made to the library. The information that is contained on this form is important, and helpful if a call to Dell service is necessary. Store this form in a secure location. Physical Library... - Page 164 Users Accounts The Administrator (admin) password is listed in the table below. Modify and add extra Administrator, Superuser, and User names and passwords that are created. User name Access Level Password admin Administrator secure Dell PowerVault TL1000 Tape Autoloader: User's Guide...
- Page 165 User name Access Level Password Support Notification User name Password Appendix D. Library Configuration Form...
- Page 166 Dell PowerVault TL1000 Tape Autoloader: User's Guide...
-
Page 167: Appendix E. Accessibility
You can use keys or key combinations to perform operations and initiate many menu actions that can also be done through mouse actions. You can navigate the HTML version of the Dell PowerVault TL1000 Tape Autoloader User's Guide help system from the keyboard. Use the following keyboard combinations: v www.Dell.com/support... - Page 168 Dell PowerVault TL1000 Tape Autoloader: User's Guide...
-
Page 169: Glossary
Glossary This glossary defines the special terms, abbreviations, and acronyms that are used in this publication. If you do not find the term that you are looking for, refer to the index or to the Dictionary of Computing, 1994. Numbers 2:1 compression The relationship between the quantity of data that can be stored with compression as compared to the quantity of data that can be stored without compression. - Page 170 A facility for transferring data between several devices that are located between two end points, only one device able to transmit at a specified moment. Dell PowerVault TL1000 Tape Autoloader: User's Guide...
- Page 171 byte A string that consists of some bits (usually 8) that are treated as a unit and represent a character. A fundamental data unit. CA certification In cryptography, a certificate from a certificate authority (CA). capacity The amount of data that can be contained on storage media and expressed in bytes of data. cartridge manual rewind tool A device that can be fitted into the reel of a cartridge and used to rewind tape into or out of the cartridge.
- Page 172 Any hardware component or peripheral device, such as a tape drive or tape library, that can receive and send data. device driver A file that contains the code that is needed to use an attached device. Dell PowerVault TL1000 Tape Autoloader: User's Guide...
- Page 173 DHCPv6 The Dynamic Host Configuration Protocol for IPv6. Although IPv6's stateless address autoconfiguration removes the primary motivation for DHCP in IPv4, DHCPv6 can still be used to statefully assign addresses if the network administrator wants more control over addressing. DH group Diffie-Hellman group.
- Page 174 A hexadecimal code that is generated by the drive or the control unit microcode in response to a detected subsystem error. Feature code. Federal communications commission. Field engineer, customer engineer, or service representative. Dell PowerVault TL1000 Tape Autoloader: User's Guide...
- Page 175 fiducial A target that is used for teaching a physical location to a robot. field replaceable unit (FRU) An assembly that is replaced in its entirety when any one of its components fails. A named set of records that are stored or processed as a unit. Also referred to as a data set. file file protection The processes and procedures that are established in an information system that are designed to...
- Page 176 INST interface A shared boundary. An interface might be a hardware component to link two devices or it might be a portion of storage or registers accessed by two or more computer programs. Dell PowerVault TL1000 Tape Autoloader: User's Guide...
- Page 177 Internet Protocol Version 4 (IPv4) See IPv4. Internet Protocol Version 6 (IPv6) See IPv6. interposer The part that is used to convert a 68-pin connector to a 50-pin D-shell connector. intervention required Manual action is needed. INTRO Introduction. Input/output. I/O station Cartridge location that is dedicated for the insertion of cartridges into and the removal of cartridges from the library.
- Page 178 A pattern of characters that controls the retention or elimination of portions of another pattern of mask characters. To use a pattern of characters to control the retention or elimination of portions of another pattern of characters. Dell PowerVault TL1000 Tape Autoloader: User's Guide...
- Page 179 master file A file that is used as an authority in a job and that is relatively permanent, even though its contents might change. Synonymous with main file. Maximum Transmission Unit (MTU) The size of the largest packet that a network protocol can transmit. Megabyte (expressed as data rate in MB/s or MB/second).
- Page 180 Pertaining to the library, to remove, by using a robotic device, a tape cartridge from a storage slot or drive. picker A robotic mechanism that is located inside the library that moves cartridges between the cartridge storage slots and the drive. Dell PowerVault TL1000 Tape Autoloader: User's Guide...
- Page 181 Preventive maintenance. Power-on reset. port A physical connection for communication between the 3590 and the host processor. The 3590 has 2 SCSI ports. Portable Document Format (PDF) A standard that is specified by Adobe Systems, Incorporated, for the electronic distribution of documents.
- Page 182 An adjective for use in qualifying some part or aspect of a servomechanism. servomechanism A feedback control system in which at least one of the system signals represents mechanical motion. Dell PowerVault TL1000 Tape Autoloader: User's Guide...
- Page 183 signature A digital signature that is used in cryptography to identify one party to ensure authenticity. slot blocker A slot blocker is used to restrict/close off a data cell so a data cartridge cannot be inserted. Small Computer Systems Interface (SCSI) A standard that is used by computer manufacturers for attaching peripheral devices (such as tape drives, hard disks, CD-ROM players, printers, and scanners) to computers (servers).
-
Page 184: Tape Cartridge
In cryptography, a trustworthy certificate that is not registered with a certificate authority. tunnel mode Port-to-port communications security in which security is provided to several machines by a single node. UART Universal asynchronous receiver/transmitter. Underwriter's Laboratories. Dell PowerVault TL1000 Tape Autoloader: User's Guide... - Page 185 Ultrium Tape Drive Located within the library, a data-storage device that controls the movement of the magnetic tape in an LTO Ultrium Tape Cartridge. The drive houses the mechanism (drive head) that reads and writes data to the tape. unload Prepare the tape cartridge for removal from the drive.
- Page 186 Dell PowerVault TL1000 Tape Autoloader: User's Guide...
-
Page 187: Index
Index configuration 27, 29, 53, 58, 62, 76, 79, access mode gateway 35, 46, 61 Web User Interface 31 library configuration 34 glossary 151 configuring auto cleaning 58 accessibility control keys 2 keyboard 149 repeat rate of up and down buttons 149 hardware attributes, viewing 54 shortcut keys 149... - Page 188 57 Notification settings 41 top menus 65 rebooting the library 57 notification settings, email 40 trace data 86 removing accessor locking screw 27 NTP 7 trace date, viewing 86 removing during installation 113 Dell PowerVault TL1000 Tape Autoloader: User's Guide...
- Page 189 trap definitions 128 trap notifications 81 Trap notifications configuration 41 troubleshooting 101 types 128 Ultrium tape drives 7 unloading 55 unloading drive 70 unlock 71 unlock user account 62 unlocking 55 unlocking the cartridge magazine 71 updating library and drive firmware 87 user 72 user access, managing 72 user accounts 72...
- Page 190 Dell PowerVault TL1000 Tape Autoloader: User's Guide...
- Page 192 IBM® Printed in USA...