Table of Contents
Advertisement
MOSCOW_LM-K7960/K6960/K6961_ENG_MFL39518830
KARAOKE MINI HOME THEATER
OWNER'S MANUAL
MODEL : LM-K7960Q
LM-K7960
LMS-K7960V, LMS-K7960C
LMS-K7960S, LMS-K7960W
LM-K6960Q
LM-K6960
LMS-K6960V, LMS-K6960C, LMS-K6960S
LM-KW6960Q
LM-KW6960
LMS-KW6960V, LMS-KW6960C, LMS-KW6960S
Please read this manual carefully before operating your set.
Retain it for future reference.
Designs and specifications are subject to change without
notice for improvement.
The working life of this product is 7 years since the date of
purchase.
CD - R/RW
USB
R
Advertisement
Table of Contents

Related Manuals for LG LM-K7960Q


Summary of Contents for LG LM-K7960Q
- Page 1 MOSCOW_LM-K7960/K6960/K6961_ENG_MFL39518830 KARAOKE MINI HOME THEATER OWNER’S MANUAL MODEL : LM-K7960Q LM-K7960 LMS-K7960V, LMS-K7960C LMS-K7960S, LMS-K7960W LM-K6960Q LM-K6960 LMS-K6960V, LMS-K6960C, LMS-K6960S LM-KW6960Q LM-KW6960 LMS-KW6960V, LMS-KW6960C, LMS-KW6960S Please read this manual carefully before operating your set. Retain it for future reference. Designs and specifications are subject to change without notice for improvement.
-
Page 2: Safety Precautions
Safety Precautions CAUTION concerning the Power Cord CAUTION Most appliances recommend they be placed upon a dedi- RISK OF ELECTRIC SHOCK DO NOT OPEN cated circuit; That is, a single outlet circuit which powers only that appliance and has no additional outlets or branch circuits. Check the WARNING: TO REDUCE THE RISK specification page of this owner's manual to be certain. -
Page 3: Table Of Contents
Table of Contents Before Use Introduction Playable Discs Safety Precautions....... . 2 Table of Contents. -
Page 4: Front Panel/ Rear Panel
12. • DISC SKIP (D.SKIP) button 21. SPEAKER Connectors - LM-KW6960Q model • CLOCK button 22. SPEAKER Connectors - LM-K6960Q model • TIMER button 23. SPEAKER Connectors - LM-K7960Q model • PLAY MODE, DEMO button 24. • S-VIDEO OUT Connector • OPTICAL IN Connector... -
Page 5: Remote Control
Remote Control POWER button POWER D.SKIP FUNCTION SELECT buttons (TUNER/BAND, DVD/KARAOKE, AUX, USB) DVD/ TUNER/BAND KARAOKE NUMERIC buttons (0-9) TAPE FUNCTION buttons SLEEP - REVERSE PLAY ( - PLAY ( DIMMER - REWIND/ FAST FORWARD PLAY ( - TAPE 1-2 SELECT buttons (1-TAPE-2) - RECORD/ RECORD PAUSE (z/[]) - TAPE STOP (x) SET UP button... -
Page 6: Connections
Connections Connecting to a TV • Make one of the following connections, depending on Progressive Scan (ColorStream pro) connection ® the capabilities of your existing equipment. • If your television is a high-definition or “digital ready” television, you may take advantage of this unit’s progressive scan output for higher video resolution. -
Page 7: Connecting To Optional Equipment
- Connect the AM loop antenna to the AM antenna This unit receives the analog signal from auxiliary connector. equipment. - Connect the FM wire antenna to the FM antenna LM-K7960Q model connector. LM-K7960Q model AUX IN REAR REAR... - Page 8 Connections Connecting USB Connecting to the Wireless microphone antenna - LM-KW6960Q model When you use the wireless microphone, connect the supplied wireless microphone antenna to the wireless microphone antenna jack of the unit. AUX IN USB Memory, REAR REAR CENTER WOOFER FRONT FRONT...
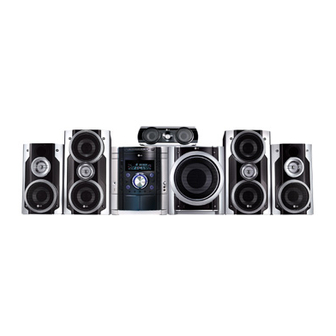
- Page 9 Connections Speaker System Connection - LM-K7960Q model Connect the speakers using the supplied speaker cables by matching the colors of the terminals and those of the cords. To obtain the best possible surround sound, adjust the speaker parameters (distance, level, etc.).
- Page 10 Connections Speaker System Connection - LM-K6960Q model Connect the speakers using the supplied speaker cables by matching the colors of the terminals and those of the cords. To obtain the best possible surround sound, adjust the speaker parameters (distance, level, etc.). If you feel lack of bass frequency Connect an active subwoofer...
-
Page 11: Connections
Connections Speaker System Connection - LM-KW6960Q model Connect the speakers using the supplied speaker cables by matching the colors of the terminals and those of the cords. To obtain the best possible surround sound, adjust the speaker parameters (distance, level, etc.). If you feel lack of bass frequency Connect an active subwoofer... -
Page 12: Before Operation
Connect a stereo headphone plug ( 3.5mm) into the • XTS-P ON headphone jack. The unique sound quality of the LG Technology cre- The speakers are automatically disabled when you plug ates the optimum sound for you to play the perfect in headphones (not supplied). -
Page 13: Setting The Clock
Before Operation Setting the Clock Using Microphone You can sing to a music source by connecting a Press CLOCK. microphone to the unit. (If the clock requires setting, press and hold CLOCK for more than 2 seconds.) Connect your microphone to the MIC socket. - The hours display begins to blink. -
Page 14: Timer Function
Before Operation Timer Function Set the minute to switch on by pressing . b b b b /B B B B > > on the front panel. With the TIMER function you can have the radio recep- tion, CD play, USB play and TAPE play turned on and Press SET/CD [[ to confirm the turn on minutes off at the time desired. - Page 15 Before Operation Mini Glossary for Audio Stream & Sound Mode Surround mode You can enjoy surround sound simply by selecting one of the pre-programmed sound fields according to the program you want to listen to. Allows you to enjoy 5.1(or 6) discrete channels of high quality dig- When DVD is inserted ital audio from DTS program sources such as discs, DVD and You can change the Digital Audio Output mode by...
-
Page 16: General Explanation
Before Operation Example: On-Screen Display during Caution: playing DVD Before using the remote control, press the DVD/KARAOKE button to select the device to be operated. Items Selection Method Title Number General Explanation , Numbers or 1 / 3 SELECT/ENTER This manual gives basic instructions for operating the Chapter Number , Numbers or unit. - Page 17 Before Operation Initial Settings DISPLAY By using the Setup menu, you can make various adjust- DISPLAY ments to items such as picture and sound. You can also TV Aspect 16 : 9 set a language for the subtitles and the Setup menu, Display Mode Widescreen Progressive Scan...
- Page 18 Before Operation AUDIO Size Press to set a mode. (Large, Small or None) • You cannot change the size of the front L/R speaker, AUDIO which is set to “Large”. 5.1 Speaker Setup Select • The size of the Subwoofer can be selected to “Large” or “None”.
- Page 19 Before Operation LOCK (Parental Control) Password (Security Code) You can enter or change password. LOCK 1 Select Password on the LOCK menu then press Rating Unlock 2 Follow step 2 as shown left (Rating). “Change” or Password **** Area Code “New”...
-
Page 20: Operation With Dvd
Before Operation Operation with DVD OTHERS Playing a DVD OTHERS Playback Setup • Turn on the TV and select the video input source DivX(R) Registration Select connected to the unit. • Audio system: Turn on the audio system and select the input source connected to the unit. -
Page 21: General Features
Operation with DVD General Features Slow Motion 1 Press PAUSE/STEP on the remote control during playback. Unless stated otherwise, all operations described use The player will now go into PAUSE mode. the remote control. Some features may also be 2 Use the m or M to select the required speed: t available on the Setup menu. -
Page 22: Special Dvd Features
Operation with DVD General Features (continued) To clear a Marked Scene 1 During disc playback, press SEARCH. The MARKER SEARCH menu will appear on the screen. Time Search DivX 2 Press to select the Marker number that you The Time Search function allows you to start playing at want to erase. -
Page 23: Operation With Audio Cd And Mp3/Wma Disc
Operation with DVD and Video CD Operation with Audio CD and MP3/WMA Disc Special DVD Features (continued) Playing an Audio CD and MP3/WMA file Changing the Audio Language DivX The unit can play audio CD and MP3/WMA. Press AUDIO repeatedly during playback to hear a different audio language or audio track. -
Page 24: Programmed Playback
Programmed Playback Operation with Audio CD and MP3/WMA Disc The Program function enables you to store your favorite Repeat Track/All/Off tracks from any disc in the player memory. You can play a title/chapter/all/track on a disc. A program can contain 300 tracks (Audio CD/MP3/WMA). 1 Press REPEAT when playing a disc. -
Page 25: Operation With Jpeg Disc
Operation with JPEG Disc Viewing a JPEG disc Slide Show JPEG JPEG to highlight the (Slide Show) This unit can play discs with JPEG files. then press SELECT/ENTER. Before playing JPEG recordings, read the notes on JPEG Recordings on right. Moving to another File JPEG Insert a disc and close the tray. -
Page 26: Operation With Divx Disc
Operation with DivX Disc The unit can play the DivX files. DivX disc compatibility with this player is limited Insert a disc and close the tray. as follows: The DivX menu appears on the TV screen. • Available resolution size of the DivX file is under 720x576 (W x H) pixel. -
Page 27: Operation With Radio
Operation with RADIO Presetting the radio stations Listening to the radio You can preset 50 stations for FM and AM. Press TUNER/BAND on the remote control to Before tuning, make sure that you have turned the vol- show either FM or AM in the display window. Or ume down to the minimum level. -
Page 28: Operation With Radio
Operation with RADIO RDS Function : OPTIONAL Programme Search (PTY) : OPTIONAL A major benefit of RDS is its ability to encode broad- About RDS : OPTIONAL casts with Programme Type (PTY) codes that indicate This unit is equipped with RDS (Radio Data System), the type of material being broadcast. -
Page 29: Operation With Tape
Operation with TAPE Basic Playback To Stop Play Press STOP(x) on the front panel or TAPE STOP(x) Press TAPE1-2 (or TAPE) to select tape function. on the remote control during playback. (“NO TAPE ” appears in the display window.) Open cassette TAPE1-2 by pushing to the To Play Rewind or Fast Forward PUSH EJECT position. -
Page 30: Operation With Karaoke
Operation with KARAOKE You can play KARAOKE (singing along) with karaoke disc by connecting a microphone to the unit. You can enjoy KARAOKE with a stereo-recorded disc, even if it is a non-karaoke disc, by reducing the singer’s voice. Karaoke Basic Playback To Adjust ECHO Volume You can give an echo effect to the sound from the Check if the system is connected. -
Page 31: Karaoke Menu Playback
Operation with KARAOKE Karaoke MENU Playback MUSIC LIST ( Preparation LOCAL SONG ( ) and POP Press MENU on the karaoke mode. SONG ( The main MENU appears on the screen. Main MENU (On the TV screen) Select by pressing the on the main menu. - Page 32 Operation with KARAOKE SINGER LIST ( CLASSIC ( 1 Select and select the initial Select by pressing the of the singer you want by pressing the , and press SELECT/ ENTER in the LOCAL the SONG LIST and SINGER LIST menu, and SONG, POP SONG and CLASSIC menu.
-
Page 33: Operation With Karaoke
Operation with KARAOKE 2 Select the composer you want by pressing the Select by pressing , and press SELECT/ ENTER. , and select one of NUMERIC buttons 1~9 by pressing to select winner’s number, then press SELECT/ ENTER. BALAKIREV BEETHOVEN Select by pressing BOCCHERINI... -
Page 34: Troubleshooting
Troubleshooting Check the following guide for the possible cause of a problem before contacting service. Symptom Cause Correction No power. • The power cord is disconnected. • Plug the power cord into the wall outlet securely. The power is on, but the •... -
Page 35: Language Code List
Language Code List Use this list to input your desired language for the following initial settings: Disc Audio, Disc Subtitle, Disc Menu. Language Code Language Code Language Code Language Code Abkhazian 6566 Finnish 7073 Macedonian 7775 Slovenian 8376 Afar 6565 French 7082 Malagasy... -
Page 36: Specifications
Front: 130 W + 130 W (4 Ω, THD 10 %) Center: 60 W (8 Ω, THD 10%) Rear: 60 W + 60 W (8 Ω, THD 10 %) Subwoofer: 180 W (3 Ω, THD 10 %) - LM-K7960Q model T.H.D 0.5 %...