Table of Contents
Advertisement
Advertisement
Table of Contents

Related Manuals for Polaris RideCommand

Summary of Contents for Polaris RideCommand
- Page 1 USER’S GUIDE...
- Page 2 User’s Guide...
- Page 3 POLARIS®, RZR®, RideCommand™, and DYNAMIX™ are trademarks of POLARIS Industries Inc. Copyright 2017 Polaris Industries Inc. All information contained within this publication is based on the latest product information at the time of publication. Due to constant improvements in the design and quality of production components, some minor discrepancies may result between the actual vehicle and the information presented in this publication.
- Page 4 WELCOME Thank you for purchasing a POLARIS vehicle, and welcome to our world-wide family of POLARIS enthusiasts. Be sure to visit us online at www.polaris.com for the latest news, new product introductions, upcoming events, career opportunities and more. Here at POLARIS we proudly produce an exciting line of utility and recreational products.
- Page 5 SAFETY SYMBOLS AND SIGNAL WORDS The following signal words and symbols appear throughout this manual and on your vehicle. Your safety is involved when these words and symbols are used. Become familiar with their meanings before reading the manual. WARNING WARNING indicates a hazardous situation that, if not avoided, may result in death to the operator, bystanders or person(s) inspecting or servicing the vehicle.
-
Page 6: Table Of Contents
TABLE OF CONTENTS Introduction ....7 General Information ....9 Features and Controls . -
Page 8: Introduction
INTRODUCTION OVERVIEW Thank you for purchasing a RIDE COMMAND™ Display, and welcome to the Polaris RIDE COMMAND™ App. Your Display is easy to use and will allow you to customize the information displayed through the use of alternate screen selections. -
Page 10: General Information
Select from available ride screens. SOFTWARE UPDATES Software updates are recommended as they become available throughout the life of the vehicle. Log in to polaris.com/ridecommand to download the latest software updates. If you need assistance, please see your POLARIS dealer. MAP UPDATES Map updates are recommended every 90 days, and especially before long trips. -
Page 12: Features And Controls
FEATURES AND CONTROLS FEATURES AND CONTROLS BUTTONS Gauge Screen Button Device Manager Button Audio Button Apps Screen Button Map Button... - Page 13 FEATURES AND CONTROLS GAUGE SCREEN 1. Press the Gauge Button to display the main gauge screen. 2. Use the gauge button again to move between gauge and camera screens. These can also be selected with the touch screen buttons in the lower left corner.
- Page 14 FEATURES AND CONTROLS 6. Swipe down from the top of the screen or press the upper navigation bar to adjust brightness and Bluetooth connection. FRONT AND REAR CAMERA Within the Gauge Menu is a front and rear view camera as shown below. To toggle between camera views, press the FRONT/REAR icon in the top left corner of the screen.
- Page 15 FEATURES AND CONTROLS AUDIO SCREEN 1. Press the audio screen button shown above to display the audio screen. 2. Use the source button in the top left corner to change between FM, AM, Weather, Bluetooth, and USB Audio. 3. Press the tune up or down icons to change the radio station by small increments or press the scan up or down icon to search for the next quality signal station.
-
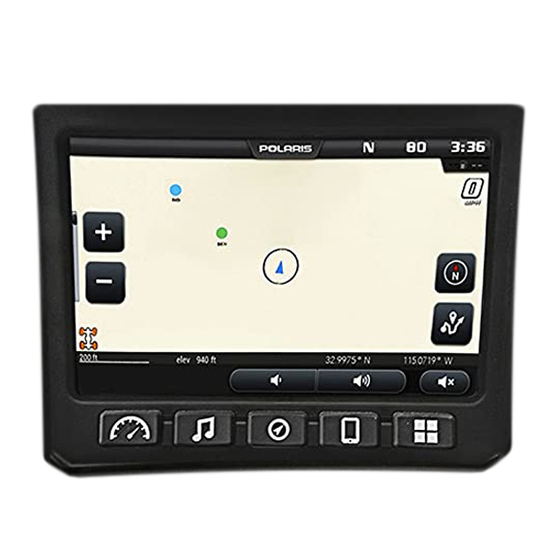
Page 16: Map Screen
FEATURES AND CONTROLS MAP SCREEN 1. Press the MAP SCREEN button shown above to display the map screen. 2. The map should center you based on the location of the GPS. 3. Use the plus and minus signs on the left side of the screen, or pinch the screen with your fingers to zoom in and out on the map. - Page 17 FEATURES AND CONTROLS 6. Select the ADD WAYPOINTS icon shown below to drop and name a waypoint where the cross-hairs are pointing. 7. You can manage waypoints by selecting the waypoint. You can manage waypoints by selecting the WAYPOINT icon shown below. 8.
- Page 18 FEATURES AND CONTROLS 10. You can manage rides on your display by clicking on the RIDE icon as shown below. MANAGE RIDES OR WAYPOINTS 1. To navigate to a waypoint, go to the waypoint menu on your display, select the waypoint you would like to navigate to and press the NAVIGATE to WAYPOINT icon.
- Page 19 FEATURES AND CONTROLS 4. To export a single ride/waypoint to a USB flashdrive, select the ride/waypoint you wish ti export and press the EXPORT icon. 5. To delete a ride or waypoint select the ride/waypoint you would like to delete and press the DELETE icon.
- Page 20 Bluetooth connection with your smartphone. GROUP RIDE The Polaris RIDE COMMAND™ app also has the ability to track the location of friends you are riding with. Simply create or join a group with your friends from the Polaris RIDE COMMAND™...
- Page 21 2. This will open up the display below. CONNECT YOUR PHONE TO THE DISPLAY The RIDE COMMAND™ Display is compatible with Android and iOS. Check polaris.com/ridecommand for latest operating system compatibility. Click on the BLUETOOTH icon below the cellphone image to open up the Bluetooth connection window.
- Page 22 Bluetooth settings. When your phone appears on the display press the “+” button next to it. 2. A prompt will appear on your iPhone requesting “Polaris RZR” to pair with your phone. 3. Ensure the conformation code on the screen and your phone are the same then press “Pair”...
- Page 23 FEATURES AND CONTROLS 5. For optimal experience press “Accept” on your phone when requested to access contacts and messages. 6. The display will now show a list of previously connected phones on the display. If it is unpaired, click on your phone from the list. 7.
- Page 24 USB music playback is not available on all devices. CONNECTING YOUR BLUETOOTH HEADSET WITH THE DISPLAY The Display can connect with Polaris approved Bluetooth headsets to listen to music, take phone calls, and talk with other riders. Use the following steps to connect your Bluetooth headset to the Display.
- Page 25 FEATURES AND CONTROLS 1. From the Device Manager menu press the Bluetooth icon below the headset to open the Bluetooth connection window. 2. Turn your Bluetooth headset on and put it in phone pairing mode. 3. When your Bluetooth headset appears on the display press the “+” icon on the display.
- Page 26 FEATURES AND CONTROLS APPS SCREEN 1. Press the Apps Menu button shown above to display the Apps Menu. 2. From this menu Settings, Diagnostics, Lock Screen, GPS Satellite Status, Ride Stats, and GoPro features can all be accessed.
- Page 27 The icon bar at the top of the screen displays cell phone related information, a clock and the GPS heading. Some of these built-in features are only functional with the addition of Polaris Accessories. Your Polaris dealer can assist. In most situations, the GPS and mapping features will function best while the vehicle is outdoors in an open space.
- Page 28 The low battery voltage indicator illuminates when the battery voltage is low. EPS WARNING (IF EQUIPPED) This indicator illuminates briefly when the key is turned to the ON position. If the light remains on, the EPS system is inoperative. Your POLARIS dealer can assist.
-
Page 30: Operation
OPERATION OPERATION SETTINGS To access the Setting menu, press the Apps Screen Button and select Settings. GENERAL Pressing the Settings icon will take you to a general settings screen as shown below. From the General Settings menu you can change the following: •... - Page 31 OPERATION AUDIO The audio tab on the left side of the display allows access to automatic volume control as well as stereo adjustments. This menu is also available from the settings button on the audio screen. Use the equalizer to adjust Bass, Mid, and Treble. To do this drag the dot above the desired adjustment up to increase band frequency and down to decrease band frequency.
- Page 32 The Diagnostics menu will provide users with a brief description of the fault and an action for correcting the fault, if one exists. For a system diagnostics inspection and/or service, please see your authorized Polaris dealer. NOTE The Diagnostics menu is meant to show any faults that may have been detected by the vehicle.
- Page 33 NOTE Ride Command™ supports GoPro Hero 4 Black and Silver models. Other models may work with limitations. Polaris recommends the use of a MicroSD card comparable to a SanDisk Extreme Plus for optimal experience. NOTE For GoPro Hero 5 users, when Ride Command™...
- Page 34 OPERATION 1. Turn on the GoPro camera by pressing the power button. 2. Turn on the GoPro’s Wi-Fi by holding the side button until a blue light flashes (you should see a Wi-Fi signal on the GoPro display). 3. In order to connect a GoPro to the display navigate to Apps Screen. 4.
- Page 35 OPERATION NOTE Preview image will be disabled when traveling at speeds over 15 MPH. ENGINE OVERHEAT INDICATORS TEMPERATURE SCALE The engine temperature scale at the right side of the Display screen changes to RED and the check engine temperature indicator at the top left of the screen illuminates when the engine is overheating.
-
Page 36: Dynamix™ Active Suspension
Polaris-designed Suspension Control Module (SCM). The suspension control algorithms and software were designed and developed by Polaris’ engineering team, leveraging our expertise and deep knowledge of off-road vehicle dynamics. DYNAMIX™ Active Suspension proactively makes split-second decisions based on operator inputs, controlling the shocks to achieve optimum performance, control, and stability under varying riding conditions and driving styles. - Page 37 DYNAMIX™ ACTIVE SUSPENSION DYNAMIX™ SYSTEM COMPONENTS SHOCKS 2.5" FOX® Podium with Electronically Controlled Damping. SUSPENSION CONTROL MODULE (SCM) The Suspension Control Module (SCM) contains the logic for suspension con- trol, including communications, operator inputs, and shock drivers, to execute the suspension control algorithms. The SCM also has an internal 6-axis inertial measurement unit which is used to monitor the performance of the vehicle by the suspension control algorithms.
- Page 38 DYNAMIX™ ACTIVE SUSPENSION BRAKING The system continuously monitors the brake switch status and vehicle deceleration rate, reducing body motion in braking conditions. ACCELERATION The system continuously monitors vehicle speed, accelerator pedal position, and engine speed to increase damping of the rear shocks under certain acceleration conditions to reduce squat.
- Page 39 SCM diagnostic indicator on the RideCommand™ display. Suspension activity notifications can be turned enabled/disabled from the vehicle the setting menu. PROCESSING CAPABILITY DYNAMIX™...
- Page 40 DYNAMIX™ ACTIVE SUSPENSION COMFORT Use Comfort mode for the most comfortable ride. In Comfort mode, the suspension control system is primarily optimized for rider comfort, intervening in performance situations where required. The system will gradually increase the base value of damping as vehicle speed increases.
- Page 41 You assume all risks associated with using this device. Read your User Guide. Always ride with the latest maps and trails data from polaris.com/ ridecommand. Check polaris.com/ridecommand for updates.
- Page 42 DYNAMIX™ ACTIVE SUSPENSION DEMONSTRATION MODE When the vehicle is first keyed on, and the shift lever is in the Park (P) position, the SCM will enter a demonstration mode. The suspension will react to the operator inputs as if the vehicle was being driven. After a period of time (5 minutes), the SCM will exit demonstration mode and stop driving the shocks to conserve vehicle power.
-
Page 44: Maintenance
USB drive to avoid losing them. To update the software, do the following: ON YOUR PERSONAL COMPUTER 1. Upload the most recent software from ridecommand.polaris.com to a USB flash drive. ON YOUR VEHICLE 1. Press the Apps Screen button. -
Page 45: Frequently Asked Questions
4. Try using a different USB flash drive. UPDATE MAPS To update the maps on your display, do the following: 1. Go to ridecommand.polaris.com and download the map update to a USB flash drive. 2. Insert USB flash drive into the USB port on your vehicle. - Page 46 MAINTENANCE 4. I get a “Memory Full” warning while in the MAPS/RIDES screen, what should I do? You are reaching the limit allowed for an individual ride. Save the current ride and start a new ride. Up to 20 rides can be saved. 5.
- Page 48 Acceleration ......37 Icon Bar........26 Advanced Diagnostics ....38 Airborne Detection ..... 37 Apps Screen......25 Audio Screen......14 Low Battery Voltage Indicator ..27 Low Fuel........27 Low Oil Indicator ....... 27 Bluetooth Functionality ....9 Braking Anti-Dive....... 37 Buttons ........
- Page 49 For your nearest Polaris dealer, call 1-800-POLARIS (765-2747) or visit www.polaris.com Polaris Industries Inc. 2100 Highway 55 Medina, MN 55340 Part No. 9928591 Rev 01 Printed in USA...