
Related Manuals for Lenovo ThinkServer sd350


Summary of Contents for Lenovo ThinkServer sd350
- Page 1 Lenovo ThinkServer sd350 Server Type 5493, Lenovo ThinkServer n400 Enclosure Type 5495 Installation and Service Guide Machine Type: Type 5493 and 5495...
- Page 2 “Getting help and technical assistance” on page 171, Appendix D “Notices” on page 175, the Warranty Information document, and the Safety Information and Environmental Notices and User Guide documents on the Lenovo Documentation CD. First Edition (Sept 26, 2016) © Copyright Lenovo .
-
Page 3: Table Of Contents
What your server offers ... . Network connection problems..Lenovo XClarity Administrator..Optional-device problems .. - Page 4 Taiwan Class A compliance statement . . . bracket ....Lenovo ThinkServer sd350 Server Type 5493, Lenovo ThinkServer n400 Enclosure Type 5495Installation and Service Guide...
- Page 5 Index....Taiwan BSMI RoHS declaration ..© Copyright Lenovo...
- Page 6 Lenovo ThinkServer sd350 Server Type 5493, Lenovo ThinkServer n400 Enclosure Type 5495Installation and Service Guide...
-
Page 7: Safety
Vor der Installation dieses Produkts die Sicherheitshinweise lesen. Prima di installare questo prodotto, leggere le Informazioni sulla Sicurezza. Les sikkerhetsinformasjonen (Safety Information) før du installerer dette produktet. Antes de instalar este produto, leia as Informações sobre Segurança. © Copyright Lenovo... -
Page 8: Safety Statements
Be sure to read all caution and danger statements in this documentation before you perform the procedures. Read any additional safety information that comes with your system or optional device before you install the device. Lenovo ThinkServer sd350 Server Type 5493, Lenovo ThinkServer n400 Enclosure Type 5495Installation and Service Guide... - Page 9 Do not: • Throw or immerse into water • Heat to more than 100°C (212°F) • Repair or disassemble Dispose of the battery as required by local ordinances or regulations. © Copyright Lenovo...
- Page 10 Statement 4 CAUTION: Use safe practices when lifting. ≥ 18 kg (39.7 lb) ≥ 32 kg (70.5 lb) ≥ 55 kg (121.2 lb) viii Lenovo ThinkServer sd350 Server Type 5493, Lenovo ThinkServer n400 Enclosure Type 5495Installation and Service Guide...
- Page 11 Hazardous voltage, current, and energy levels are present inside any component that has this label attached. There are no serviceable parts inside these components. If you suspect a problem with one of these parts, contact a service technician. © Copyright Lenovo...
- Page 12 Statement 15 CAUTION: Make sure that the rack is secured properly to avoid tipping when the server unit is extended. Lenovo ThinkServer sd350 Server Type 5493, Lenovo ThinkServer n400 Enclosure Type 5495Installation and Service Guide...
- Page 13 Statement 26 CAUTION: Do not place any object on top of rack-mounted devices. Statement 27 CAUTION: Hazardous moving parts are nearby. © Copyright Lenovo...
- Page 14 4. Attach signal cables to other devices. 3. Remove all cables from the devices. 5. Connect power cords to their sources. 6. Turn ON all the power sources. Lenovo ThinkServer sd350 Server Type 5493, Lenovo ThinkServer n400 Enclosure Type 5495Installation and Service Guide...
- Page 15 • Always install stabilizer brackets on the rack cabinet. • Always install servers and optional devices starting from the bottom of the rack cabinet. • Always install the heaviest devices in the bottom of the rack cabinet. © Copyright Lenovo xiii...
- Page 16 Lenovo ThinkServer sd350 Server Type 5493, Lenovo ThinkServer n400 Enclosure Type 5495Installation and Service Guide...
-
Page 17: Chapter 1. The Lenovo Thinkserver Sd350 Server Type 5493, Lenovo Thinkserver N400 Enclosure Type 5495
You can obtain up-to-date information about the server and other Lenovo server products at http://shop.lenovo.com/us/en/systems/. At http://www.lenovo.com/support, you can create a personalized support page by identifying Lenovo products that are of interest to you. From this personalized page, you can subscribe to weekly email notifications about new technical documents, search for information and downloads, and access various administrative services. - Page 18 Lenovo Service Information website. The Lenovo Service Information website provides additional information for parts installation and replacement videos, and error codes for server support. The following illustration shows the QR code: Lenovo ThinkServer sd350 Server Type 5493, Lenovo ThinkServer n400 Enclosure Type 5495Installation and Service Guide...
-
Page 19: The Lenovo Thinkserver Documentation Cd
Figure 3. QR code You can download the Lenovo EasyStartup Setup and Installation CD to help you configure the hardware, install device drivers, and install the operating system. For a list of supported optional devices for the server, see http://www.lenovo.com/us/en/ serverproven/. -
Page 20: Related Documentation
This document is in PDF format on the Lenovo Documentation CD. It contains translated environmental notices. • Lenovo License Agreement for Machine Code This document is in PDF format on the Lenovo Documentation CD. It provides translated versions of the Lenovo License Agreement for Machine Code for your product. • Important Notices This document is in printed format and comes with the server. -
Page 21: Brocade Documentation
The documentation might be updated occasionally to include information about those features, or technical updates might be available to provide additional information that is not included in the server documentation. These updates are available from the Lenovo website. To check for updated documentation and technical updates, go to http://www.lenovo.com/support. -
Page 22: Server Features And Specifications
• 1200-watt power supply • 1600-watt power supply • 1+1 redundant Important: Do not mix 1200-watt and 1600-watt power supply for use. RAID controllers (depending on the model): Lenovo ThinkServer sd350 Server Type 5493, Lenovo ThinkServer n400 Enclosure Type 5495Installation and Service Guide... - Page 23 • Operation: 6.8 bels • Idle: 6.2 bels Environment: The ThinkServer sd350 Server complies with ASHRAE class A2 specifications Chapter 1 The Lenovo ThinkServer sd350 Server Type 5493, Lenovo ThinkServer n400 Enclosure Type 5495...
- Page 24 – Minimum: 0.153 kVA – Maximum: 1.544 kVA Attention: 1. Chassis is powered on. 2. A2 - Derate maximum allowable temperature 1°C/300 m above 950 m. Lenovo ThinkServer sd350 Server Type 5493, Lenovo ThinkServer n400 Enclosure Type 5495Installation and Service Guide...
-
Page 25: What Your Server Offers
– Simple Network Management Protocol (SNMP) version 3.0 – Common Information Model (CIM) – Web browser For additional information, see the TMM User Guide: Thinkserver SD350 System Manager User Guide.pdf at the http://www.lenovo.com/support. • Lenovo ThinkServer Diagnostics (LTD) The Lenovo ThinkServer Diagnostics enables you to diagnose server problems offline, perform some diagnostic tests, and collect system information. - Page 26 The program also helps to plan servers and devices deployment in an efficient way. For detailed information about using the Lenovo ThinkServer Power Planner program, refer to the help system of the program. • Lenovo XClarity Administrator Lenovo XClarity Administrator is a centralized resource-management solution that enables administrators to deploy infrastructure faster and with less effort.
- Page 27 Fsetup.html. – Free 90-day trial Lenovo XClarity Administrator offers a free, 90-day trial license that enables you to use all available features (including operating-system deployment, firmware maintenance, and configuration management) for a limited time. After 90 days, you can continue to use Lenovo XClarity Administrator to manage and monitor your hardware for free;...
-
Page 28: Lenovo Xclarity Administrator
Lenovo XClarity Administrator provides a centralized view of all events and alerts that are generated from the managed endpoints. When a CMM or IMM detects an issue, an alert or event is passed to the Lenovo XClarity Administrator and is displayed in the events or alerts log. A summary of all alerts and events is visible from the Dashboard and the Status bar. -
Page 29: Smash-Clp
Lenovo XClarity Administrator and the managed endpoints. You can choose to send diagnostic files to Lenovo Support using call home or to another service provider using SFTP. You can also manually collect diagnostic files, open a problem record, and send diagnostic files to the Lenovo Support Center. - Page 30 Eg: The below command “show /admin1/system1/sp1/sshsvc1” will display all the information about SSH Service. -> show /admin1/system1/sp1/sshsvc1 Command Status: COMMAND COMPLETED ufip=/admin1/system1/sp1/sshsvc1 Targets: sshendpt1/ sshprofile1/ sshsetting1/ Associations: ElementConformsToProfile=>/admin1/system1/sp1/sshsvc1/sshprof1 ElementSettingData=>/admin1/system1/sp1/ssttings1/sshsetting1 ElementCapabilities=>/admin1/system1/sp1/capabilities1/sshcap1 ServiceAccessBySAP=>/admin1/system1/sp1/sshsvc11/tcpendpt1 Lenovo ThinkServer sd350 Server Type 5493, Lenovo ThinkServer n400 Enclosure Type 5495Installation and Service Guide...
- Page 31 SMASH CLP is a command line interface for the remote user to the server. The commands are of the form of <verb><options><targets><target-properties> Commands List: create delete dump exit help load reset show start stop version Chapter 1 The Lenovo ThinkServer sd350 Server Type 5493, Lenovo ThinkServer n400 Enclosure Type 5495...
- Page 32 This is used to cause a target with power/process control to change states to a higher run level. Eg: The below command “stop /admin1/system1” will shut down the host system. Lenovo ThinkServer sd350 Server Type 5493, Lenovo ThinkServer n400 Enclosure Type 5495Installation and Service Guide...
- Page 33 <response xmlns=http://schemas.dmtf.org/smash/ commandresponse/1.0.0/dsp0224.xsd xmlns:xsi=”http://www. w3.org/2001/XMLSchem <command> <inputline>cd -o format=clpxml /admin1/system1< /inputline> </command> <cmdstat> <status>0< /status> <status_tag>COMMAND COMPLETED< /status_tag> <job> <job_id>clpjob-36256-4< /job_id> </job> </cmdstat> <cd> <ufip>/admin1/system1< /ufip> </cd> </response> Chapter 1 The Lenovo ThinkServer sd350 Server Type 5493, Lenovo ThinkServer n400 Enclosure Type 5495...
- Page 34 -help will display the decryption & usage of show verb. Eg: The below command “exit -help” will display the usage of exit verb. Lenovo ThinkServer sd350 Server Type 5493, Lenovo ThinkServer n400 Enclosure Type 5495Installation and Service Guide...
-
Page 35: Reliability, Availability, And Serviceability
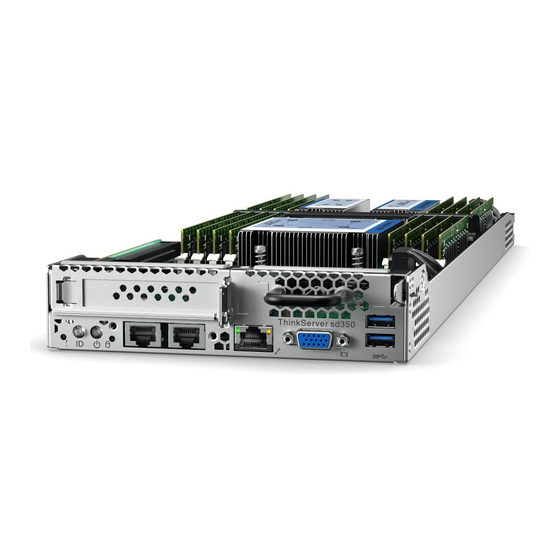
LAN Major components The following illustration shows the major components in the server. The illustrations in this document might differ slightly from your hardware. Chapter 1 The Lenovo ThinkServer sd350 Server Type 5493, Lenovo ThinkServer n400 Enclosure Type 5495... - Page 36 / power backplane 2.5-inch hot-swap hard disk drive 2.5-inch hard disk drive filler panel 2.5-inch hard disk drive x4 filler panel Figure 4. Major components Lenovo ThinkServer sd350 Server Type 5493, Lenovo ThinkServer n400 Enclosure Type 5495Installation and Service Guide...
-
Page 37: Server Controls, Leds, And Power
The following illustration shows the control panel and its LEDs in the front of the server. Power button / LED System error LED ID button / LED Figure 6. Control panel Chapter 1 The Lenovo ThinkServer sd350 Server Type 5493, Lenovo ThinkServer n400 Enclosure Type 5495... -
Page 38: Rear View
When this LED is lit, the identify LED on the chassis is also lit. • Hard disk drive LED: When this LED is lit, it indicates that one or more hard disk drive has failed. Lenovo ThinkServer sd350 Server Type 5493, Lenovo ThinkServer n400 Enclosure Type 5495Installation and Service Guide... -
Page 39: System-Board Internal Connectors
• Power cord connector: Connect the power cord to this connector. System-board internal connectors The following illustration shows the internal connectors on the system board. Chapter 1 The Lenovo ThinkServer sd350 Server Type 5493, Lenovo ThinkServer n400 Enclosure Type 5495... -
Page 40: System-Board External Connectors
OCP mezzanine connector Figure 9. Internal connectors on the system board System-board external connectors The following illustration shows the external connectors on the system board. Lenovo ThinkServer sd350 Server Type 5493, Lenovo ThinkServer n400 Enclosure Type 5495Installation and Service Guide... -
Page 41: System-Board Switches And Jumpers
1. Before you change any switch settings or move any jumpers, turn off the server; then, disconnect external cables. Review the information in “Safety” on page v, “Installation guidelines” on page 75, and “Turning off the server” on page 29. Chapter 1 The Lenovo ThinkServer sd350 Server Type 5493, Lenovo ThinkServer n400 Enclosure Type 5495... - Page 42 Clear CMOS jumper Figure 11. Location of the switches, jumpers, and buttons on the system board The following table describes the jumpers on the system board. Lenovo ThinkServer sd350 Server Type 5493, Lenovo ThinkServer n400 Enclosure Type 5495Installation and Service Guide...
-
Page 43: System-Board Leds
Description BIOS recovery. ME recovery. Default off. Password clear. System-board LEDs The following illustration shows the light-emitting diodes (LEDs) on the system board. Chapter 1 The Lenovo ThinkServer sd350 Server Type 5493, Lenovo ThinkServer n400 Enclosure Type 5495... -
Page 44: Server Power Features
However, the server can respond to requests from TMM, such as a remote request to turn on the server. The power-on LED will not be lit when the server is connected to ac power but is not turned on. Lenovo ThinkServer sd350 Server Type 5493, Lenovo ThinkServer n400 Enclosure Type 5495Installation and Service Guide... - Page 45 • You can turn off the server from the operating system, if your operating system supports this feature. After an orderly shutdown of the operating system, the server will turn off automatically. Chapter 1 The Lenovo ThinkServer sd350 Server Type 5493, Lenovo ThinkServer n400 Enclosure Type 5495...
- Page 46 PCI Express assembly. Otherwise, the Wake on LAN feature might not work. • The TMM can turn off the server as an automatic response to a critical system failure. Lenovo ThinkServer sd350 Server Type 5493, Lenovo ThinkServer n400 Enclosure Type 5495Installation and Service Guide...
-
Page 47: Chapter 2. Configuration Information And Instructions
RAID cards, HBA and system management controllers. The tool is delivered as an ISO image of a bootable CD, to be downloaded by end users from the Lenovo support website at http://www.lenovo.com/support. The CD contains an operating system environment, all necessary device drivers, the firmware updater user application, system and device firmware updating tools, firmware images, and documentation. -
Page 48: Configuring The Server
Important: It is highly recommended to apply a clean hard disk drive for RAID function to prevent unexpected system behavior. Using the EasyStartup Setup Use this information as an overview for using the EasyStartup Setup. Lenovo ThinkServer sd350 Server Type 5493, Lenovo ThinkServer n400 Enclosure Type 5495Installation and Service Guide... - Page 49 ThinkServer EasyStartup is a tool designed to facilitate the configuration and installation of the operating systems on the Lenovo Servers. It provides a Graphical User Interface that provides you a step by step process to Startup their system. This tool allows you to choose the language, keyboard layout they want to use during the configuration process.
-
Page 50: Using The Setup Utility
The following choices are on the Setup utility main menu for the UEFI. Depending on the version of the firmware, some menu choices might differ slightly from these descriptions. • Main Lenovo ThinkServer sd350 Server Type 5493, Lenovo ThinkServer n400 Enclosure Type 5495Installation and Service Guide... - Page 51 This page shows you the system information, include UEFI firmware version, build time and the system Date / Time were being set. This page also includes 2 sub-mainus below: – Processors Select this choice to view or change the processor settings. –...
- Page 52 Select this to handle how the logs in SEL to be managed. – TMM network Configuration Select this choice to view the system management network interface port, the MAC address. Lenovo ThinkServer sd350 Server Type 5493, Lenovo ThinkServer n400 Enclosure Type 5495Installation and Service Guide...
- Page 53 – View Sysetm Event Log Select this choice to enter the System Event viewer to view the log messages details. – DNS Configuration Select this to Enable/Disable DNS Service, change DNS DHCP mode and DNS Server IP address • Security There are 2 levels of passwords can be applied for the system: Administrator Passwrod and and User Password.
-
Page 54: Using The Boot Manager
• Automatic Server Restart (ASR) when POST is not complete or the operating system hangs and the operating system watchdog timer times-out. The TMM might be configured to watch for the operating Lenovo ThinkServer sd350 Server Type 5493, Lenovo ThinkServer n400 Enclosure Type 5495Installation and Service Guide... -
Page 55: Using The Remote Presence And Blue-Screen Capture Features
system watchdog timer and reboot the system after a timeout, if the ASR feature is enabled. Otherwise, the TMM allows the administrator to generate a nonmaskable interrupt (NMI) by pressing an NMI button for an operating-system memory dump. ASR is supported by IPMI. •... -
Page 56: Configuring Raid Arrays
Through the Setup utility, you can access utilities to configure RAID arrays. For information about configuring RAID arrays, see “Configuring RAID arrays” on page 40 and http://docs.avagotech.com/docs/12353379. Lenovo ThinkServer sd350 Server Type 5493, Lenovo ThinkServer n400 Enclosure Type 5495Installation and Service Guide... -
Page 57: Chapter 3. Troubleshooting
The documentation that comes with your operating system and software also contains troubleshooting information. Diagnosing a problem Before you contact Lenovo or an approved warranty service provider, follow these procedures in the order in which they are presented to diagnose a problem with your server. Step 1. - Page 58 Problem determination information is available for many devices such as RAID and network adapters. For problems with operating systems or Lenovo software or devices, go to http://www.lenovo.com/support. Lenovo ThinkServer sd350 Server Type 5493, Lenovo ThinkServer n400 Enclosure Type 5495Installation and Service Guide...
-
Page 59: Undocumented Problems
If you have completed the diagnostic procedure and the problem remains, the problem might not have been previously identified by Lenovo. After you have verified that all code is at the latest level, all hardware and software configurations are valid, and no diagnostics LEDs or log entries indicate a hardware component failure, contact Lenovo or an approved warranty service provider for assistance. -
Page 60: Performing The Checkout Procedure
The event logs list the error codes and messages that are generated when an error is detected for the subsystems TMM, POST, LTD, and the server baseboard management controller. See “System event logs” on page 47 for more information. • TMM Lenovo ThinkServer sd350 Server Type 5493, Lenovo ThinkServer n400 Enclosure Type 5495Installation and Service Guide... -
Page 61: System Error Leds
The TMM combines service processor functions, video controller, and remote presence and blue-screen capture features in a single chip. The TMM provides advanced service-processor control, monitoring, and alerting function. If an environmental condition exceeds a threshold or if a system component fails, the TMM lights LEDs to help you diagnose the problem, records the error in the TMM event log, and alerts you to the problem. - Page 62 LEDs are lit, including the LEDs that are lit on the operation information panel and LEDs inside the server on the system board. Lenovo ThinkServer sd350 Server Type 5493, Lenovo ThinkServer n400 Enclosure Type 5495Installation and Service Guide...
-
Page 63: System Event Logs
Many errors are first indicated by a lit system-error LED on the control-panel assembly of the server. If this LED is lit, one or more LEDs elsewhere in the server might also be lit and can direct you to the source of the error. - Page 64 Step 3. To clear the TMM system-event log, select System Event Log ➙ Clear System Event Log, then, press Enter twice. Lenovo ThinkServer sd350 Server Type 5493, Lenovo ThinkServer n400 Enclosure Type 5495Installation and Service Guide...
-
Page 65: Post
Remove the software or device that you just added. Step 3. Run Lenovo ThinkServer Diagnostics Tool to determine whether the server is running correctly (for information about using Lenovo ThinkServer Diagnostics Tool, see Appendix B “Diagnostic error messages” on page 169). -
Page 66: Hard Disk Drive Problems
A hard disk drive was not Reseat all hard disk drives and cables; then, run the hard disk drive diagnostic detected while the operating tests again. system was being started. Lenovo ThinkServer sd350 Server Type 5493, Lenovo ThinkServer n400 Enclosure Type 5495Installation and Service Guide... - Page 67 • If the green activity LED is flashing and the yellow status LED is not lit, the drive is recognized by the controller and is working correctly. Run the Lenovo ThinkServer Diagnostics Tool hard disk drive test to determine whether the drive is detected.
-
Page 68: Intermittent Problems
This can cause the server to overheat and shut down. 2. Check the system-error log or TMM event log (see “System event logs” on page 47). Lenovo ThinkServer sd350 Server Type 5493, Lenovo ThinkServer n400 Enclosure Type 5495Installation and Service Guide... -
Page 69: Keyboard, Mouse, Or Usb-Device Problems
• If an action step is preceded by '(Trained technician only)', that step must be performed only by a Trained technician. • Go to the Lenovo support website at http://www.lenovo.com/support to check for technical information, hints, tips, and new device drivers or to submit a request for information. -
Page 70: Monitor Problems
3. (Trained technician only) Replace the system board Monitor problems Some Lenovo monitors have their own self-tests. If you suspect a problem with your monitor, see the documentation that comes with the monitor for instructions for testing and adjusting the monitor. If you cannot diagnose the problem, call for service. - Page 71 To prevent diskette drive read/write errors, make sure that the distance between the monitor and any external diskette drive is at least 76 mm (3 in.). b. Non-Lenovo monitor cables might cause unpredictable problems. 2. Reseat the monitor and cable.
-
Page 72: Network Connection Problems
• You updated the configuration information in the Setup utility. Whenever memory or any other device is changed, you must update the configuration. 2. Reseat the device that you just installed. Lenovo ThinkServer sd350 Server Type 5493, Lenovo ThinkServer n400 Enclosure Type 5495Installation and Service Guide... -
Page 73: Power Problems
• If an action step is preceded by '(Trained technician only)', that step must be performed only by a Trained technician. • Go to the Lenovo support website at http://www.lenovo.com/support to check for technical information, hints, tips, and new device drivers or to submit a request for information. -
Page 74: Software Problems
2. If you received any error messages when using the software, see the information that comes with the software for a description of the messages and suggested solutions to the problem. 3. Contact the software vendor. Lenovo ThinkServer sd350 Server Type 5493, Lenovo ThinkServer n400 Enclosure Type 5495Installation and Service Guide... -
Page 75: Universal Serial Bus (Usb) Port Problems
• If an action step is preceded by '(Trained technician only)', that step must be performed only by a Trained technician. • Go to the Lenovo support website at http://www.lenovo.com/support to check for technical information, hints, tips, and new device drivers or to submit a request for information. -
Page 76: Solving Undetermined Problems
Solving undetermined problems If Lenovo ThinkServer Diagnostics Tool cannot diagnose the failure or if the server is inoperative, use the information in this section to solve the undetermined problems. If you suspect that a software problem is causing failures (continuous or intermittent), see “Software problems”... -
Page 77: Problem Determination Tips
Because of the variety of hardware and software combinations that can encounter, use the following information to assist you in problem determination. If possible, have this information available when requesting assistance from Lenovo. The model number and serial number of the server are located on both the front bezel and the chassis. - Page 78 – Is this the original reported failure? • Diagnostic program type and version level • Hardware configuration (print screen of the system summary) • UEFI firmware level • TMM firmware level Lenovo ThinkServer sd350 Server Type 5493, Lenovo ThinkServer n400 Enclosure Type 5495Installation and Service Guide...
-
Page 79: Recovering The Server Firmware (Uefi Update Failure)
• Diagnostic program type and version level • Configuration option settings • Operating-system control-file setup See Appendix C “Getting help and technical assistance” on page 171 for information about calling Lenovo for service. Recovering the server firmware (UEFI update failure) Use this information to recover the server firmware. -
Page 80: Recovery Bios Function By Sw1
Pull out the node and place SW1 DIP1 to “ON” location. SATADOM power jumper (JP136) Switch block 1 (SW1) Clear CMOS jumper Figure 16. Location of the switches, jumpers, and buttons on the system board Lenovo ThinkServer sd350 Server Type 5493, Lenovo ThinkServer n400 Enclosure Type 5495Installation and Service Guide... -
Page 81: Out-Of-Band Recovery Method
If the server firmware has become corrupted, such as from a power failure during an update, you can recover the server firmware by using Out-Of_Band Recovery method. For additional information, see the TMM User Guide: Thinkserver SD350 System Manager User Guide.pdf at http://www.lenovo.com/support and Chapter 2 “Configuration information and instructions” on page 31 for firmware update. - Page 82 Lenovo ThinkServer sd350 Server Type 5493, Lenovo ThinkServer n400 Enclosure Type 5495Installation and Service Guide...
-
Page 83: Chapter 4. Parts Listing, Lenovo Thinkserver Sd350 Server Type 5493, Lenovo Thinkserver N400 Enclosure Type 5495
Tier 1 CRU at your request, you will be charged for the installation. • Tier 2 customer replaceable unit: You may install a Tier 2 CRU yourself or request Lenovo to install it, at no additional charge, under the type of warranty service that is designated for your server. - Page 84 Figure 17. Server components Lenovo ThinkServer sd350 Server Type 5493, Lenovo ThinkServer n400 Enclosure Type 5495Installation and Service Guide...
- Page 85 Solid state drive, 2.5-inch S3610 hot-swap 480 GB enterprise 00YK213 mainstream SATA Solid state drive, 2.5-inch S3610 hot-swap 800 GB enterprise 00YK218 mainstream SATA Chapter 4 Parts listing, Lenovo ThinkServer sd350 Server Type 5493, Lenovo ThinkServer n400 Enclosure Type 5495...
- Page 86 Heat sink, rear (for microprocessor 2) Host bus adapters mezzanine card, H701-L 6 Gb 00YD431 Lan mezz card, I350AM2 OCP dual-port 1GbE RJ-45 00YJ082 PCI riser assembly 00YD438 Lenovo ThinkServer sd350 Server Type 5493, Lenovo ThinkServer n400 Enclosure Type 5495Installation and Service Guide...
- Page 87 00WE029 Label 00YL627 00D9552 Mellanox ConnectX-3 40 GbE/ FDR IB VPI adapter Mezz card, Intel X520 dual-port 10GbE SFP+ OCP 00MM882 Miscellaneous kit 00MW878 Chapter 4 Parts listing, Lenovo ThinkServer sd350 Server Type 5493, Lenovo ThinkServer n400 Enclosure Type 5495...
-
Page 88: Structural Parts
For your safety, a power cord with a grounded attachment plug is provided to use with this product. To avoid electrical shock, always use the power cord and plug with a properly grounded outlet. Lenovo power cords used in the United States and Canada are listed by Underwriter's Laboratories (UL) and certified by the Canadian Standards Association (CSA). - Page 89 Ecuador, El Salvador, Guam, Guatemala, Haiti, Honduras, Jamaica, Mexico, Micronesia (Federal States of), Netherlands Antilles, Nicaragua, Panama, Peru, Philippines, Saudi Arabia, Thailand, Taiwan, United States of America, Venezuela Chapter 4 Parts listing, Lenovo ThinkServer sd350 Server Type 5493, Lenovo ThinkServer n400 Enclosure Type 5495...
- Page 90 Korea (Democratic People’s Republic of), Korea (Republic of) 39M5199 Japan 39M5068 Argentina, Paraguay, Uruguay 39M5226 India 39M5240 Brazil 39M5241 39M5375 Canada, United States of America 39M5377 39M5378 39M5509 39M5512 Lenovo ThinkServer sd350 Server Type 5493, Lenovo ThinkServer n400 Enclosure Type 5495Installation and Service Guide...
-
Page 91: Chapter 5. Removing And Replacing Server Components
Tier 1 CRU at your request, you will be charged for the installation. • Tier 2 customer replaceable unit (CRU): You may install a Tier 2 CRU yourself or request Lenovo to install it, at no additional charge, under the type of warranty service that is designated for your server. -
Page 92: System Reliability Guidelines
The compute node operates as a symmetric multiprocessing (SMP) compute node, regardless of how many microprocessors are installed. For optimum performance, you must upgrade the operating system to support SMP. See your operating-system documentation for additional information. Lenovo ThinkServer sd350 Server Type 5493, Lenovo ThinkServer n400 Enclosure Type 5495Installation and Service Guide... -
Page 93: Removing A Compute Node From A Chassis
If you are instructed to return the compute node, follow all packaging instructions, and use any packaging materials for shipping that are supplied to you. Installing a compute node in a chassis Use this information to install a compute node in a Lenovo ThinkServer n400 Enclosure Type 5495 chassis. Chapter 5 Removing and replacing server components... - Page 94 Make sure that the power LED on the compute node control panel is lit continuously, indicating that the compute node is receiving power and is turned on. Step 6. If you have other compute nodes to install, do so now. Lenovo ThinkServer sd350 Server Type 5493, Lenovo ThinkServer n400 Enclosure Type 5495Installation and Service Guide...
-
Page 95: Removing And Replacing Structural Parts
Removing and replacing structural parts This section provides information for removing and replacing structural parts in the server. Replacement of structural parts is your responsibility. If Lenovo installs a structural part at your request, you will be charged for the installation. -
Page 96: Installing The Shipping Brackets Kit
You can replace the shipping brackets kit by either via “Replaceable server components” on page 67, or you can order it as an option. To install the shipping brackets kit, complete the following steps. Lenovo ThinkServer sd350 Server Type 5493, Lenovo ThinkServer n400 Enclosure Type 5495Installation and Service Guide... - Page 97 Step 1. Turn off the server (see “Turning off the server” on page 29 for instructions) and all attached peripheral devices. Disconnect all power cords; then, disconnect all external cables from the server. Step 2. Install the four (two on each side) C-clips to the rack on the rear of the chassis. Make sure that the thinner face is displayed outwards.
-
Page 98: Removing The Fan Cage Cover
Hazardous energy is present when the compute node is connected to the power source. Always replace the compute node cover before installing the compute node. To remove the fan cage cover, complete the following steps: Lenovo ThinkServer sd350 Server Type 5493, Lenovo ThinkServer n400 Enclosure Type 5495Installation and Service Guide... -
Page 99: Installing The Fan Cage Cover
Step 2. Orient the cover so that the posts on the inside of the cover slide into the slots on the Lenovo ThinkServer n400 Enclosure Type 5495. Note: Before you close the cover, make sure that all components are installed and seated correctly and that you have not left loose tools or parts inside the Lenovo ThinkServer n400 Enclosure Type 5495. -
Page 100: Removing The System Management Board Cover
3. Carefully lay the compute node on a flat, static-protective surface, orienting the compute node with the bezel pointing toward you. Statement 12 CAUTION: The following label indicates a hot surface nearby. Lenovo ThinkServer sd350 Server Type 5493, Lenovo ThinkServer n400 Enclosure Type 5495Installation and Service Guide... -
Page 101: Installing The System Management Board Cover
Statement 21 CAUTION: Hazardous energy is present when the compute node is connected to the power source. Always replace the compute node cover before installing the compute node. To remove the system management board cover, complete the following steps: Step 1. Remove the fan cover (see “Removing the fan cage cover”... -
Page 102: Removing The Air Baffle
Install the fan cage cover (see “Installing the fan cage cover” on page 83). Removing the air baffle Use this information to remove the air baffle from the server. Lenovo ThinkServer sd350 Server Type 5493, Lenovo ThinkServer n400 Enclosure Type 5495Installation and Service Guide... -
Page 103: Installing The Air Baffle
Read the safety information in “Safety” on page v and “Installation guidelines” on page 75. If you are replacing a server component or installing an optional device in the server, you need to take out the node out from the rack enclosure, turn off the server and peripheral devices, and disconnect all external cables. -
Page 104: Removing And Replacing Tier 1 Crus
Removing and replacing Tier 1 CRUs This section provides information for removing and replacing Tier 1 CRUs in the server. Replacement of Tier 1 CRUs is your responsibility. If Lenovo installs a Tier 1 CRU at your request, you will be charged for the installation. -
Page 105: Replacing A System Fan
Step 3. Remove the failed fan from the server by grasping the top of the fan by pressing the release latch with your index finger and thumb and lift the fan out of the server. Release latch Figure 28. System fans If you are instructed to return the server component or optional device, follow all packaging instructions, and use any packaging materials for shipping that are supplied to you. -
Page 106: Removing A Hot-Swap Hard Disk Drive
Read the safety information in “Safety” on page v and “Installation guidelines” on page 75. To remove a hot-swap hard disk drive, complete the following steps. Lenovo ThinkServer sd350 Server Type 5493, Lenovo ThinkServer n400 Enclosure Type 5495Installation and Service Guide... -
Page 107: Installing A Hot-Swap Hard Disk Drive
EMC shield and filler panel from the bay or PCI or PCI Express adapter slot cover in the event that you later remove the device. • For a complete list of supported optional devices for the server, see http://www.lenovo.com/us/en/ serverproven/. - Page 108 Figure 31. Hot-swap hard disk drive installation Gently push the drive into the bay until the drive stops. Rotate the tray handle to the closed (locked) position. Lenovo ThinkServer sd350 Server Type 5493, Lenovo ThinkServer n400 Enclosure Type 5495Installation and Service Guide...
-
Page 109: Removing A Dimm
Check the hard disk drive status LED to verify that the hard disk drive is operating correctly. If the yellow hard disk drive status LED of a drive is lit continuously, that drive is faulty and must be replaced. If the green hard disk drive activity LED is flashing, the drive is being accessed. Note: 1. -
Page 110: Memory Module Installation
– R = rank(s) – xff = Device organization (data bit width) of SDRAMs used on this assembly • x4 = x4 organization (4 DQ lines per SDRAM) Lenovo ThinkServer sd350 Server Type 5493, Lenovo ThinkServer n400 Enclosure Type 5495Installation and Service Guide... - Page 111 • x8 = x8 organization • x16 = x16 organization – wwwww is the DIMM bandwidth, in MBps: 2133, 2400, 2666, 2933, 3200 – aa is the SDRAM speed grade – m is the DIMM type – E = Unbuffered DIMM (UDIMM), x64 primary + 8 bit ECC module data bus –...
- Page 112 Locate the DIMM connectors on the system board. Determine the connectors into which you will install the DIMMs. Install the DIMMs in the sequence shown in the following table. Lenovo ThinkServer sd350 Server Type 5493, Lenovo ThinkServer n400 Enclosure Type 5495Installation and Service Guide...
- Page 113 Table 18. DIMM installation sequence (normal mode) Number of DIMMs Installation sequence (connectors) Microprocessor 1 installed A1, C1, B1, D1, A2, C2, B2, D2 Microprocessor 1 and 2 installed A1, E1, C1, G1, B1, F1, D1, H1, A2, E2, C2, G2, B2, F2, D2, H2 Table 19.
-
Page 114: Removing A Hot-Swap Power Supply
To remove all electrical current from the device, ensure that all power cords are disconnected from the power source. Statement 8 CAUTION: Never remove the cover on a power supply or any part that has the following label attached. Lenovo ThinkServer sd350 Server Type 5493, Lenovo ThinkServer n400 Enclosure Type 5495Installation and Service Guide... -
Page 115: Replacing A Hot-Swap Power Supply
Hazardous voltage, current, and energy levels are present inside any component that has this label attached. There are no serviceable parts inside these components. If you suspect a problem with one of these parts, contact a service technician. Read the safety information in “Safety” on page v and “Installation guidelines” on page 75. To remove a hot-swap power supply, complete the following steps. - Page 116 The device also might have more than one power cord. To remove all electrical current from the device, ensure that all power cords are disconnected from the power source. Lenovo ThinkServer sd350 Server Type 5493, Lenovo ThinkServer n400 Enclosure Type 5495Installation and Service Guide...
- Page 117 Statement 8 CAUTION: Never remove the cover on a power supply or any part that has the following label attached. Hazardous voltage, current, and energy levels are present inside any component that has this label attached. There are no serviceable parts inside these components. If you suspect a problem with one of these parts, contact a service technician.
-
Page 118: Removing The System Battery
1. Read the safety information in “Safety” on page v and “Installation guidelines” on page 75. 2. If the compute node is installed in a Lenovo ThinkServer n400 Enclosure Type 5495, remove it (see “Removing a compute node from a chassis” on page 77 for instructions). -
Page 119: Replacing The System Battery
1. Read the safety information in “Safety” on page v and “Installation guidelines” on page 75. 2. If the compute node is installed in a Lenovo ThinkServer n400 Enclosure Type 5495, remove it (see “Removing a compute node from a chassis” on page 77 for instructions). - Page 120 Reinstall the node SATA cable (see “Installing the node SATA cable” on page 149). Step 6. Reinstall compute node (see “Installing a compute node in a chassis” on page 77). Lenovo ThinkServer sd350 Server Type 5493, Lenovo ThinkServer n400 Enclosure Type 5495Installation and Service Guide...
-
Page 121: Removing And Replacing Tier 2 Crus
This section provides information for removing and replacing Tier 2 CRUs in the server. You may install a Tier 2 CRU yourself or request Lenovo to install it, at no additional charge, under the type of warranty service that is designated for your server. -
Page 122: Removing The Hot-Swap Hard Disk Drive Backplane
To remove the hot-swap hard disk drive backplane, complete the following steps: Lenovo ThinkServer sd350 Server Type 5493, Lenovo ThinkServer n400 Enclosure Type 5495Installation and Service Guide... -
Page 123: Installing The Hot-Swap Hard Disk Drive Backplane
Step 1. Remove the fan cage cover (see “Removing the fan cage cover” on page 82). Step 2. Pull the hard disk drives or fillers out of the server slightly to disengage them from the hard disk drive backplane (see “Removing a hot-swap hard disk drive” on page 90). Step 3. -
Page 124: Removing An Adapter
Disconnect the cables from the adapter if any. Step 4. Place the PCI riser-card assembly on a flat, static-protective surface. Step 5. Remove the screw. Lenovo ThinkServer sd350 Server Type 5493, Lenovo ThinkServer n400 Enclosure Type 5495Installation and Service Guide... -
Page 125: Replacing An Adapter
The following notes describe the types of adapters that the server supports and other information that you must consider when you install an adapter: • To confirm that the server supports the adapter that you are installing, see http://www.lenovo.com/us/en/ serverproven/. - Page 126 Make sure that the adapter is securely installed in the PCI riser-card assembly. Important: Make sure that the U-shaped opening in the metal adapter bracket engages the tab on the expansion-slot filler. Lenovo ThinkServer sd350 Server Type 5493, Lenovo ThinkServer n400 Enclosure Type 5495Installation and Service Guide...
-
Page 127: Removing An Hba Adapter
Note: If the server is configured for RAID operation through an optional RAID adapter, you might have to reconfigure your disk arrays after you install an adapter. See the RAID documentation on the Lenovo RAID Support CD for additional information about RAID operation and complete instructions for using RAID Manager. - Page 128 If you are instructed to return the server component or optional device, follow all packaging instructions, and use any packaging materials for shipping that are supplied to you. Lenovo ThinkServer sd350 Server Type 5493, Lenovo ThinkServer n400 Enclosure Type 5495Installation and Service Guide...
-
Page 129: Replacing An Hba Adapter
• To confirm that the server supports the HBA adapter that you are installing, see http://www.lenovo.com/us/en/ serverproven/. • Locate the documentation that comes with the HBA adapter and follow those instructions in addition to the instructions in this section. -
Page 130: Removing A Lan Mezz Adapter
Note: If the server is configured for RAID operation through an optional RAID adapter, you might have to reconfigure your disk arrays after you install an adapter. See the RAID documentation on the Lenovo RAID Support CD for additional information about RAID operation and complete instructions for using RAID Manager. - Page 131 Read the safety information in “Safety” on page v and “Installation guidelines” on page 75. If you are replacing a server component or installing an optional device in the server, you need to take out the node out from the rack enclosure, turn off the server and peripheral devices, and disconnect all external cables.
-
Page 132: Replacing A Lan Mezz Adapter
Step 2. Install the 4 stand offs. Step 3. Install the LAN Mezz adapter. Step 4. Tighten the 4 screws. Lenovo ThinkServer sd350 Server Type 5493, Lenovo ThinkServer n400 Enclosure Type 5495Installation and Service Guide... -
Page 133: Removing The Pci Riser-Card Assembly
Note: If the server is configured for RAID operation through an optional RAID adapter, you might have to reconfigure your disk arrays after you install an adapter. See the RAID documentation on the Lenovo RAID Support CD for additional information about RAID operation and complete instructions for using RAID Manager. -
Page 134: Replacing The Pci Riser-Card Assembly
To replace the PCI riser-card assembly, complete the following steps. Lenovo ThinkServer sd350 Server Type 5493, Lenovo ThinkServer n400 Enclosure Type 5495Installation and Service Guide... -
Page 135: Removing A Satadom
Step 1. Install the adapter in the PCI riser-card assembly (see “Replacing an adapter” on page 109). Step 2. Reconnect any adapter cables that you disconnected when you removed the PCI riser-card assembly. Step 3. Carefully align the PCI riser-card assembly with the guides on the rear of the server and with the PCI riser-card connector on the system board;... -
Page 136: Replacing A Satadom
Step 2. Install the SATADOM. Note: Make sure JP136 jumper surrounds Pin2 & Pin3. For more information, see “System-board switches and jumpers” on page 25. Lenovo ThinkServer sd350 Server Type 5493, Lenovo ThinkServer n400 Enclosure Type 5495Installation and Service Guide... -
Page 137: Removing And Replacing Frus
Figure 60. SATADOM installation Step 3. Reinstall compute node (see “Installing a compute node in a chassis” on page 77). 1. Install the server into the rack enclosure and push the server into the rack until it clicks into place. 2. -
Page 138: Installing The Fan Board
To install the fan board, complete the following steps. Step 1. Align the fan board holes with the cage holes on the server chassis. Step 2. Lower the fan board into the server. Lenovo ThinkServer sd350 Server Type 5493, Lenovo ThinkServer n400 Enclosure Type 5495Installation and Service Guide... -
Page 139: Removing The Hard Disk Drive Cage Assembly
Figure 62. Fan board installation Step 3. Tighten the fan board with 10 6#32 screws. Step 4. Reinstall the cable on the fan board. Step 5. Reinstall the power interface board bracket (see “Installing the power interface board bracket” on page 141). -
Page 140: Replacing The Hard Disk Drive Cage Assembly
Make sure the front I/O cable and the thermal sensor cable are placed properly on the hard disk drive cage. Step 2. Do not damage the cables including the front I/O cable and thermal sensor cable during the installation. Lenovo ThinkServer sd350 Server Type 5493, Lenovo ThinkServer n400 Enclosure Type 5495Installation and Service Guide... -
Page 141: Removing A Microprocessor And Heat Sink
Step 3. Align the hard disk drive cage assembly bottom with the cage pin holes on the server chassis. Step 4. Lower the hard disk drive cage assembly into the server. Press the hard disk drive cage assembly inward until it is securely seated. Figure 64. - Page 142 Lenovo ThinkServer sd350 Server Type 5493, Lenovo ThinkServer n400 Enclosure Type 5495Installation and Service Guide...
- Page 143 Use a screwdriver to loosen the captive screw on one side of the heat sink to break the seal with the microprocessor. Loosen all the captive screws on the heat sink, rotating each screw one full turn until each screw is loose. Gently lift the heat sink from the microprocessor.
- Page 144 • When using the installation tool, gently twist the handle of the installation tool clockwise until it locks in the “H” or “L” position, depending on the size of microprocessor, and then lift the microprocessor out of the socket. Lenovo ThinkServer sd350 Server Type 5493, Lenovo ThinkServer n400 Enclosure Type 5495Installation and Service Guide...
- Page 145 Figure 70. Installation tool handle adjustment Lock Position Unlock Position E5-x6xx v3 E5-x6xx v4 Figure 71. Installation Tool Lift the microprocessor out of the socket. Figure 72. Installation tool removal Step 10. Install the new microprocessor (see “Replacing microprocessor and heat sink” on page 130). Attention: If you are replacing a microprocessor, use the empty installation tool that comes with the new microprocessor to remove the microprocessor.
-
Page 146: Replacing Microprocessor And Heat Sink
• Read the documentation that comes with the microprocessor to determine whether you have to update the server firmware. To download the latest level of server firmware and other code updates for your server, go to http://www.lenovo.com/support. Lenovo ThinkServer sd350 Server Type 5493, Lenovo ThinkServer n400 Enclosure Type 5495Installation and Service Guide... - Page 147 Note: Removing the heat sink from the microprocessor destroys the even distribution of the thermal grease and requires replacing the thermal grease. • To order an additional optional microprocessor, contact your Lenovo sales representative or Lenovo reseller. • The microprocessor installation tool has the microprocessor installed on the tool, and may have a protective cover over the microprocessor.
- Page 148 Align the installation tool with the microprocessor socket. The installation tool rests flush on the socket only if properly aligned. Figure 75. Installation tool alignment Install the microprocessor using the following instructions for your installation tool. Lenovo ThinkServer sd350 Server Type 5493, Lenovo ThinkServer n400 Enclosure Type 5495Installation and Service Guide...
- Page 149 • When using the installation tool, twist the handle of the installation tool assembly counterclockwise until the microprocessor is inserted into the socket, and lift the installation tool out of the socket. Figure 76. Installation tool handle adjustment Lock Position Unlock Position E5-x6xx v3 E5-x6xx v4...
- Page 150 • Do not touch the thermal grease on the bottom of the heat sink after you remove the plastic cover. Touching the thermal grease will contaminate it. See “Thermal grease” on page 137 for more information. Lenovo ThinkServer sd350 Server Type 5493, Lenovo ThinkServer n400 Enclosure Type 5495Installation and Service Guide...
- Page 151 Thermal grease Heat sink Figure 80. Thermal grease Remove the plastic protective cover from the bottom of the heat sink. Position the heat sink over the microprocessor. The heat sink is keyed to assist with proper alignment. Chapter 5 Removing and replacing server components...
- Page 152 (For SATADOM install) SATA 2 HBA mezzanine connector connector PCIe riser connector OCP mezzanine connector Figure 81. Internal connectors on the system board Lenovo ThinkServer sd350 Server Type 5493, Lenovo ThinkServer n400 Enclosure Type 5495Installation and Service Guide...
- Page 153 Heat sink for cpu 1 Heat sink for cpu 2 Microprocessor Figure 82. Heat sink installation Align and place the heat sink on top of the microprocessor in the retention bracket, thermal material side down. Press firmly on the heat sink. Press down on the center of the heat sink;...
-
Page 154: Removing The Power Interface Board
Remove the system fan (see “Removing a system fan” on page 88). Step 4. Remove the fan cage (see “Removing the fan cage” on page 105). Lenovo ThinkServer sd350 Server Type 5493, Lenovo ThinkServer n400 Enclosure Type 5495Installation and Service Guide... -
Page 155: Installing The Power Interface Board
Step 5. Remove the cables from the power interface board. Step 6. Remove nodes #3 and #4 (see “Removing a compute node from a chassis” on page 77). Step 7. Remove the 5 6#32 screws from the power interface board. Step 8. -
Page 156: Removing The Power Interface Board Bracket
Remove the fan cage (see “Removing the fan cage” on page 105). Step 5. Remove the power interface board (see “Removing the power interface board” on page 138). Lenovo ThinkServer sd350 Server Type 5493, Lenovo ThinkServer n400 Enclosure Type 5495Installation and Service Guide... -
Page 157: Installing The Power Interface Board Bracket
Step 6. Remove the 8 M3 screws from the power interface board bracket. Step 7. Lift the power interface board bracket out of the server. Figure 87. Power interface board bracket removal Installing the power interface board bracket Use this information to replace the power interface board bracket. Read the safety information in “Safety”... -
Page 158: Removing The System Management Board And Backplane Assembly
Remove the system management board cover (see “Removing the system management board cover” on page 84). Step 4. Disconnect all of the cables from the system management board. Lenovo ThinkServer sd350 Server Type 5493, Lenovo ThinkServer n400 Enclosure Type 5495Installation and Service Guide... -
Page 159: Installing The System Management Board And Backplane Assembly
Step 5. Remove the 6 6#32 screws from the system management board. Step 6. Remove the 2 M3 screws from the system management board bracket. Step 7. Place your fingers under the front and back of the top of the system management board and backplane assembly;... -
Page 160: Internal Cable Routing And Connectors
For more information about the requirements for cables and connecting devices, see the documentation that comes with these devices. The following illustration displays the cabling information on the fan board: Lenovo ThinkServer sd350 Server Type 5493, Lenovo ThinkServer n400 Enclosure Type 5495Installation and Service Guide... - Page 161 Connect to Connect to PIB HDD backplane Connect to Connect to PIB Fan board power backplane power connector Connect to HDD SMB board backplane Connect to PIB Figure 91. Internal cable routing and connectors on the fan board The following illustration displays the cabling information on the power interface board: Connect to Connect to FB HDD backplane...
- Page 162 Figure 93. Internal cable routing and connectors on the hard disk drive backplane The following illustration displays the cabling information on the hard disk drive backplane and the power interface board: Lenovo ThinkServer sd350 Server Type 5493, Lenovo ThinkServer n400 Enclosure Type 5495Installation and Service Guide...
- Page 163 HDD backplane Power interface board SAS/SATA cables SMB board Power cables Figure 94. Internal cable routing and connectors on the hard disk drive backplane and the power interface board The following illustration displays the cabling information on the hard disk drive backplane and the fan board: HDD backplane Fan board Signal cable...
-
Page 164: Removing The Node Sata Cable
Use this information to remove the node SATA cable from the server. Read the safety information in “Safety” on page v and “Installation guidelines” on page 75. Lenovo ThinkServer sd350 Server Type 5493, Lenovo ThinkServer n400 Enclosure Type 5495Installation and Service Guide... -
Page 165: Installing The Node Sata Cable
If you are replacing a server component or installing an optional device in the server, you need to take out the node out from the rack enclosure, turn off the server and peripheral devices, and disconnect all external cables. To remove the node SATA cable, complete the following steps. Step 1. - Page 166 1. Install the server into the rack enclosure and push the server into the rack until it clicks into place. 2. Reconnect any cable that you removed. 3. Turn on the peripheral devices and the server. Lenovo ThinkServer sd350 Server Type 5493, Lenovo ThinkServer n400 Enclosure Type 5495Installation and Service Guide...
- Page 167 Serviceable Specifies whether user action is required to correct the problem. CIM Information Provides the prefix of the message ID and the sequence number that is used by the CIM message registry. © Copyright Lenovo...
-
Page 168: Tmm Error Messages
The SNMP trap ID that is found in the SNMP alert management information base (MIB). Automatically contact Service If this field is set to Yes, and you have enabled Electronic Service Agent (ESA), Lenovo Support will be notified automatically if the event is generated. - Page 169 Non-Recoverable - Going to this error. 2. Contact your Lenovo service High - Asserted representative for support Sensor Type: Voltage 1. Check the Lenovo support website for an Event Severity: Critical 12V voltage is too applicable tip or firmware update that applies...
- Page 170 Description: Upper 02010714 voltage is too high to this error. 2. Contact your Lenovo service Non-Critical - Going High representative for support - Asserted Lenovo ThinkServer sd350 Server Type 5493, Lenovo ThinkServer n400 Enclosure Type 5495Installation and Service Guide...
- Page 171 Sensor Type: Voltage 1. Check the Lenovo support website for an Event Severity: Critical 02010415 CPU% DDR_VDD applicable tip or firmware update that applies Description: Lower 02010416 voltage is too low to this error. 2. Contact your Lenovo service Non-Recoverable - Going...
- Page 172 01010025 Severity: Warning for an applicable tip or firmware update that Description: Lower applies to this error. 3. Check Fan status. if Lenovo ThinkServer sd350 Server Type 5493, Lenovo ThinkServer n400 Enclosure Type 5495Installation and Service Guide...
- Page 173 Fan is broken, please replace the new Fan. 4. Non-Critical - Going Low Contact your Lenovo service representative - Asserted for support Sensor Type: 1. Check the Lenovo support website for an Temperature Event applicable tip or firmware update that applies CPU% VR 01010B26 Severity: Critical to this error.
- Page 174 Units-based sensor 1. Check the Lenovo support website for an 0B010791 is too high Event Severity: Warning applicable tip or firmware update that applies Description: Upper Lenovo ThinkServer sd350 Server Type 5493, Lenovo ThinkServer n400 Enclosure Type 5495Installation and Service Guide...
- Page 175 Non-Critical - Going High to this error. 2. Contact your Lenovo service - Asserted representative for support Sensor Type: Other Units-based sensor 1. Check the Lenovo support website for an Node output Event Severity: Critical applicable tip or firmware update that applies...
- Page 176 0B010996 Description: Upper is too high to this error. 2. Contact your Lenovo service Critical - Going High - representative for support Asserted Lenovo ThinkServer sd350 Server Type 5493, Lenovo ThinkServer n400 Enclosure Type 5495Installation and Service Guide...
- Page 177 Sensor Type: Other Units-based sensor 1. Check the Lenovo support website for an Event Severity: Warning Node output power applicable tip or firmware update that applies 0B010796 Description: Upper is too high to this error. 2. Contact your Lenovo service...
- Page 178 0B0109AA power consumption Description: Upper to this error. 2. Contact your Lenovo service is too high Critical - Going High - representative for support Asserted Lenovo ThinkServer sd350 Server Type 5493, Lenovo ThinkServer n400 Enclosure Type 5495Installation and Service Guide...
- Page 179 Sensor Type: Other Units-based sensor 1. Check the Lenovo support website for an HDD backplane Event Severity: Critical applicable tip or firmware update that applies 0B010BAB power consumption Description: Upper to this error. 2. Contact your Lenovo service is too high...
- Page 180 Event Severity: Critical CPU VR fault. applies to this error. 2. Restart the server. 3. Description: State Contact your Lenovo service representative Asserted - Asserted for support Lenovo ThinkServer sd350 Server Type 5493, Lenovo ThinkServer n400 Enclosure Type 5495Installation and Service Guide...
- Page 181 1. Check the Lenovo support website for an Memory applicable tip or firmware update that applies temperature is too Sensor Type: Memory to this error. 2. Check Fan status. if Fan 0C0301D2 Mem_Therm_Trip high. At the same Event Severity: Critical is broken, please replace the new Fan.
- Page 182 Load new device driver and any Asserted hang up. required firmware updates. 2. if this node and/or any attached cables were recently Lenovo ThinkServer sd350 Server Type 5493, Lenovo ThinkServer n400 Enclosure Type 5495Installation and Service Guide...
- Page 183 installed, moved, serviced or upgraded, a. Reset adapter and any attached cables. b. Reload Device Driver. c. If device is not recognized, reconfiguring slot to Gen1 or Gen2 may be required. Gen1/Gen2 settings can be configured via F1 Setup -> System Settings ->...
- Page 184 Lenovo ThinkServer sd350 Server Type 5493, Lenovo ThinkServer n400 Enclosure Type 5495Installation and Service Guide...
-
Page 185: Appendix B. Diagnostic Error Messages
2.Reseat firstly. If it still fails, then, replace defective module and contact Lenovo Customer Service for further support options. MegaRaid Test Failed Raid controller test has detected 1.Please refer to drive status in an error. - Page 186 Lenovo ThinkServer sd350 Server Type 5493, Lenovo ThinkServer n400 Enclosure Type 5495Installation and Service Guide...
-
Page 187: Appendix C. Getting Help And Technical Assistance
Before you call, make sure that you have taken these steps to try to solve the problem yourself. If you believe that you require warranty service for your Lenovo product, the service technicians will be able to assist you more efficiently if you prepare before you call. -
Page 188: Using The Documentation
Using the documentation Information about your Lenovo system and preinstalled software, if any, or optional device is available in the product documentation. That documentation can include printed documents, online documents, readme files, and help files. See the troubleshooting information in your system documentation for instructions for using the diagnostic programs. -
Page 189: Taiwan Product Service
In the U.S. and Canada, hardware service and support is available 24 hours a day, 7 days a week. In the U.K., these services are available Monday through Friday, from 9 a.m. to 6 p.m. Taiwan product service Use this information to contact product service for Taiwan. Appendix C. - Page 190 Lenovo ThinkServer sd350 Server Type 5493, Lenovo ThinkServer n400 Enclosure Type 5495Installation and Service Guide...
-
Page 191: Appendix D. Notices
Lenovo representative for information on the products and services currently available in your area. Any reference to a Lenovo product, program, or service is not intended to state or imply that only that Lenovo product, program, or service may be used. Any functionally equivalent product, program, or service that does not infringe any Lenovo intellectual property right may be used instead. -
Page 192: Trademarks
(TBW). A device that has exceeded this limit might fail to respond to system-generated commands or might be incapable of being written to. Lenovo is not responsible for replacement of a device that has exceeded its maximum guaranteed number of program/erase cycles, as documented in the Official Published Specifications for the device. -
Page 193: Particulate Contamination
If Lenovo determines that the levels of particulates or gases in your environment have caused damage to the device, Lenovo may condition provision of repair or replacement of devices or parts on implementation of appropriate remedial measures to mitigate such environmental contamination. -
Page 194: Electronic Emission Notices
Properly shielded and grounded cables and connectors must be used in order to meet FCC emission limits. Lenovo is not responsible for any radio or television interference caused by using other than recommended cables and connectors or by unauthorized changes or modifications to this equipment. Unauthorized changes or modifications could void the user's authority to operate the equipment. -
Page 195: Germany Class A Statement
Geräte der Klasse A. Dieses Gerät ist berechtigt, in Übereinstimmung mit dem Deutschen EMVG das EG-Konformitätszeichen - CE - zu führen. Verantwortlich für die Konformitätserklärung nach Paragraf 5 des EMVG ist die Lenovo (Deutschland) GmbH, Meitnerstr. 9, D-70563 Stuttgart. Informationen in Hinsicht EMVG Paragraf 4 Abs. (1) 4:Das Gerät erfüllt die Schutzanforderungen nach EN 55024 und EN 55022 Klasse A. -
Page 196: Japanese Electromagnetic Compatibility Statements
This is electromagnetic wave compatibility equipment for business (Type A). Sellers and users need to pay attention to it. This is for any areas other than home. Lenovo ThinkServer sd350 Server Type 5493, Lenovo ThinkServer n400 Enclosure Type 5495Installation and Service Guide... -
Page 197: Russia Electromagnetic Interference (Emi) Class A Statement
Russia Electromagnetic Interference (EMI) Class A statement People's Republic of China Class A electronic emission statement Taiwan Class A compliance statement Appendix D. Notices... - Page 198 Taiwan BSMI RoHS declaration Lenovo ThinkServer sd350 Server Type 5493, Lenovo ThinkServer n400 Enclosure Type 5495Installation and Service Guide...
- Page 199 China Class A electronic emission statement install Class A electronic emission notice DIMM, install collecting data DIMMs components removal major display problems server documentation compute node Documentation Browser installing ThinkServer Documentation CD removing using configuration documentation cd © Copyright Lenovo...
- Page 200 TMM HBA adapter, remove expansion bays HBA adapter, replace external connectors head output heat sink removing replacing help simple-swap from the World Wide Web Lenovo ThinkServer sd350 Server Type 5493, Lenovo ThinkServer n400 Enclosure Type 5495Installation and Service Guide...
- Page 201 5, 176 power-supply information center power-supply detected problems installation Lenovo XClarity Administrator installation guidelines Lenovo, next generation technology installing locator LED compute node logging dimm DIMM fan board hot-swap hard disk drive hot-swap hard disk drive backplane...
- Page 202 Tier 1 CRUs intermittent removing and replacing keyboard removing memory structural parts monitor structural parts Lenovo ThinkServer sd350 Server Type 5493, Lenovo ThinkServer n400 Enclosure Type 5495Installation and Service Guide...
- Page 203 Taiwan BSMI RoHS declaration server, front view Taiwan Class A electronic emission statement ServerGuide CD Taiwan product service service and support telecommunication regulatory statement before you call telephone numbers © Copyright Lenovo...
- Page 204 Setup starting using video connector rear video controller, integrated specifications viewing event log VMware Hypervisor support Wake on LAN feature weight what the server offers Lenovo ThinkServer sd350 Server Type 5493, Lenovo ThinkServer n400 Enclosure Type 5495Installation and Service Guide...
- Page 206 Part Number: 00MV565 Printed in China (1P) P/N: 00MV565 *1P00MV565*...