Advertisement
Available languages
Available languages
Quick Links
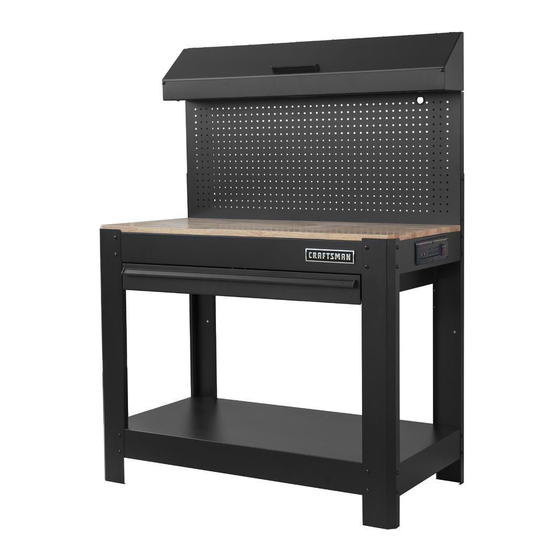
45-In. One Drawer
Workbench
76637
9
UNPACKING
1. Remove top of box. Remove styrofoam packing and
loose cardboard corner inserts. Remove leg packaging
from front of box.
2. Use utility knife to cut down box corners.
3. Carefully remove top tray from bottom shelf.
4. Remove remaining work bench parts from box. Be sure
to separate supportive plates from back legs and slide
boards from front legs.
5. Compare all parts with the Package Contents list and
the Hardware Included count. If any part appears
missing or damaged, do not proceed with assembly.
Repack and return bench to store where purchased
for exchange.
Español, página 7
For Help Line, Parts and Service:
Call 8 am - 5 pm, CT, Monday - Friday
1-888-448-6746
Used under license
Sears Brands Management Corporation, Hoffman Estates, IL 60179 U.S.A.
Assembly Instructions
Printed in China
www.craftsman.com
Advertisement

Related Manuals for Craftsman 76637


Summary of Contents for Craftsman 76637
- Page 1 Assembly Instructions 45-In. One Drawer Workbench 76637 UNPACKING 1. Remove top of box. Remove styrofoam packing and loose cardboard corner inserts. Remove leg packaging from front of box. 2. Use utility knife to cut down box corners. 3. Carefully remove top tray from bottom shelf.
-
Page 2: Table Of Contents
Table of Contents Table of Contents ........2 Warranty . -
Page 3: Warranty
WITH PROOF OF SALE a defective part will be replaced free of charge. If a replacement part is unavailable, the product will be replaced with one of equal value. For warranty coverage details to obtain free replacement, visit the web page: www. craftsman. com/ warranty This warranty does not apply to a product that is damaged or altered through transportation, misuse, abuse, corrosion, accident, neglect modification or mishandling, nor does coverage apply if the product is ever attached to a moving vehicle. - Page 4 Pre-Assembly (continued) PACKAGE CONTENTS Part Description Quantity Part Description Quantity Bottom shelf Pegboard Left front leg (L) Top storage tray Right front leg (R) Side board for top storage tray Left back leg (L) Wooden top Right back leg (R) Hook Top tray Protective ring...
-
Page 5: Assembly
Assembly Attaching the front and back legs Attaching the top tray Attach the front legs (B, C) and back legs (D, E) onto the bottom Attach the top tray (F) to bench using 4 (AA) screws to secure shelf (A) using 4 (AA) screws for each leg as shown. each corner as shown. - Page 6 Assembly Top storage tray Top storage tray assembly Fold the top storage tray (K) as shown. 1. Slide the tray side boards (L) into position as shown on each side of tray and attach with four (AA) screws. 2. Unfold each lid hinge to full extension. Use one BB bolt and one (CC) nut to attach hinge to tab on each side of lid.
- Page 7 Instrucciones de montaje Mesa de Trabajo de Un Cajón de 45 Pulg. (1.14 m) 76637 DESEMBALAJE 1. Retire la parte superior de la caja. Retire el embalaje de poliestireno extruido y los esquineros de cartón sueltos. Retire el embalaje de las patas de la parte anterior de la caja.
- Page 8 Índice Índice ..........8 Garantía.
- Page 9 Para conocer los detalles de cobertura de la garantía para obtener un reemplazo gratuito, visite la página web: www.craftsman.com/warranty. Esta garantía no se aplica a un producto que se haya dañado o alterado a causa del transporte, uso incorrecto o indebido, corrosión, accidente, negligencia, modificación o mal trato, y tampoco se aplicará...
- Page 10 Preensamblado (continuación) CONTENIDOS DEL EMBALAJE Part Descripción Cant Part Descripción Cant Estante inferior Tablero de clavijas Pata frontal izquierda (I) Bandeja de almacenamiento superior Placa lateral para bandeja de Pata frontal derecha (D) almacenamiento superior Pata trasera izquierda (I) Superficie superior de madera Pata trasera derecha (D) Gancho Bandeja superior...
- Page 11 Montaje Colocación de las patas traseras y delanteras Colocación de la bandeja superior Fije las patas delanteras (B, C) y las patas traseras (D, E) sobre el Fije la bandeja superior (F) a la mesa de trabajo utilizando 4 estante inferior (A) utilizando 4 tornillos (AA) para cada pata tal tornillos (AA) para asegurar cada esquina tal como se lo muestra como se muestra en la ilustración.
- Page 12 Montaje Montaje de la bandeja de almacenamiento Bandeja de alma almacenamiento superior superior Pliegue la bandeja de almacenamiento superior (K) como se 1. Deslice las placas laterales (L) hasta que queden en su posición a muestra en la imagen. ambos lados de la bandeja y ajuste con cuatro tornillos (AA). 2.
- Page 13 Call 8 am - 5 pm, CT, Monday - Friday 1-888-448-6746 Línea de ayuda, Piezas de repuesto y Servicio: Llame de lunes a viernes de 8 am a 5 pm CT 1-888-448-6746 Used under license Sears Brands Management Corporation, Hoffman Estates, IL 60179 U.S.A. Utilizado bajo licencia www.craftsman.com...