Table of Contents
Advertisement
Quick Links
Advertisement
Table of Contents

Related Manuals for HP MediaSmart Frame 100


Summary of Contents for HP MediaSmart Frame 100
- Page 1 HP MediaSmart Frame User Guide Revision 1.0...
- Page 2 Copyright © 2009 Hewlett-Packard Development Company, L.P. The information in this document is subject to change without notice. Notational Conventions The following section describes notational conventions used in this document. Notes, Cautions, and Warnings Throughout this guide, blocks of text may be accompanied by an icon. These blocks are notes, cautions, and warnings, and they are used as follows: WARNING: Indicates that failure to follow directions could result in bodily harm or loss of life.
-
Page 3: Table Of Contents
Table of Contents What’s in the Box ..................... 1 Getting Started ......................2 Remote Control ......................3 Picture Frame ......................4 Key Features ......................5 Initial Setup ......................6 Photo/Picture Slide Show and Browse ................. 6 Slide show modes ....................6 Browse mode ..................... -
Page 4: What's In The Box
What’s in the Box Item Image HP MediaSmart Frame 100 or HP MediaSmart Frame 130 BACK Picture Stand Power Adapter (12V, 2A, 24W, 100/240) Remote Control Cleaning Cloth PC Software / User Guide / Video Setup Turorials CD Warranty Document... - Page 5 USB Type B Cable...
-
Page 7: Getting Started
Attach the stand to the rear of the Hewlett-Packard MediaSmart Frame100 or HP MediaSmart Frame 130 by screwing it into the threaded hole in the back of the frame. When the picture frame is in the horizontal position, the threaded hole is at the lower right as you face the rear of the unit. - Page 8 Settings. Enjoy it and have fun! Wall Mounting To prepare the HP MediaSmart Frame 100 or HP MediaSmart Frame 130 for wall mounting, unscrew the stand.
-
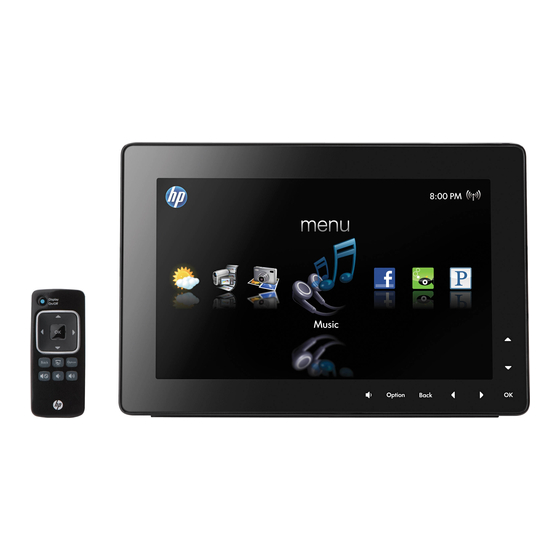
Page 9: Remote Control
Select a highlighted thumbnail to view the picture at maximum size. Right Right Arrow on the cursor pad: Press to move right in menu, thumbnail, or browse mode. Move right or change some items in a submenu list. HP MediaSmart Frame User Guide... - Page 10 Press and hold until the volume begins to get softer, and release when the volume is the desired level. Mute Press to silence the speaker. Press again to reactivate the speaker. The previously set volume level is retained. HP MediaSmart Frame User Guide...
-
Page 11: Picture Frame
LED facing rear of picture frame.) LAN/ETHERNET 2279 Slot Front View Up Button Down Button OK Button Right Button Left Button Back Button BACK Option Button Volume Control (button on picture frame launches a volume control submenu) HP MediaSmart Frame User Guide... -
Page 12: Key Features
Internal Memory Photo slide show with music Photo slide show without music Photo auto-rotation with frame orientation Delete photos from memory Playback music/audio files Playback video clips View Photo thumbnails Photo Zoom Browse Photos/Images Widescreen View HP MediaSmart Frame User Guide... -
Page 13: Initial Setup
Depending on whether you have any other inputs connected, such as a PC, memory cards (CF or SD), or a USB flash drive, different tabs will appear. The default tab All Photos represents the photos stored in the internal memory. Press OK. The thumbnail list of photos appears. HP MediaSmart Frame User Guide... -
Page 14: Thumbnail Mode
(CF or SD), or a USB flash drive, different tabs will appear. The default tab All Photos represents the photos stored in the internal memory. Press OK. The thumbnail list of photos appears. When ready, exit Thumbnail mode by pressing Back three times. HP MediaSmart Frame User Guide... -
Page 15: Managing Photos/Pictures
Press when in browse mode and follow the on-screen instructions. NOTE: HP MediaSmart Frame only allows copies from external memory cards or USB storage devices onto internal memory! HP MediaSmart Frame only allows deletion from internal memory. It will not delete photos/pictures from external memory cards or a USB storage device. - Page 16 Dates Folders All Videos PC, SD, CF, and/or USB (depending upon which of these are installed) Photo Dates Folders All Videos Snapfish PC, SD, CF, and/or USB (depending upon which of these are installed) Music HP MediaSmart Frame User Guide...
- Page 17 Continue until you have spelled out the new device name. Use the arrow buttons to select Enter on the keyboard screen. Then press OK. Time Zone Press OK to view a Time Zone Selection map. HP MediaSmart Frame User Guide...
- Page 18 Click Setup to continue with network setup. Select Ethernet if you are connected to the network by an Ethernet cable. Select Wireless if you are going to use a wireless connection. HP MediaSmart Frame User Guide...
- Page 19 The picture frame successfully connects in a few seconds if the network is configured properly. Automatic Power On Press OK. The Time Setting page appears. Press the Up Arrow to enable and press the Down Arrow to disable Automatic Power HP MediaSmart Frame User Guide...
- Page 20 Default, and Frame Diagnostics. Press the Ok button. Then follow the instructions on the page that is displayed. Note: Factory Default offers the option not to reset to factory defaults, since this action will erase all configurable settings. HP MediaSmart Frame User Guide...
- Page 21 Continue until you have spelled out the name of the country (or at least the first three letters). Use the arrow buttons to select Enter on the keyboard. Then press OK. And/Or Select Type City and press OK. A keyboard page appears. HP MediaSmart Frame User Guide...
- Page 22 SD, CF, or USB) to the internal memory of the picture frame. You cannot copy videos to an external source. Delete - Press OK on Delete to delete the selected video from the internal memory of the picture frame. You cannot delete videos from an external source. HP MediaSmart Frame User Guide...
- Page 23 Copy - Press OK on Copy to copy the selected photo from an external source (PC, SD, CF, or USB) to the internal memory of the picture frame. You cannot copy photos to an external source. HP MediaSmart Frame User Guide...
- Page 24 Press OK on the Music icon in the main menu. Press the Right Arrow or Left Arrow to select among the Album, Artist, Genre, Song, HP Smart Radio, Pandora, (and if present) PC, SD, CF, and/or USB tabs. Press OK.
- Page 25 You cannot delete music from an external source. Delete All - Press OK on Delete All to delete all music from the internal memory of the picture frame. You cannot delete music from an external source. HP MediaSmart Frame User Guide...
- Page 26 Press Back two more times to return to the main menu. For HP Smart Radio: HP Smart Radio requires an Internet connection and an account that has already been set up. For Pandora: Pandora requires an Internet connection and an account that has already been set up.
- Page 27 Use the Up Arrow or Down Arrow to select Google Account or Password. A Keyboard page appears. Internet Press OK on the Internet icon in the main menu. A keyboard page with a URL field. appears. HP MediaSmart Frame User Guide...
- Page 28 There are several shortcut keys that enter commonly used groups of characters (e.g. www., .co, .ne, .org, .com, .html, etc). When you are done filling out the URL, select GO. A Web browser page opens at the chosen Web site. HP MediaSmart Frame User Guide...
-
Page 29: Specifications
Specifications Panel Specification Size HP MediaSmart Frame 100: 254.5 mm (10.2 in) HP MediaSmart Frame 130: 337.8 mm (13.3 in) Aspect ratio HP MediaSmart Frame 100: 15:9 HP MediaSmart Frame 130: 16:10 Resolution HP MediaSmart Frame 100: 800 x 480... - Page 30 Buttons on the front of the Yes, Capacitive touch buttons HP MediaSmart Frame Remote control Yes, with remote pocket Vertical Image Switch Auto image rotate with Yes, but only when device is doing the slide show HP MediaSmart Frame orientation HP MediaSmart Frame User Guide...
-
Page 31: Frequently Asked Questions
Yes. Visit www.hp.com/support for more details. remote and/or power adapter. Can I order replacements? How can I find the latest Visit www.hp.com/support for more details and the information/FAQs about my latest information. HP MediaSmart Frame? HP MediaSmart Frame User Guide... -
Page 32: Cleaning And Care Tips
Cleaning and Care Tips Please power off the HP MediaSmart Frame before cleaning. DO NOT spray or pour liquid cleaning agents directly on the screen or frame. DO NOT use ammonia, alcohol, or abrasive detergent cleaning agents. Cleaning the Screen: Wipe screen with a clean, soft, lint-free cloth to remove dust and loose particles. - Page 33 Electronic Industries Alliance (EIA) (http://www.eiae.org). Note: The HP MediaSmart Frame 100 does not contain mercury, but please ensure that you dispose of it properly at the end of product life.
- Page 34 Federal Communication Commission Interference Statement This equipment has been tested and found to comply with the limits for a Class B digital device, pursuant to Part 15 of the FCC Rules. These limits are designed to provide reasonable protection against harmful interference in a residential installation.
- Page 35 HP MediaSmart Frame User Guide...