Table of Contents
Advertisement
Advertisement
Table of Contents

Related Manuals for Asus S2 Series


Summary of Contents for Asus S2 Series
- Page 1 LED projector E-Manual S2 Series...
- Page 2 Product warranty or service will not be extended if: (1) the product is repaired, modified or altered, unless such repair, modification of alteration is authorized in writing by ASUS; or (2) the serial number of the is defaced or missing.
-
Page 3: Table Of Contents
Table of Contents About this manual ..................... 5 Conventions used in this manual ............... 6 Typography ......................6 Multi-language versions ................6 Safety precautions ..................... 7 Using your LED projector ................7 Servicing and replacement of parts ............7 Caring for your LED projector ..............8 Proper disposal .................... - Page 4 Turning off your LED projector ..............46 Multi-language versions ................47 Appendices Federal Communications Commission Statement ......50 Regional notice for California ..............51 Global Environmental Regulation Compliance and Declaration .52 ASUS Recycling/Takeback Services ............52 Specifications for S2 series LED projector ..........53 Support PC Timings ..................55 LED projector E-Manual...
-
Page 5: About This Manual
About this manual This manual provides information about the hardware and software features of your LED projector through the following chapters: Chapter 1: Knowing your LED Projector This chapter details the parts of your LED projector and its accompanying remote control. Chapter 2: Setting up This chapter shows you how to set up your LED projector and use its parts for input device connection. -
Page 6: Conventions Used In This Manual
Bold = This indicates a menu or an item that must be selected. Italic = This indicates sections that you can refer to in this manual. Multi-language versions Download other language versions of this E-Manual via this website: https://www.asus.com/support LED projector E-Manual... -
Page 7: Safety Precautions
Servicing and replacement of parts • Do not disassemble or attempt to service this LED projector by yourself. Contact your local ASUS service center for assistance. • When replacing parts of your LED projector, purchase items as specified by ASUS and contact your local service center for assistance. LED projector E-Manual... -
Page 8: Caring For Your Led Projector
Caring for your LED projector • Switch off then unplug the LED projector from the power outlet before cleaning it. • When cleaning the LED projector’s housing, use a clean soft cloth dampened with water or a mix of water and neutral detergent. Wipe it dry using a soft dry cloth. • Ensure that the lens is cool before cleaning it. Gently wipe the lens using a lens cleaning paper. Do not touch the lens with your hands. -
Page 9: Chapter 1: Knowing Your Led Projector
Chapter 1: Knowing your LED projector Chapter 1: Knowing your LED projector LED projector E-Manual... -
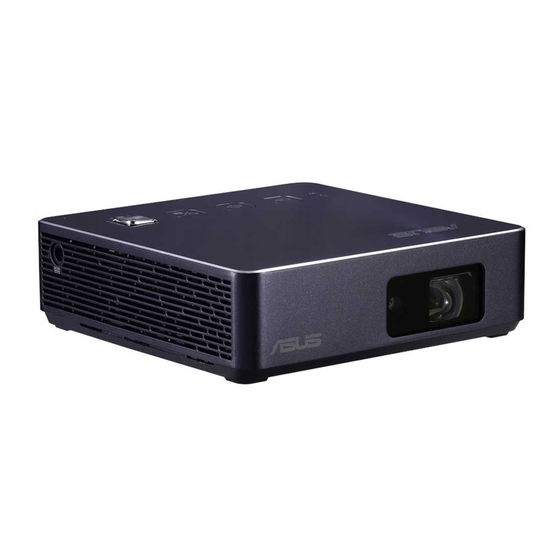
Page 10: Features
Features Top view LED projector E-Manual... - Page 11 Power indicator and battery status indicator This LED indicator indicates the following scenarios for your LED projector: • It lights up when the LED projector is powered on. • It lights up as either green or red depending on the battery charge status. For details on how this LED indicator functions as a battery status indicator, refer to the following table: Color Status Solid Green...
- Page 12 Control panel buttons These buttons correspond to a specific LED projector setting as indicated below. Keystone Input Back/Splendid Joystick This joystick allows you to navigate the onscreen display menu and select menu settings. This joystick also correspond to specific LED projector settings as indicated below. Open main menu/OK Adjust focus Adjust volume...
-
Page 13: Front View
Front view Auto focus camera This camera helps the LED projector with the auto focus feature. Lens The lens projects video or image files onscreen from your input device. WARNING! Do not touch the lens using your hands or any sharp object. -
Page 14: Rear View
Rear view Audio output jack port The audio output jack port allows you to connect your LED projector to amplified speakers or headphones. HDMI port This port is for the HDMI (High-Definition Multimedia Interface) connectors. This port is HDCP compliant for HD DVD, Blu-ray, and other protected content playback. - Page 15 USB 3.1 Gen 2 Type-C™ DisplayPort/Power Delivery combo port Use a USB Type-C™ adapter to connect your LED projector to a compatible device to stream media contents. This Power Delivery output port provides up to 5V/1.5A of output voltage and current when a power source is connected to the Power (DC) input port.
-
Page 16: Left Side
Left side Power (DC) input port Insert the bundled power adapter into this port to charge the battery pack and supply power to your LED projector. IMPORTANT! Use only the bundled power adapter to charge the battery pack and supply power to your LED projector. WARNING! The adapter may become warm to hot while in use. -
Page 17: Right Side
Right side Air vents The air vents allow cool air to enter and warm air to exit your LED projector. WARNING! Ensure that paper, books, clothing, cables, or other objects do not block any of the air vents or else overheating may occur. -
Page 18: Bottom View
Bottom view Tripod socket Connect the LED projector to a tripod using this socket. Built-in stand This LED projector comes with a built-in stand that allows you to adjust the height of the projector by either 4.5 degrees or 9.7 degrees. LED projector E-Manual... -
Page 19: Extended Features
Extended features Your LED projector also have stand-alone features that are launched by pressing the Back/Splendid button while your LED projector is on battery mode. Flashlight The LED projector flashes a steady white light when you use this feature. Back/Splendid button To use your LED projector as a flashlight: Disconnect all peripherals from your LED projector then press... - Page 20 Emergency light mode The LED projector flashes a blinking white light when you use this feature. Back/Splendid button To use your LED projector as a flashlight: Disconnect all peripherals from your LED projector then press the power button to turn it on. Press on the control panel of your LED projector to launch the NO SIGNAL display.
-
Page 21: Led Projector Remote Control
LED projector remote control NOTE: Actual appearance may vary depending on model. Battery compartment The battery compartment allows you to use CR2025 lithium coin batteries to power your LED projector’s remote control. NOTE: For more details on using the battery compartment, refer to the Replacing the battery section in this manual. - Page 22 Remote control buttons These additional buttons allow you to use the LED projector from a distance of up to 8 meters. Power - Press this button to turn your LED projector on or off. Auto focus - Press this button to automatically focus the image.
-
Page 23: Replacing The Battery
Replacing the battery A. Move the battery compartment’s latch to the right to unlock the battery holder. Pull down the battery holder and remove it completely out of the battery compartment. Remove the old battery, then insert the new CR2025 lithium coin battery into the battery holder with the positive side (+) facing up. - Page 24 D. Slide the battery holder back into the battery compartment. Push it all the way in until you hear a soft click, indicating that the battery compartment is locked back in place. LED projector E-Manual...
-
Page 25: Chapter 2: Setting Up
Chapter 2: Setting up Chapter 2: Setting up LED projector E-Manual... -
Page 26: Operating Your Led Projector
Operating your LED projector This portable LED projector allows you to plug and play your devices so you can easily open multimedia files and hear audio straight from its built-in SonicMaster speakers. For your safety and to maintain the quality of this unit, refer to the following steps when operating your LED projector. - Page 27 IMPORTANT! • Use only the bundled power adapter to charge the battery pack and supply power to your LED projector. • Ensure that your LED projector is connected to the power adapter before turning it on for the first time. We strongly recommend that you use a grounded wall socket while using your LED projector on power adapter mode. • The socket outlet must be easily accessible and near your LED projector.
- Page 28 AC power cord requirements Use the correct AC plug type according to your current location. IMPORTANT! Contact your sales dealer if the AC power cord bundled with your LED projector does not match your local power source. NOTE: We highly recommend that you use a video source device that also uses a grounding type plug to prevent signal interference due to voltage fluctuations.
-
Page 29: Connect The Led Projector To Your Device
Connect the LED projector to your device A. Audio output jack LED projector E-Manual... - Page 30 HDMI input LED projector E-Manual...
- Page 31 Power output (5V/1A) NOTE: The power output port is available when using the LED projector in battery mode or charging mode. LED projector E-Manual...
- Page 32 D. USB 3.1 Gen 2 Type-C™ DisplayPort input LED projector E-Manual...
- Page 33 USB 3.1 Gen 2 Type-C™ Power Delivery output (5V/1.5A) NOTE: The Power Delivery output port is only available when using the LED projector in charging mode. LED projector E-Manual...
-
Page 34: Adjust The Height Of The Led Projector
Adjust the height of the LED projector Your LED projector comes with a built-in stand that helps adjust the image height onscreen. WARNING! Ensure that the built-in stand is fully retracted before placing the LED projector inside the projector bag. NOTE: •... - Page 35 Screen size and projection distance table Adjust the LED projector’s distance from the screen using the table below. Screen size LED projector Projection distance Screen Size Projection Screen Distance Horizontal Vertical Diagonal inch inch inch inch 1524 52.28 1328 29.41 59.06 1500 1778...
-
Page 36: Press The Power Button
Press the power button LED projector E-Manual... -
Page 37: Adjust The Image Focus
Adjust the image focus Push the focus button on the LED projector up or down, or press the focus button on the remote control to adjust the image focus. NOTE: Use a still image when adjusting the onscreen display. LED projector E-Manual... - Page 38 LED projector E-Manual...
-
Page 39: Chapter 3: Using The Onscreen Display Menu
Chapter 3: Using the onscreen display menu Chapter 3: Using the onscreen display menu LED projector E-Manual... -
Page 40: Using Your Led Projector For The First Time
NOTE: The following screenshots are for reference only and may be updated without prior notice. Screenshots may also vary depending on the LED projector model. Using your LED projector for the first time Refer to the following steps when using your LED projector for the first time. -
Page 41: Adjusting Your Led Projector's Settings
Adjusting your LED projector's settings To adjust your LED projector settings: Press the center of the joystick on your LED projector (or press the Menu/OK button on your remote control) to launch the onscreen display menu. Move the joystick up or down (or press the Focus up/Up or Focus down/Down button on your remote control) to select the menu option you would like to adjust. -
Page 42: Onscreen Display Menu Options
Onscreen display menu options Image The options under this menu allows you to adjust image options to fine tune your image projection onscreen. Splendid - This option allows you to select a Splendid mode for • your LED projector. Brightness - Select this menu option to adjust the brightness •... -
Page 43: Display
Display The options under this menu allows you to adjust how the image projection will be displayed. Auto Focus - This option allows you to turn Auto Focus on or • off. Projection Position - This option allows you to change the way •... -
Page 44: Input
Input The options under this menu allows you to select the input source for your LED projector. Auto Source - This option allows you to turn Auto Source on or • off. Turn this option on to scan the connected devices to your LED projector automatically. -
Page 45: System
Reset all - This option allows you to reset all the settings you • have currently set up for your LED projector. System Update - This option allows you to update the LED • projector’s firmware. NOTE: For the latest firmware and more information, visit https://www.asus.com/Projectors/ASUS-ZenBeam-S2/ LED projector E-Manual... -
Page 46: Turning Off Your Led Projector
Turning off your LED projector Press the power button. When the following screen appears, press the power button again to completely turn off your LED projector. LED projector E-Manual... -
Page 47: Multi-Language Versions
Multi-language versions Download other language versions of this E-Manual via this website: https://www.asus.com/support LED projector E-Manual... - Page 48 LED projector E-Manual...
-
Page 49: Appendices
Appendices Appendices Appendices LED projector E-Manual... -
Page 50: Federal Communications Commission Statement
Federal Communications Commission Statement This equipment has been tested and found to comply with the limits for a class B digital device, pursuant to Part 15 of the Federal Communications Commission (FCC) rules. These limits are designed to provide reasonable protection against harmful interference in a residential installation. -
Page 51: Regional Notice For California
Compliance Statement of Innovation, Science and Economic Development Canada (ISED) This device complies with Innovation, Science and Economic Development Canada licence exempt RSS standard(s). Operation is subject to the following two conditions: (1) this device may not cause interference, and (2) this device must accept any interference, including interference that may cause undesired operation of the device. -
Page 52: Global Environmental Regulation Compliance And Declaration
ASUS follows the green design concept to design and manufacture our products, and makes sure that each stage of the product life cycle of ASUS product is in line with global environmental regulations. In addition, ASUS disclose the relevant information based on regulation requirements. -
Page 53: Specifications For S2 Series Led Projector
Specifications for S2 series LED projector Display Display Technology 0.3” DLP® Light Source R/G/B LED Light Source Life 30,000 hours (Max) True Resolution HD 720p (1280 x 720) (native) Light Output (Max) 500 Lumens Contrast Ratio 400:1 (typical) 4,000:1 (DCR) - Page 54 Signal Digital Signal 37.8 ~ 79.9 KHz(H) / 50 ~ 60 Frequency Frequency Hz(V) Power Power On Mode ≤65 W Standby Mode <0.5 W Noise Standard mode ≤32dB Interface Signal Input USB-C (DP Alt Mode), HDMI Audio Output Earphone out (3.5mm Mini- jack) USB Port Type-A 2.0 x 1 (5V/1A Power...
-
Page 55: Support Pc Timings
Support PC Timings HDMI (PC) Resolution Mode Refresh rate (Hz) H-frequency (kHz) Clock (MHz) 800 x 600 SVGA_60 60.317 37.879 SVGA_75 46.875 49.5 1024 x 768 XGA_60 60.004 48.363 XGA_75 75.029 60.023 78.75 1280 x 768 1280 x 768_60 59.87 47.776 79.5 1280 x 800... - Page 56 LED projector E-Manual...