Table of Contents
Advertisement
Available languages
Available languages
Advertisement
Table of Contents

Related Manuals for Motorola HTN9000


Summary of Contents for Motorola HTN9000
- Page 1 Single-Unit Chargers User Guide...
-
Page 3: Important Safety Instructions
(2) the battery, and (3) on the radio using the battery. WARNINGS 1. To reduce risk of injury, charge only the rechargeable Motorola authorized batteries listed in Table 1. Other batteries may explode, WARNING causing personal injury and damage. - Page 4 16AWG for lengths up to 150 feet (45.72 5. To reduce risk of fire, electric shock, or injury, do not operate the charger if it has been broken or damaged in any way. Take it to a qualified Motorola service representative.
- Page 5 WARNINGS (continued) 6. Do not disassemble the charger; it is not repairable and replacement parts are not available. Disassembly of the charger may result in risk of WARNING electrical shock or fire. 7. To reduce risk of electric shock, unplug the charger from the ac outlet before attempting any maintenance or cleaning.
-
Page 6: Operational Safety Guidelines
OPERATIONAL SAFETY GUIDELINES • Turn the radio off when charging the battery. • This equipment is not suitable for outdoor use. Use only in dry locations/conditions. • Connect equipment only to an appropriately fused and wired supply of the correct voltage (as specified on the product). -
Page 7: Motorola Authorized Batteries
MOTOROLA AUTHORIZED BATTERIES The batteries listed in Table 1 are approved for use with the Single- Unit Chargers in Table 2. Table 1. Motorola Authorized Batteries Kit (part) Battery Chemistry/Description Number HNN9008_R NiMH/High-Capacity HNN9009 NiMH/Ultra-High-Capacity HNN9010_R NiMH/Ultra-High-Capacity, Factory Mutual HNN9011... -
Page 8: Power Sources And Motorola Authorized Transformers
PMNN4511 IMPRES Lithium Ion 2900T, IP68 POWER SOURCES AND MOTOROLA AUTHORIZED TRANSFORMERS These Class 2 battery chargers should be used with the direct plug-in, Motorola authorized transformers listed below Table 2. Kits/Power Sources/Transformers Transformer Kit Number Power Source (part) Number AAHTN3000 110–120 Vac... -
Page 9: Operating Instructions
Note: All the transformers listed in Table 2 can also be used with the HTN9000 charger. OPERATING INSTRUCTIONS Single-unit chargers will charge only the Motorola authorized batteries listed in Table 1 on page 5 Other batteries may not charge. The battery charger’s pocket will accommodate either a radio with a battery attached or a battery alone. - Page 10 2. Plug the transformer into the appropriate ac outlet. The charger LED will blink green once to indicate a successful power-up. 3. Insert a battery, or a radio with battery (radio turned off), into the charger's pocket by: a. aligning the groove on each side of the battery with the corresponding raised rail on each side of the charger pocket.
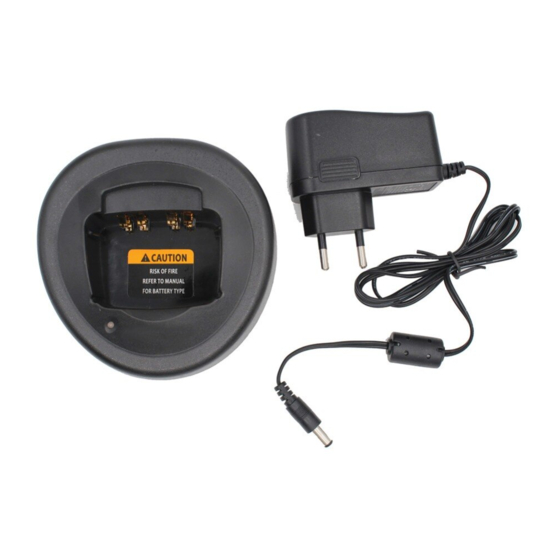
- Page 11 SOCKET RAISED RAIL (located here) CHARGING CONTACTS WARNING POCKET LABEL Figure 1. Battery Charger...
- Page 12 4. When the battery is properly seated in the pocket, the charger LED will light red to indicate that the battery is charging rapidly. When the battery is 90% charged, the LED will begin to blink green to indicate that the battery is trickle charging. When the battery is fully charged, the LED will change to a steady green light to indicate that the battery is fully charged.
-
Page 13: Troubleshooting
TROUBLESHOOTING When troubleshooting, always observe the color of the LED: Table 3. LED Indications of Battery/Charger Status LED Color Battery/Charger Status No LED indication Battery is inserted incorrectly. Single green blink Successful charger power-up Battery is unchargeable or not Blinking red making proper contact. - Page 14 Blinking Red LED Indicator? 1. Remove the battery from the charger, and: a. make sure that it is a Motorola authorized battery listed in Table 1 on page 5. Other batteries may not charge.
- Page 15 Blinking Yellow LED Indicator? • the battery temperature may be below 5°C (41°F) or above 40°C (104°F). • the voltage may be lower than the predetermined threshold level for rapid charging. Note: Rapid charging outside of the stated temperature and voltage limits can drastically reduce the life expectancy of the battery.
- Page 16 Notes...
-
Page 17: Instrucciones De Seguridad Importantes
Motorola que aparecen en la Tabla 1. Otras baterías podrían explotar y causar ADVERTENCIA lesiones personales y daños. 2.El uso de accesorios no recomendados por Motorola podría representar peligro de incendio, choque eléctrico o lesiones. - Page 18 Llévelo a un agente de servizcio autorizado de Motorola. 6. No desarme el cargador; no es reparable y no conseguirá piezas de repuesto para repararlo.
-
Page 19: Reglas De Seguridad
ADVERTENCIAS (continuación) 8.Este es un producto de clase A. En un ambiente doméstico este producto puede causar radio interferencia, en cuyo caso puede requerirse que el usuario tome medidas al efecto. ADVERTENCIA REGLAS DE SEGURIDAD • Apague el radio cuando esté cargando la batería. •... -
Page 20: Baterías Autorizadas Por Motorola
BATERÍAS AUTORIZADAS POR MOTOROLA Las baterías que aparecen en la Tabla 1 están aprobadas para uso con los cargadores individuales en la Tabla 2. Tabla 1. Baterías autorizadas por Motorola Nº de parte Composición/descripción de la batería (pieza) -
Page 21: Fuentes De Energía Y Transformadores Aprobados Por Motorola
Tabla 1. Baterías autorizadas por Motorola (continuación) Nº de parte Composición/descripción de la batería (pieza) HNN9013_R Litio-ion/alta capacidad JMNN4023_R Litio-ion JMNN4024_R Litio-ion/alta capacidad JMNN4025_R NiMH, aprobado por FMRC NNTN5510_R ATEX Litio-ion, 1480 mAh PMNN4073_R Litio-ion, aprobado por FMRC, IP67 PMNN4074_R... - Page 22 90–264Vac (enchufe Inglés) 2571886T01 PMLN5196 90–264Vac (enchufe Europeo) 2571886T01 PMLN5197 90–264Vac (enchufe U.S.) 2571886T01 PMLN5205 90–264Vac (enchufe Aus/NZ) 2571886T01 WPLN4282 90–264Vac (enchufe Brazil) 2571886T01 Nota:Todos los transformadores de la lista en la Tabla 2 también pueden usarse con el cargador HTN9000.
-
Page 23: Instrucciones De Operación
INSTRUCCIONES DE OPERACIÓN Los cargadores individuales sólo cargan las baterías autorizadas por Motorola que aparecen en la Tabla 1, página 4. Otro tipo de batería no puede ser cargada. La cavidad del cargador de batería admite ya sea un radio con una batería acoplada, o bien una batería sola. - Page 24 contacto con el cargador. CONECTOR (ubicado aquí) GUÍA CONTACTOS DE CARGA ETIQUETA CAVIDAD ADVERTENCIA Figura 1. Cargador de batería...
- Page 25 4. Cuando la batería queda debidamente asentada en la cavidad, el LED del cargador se ilumina para indicar que la batería se está cargando rápidamente. Cuando la batería alcanza el 90% de su carga total, el LED verde comieza a destellar para indicar que la batería se está...
-
Page 26: Solución De Problemas
SOLUCIÓN DE PROBLEMAS Cuando busque la causa de una falla, siempre observe el color del LED: Tabla 3. Estados del cargador/batería indicados por el LED Color del LED Estado del cargador/batería LED apagado Batería insertada incorrectamente. Un solo destello El cargador se encendió verde correctamente. - Page 27 1. Extraiga la batería del cargador y: a. compruebe que la batería esté aprobada por Motorola (ver Tabla 1). Si la batería no aparece en la lista no podrá cargarla con este cargador. b. Desconecte el cargador de batería de la fuente de energía eléctrica y limpie los contactos enchapados...
- Page 28 ¿Está destellando el LED amarillo? • es posible que la temperatura de la batería esté por debajo de 5°C (41°F) o por encima de 40°C (104°F). • puede ser que el voltaje esté por debajo del nivel mínimo prefijado para carga rápida. Nota: Aplicar una carga rápida fuera de los límites de voltaje y temperatura especificados podría reducir drásticamente la vida útil de la batería.
-
Page 29: Instruções De Segurança Importantes
1.Para reduzir o risco de lesões, carregue apenas baterias recarregáveis aprovadas pela Motorola relacionadas na Figura 1. Outras baterias podem explodir, causando ferimentos pessoais AVISO e danos. 2.Usar um acessório não recomendado pela Motorola pode resultar em risco de incêndio, choque elétrico ou lesões pessoais. - Page 30 5. Para reduzir o risco de incêndio, choque elétrico ou lesões, não opere o carregador se ele estiver quebrado ou danificado. Leve-o a uma assistência técnica autorizada da Motorola. 6. Não desmonte o carregador; ele não pode ser consertado e não existem peças de reposição à venda.
-
Page 31: Diretrizes De Segurança Operacional
AVISOS (continuação) 7.Para reduzir o risco de choque elétrico, desconecte o carregador da tomada CA antes de tentar executar qualquer procedimento de manutenção ou limpeza. 8.Este e um produto classe A. Em um AVISO ambiente doméstico este producto pode causar rádio interferência, o qual pode requerer que o tome medidas de precaucão. -
Page 32: Baterias Autorizadas Motorola
água ou esteja sujeito a danos e avarias. BATERIAS AUTORIZADAS MOTOROLA As baterias relacionadas na Figura 1 são aprovadas para uso com os carregadores de uma única bateria modelos na Figura 2. Tabela 1. Baterias Autorizadas Motorola Número do Kit Descrição/química da bateria (peça) HNN9008_R... -
Page 33: Fontes De Alimentação Etransformadores Autorizados Motorola
Tabela 1. Baterias Autorizadas Motorola (continuação) Número do Kit Descrição/química da bateria (peça) HNN9011 NiCd/alta capacidade, aprovada pelo Factory Mutual HNN9012 NiCd/alta capacidade HNN9013_R Lítio-íon/alta capacidade JMNN4023_R Lítio-íon JMNN4024_R Lítio-íon/alta capacidade JMNN4025_R NiMH, Factory Mutual NNTN5510_R ATEX Lítio-íon, 1480 mAh PMNN4073_R Lítio-íon, Factory Mutual, IP67... - Page 34 Motorola, conforme relação abaixo: Tabela 2. Fontes de alimentação/transformadores Número do Kit Número do transformador Fonte de alimentação (peça) Motorola (peça) AAHTN3000 110–120Vca 50/60 Hz 2571586S13 (plugue EUA) AAHTN3001 230Vca (plugue Europa) 2571586S07 AAHTN3002 230Vca (plugue inglês) 2571586S06...
-
Page 35: Instruções De Operação
INSTRUÇÕES DE OPERAÇÃO Os carregadores para uma única bateria carregarão somente as baterias autorizadas Motorola relacionadas na Figura 1, page 4. As outras baterias podem não carregar. O encaixe do carregador de bateria poderá conter um rádio com uma bateria ou então apenas a bateria. Antes de carregar uma bateria com rádio, desligue o rádio. - Page 36 c. deslize a bateria para o encaixe e verifique se há contato completo entre o carregador e os contatos da bateria. TOMADA (localizada aqui) TRILHO CONTATOS RECARGA ENCAIXE ETIQUETA DE AVISO Figura 1. Carregador de bateria...
- Page 37 4. Se a bateria estiver bem posicionada no encaixe, o indicador LED acenderá uma luz vermelha indicando que a bateria está carregando rapidamente. Quando a bateria estiver com 90% da carga, o LED verde começará a piscar para indicar que está carregando lentamente.Quando a bateria estiver totalmente carregada, o indicador LED verde será...
-
Page 38: Resolução De Problemas
RESOLUÇÃO DE PROBLEMAS Na resolução de problemas, observe sempre a cor do indicador LED: Tabela 3. Indicações de LED das condições da bateria/ carregador Cor do LED Condições da bateria/carregador Sem indicação Bateria não está posicionada do LED corretamente. Pisca verde Carregador energizado Vermelho Bateria não é... - Page 39 LED vermelho intermitente? 1. Retire a bateria do carregador e: a. verifique se é uma bateria autorizada Motorola relacionada na Figura 1. As outras baterias podem não carregar. b. desligue o carregador de bateria e, usando um pano seco e limpo, limpe os contatos de metal da bateria e do carregador.
-
Page 40: Assistência Técnica
LED amarelo intermitente? • a temperatura da bateria pode estar abaixo de 5°C (41°F) ou acima de 40°C (104°F). • a tensão pode estar abaixo do limite predeterminado para carregamento rápido. Nota:Se o carregamento for feito fora destes limites de temperatura e tensão, poderá... -
Page 41: Consignes De Sécurité Importantes
2) la batterie et 3) la radio alimentée par batterie. AVERTISSEMENTS 1. Pour réduire les risques de blessure, ne rechargez que les batteries agréées par Motorola figurant sur le Tableau 1. Les autres batteries peuvent exploser et causer des dommages physiques ou matériels. - Page 42 Faites-le vérifier par un technicien qualifié pour le service del produits Motorola. 6. Ne démontez pas le chargeur; il n'est pas réparable et les pièces de rechange ne sont pas disponibles. Le démontage du chargeur peut entraîner des risques d'incendie ou de...
-
Page 43: Consignes De Sécurité Relatives Au Fonctionnement
AVERTISSEMENTS (suite) 7.Pour réduire le risque de choc électrique, débranchez le chargeur de la prise de secteur avant de procéder à l'entretien et au nettoyage de l'appareil. 8.Ceci est un produit de classe A. Dans un AVERTISSEMENT environnement domestique ce produit peut causer des interférences radios dans ce cas l'utilisateur devra prendre des mesures appropriées. -
Page 44: Batteries Agréées Par Motorola
BATTERIES AGRÉÉES PAR MOTOROLA Les batteries listées sur le Tableau 1 peuvent être utilisées avec les chargeurs à une seule unité sur le Tableau 2. Tableau 1. Batteries agréées par Motorola Numéro de kit Composition chimique/description de (pièce) la batterie HNN9008_R NiMH/Haute capacité... - Page 45 Tableau 1. Batteries agréées par Motorola (suite) Numéro de kit Composition chimique/description de (pièce) la batterie HNN9011 NiCd/Haute capacité, approuvé FM HNN9012 NiCd/Haute capacité HNN9013_R Lithium-Ion/Haute capacité JMNN4023_R Lithium-Ion JMNN4024_R Lithium-Ion//Haute capacité JMNN4025_R NiMH, approuvé FM NNTN5510_R ATEX Lithium-Ion, 1480 mAh PMNN4073_R Lithium-Ion, approuvé...
- Page 46 SOURCES D'ALIMENTATION ET TRANSFORMATEURS AGRÉÉS PAR MOTOROLA Ces chargeurs de batterie de classe 2 devraient être utilisés avec les transformateurs enfichables agréés par Motorola d’qprès le tableau ci-dessous : Tableau 2. Sources d'alimentation/transformateurs Numéro de pièce du Numéro de Sources d'alimentation transformateur kit (pièce)
-
Page 47: Directives De Fonctionnement
HTN9000. DIRECTIVES DE FONCTIONNEMENT Les chargeurs à une seule unité chargeront seulement les batteries agréées par Motorola figurant sur le Tableau 1, page 4. La charge appropriée des autres batteries n'est pas garantie. Le compartiment du chargeur de batterie peut accueillir une radio avec batterie ou une batterie seulement. - Page 48 appropriée. Un voyant vert s’allumera un instant sur le témoin du chargeur pour confirmer la mise sous tension. 3. Insérez une batterie ou une radio avec batterie (radio éteinte) dans le compartiment du chargeur en: a. alignant les rainures des deux côtés de la batterie avec les rails surélevés correspondants des deux côtés du compartiment;...
- Page 49 COMPARTIMENT (situé ici) RAIL SURÉLEVÉ CONTACTS DE CHARGEMENT ÉTIQUETTE D'AVERTISSE COMPARTIMENT MENT TÉMOIN Figure 1. Chargeur de batterie...
- Page 50 4. Lorsque la batterie sera bien installée dans le compartiment, un voyant rouge s'allumera sur le témoin du chargeur pour indiquer la charge rapide de la batterie. Lorsque la batterie sera chargée à 90%, un voyant vert se mettra à clignoter pour indiquer que la batterie se charge à...
-
Page 51: Dépannage
DÉPANNAGE Pour le dépannage, surveillez toujours la couleur du témoin : Tableau 3. Témoin d'état de la batterie/du chargeur Couleur du témoin État de la batterie/du chargeur Témoin éteint Batterie mal insérée. Brève lumière verte Confirmation de mise sous tension du chargeur. - Page 52 1. Retirez la batterie du chargeur et : a. vérifiez qu'il s'agit bien d'une batterie agréée par Motorola listée sur le Tableau 1. La charge appropriée des autres batteries n'est pas garantie; b. coupez l'alimentation vers le chargeur de batterie et, au moyen d'un chiffon sec et propre, nettoyez les contacts de chargement métalliques or de la batterie...
- Page 53 Témoin jaune clignotant? • la température de la batterie est peut-être inférieure à 5°C (41°F) ou supérieure à 40°C (104°F). • la tension est peut-être inférieure au seuil prédéterminé pour la charge rapide. Remarque: La charge rapide nes respectant pas les limites de température et de tension spécifiées peut réduire considérablement la durée de vie de la batterie.
- Page 54 Remarque...
- Page 56 All other trademarks are the property of their respective owners.. MOTOROLA, MOTO, MOTOROLA SOLUTIONS y el logotipo de la M estilizada son marcas comerciales o marcas registradas de Motorola Trademark Holdings, LLC, y se utilizan con los permisos correspondientes. Las demás marcas comerciales son propiedad de sus respectivos titulares.