Table of Contents
Advertisement
Quick Links
Advertisement
Table of Contents

Related Manuals for ABB ACS800-17LC


Summary of Contents for ABB ACS800-17LC
- Page 1 ABB industrial drives Hardware manual ACS800-17LC Drives (55 to 5200 kW)
- Page 2 You can find manuals and other product documents in PDF format on the Internet. See section Document library on the Internet on the inside of the back cover. For manuals not available in the Document library, contact your local ABB representative.
- Page 3 ACS800-17LC Drives 55 to 5200 kW Hardware Manual 3AUA0000065339 REV B EN EFFECTIVE: 2016-06-07 2016 ABB Oy. All Rights Reserved.
- Page 5 Update notice ACS800LC liquid-cooled industrial units and drives Code: 3AXD50000371952 Rev A coolant change to Antifrogen® L. Valid: 2019-05-01 Code Revision Language Contents: 3AFE68715474 English This notice concerns industrial ACS800 Liquid-cooled 3AFE68843723 German multidrive Units Hardware manuals, ACS800 Liquid-cooled Single Drive cabinet manuals, ACS800 Liquid Cooling Unit 3AFE68843731 Finnish User's Manual and their respective translations.
- Page 6 This change concerns ACS800 Liquid-cooled multidrive Units (ACS800-107LC, - 207LC, -307LC, -507LC, -607LC, -1107LC, -1207LC), ACS800-1007LC Liquid Cooling Unit, ACS800-07LC Drives, ACS800-17LC Drives and ACS800-37LC Drives manufactured in Finland or Estonia. New units and drives are tested with Antifrogen® L. Antifrogen® L is a ready-made propylene glycol based coolant mixture with corrosion inhibitors included.
- Page 7 This results in a higher pressure loss in the system. The nominal current ratings of drive system modules apply to Antifrogen®L / water solution of 25/75 (volume). For derating with other ratios, contact your local ABB representative. Update notice...
- Page 8 42.2 37.1 = Not allowed as standard but the coolant temperature must be 5 °C or above. Consult an ABB representative if operation below coolant temperature 5 °C is required. Example: At an air temperature of 45 °C and relative humidity of 65% the coolant temperature may not be below +36.8 °C.
- Page 9 Pressure limits Base pressure: 100...150 kPa (recommended): 200 kPa (maximum). “Base pressure” denotes the pressure of the system compared with the atmospheric pressure when the cooling circuit is filled with coolant. Air counterpressure in the expansion tank: 40 kPa Design pressure (Ps): 600 kPa Nominal pressure difference (between main in/out lines): 120 kPa with 25(75% (volume) coolant solution, 150 kPa with 50/50% coolant solution.
- Page 10 Update notice...
-
Page 11: Table Of Contents
Table of contents Table of contents Safety instructions What this chapter contains ............13 Use of warnings . - Page 12 Layout of LCL filter and supply module cubicles (frame 2×R8i and up) ..... .36 Swing-out frame layout ............37 Layout of inverter module cubicle (frame 2×R8i) .
- Page 13 HXR and AMA motors ..........73 ABB motors of types other than M2_, M3_, HX_ and AM_ ..... 73 When DC link voltage is increased with parameter settings .
- Page 14 control voltage (option +G307) ..........86 Using power factor compensation capacitors with the drive .
- Page 15 Parameters ............. 115 Default values of parameters with the ACS800-17LC ......116 ACS800-17LC-specific parameters in the application program .
- Page 16 Reforming the capacitors ...........134 Replacing the capacitors .
- Page 17 Providing feedback on ABB manuals ........
- Page 18 Table of contents...
-
Page 19: Safety Instructions
Safety instructions What this chapter contains This chapter contains safety instructions you must follow when installing, operating and servicing the drive. If ignored, physical injury or death may follow, or damage may occur to the drive, motor or driven equipment. Read the safety instructions before you work on the unit. -
Page 20: Safety In Installation And Maintenance
Safety in installation and maintenance Electrical safety These warnings are intended for all who work on the drive, motor cable or motor. WARNING! Ignoring the following instructions can cause physical injury or death, or damage to the equipment: • Only qualified electricians are allowed to install and maintain the drive. •... -
Page 21: Grounding
Grounding These instructions are intended for all who are responsible for the grounding of the drive. WARNING! Ignoring the following instructions can cause physical injury, death, increased electromagnetic interference and equipment malfunction: • Ground the drive, motor and adjoining equipment to ensure personnel safety in all circumstances, and to reduce electromagnetic emission and interference. -
Page 22: Permanent Magnet Motor Drives
Permanent magnet motor drives These are additional warnings concerning permanent magnet motor drives. WARNING! Ignoring the following instructions can cause physical injury, death, increased electromagnetic interference and equipment malfunction: • Do not work on the drive when the permanent magnet motor is rotating. Also, when the supply power is switched off and the inverter is stopped, a rotating permanent magnet motor feeds power to the intermediate circuit of the drive and the supply connections become live. -
Page 23: General Safety
General safety These instructions are intended for all who install and service the drive. WARNING! Ignoring the following instructions can cause physical injury or death, or damage to the equipment: • Cover the drive when installing to ensure that dust from borings and grindings or foreign objects do not enter the drive. -
Page 24: Use Of The Hand-Operated Winch
Use of the hand-operated winch These instructions are intended for all who use the hand-operated winch delivered with the drive when replacing the supply or inverter modules. WARNING! Ignoring these instructions can cause physical injury or death, or damage the to equipment. •... -
Page 25: Safe Start-Up And Operation
Safe start-up and operation General safety These warnings are intended for all who plan the operation of the drive or operate the drive. WARNING! Ignoring the following instructions can cause physical injury or death or damage the equipment: • Before adjusting the drive and putting it into service, make sure that the motor and all driven equipment are suitable for operation throughout the speed range provided by the drive. - Page 26 Safety instructions...
-
Page 27: Introduction To The Manual
The flowchart refers to chapters/sections in this manual and other manuals. Applicability This manual applies to the hardware of the ACS800-17LC drives. For the firmwares and optional devices, see the appropriate manuals. Target audience This manual is intended for people who plan the installation, install, commission, use and service the drive. -
Page 28: Related Documents
+E202. Check that all necessary optional modules than one year, the drive DC link capacitors and equipment are present and correct. need to be reformed. Contact your local ABB representative for more information. Only intact units may be started up. -
Page 29: Terms And Abbreviations
Common mode filtering Common motor Cubicle with the busbars for the motor cable connection terminal cubicle DDCS Distributed drives communication system; a protocol used in optical fiber communication inside and between ABB drives. Electromagnetic compatibility Introduction to the manual... - Page 30 Term/Abbreviation Explanation Four-quadrant Operation of a machine as a motor or generator in quadrants I, II, III and operation IV as shown below. Also used as an attribute of a drive; a regenerative drive can operate the electric machine in all four quadrants, a non- regenerative only in two.
- Page 31 Term/Abbreviation Explanation RMIO Motor control and I/O board. The RMIO is a versatile control board and an IO interface the use of which is determined by the control program loaded onto the board. The RMIO is widely used in the ACS800 product series, eg.
- Page 32 Introduction to the manual...
-
Page 33: Hardware Description
This chapter describes the operation principle and the construction of the drive in short. Product overview The ACS800-17LC is a four-quadrant, cabinet-installed liquid-cooled drive for controlling asynchronous AC induction motors and generators, and permanent magnet synchronous motors and generators. Hardware description... -
Page 34: Single-Line Circuit Diagram Of The Drive
Single-line circuit diagram of the drive Example circuit diagram (frames R7i+R7i and R8i+R8i) This diagram represents frame R7i+R7i and R8i+R8i drives with out any EMC, du/dt filter or brake options. DC bus Supply unit Inverter unit 230/115 V AC 230/115 V AC LCL filter Main Main switch... -
Page 35: Example Circuit Diagram (Frame 2×R8I+2×R8I)
Example circuit diagram (frame 2×R8i+2×R8i) This diagram represents a frame 2×R8i+2×R8i drive with out any EMC, du/dt filter or brake options. Both the supply unit and the inverter unit consist of two parallel frame R8i converter modules. DC bus Supply unit Inverter unit 230/115 V AC 230/115 V AC... -
Page 36: Block Diagram Of The Main Circuit With Options
Block diagram of the main circuit with options R1.1 R2.1 R3.1 R1.2 R2.2 R3.2 No. Description Main switch and disconnector and charging circuit Drives of frame sizes R7i+R7i and R8i+R8i are Drives of frame sizes n×R8i+n×R8i are equipped with an air equipped with a main switch disconnector and circuit breaker: contactor:... -
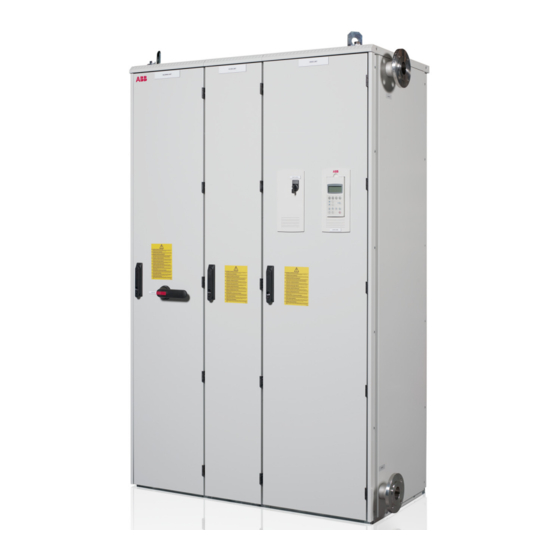
Page 37: General Information On Drive Cabinet Layout
1 to 10 IGBT supply module(s) forming the supply unit, 1 to 9 inverter modules forming the inverter unit, and optional equipment. The actual arrangement of the cubicles varies from type to type and the selected options. An example line-up is shown below: ACS800-17LC-1240-7+C141+D152. Auxiliary control cubicle (optional) -
Page 38: Cabinet Layout (Frames R7I+R7I And R8I+R8I)
Cabinet layout (frames R7i+R7i and R8i+R8i) Doors closed Description Incoming cubicle LCL filter cubicle Supply and inverter module cubicle Drive control panel Operating switch Meters (optional) Main switch handle PE terminal (cabinet grounding busbar at the side of the cabinet) Auxiliary voltage transformer (T10) Doors open Input power cable connection terminals... -
Page 39: Swing-Out Frame Layout
Swing-out frame layout Description Terminal block of the inverter (option +L504). Hardwired to terminals of the inverter control board. Inverter control unit (RDCU) including the control board (RMIO) Supply control unit (RDCU) including the control board (RMIO) I/O module adapter (AIMA, optional) 24 V DC power supply 24 V DC back-up accumulator (auxiliary power interface board [RAPI]) -
Page 40: Auxiliary Control Cubicle Layout
Auxiliary control cubicle layout An optional 400 mm or 600 mm wide auxiliary control cubicle is available in frames 2×R8i and up. Some options, such as auxiliary voltage transformer, require an auxiliary control cubicle. A 600 mm wide cubicle is shown below. Door closed Door open Description... -
Page 41: Main Switch Disconnecter Cubicle Layout (Frames 2×R8I+2×R8I And Up)
Main switch disconnecter cubicle layout (frames 2×R8i+2×R8i and up) 600 mm wide cubicle Door closed Door open 600 mm wide cubicle Description Operating switch of the supply unit (Off/ On/Start) Emergency stop reset push button (option +G331) Handle of grounding switch (option +F259) Meters (options +G335, +3G335, +G334) Main switch disconnector (air circuit breaker) -
Page 42: Layout Of Lcl Filter And Supply Module Cubicles (Frame 2×R8I And Up)
Layout of LCL filter and supply module cubicles (frame 2×R8i and up) An example layout of the LCL and supply module cubicles of frame 2×R8i is shown below. The larger units employ similar cubicles in parallel. Doors open Doors closed Description LCL filter cubicle Supply module cubicle... -
Page 43: Swing-Out Frame Layout
Swing-out frame layout The swing-out frame inside the supply module cubicle provides space for the control unit (RDCU), branching unit (APBU), I/O signal and auxiliary circuit terminal blocks, breakers and relays. The frame can be opened by removing the mounting screws and moving the swing- out frame aside. -
Page 44: Layout Of Inverter Module Cubicle (Frame 2×R8I)
Layout of inverter module cubicle (frame 2×R8i) 2×R8i inverter units are installed in a cubicle as shown below. No. Description Inverter unit control panel Inverter unit LED panel (optional) Handle with marine construction (option +C121) DC fuses Inverter modules (behind the swing-out frame) Swing-out frame with inverter unit control electronics, I/O terminal blocks and communication options Motor cable terminals (busbies behind the fans) -
Page 45: Layout Of Inverter Module Cubicle (Frame 3×R8I)
Layout of inverter module cubicle (frame 3×R8i) 3×R8i inverter units are installed in a 700 mm wide cubicle as shown below. No. Description Inverter unit control panel Inverter unit LED panel (optional) Handle with marine construction (option +C121) DC fuses Inverter modules (behind the swing-out frame) Swing-out frame with inverter unit control electronics, I/O terminal blocks and communication options... -
Page 46: Layout Of Inverter Module Cubicles (Frames 4×R8I To 9×R8I)
Layout of inverter module cubicles (frames 4×R8i to 9×R8i) Inverter units of frames 4×R8i to 9×R8i are composed of parallel-connected 2×R8i and 3×R8i cubicles. Swing-out frame layout of the inverter module cubicles The swing-out frame inside the inverter module cubicle provides space for the control unit (RDCU), branching unit (APBU), I/O signal and auxiliary circuit terminal blocks, breakers and relays. -
Page 47: Overview Of Supply And Inverter Modules (R7I And R8I)
Overview of supply and inverter modules (R7i and R8i) The figure below shows the supply/inverter module of size R7i and R8i. The control unit containing the RMIO board is external and located in the swing-out frame of the module cubicle. The control unit is connected to the inverter module(s) by a fiber optic link, distributed through an optical branching unit. -
Page 48: Overview Of Power And Control Connections
Overview of power and control connections The following diagram shows the power connections, control interfaces and I/O options of the drive. Hardware description... -
Page 49: Control Of The Supply Unit
The red push button disconnects the control voltage from the supply transformer breaker. The push button is added on the cabinet door at the factory by ABB. The installer of the drive must wire the button to the breaker control circuit on the installation site. -
Page 50: Emergency Stop Push Button
The switch cannot be closed if the contactor/breaker is closed. The main contactor/ breaker cannot be closed before the grounding switch has been opened. Emergency stop push button An emergency stop button is included with options +Q951 and +Q952. Reset button A reset button is included with options +Q951 and +Q952. -
Page 51: Connections And Use Of The I/O In The Supply Unit
Connections and use of the I/O in the supply unit The table and the figure below describe the connections and use of the I/O in the supply unit. The use of I/O is fixed in the supply unit control program and the wiring to RMIO terminals are made accordingly at the factory. -
Page 52: Connections To Standard I/O Terminals
Connections to standard I/O terminals Terminal block size: VREF- Reference voltage -10 V DC, 1 kohm < R < 10 cables 0.3 to 3.3 mm (22 to 12 AWG) kohm AGND Tightening torque: 0.2 to 0.4 N·m (0.2 to 0.3 lbf·ft) VREF+ Reference voltage 10 V DC, 1 kohm <... -
Page 53: Control Of The Inverter Unit And Motor
Start/Stop/Direction/Reset/Reference, and the parameter settings for the control programs. The suffix “LM” on the control panel display denotes ACS800-17LC. More information on using the panel can be found in the inverter unit firmware manual delivered with the drive. -
Page 54: Type Designation Labels
Type designation labels Drive label The type designation label of the drive includes an IEC rating, CE, C-UL US, and CSA markings, a type designation and a serial number, which allow individual recognition of each unit. The first digit of the serial number refers to the manufacturing plant. - Page 55 An example type designation label of the ACS800-104LC inverter, supply and brake module is shown below. Description Serial number. The first digit of the serial number refers to the manufacturing plant. The next four digits refer to the unit’s manufacturing year and week, respectively. The remaining digits complete the serial number so that there are no two units or modules with the same number.
-
Page 56: Type Designation Key
Single-pump liquid cooling unit (70 kW). The cooling unit will be connected to the line- up at the factory, pipe connection on the right side, DIN flanges, industrial water. Control panel CDP312R included on the cubicle door. ACS800-17LC-xxxx-5 units: External power supply for pump motors is required, refer to options +M633, +M634. - Page 57 Knobs for grounding the AC output busbars temporarily. Available with +H359 only. F259 Grounding switch. Not available with options +C129 and +C134 or frames R7i+R7i and R8i+R8i. F269 Output contactor. Available for ACS800-17LC-0870-3, -1030-5 and -1240-7 and larger units. Heaters and auxiliary G300 Cabinet heater (external supply) control voltage...
- Page 58 Class Code Description Fieldbus adapter modules K... +K451: RDNA-01 DeviceNet™ adapter module +K452: RLON-01 LonWorks® adapter module +K453: NIBA-01 InterBus-S adapter module +K454: FPBA-01 PROFIBUS DP adapter module +K455: NMBA-01Modbus Plus +K457: RCAN-01 CANopen adapter module +K458: RMBA-01 Modbus adapter module +K462: RCNA-01 ControlNet™...
- Page 59 Class Code Description Paper manuals R… +R700: English +R701: German +R702: Italian +R705: Swedish +R706: Finnish +R707: French Note: The delivered manual set may include manuals in English if the translation is not available. Safety Q950 Prevention of unexpected start Q951 Emergency stop of Category 0 with opening the main breaker/contactor, see also +G331 Q952 Emergency stop of Category 1 with opening the main breaker/contactor, see also...
- Page 60 Hardware description...
-
Page 61: Mechanical Installation
Mechanical installation What this chapter contains This chapter describes the mechanical installation procedure of the drive. Checking the installation site Ambient conditions on page for allowable operating conditions, and Dimensions, weights and free space requirements on page for requirements for free space around the unit. -
Page 62: Checking The Delivery
Checking the delivery The drive delivery contains: • drive cabinet line-up • optional modules (if ordered) installed into the control rack at the factory • winch for the supply and inverter module replacement (if ordered) • installation stand (delivered in a separate pallet) •... -
Page 63: Moving The Unit By Fork-Lift Or Pallet Truck
Moving the unit by fork-lift or pallet truck The centre of gravity is high. Be therefore careful when transporting the unit. Avoid tilting the cabinets. The units are to be moved only in the upright position. If using a pallet truck, check its load capacity before attempting to move the unit. -
Page 64: Placing The Unit
Placing the unit The cabinet can be moved into its final position with an iron bar and a wooden piece at the bottom edge of the cabinet. Care is to be taken to properly place the wooden piece so as not to damage the cabinet frame. Mechanical installation... -
Page 65: Overview Of The Installation Procedure
Overview of the installation procedure This section contains a brief description of the installation procedure. See the detailed instructions refered to on each step. (1) The cabinet can be installed with its back against a wall, or back-to-back with another unit. Fasten the unit (or first shipping split) to the floor. -
Page 66: Fastening The Cabinet To The Floor And Wall (Non-Marine Units)
Fastening the cabinet to the floor and wall (non-marine units) Fasten the cabinet to the floor by using clamps along the edge of the cabinet bottom, or by bolting the cabinet to the floor through the holes inside. Alternative 1 – Clamping Insert the clamps into the twin slots along the front and rear edges of the cabinet frame body and fasten them to the floor with a bolt. -
Page 67: Alternative 2 - Using The Holes Inside The Cabinet
Alternative 2 – Using the holes inside the cabinet The cabinet can be fastened to the floor using the fastening holes inside the cabinet, if they are accessible. The recommended maximum distance between the fastening points is 800 mm (31.5”). If there is not enough working space behind the cabinet for mounting, replace the lifting lugs at the top with L-brackets (not included) and fasten the top of the cabinet to the wall. -
Page 68: Fastening The Unit To The Floor And Wall (Marine Units, Option +C121)
Fastening the unit to the floor and wall (marine units, option +C121) 1. Bolt the cabinet to the floor through the holes in each flat bar at the base of the cabinet using M10 or M12 screws. Note: Welding is not recommended, see page 67. -
Page 69: Joining The Shipping Splits
Joining the shipping splits All necessary materials for connecting the shipping splits together are located in the joining cubicle. Join the shipping splits in the following order. Preparing the liquid pipe connections Slide Axilock connectors onto the liquid pipes. Note: when the cabinets are pushed together the pipe ends come too close to each other and the connectors cannot be installed any more. -
Page 70: Connecting The Liquid Pipes
Connecting the liquid pipes 1. Ensure the Axilock connectors are slid on pipe ends. See section Preparing the liquid pipe connections on page 63. 2. Position the liquid pipe ends against each other. 3. Centre the Axilock connector onto the pipe ends. 4. -
Page 71: Connecting The Dc Busbars
Connecting the DC busbars Connect the main DC busbars from front as follows: 1. Remove the metal plate covering the busbars in the joining cubicle. 2. Unscrew the bolts of the joint pieces (a). 3. Connect the busbars with the joint pieces (a). Tighten the bolts to 55–70 N·m (40– 50 lbf·ft). -
Page 72: Miscellaneous
Miscellaneous Cable duct in the floor below the cabinet A cable duct can be constructed below the middle part of the cabinet. The duct width may not exceed 450 mm. The cabinet weight lies on the 100 mm wide section in front and 50 mm wide section at the back which the floor must carry. -
Page 73: Electric Welding
Electric welding It is not recommended to fasten the cabinet by welding. If the other fastening methods cannot be used, follow the welding instructions below. Cabinets without flat bars at the base • Connect the return conductor of the welding equipment to the cabinet frame at the bottom within 0.5 metres of the welding point. - Page 74 Mechanical installation...
-
Page 75: Planning The Electrical Installation
Note: The installation must always be designed and made according to applicable local laws and regulations. ABB does not assume any liability whatsoever for any installation which breaches the local laws and/or other regulations. Furthermore, if the recommendations given by ABB are not followed, the drive may experience problems that the warranty does not cover. -
Page 76: Protecting The Motor Insulation And Bearings
To avoid damage to motor bearings: • select and install the cables according to the instructions given in the hardware manual • use insulated N-end (non-drive end) bearings and output filters from ABB according to section Requirements for motor insulation and bearings and drive filters below. -
Page 77: Requirements For Motor Insulation And Bearings And Drive Filters
Requirements for motor insulation and bearings and drive filters The following table shows how to select the motor insulation system and when an optional ABB du/dt filter, insulated N-end (non-drive end) motor bearings and ABB common mode filters are required. The motor manufacturer should be consulted regarding the construction of the motor insulation and additional requirements for explosion-safe (EX) motors. -
Page 78: Explosion-Safe (Ex) Motors
Motor type Nominal AC line Requirement for voltage Motor insulation ABB du/dt filter, insulated N-end bearing and ABB common mode system filter < 100 kW 100 kW < P < 350 kW > 350 kW frame size > IEC 315 frame size <... -
Page 79: High-Output Motors And Ip 23 Motors
For motors with higher rated output than what is stated for the particular frame size in EN 50347 (2001) and for IP23 motors, the requirements of ABB random-wound motor series (for example M3AA, M3AP, M3BP) are given below. For non-ABB motor types, see the basic table above and apply the requirements of range 100 kW < P <... -
Page 80: Sine Filters
Û du/dt ------------ - (1/μs) Û du/dt ------------ - (1/μs) Cable length (m) Cable length (m) Without du/dt Filter With du/dt Filter Sine filters Sine filters protect the motor insulation system. Therefore, a du/dt filter can be replaced with a sine filter. - Page 81 To operate as a protective conductor, the shield conductivity requirements according to IEC 60439-1 are shown below when the protective conductor is made of the same metal as the phase conductors. The table applies also to four-conductor systems. Cross-sectional area of the phase Minimum cross-sectional area conductors of the corresponding protective...
-
Page 82: Typical Power Cable Sizes
Typical power cable sizes Tables below give current carrying capacity (I ) for aluminium and copper PVC/ Lmax XLPE insulated cables. A correction factor K = 0.70 is used (cables laid on the cable trays side by side, max 9 cables per tray, three ladder type trays one on top of the other, ambient temperature 30°C, EN 60204-1 and IEC 364-5-52). - Page 83 Copper cable PVC insulation XLPE insulation Conductor temperature 70° Conductor temperature 90° Size ø [mm] Time const. [s] Time const. [s] Lmax Lmax 3 × 1.5 + 1.5 3 × 2.5 + 2.5 (3 × 4 + 4) 3 × 6 + 6 3 ×...
-
Page 84: Alternative Power Cable Types
Alternative power cable types Power cable types that can be used with the drive are represented below. A separate PE conductor is required if Recommended: Symmetrical shielded cable: three the conductivity of the cable shield is < phase conductors and a concentric or otherwise 50 % of the conductivity of the phase symmetrically constructed PE conductor, and a shield conductor. -
Page 85: Additional Us Requirements
Additional US requirements Type MC continuous corrugated aluminum armor cable with symmetrical grounds or shielded power cable must be used for the motor cables if metallic conduit is not used. For the North American market, 600 V AC cable is accepted for up to 500 V AC. -
Page 86: Relay Cable
Control panel cable In remote use, the cable connecting the control panel to the drive must not exceed 3 metres (10 ft). The cable type tested and approved by ABB is used in control panel option kits. Coaxial cable (for use with Advant Controllers AC 80/AC 800) •... -
Page 87: Separate Control Cable Ducts
A diagram of the cable routing is below. Motor cable Drive min 300 mm (12 in.) Power cable Input power cable Motor cable 90 ° min 200 mm (8 in.) min 500 mm (20 in.) Control cables Separate control cable ducts 230 V 230 V (120 V) -
Page 88: Protecting The Motor And Motor Cable In Short-Circuit Situations
If the drive is supplied through busbars, fuses must be installed at the drive input. In networks with a short-circuit withstand of less than 50 kA, standard gG fuses are sufficient. If the network has a short-circuit withstand of 50…65 kA, aR fuses are required. -
Page 89: Insulation Requirements For The Motor Temperature Sensor Circuit
Insulation requirements for the motor temperature sensor circuit WARNING! IEC 60664 requires double or reinforced insulation between live parts and the surface of accessible parts of electrical equipment which are either non- conductive or conductive but not connected to the protective earth. To fulfil this requirement, the connection of a thermistor (and other similar components) to the digital inputs of the drive can be implemented in three alternate ways:... -
Page 90: Implementing The Prevention Of Unexpected Start Function
Implementing the Prevention of unexpected start function The drive equipped with option +Q950 supports the Prevention of unexpected start function according to standards IEC/EN 60204-1:1997; ISO/DIS 14118:1996 and EN 1037:1996. The circuit conforms to EN 954-1, Category 3. The Prevention of unexpected start function disables the control voltage of the power semiconductors of the drive output stage, thus preventing the motor-side converter from generating the voltage required to rotate the motor. -
Page 91: Implementing The Safe Torque Off Function
Implementing the Safe torque off function Safe torque off with safety relay option (+Q968) is available for the drive. It provides Safe torque off (STO) function according to standards EN 61800-5-2:2007; EN ISO 13849-1:2008, IEC 61508 and EN 62061:2005. The function also corresponds to an uncontrolled stop in accordance with stop category 0 of EN 60204-1 and prevention of unexpected start-up of EN 1037. -
Page 92: Terminals For Connecting External Control Voltage (Option +G307)
Drives of frame sizes 2×R8i+2×R8i and up can be equipped with an optional auxiliary control voltage transformer which supplies 230 V AC voltage to cooling fans and control circuits. With option +G304 the supplied voltage is 115 V AC. The drive can be equipped with terminals for uninterruptible power supply (option +G307). -
Page 93: Implementing A Safety Switch Between The Drive And Motor
Implementing a safety switch between the drive and motor It is recommended to install a safety switch between the permanent magnet synchronous motor and the drive output. The switch is needed to isolate the motor during any maintenance work on the drive. Using a contactor between the drive and motor Implementing the control of an output contactor depends on how you select the drive to operate. -
Page 94: Implementing A Bypass Connection
Implementing a bypass connection If bypassing is required, employ mechanically or electrically interlocked contactors between the motor and the drive and between the motor and the power line. Ensure with interlocking that the contactors cannot be closed simultaneously. WARNING! Never connect the supply power to the drive output terminals U2, V2 and W2. -
Page 95: Switching The Motor Power Supply From Direct-On-Line To Drive
3. Switch the motor power supply from the drive to direct-on-line with S40. 4. Wait for 10 seconds to allow the motor magnetization to die away. 5. Start the motor with S41. Switching the motor power supply from direct-on-line to drive 1. -
Page 96: Considering The Pelv On Installation Sites Above 2000 Metres (6562 Feet)
Considering the PELV on installation sites above 2000 metres (6562 feet) WARNING! Wear appropriate protection when installing, operating or servicing the RMIO board wiring and optional modules attached to the board. The Protective Extra Low Voltage (PELV) requirements stated in EN 61800-5-1 are not fulfilled at altitudes above 2000 m (6562 ft). -
Page 97: Electrical Installation
2. Measure the insulation resistance between each phase conductor and then between each phase conductor and the Protective Earth conductor using a measuring voltage of 1000 V DC. The insulation resistance of an ABB motor must exceed 100 Mohm (reference value at 25 °C or 77 °F). For the insulation resistance of other motors, consult the manufacturer’s instructions. -
Page 98: Braking Resistor Assembly
EMC filter +E202, disconnect the filter before connecting the drive to the supply network. For detailed instructions on how to do this, please contact your local ABB representative. WARNING! If a drive with EMC filter +E202 is installed on an IT system (an... -
Page 99: Connecting The Input Power Cable
Connecting the input power cable Connection diagram A connection diagram of frame R7i and R8i units is shown below. The input cable connection for frames 2×R8i and up is similar. Incoming cubicle Notes: Input power connection: L1, L2, L3 and PE. To be wired by the user. For selection of input power cables, see page 74. -
Page 100: Connecting The Motor Cable - Units With No Common Motor Terminals Cubicle Option +H359
4. Connect the cables as follows: • Twist the cable shields into bundles and connect to cabinet PE (ground) busbar. Connect any separate ground conductors or cables to cabinet PE (ground) busbar. • Connect the phase conductors to the input power terminals (L1, L2, L3). For the tightening torques, see page 155. -
Page 101: Connection Diagram - Parallel Inverter Modules Feed One Motor
Connection diagram – parallel inverter modules feed one motor Inverter module cubicle WARNING! The cabling from all inverter modules to the motor must be physically identical considering cable type, cross-sectional area, and length. Inverter module cubicle Electrical installation... -
Page 102: Connection Procedure
Connection procedure WARNING! Follow the instructions in chapter Safety instructions. Ignoring the instructions can cause physical injury or death, or damage to the equipment. 1. Disconnect the inverter cubicle from the DC supply (open the DC switch or remove the fuses). Ensure by measuring that the drive is dead. 2. - Page 103 Inverter module cubicle from Inverter module cubicle from Lower part of the inverter module cubicle from front, front, door closed front, door open shroud removed Terminals are behind the fan. 360° grounding of the cable shield Alternative cable shield grounding means at the at the inverter end motor end Alternative 1:...
-
Page 104: Connecting The Motor Cable
Connecting the motor cable (units with the common motor cable connection terminals cubicle option +H359) Connection diagram Inverter module cubicle Common motor terminal cubicle Connection procedure WARNING! Follow the instructions in chapter Safety instructions. Ignoring the instructions can cause physical injury or death, or damage to the equipment. 1. - Page 105 4. Connect the cables as follows: - Cut the cables to suitable length. Strip the cables and conductors. Fasten the cable lugs to the conductor ends. - Twist the cable shields into bundles and connect to cabinet PE (ground) busbar. - Connect the phase conductors to the output terminals.
-
Page 106: Connecting External Power Supply For The Auxiliary Circuits
Connecting external power supply for the auxiliary circuits Frames R7i×R7i and R8i×R8i As standard, the drive auxiliary circuit is supplied from the main power supply of the drive through an auxiliary voltage transformer. You do not need to connect any external auxiliary power supply for the auxiliary circuits. -
Page 107: Frames 2×R8I And Up
Frames 2×R8i and up Standard unit without optional auxiliary control voltage transformer or terminals for connecting external control voltage Connect the external auxiliary power supply for the cooling fans and control circuitry to breaker Q11. The breaker Q11 is located in the auxiliary control cubicle or in the inverter module cubicle. -
Page 108: Units With Terminals For Connecting External Control Voltage (Option +G307) And Without Optional Auxiliary Control Voltage Transformer
Units with terminals for connecting external control voltage (option +G307) and without optional auxiliary control voltage transformer Connect the external auxiliary power supply for the drive control circuitry to breaker Q11. See section Auxiliary circuit current consumption on page for the current consumption of the circuitry. -
Page 109: Connecting The Control Cables For The Inverter Unit
Connecting the control cables for the inverter unit Default I/O connection diagram RMIO RMIO VREF- Reference voltage -10 V DC, 1 kohm < R Terminal block size: < 10 kohm AGND cables 0.3 to 3.3 mm (22 to 12 AWG) Tightening torque: VREF+ Reference voltage 10 V DC, 1 kohm <... - Page 110 External control cable connections to the RMIO board for the ACS800 standard control program (Factory macro) are shown in the above diagram. For external control connections of other application macros, see the Standard Control Program Firmware Manual (3AFE64527592 [English]). Electrical installation...
-
Page 111: Connection Procedure
Connection procedure WARNING! Follow the instructions in chapter Safety instructions. Ignoring the instructions can cause physical injury or death, or damage to the equipment. Open the cabinet door(s). Remove any shrouds that limit access to the cable lead-throughs and cable trunking. Run the cables into the inside of the cabinet through the grommets provided. -
Page 112: Connecting A Pc
Run the cables to the appropriate terminals. Wherever possible, use the existing cable trunking in the cabinet. Use sleeving wherever the cables are laid against sharp edges. Note: When running cables to the swing-out frame, leave some slack in the cable at the hinge to allow the frame to open fully. -
Page 113: Cabling Of I/O And Fieldbus Modules
Cabling of I/O and fieldbus modules Module Keep unshielded portion as short as possible Shield To nearest PE terminal Cabling of pulse encoder interface module CH AS S IS RTAC-01 PULSE ENCODER INTERFACE G N D S HL D S HL D C HA CH A+ C HB... - Page 114 Electrical installation...
-
Page 115: Installation Checklist
If the drive has been stored over one year: The electrolytic DC capacitors in the DC link of the drive have been reformed. See the separate reforming instructions (available in the Internet of from a local ABB representative). There is an adequately sized protective ground conductor between the drive and the switchboard. - Page 116 Check that … The motor cable (and brake resistor cable, if present) has been routed away from other cables. No power factor compensation capacitors have been connected to the motor cable. The control cables (if any) have been connected to the appropriate terminals on the inverter control board.
-
Page 117: Start-Up
Start-up What this chapter contains This chapter contains start-up instructions for the drive. Start-up procedure These instructions do not cover all start-up tasks of all possible variants of the drive, just the basic steps. Always refer to the delivery-specific circuit diagrams when proceeding with the start-up. -
Page 118: Connecting Voltage To The Input Terminals And Auxiliary Circuit
Action Additional information Connecting voltage to the input terminals and auxiliary circuit WARNING! Make sure that it is safe to apply voltage. Ensure that: • nobody is working on the unit or circuits that are wired from outside into the cabinets •... -
Page 119: On-Load Checks
Action Additional information On-load checks Check that the cooling fans rotate freely in the right direction, and the air flows upwards. Check the rotation direction of the motor. Check that the motor starts, stops and follows the speed reference when controlled with the control panel. -
Page 120: Switching The Control Panel Between The Supply And Inverter Units
Switching the control panel between the supply and inverter units The control panel is switched between the supply unit and inverter units as follows: Changing control to the supply unit Step Action Press… Display (example) To enter the Drive Selection Mode ACS 800 0490_3LM Note: In local control mode, the inverter unit trips if DRIVE... -
Page 121: Acs800-17Lc-Specific Parameters In The Igbt Supply Control Program
ACS800-17LC-specific parameters in the IGBT Supply Control Program The ACS800-17LC specific signals and parameters of IGBT Supply Control Program are described in the tables below. Terms and abbreviations Term Definition Boolean Character string Def. Default value FbEq Fieldbus equivalent: the scaling between the value shown on the control panel and the... -
Page 122: Default Values Of Parameters With The Acs800-17Lc
65535 Default values of parameters with the ACS800-17LC When the IGBT Supply Control Program is loaded into the ACS800-17LC, the following parameters receive the default values given in the table below. Do not change the default values. If they are changed, the drive will not operate properly. -
Page 123: Acs800-17Lc-Specific Parameters In The Application Program
ACS800-17LC-specific parameters in the application program The ACS800-17LC specific actual signals and parameters in the ACS800 Standard Control Program (running on the inverter control board) are described below. Terms and abbreviations Term Definition Actual signal Signal measured or calculated by the drive. Can be monitored by the user. No user setting possible. - Page 124 Name/Value Description FbEq Def. 95 HARDWARE SPECIF Line-side converter references and actual signal selections. 95.06 LCU Q PW REF Reactive power reference for the line-side converter i.e. the value for par. 24.02 Q POWER REF2 in the IGBT Supply Control Program.
-
Page 125: Fault Tracing
Fault tracing LEDs Location Indication RMIO board (RDCU drive control Fault state. unit) Green The power supply on the board is OK. Control panel mounting platform Fault state. (with the control panel removed) Green The main +24 V power supply for the control panel and the RMIO board is OK. - Page 126 • Disconnect the panel cable from the RMIO board of the inverter unit. • Set the ID number of the supply unit RMIO board to 2. For the setting procedure, see the inverter control program firmware manual. • Connect the disconnected cable to the RMIO board of the inverter unit again and set the ID number to 1.
-
Page 127: Maintenance
(APBU-xx) memory backup battery on page 135. branching unit (APBU-xx) Consult your local ABB Service representative for more details on the maintenance. On the Internet, go to http://www.abb.com/drives. Note: If the drive is equipped with the cooling unit (options +C139, +C140 or +C141), see also the maintenance intervals given in ACS800-1007LC User’s... -
Page 128: Replacing The Additional Fan In The Incoming Cubicle (Frames R7I+R7I And R8I+R8I)
Replacing the additional fan in the incoming cubicle (frames R7i+R7i and R8i+R8i) WARNING! Follow the instructions in chapter Safety instructions. Ignoring the instructions can cause physical injury or death, or damage to the equipment. 1. Disconnect the drive from the power line. 2. -
Page 129: Replacing The Auxiliary Control Cubicle Fan (Frames 2×R8I+2×R8I And Up)
Replacing the auxiliary control cubicle fan (frames 2×R8i+2×R8i and up) WARNING! Follow the instructions in chapter Safety instructions. Ignoring the instructions can cause physical injury or death, or damage to the equipment. 1. Disconnect the drive from the power line. 2. -
Page 130: Replacing The Fan In The Incoming Cubicle (Frames 2×R8I+2×R8I And Up)
Replacing the fan in the incoming cubicle (frames 2×R8i+2×R8i and up) WARNING! Follow the instructions in chapter Safety instructions. Ignoring the instructions can cause physical injury or death, or damage to the equipment. 1. Disconnect the drive from the power line. 2. -
Page 131: Replacing The Cooling Fans In Supply Module Cubicle
Replacing the cooling fans in supply module cubicle WARNING! Follow the instructions in chapter Safety instructions. Ignoring the instructions can cause physical injury or death, or damage to the equipment. 1. Disconnect the drive from the power line. 2. Open the door and remove the lower shroud of the cubicle. 3. -
Page 132: Replacing The Inverter Module Fans (2×R8I And Up)
Replacing the inverter module fans (2×R8i and up) WARNING! Follow the instructions in chapter Safety instructions. Ignoring the instructions can cause physical injury or death, or damage to the equipment. 1. Disconnect the drive from the power line. 2. Open the inverter cubicle door and remove the shroud to gain access to the fan. 3. -
Page 133: Reduced Run Capability
Reduced run capability The reduced run capability is available for units with parallel-connected inverter modules of frame sizes 2×R8i and up, and for parallel-connected IGBT supply modules of frame sizes 4×R8i and up. If one of the parallel-connected inverter or supply modules fails, the unit can continue to be run at reduced power using the remaining modules. -
Page 134: Replacing Supply And Inverter Modules
Replacing supply and inverter modules Note: Performing this action requires the following accessories that are not included with the drive as standard: • Winch (order code: 68847826) • Installation stand (order code: 68847711). WARNING! Follow the instructions in chapter Safety instructions. - Page 135 2 Removing the shrouds 3 Draining the cooling unit 4 Fastening the supports of the winch 5 Installing the winch 6 Opening the swing- 7 Opening the locking Decoupling the inlet (8) and outlet (9) out frame Maintenance...
- Page 136 10. Unplug the fiber optic cable from the module. 11. Unplug the terminal block from the module. 12. Remove the module mounting screws (four at top, two at bottom). 13. Disconnect the DC output busbars from the module. Beware not to drop the screws inside the module! 14.
- Page 137 13 Disconnecting the 14 Fastening the 15 Pulling the module out 10 Unplugging the fiber optic DC busbars installation stand cables 11 Unplugging the terminal block 12 Removing the mounting screws 16 Fastening the lifting 18 Winching the module 19 Removing the 20 Winching the module installation stand down...
-
Page 138: Installing The Winch
Installing the winch The winch is available from ABB as an accessory. The order code is 68847826. 1. Fasten the right-hand side support of the winch to the support frame of the cubicle (four screws). Fasten the left-hand side support of the winch to the support frame of the cubicle (four screws). -
Page 139: Installing The Installation Stand
Installing the installation stand An installation stand for supply and inverter module replacement is available from ABB as an accessory. The order code is 68847711. 1. Fasten the module installation stand to the frame of the cubicle (2 × 5 screws). -
Page 140: Capacitors
Capacitor life can be prolonged by lowering the ambient temperature. It is not possible to predict capacitor failure. Capacitor failure is usually followed by damage to the unit and an input cable fuse failure, or a fault trip. Contact ABB if capacitor failure is suspected. -
Page 141: Replacing The Ppcs Branching Unit (Apbu-Xx) Memory Backup Battery
Replacing the PPCS branching unit (APBU-xx) memory backup battery 1. Switch off the power to the unit. 2. Open the screws on the cover (3 pcs). 3. Slide off the cover. 4. Remove the battery. 5. Insert the new CR 2032 battery and reattach the cover. Maintenance... - Page 142 Maintenance...
-
Page 143: Internal Cooling Circuit
Internal cooling circuit General The cooling system of the drive consists of two circuits: firstly, the internal cooling circuit that covers the heat-generating electrical components and transfers the heat to the cooling unit, and the external cooling circuit that is usually part of a larger external cooling system. -
Page 144: Connection To A Cooling Unit
Connection to a cooling unit Connection to an ACS800-1007LC cooling unit Refer to the ACS800-1007LC Cooling Unit User’s Manual (3AFE68621101, English). Connection to a custom cooling unit General requirements Equip the system with an expansion tank to damp pressure rise due to volume changes when the temperature varies. -
Page 145: Filling Up And Bleeding The Internal Cooling Circuit
Filling up and bleeding the internal cooling circuit Both the drive and coolant must be at room temperature before filling in the cooling circuit. WARNING! Ensure that the maximum permissible operating pressure is not exceeded. When necessary regulate the pressure to appropriate level by draining excess coolant out of the system. -
Page 146: Draining The Internal Cooling Circuit
10. Continue to fill in coolant until a base pressure of 100…150 kPa is achieved. 11. Open the bleed valve of the pump to allow any air out. 12. Re-check the pressure and add coolant if necessary. 13. Start the coolant pump. Let any air remaining in the system out through the bleed valve at the cooling unit. -
Page 147: Specifications
42.2 37.1 Not allowed as standard but the coolant temperature must be 5 °C or above. Consult an ABB representative if operation below coolant temperature 5 °C is required. Example: At an air temperature of 45 °C and relative humidity of 65% the coolant temperature may not be below +36.8 °C... -
Page 148: Water Quality
Air counterpressure in the expansion tank: 40 kPa Maximum design pressure: 600 kPa Minimum pressure difference: 100 kPa / 120 kPa (hydrostatic) Maximum pressure difference: 250 kPa Water quality Tap water The use of tap water is allowed as follows. Tap water must fulfil the requirements of the Council Directive 98/83/EC of 3/11/98 on the quality of water intended for human consumption. -
Page 149: Materials
WARNING! Operation at temperatures below 0 °C (32 °F) is not permitted even with antifreeze. Note: If more than 25% or DOW Propylene Glycol is added, the pressure loss in the system increases. An operating pressure of more than 150 kPa is required for sufficient flow. - Page 150 Internal cooling circuit...
-
Page 151: Technical Data
The rating for the drive with a 50 Hz supply are given below. The symbols are defined below the table. Drive type Nominal ratings No-overload Light-overload use Heavy-duty use cont.max contmax A (AC) = 400 V ACS800-17LC-0110-3 ACS800-17LC-0140-3 ACS800-17LC-0170-3 ACS800-17LC-0200-3 ACS800-17LC-0260-3 ACS800-17LC-0350-3 ACS800-17LC-0430-3 ACS800-17LC-0580-3 1037 ACS800-17LC-0870-3 1250... -
Page 152: Definitions
Drive type Nominal ratings No-overload Light-overload use Heavy-duty use cont.max contmax A (AC) = 690 V ACS800-17LC-0130-7 ACS800-17LC-0170-7 ACS800-17LC-0210-7 ACS800-17LC-0280-7 ACS800-17LC-0390-7 ACS800-17LC-0470-7 ACS800-17LC-0630-7 ACS800-17LC-0950-7 1344 ACS800-17LC-1240-7 1040 1710 1000 1000 ACS800-17LC-1840-7 1540 2538 1600 1478 1400 1152 1200 ACS800-17LC-2430-7 2035... -
Page 153: Altitude Derating
At altitudes from 1000 to 4000 m (3281 to 13123 ft) above sea level, the derating is 1% for every 100 m (328 ft). For a more accurate derating, use the DriveSize PC tool. If the installation site is higher than 2000 m (6600 ft) above sea level, please contact your local ABB distributor or office for further information. -
Page 154: 1-Phase Brake Choppers (Option +D150) And Resistors (Option +D151)
Drive type Frame sizes Supply modules Inverter modules (supply + Type Type inverter) ACS800-17LC-0950-7 2×R8i+2×R8i ACS800-104LC-0550-7+E205 ACS800-104LC-0550-7+E205 ACS800-17LC-1240-7 2×R8i+2×R8i ACS800-104LC-0700-7+E205 ACS800-104LC-0700-7+E205 ACS800-17LC-1840-7 3×R8i+3×R8i ACS800-104LC-0700-7+E205 ACS800-104LC-0700-7+E205 ACS800-17LC-2430-7 4×R8i+4×R8i ACS800-104LC-0700-7+E205 ACS800-104LC-0700-7+E205 ACS800-17LC-3620-7 6×R8i+6×R8i ACS800-104LC-0700-7+E205 ACS800-104LC-0700-7+E205 ACS800-17LC-4630-7 8×R8i+7×R8i ACS800-104LC-0700-7+E205 ACS800-104LC-0700-7+E205 ACS800-17LC-5300-7 9×R8i+8×R8i ACS800-104LC-0700-7+E205... - Page 155 Drive type Brake unit type Resistor Cubicle width * DC (rms) ACS800-17LC-0580-3 ACS800-607LC-0500-3 3×1.7 400/700 ACS800-17LC-0870-3 ACS800-17LC-1130-3 ACS800-17LC-1680-3 ACS800-17LC-2220-3 ACS800-17LC-3300-3 = 500 V ACS800-17LC-0120-5 ACS800-607LC-0310-5 3×4.3 400/700 ACS800-17LC-0170-5 ACS800-607LC-0310-5 3×4.3 400/700 ACS800-17LC-0210-5 ACS800-607LC-0310-5 3×4.3 400/700 ACS800-17LC-0250-5 ACS800-607LC-0310-5 3×4.3 400/700 ACS800-17LC-0310-5 ACS800-607LC-0310-5 3×4.3...
-
Page 156: Fuses
• The recommended fuses are for branch circuit protection per NEC as required for UL approval. Main circuit AC fuses Drive type Input AC fuse information (aR IEC and UL Recognized) current Bussmann Ferraz Shawmut = 400 V ACS800-17LC-0110-3 170M4409 ACS800-17LC-0140-3 170M4411 PC31UD69V350TF ACS800-17LC-0170-3 170M4411 PC31UD69V350TF ACS800-17LC-0200-3 170M4413... -
Page 157: Main Circuit Dc Fuses
Drive type Input AC fuse information (aR IEC and UL Recognized) current Bussmann Ferraz Shawmut ACS800-17LC-0950-7 170M7059 PC33UD69V1250TF ACS800-17LC-1240-7 170M7060 PC33UD69V1400TF ACS800-17LC-1840-7 1397 170M7062 PC44UD75V20CTQ ACS800-17LC-2430-7 1843 170M7060 PC33UD69V1400TF ACS800-17LC-3620-7 2736 170M7062 PC44UD75V20CTQ ACS800-17LC-4630-7 3648 170M7060 PC33UD69V1400TF ACS800-17LC-5300-7 4104 170M7062... -
Page 158: Dimensions, Weights And Free Space Requirements
Drive type Supply output (IEC and UL Recognized) Inverter input (IEC and UL Recognized) Bussmann Ferraz Shawmut Bussmann Ferraz Shawmut ACS800-17LC-0280-7 ACS800-17LC-0390-7 ACS800-17LC-0470-7 ACS800-17LC-0630-7 ACS800-17LC-0950-7 170M6546 PC73UD13C800TF 170M6546 PC73UD13C800TF ACS800-17LC-1240-7 170M6549 PC73UD10C11CTF 170M6549 PC73UD10C11CTF ACS800-17LC-1840-7 170M6549 PC73UD10C11CTF 170M6549 PC73UD10C11CTF ACS800-17LC-2430-7... -
Page 159: Losses, Cooling Data And Noise
Drive type Height Width Depth Weight ACS800-17LC-1350-5 2003 1900 1950 ACS800-17LC-2000-5 2003 3100 3000 ACS800-17LC-2640-5 2003 3200 3350 ACS800-17LC-3930-5 2003 5000 4950 = 690 V ACS800-17LC-0130-7 2003 1200 ACS800-17LC-0170-7 2003 1200 ACS800-17LC-0210-7 2003 1200 ACS800-17LC-0280-7 2003 1200 1100 ACS800-17LC-0390-7 2003... -
Page 160: Internal Cooling Circuit Data
Drive type Losses Cooling data Noise Coolant Massflow Pressure loss loss loss loss quantity (total) (coolant) (air) l/min ACS800-17LC-0210-5 10.3 ACS800-17LC-0250-5 10.3 ACS800-17LC-0310-5 12.7 12.4 10.3 ACS800-17LC-0410-5 14.8 14.5 10.3 ACS800-17LC-0520-5 17.2 16.9 10.3 ACS800-17LC-0690-5 21.9 21.4 11.1 ACS800-17LC-1030-5 32.9 32.2... -
Page 161: Terminal And Lead-Through Data For The Input Power Cable
Terminal and lead-through data for the input power cable The data is divided into subsections according to the number and size of the supply modules used. For the usage of modules in each drive type, see the section Type equivalence table on page 147. -
Page 162: Terminal And Lead-Through Data For The Motor Cable
Terminal and lead-through data for the motor cable Units without common motor terminal cubicle (no option +H359) When the drive is not equipped with common motor terminal cubicle, the motor cables enter the inverter module cubicle(s). Inverter unit Tightening Cable lead- No. -
Page 163: Units With The Common Motor Terminal (Cmt) Cubicle (Option +H359)
Units with the Common Motor Terminal (CMT) cubicle (option +H359) Inverter unit No. of Screw size Tightening torque Cable lead-throughs busbars Modules ACS800-17LC type R7i, R8i, 2×R8i M12 (½”) 70 N·m (52 lbf·ft) 9 × Ø60 mm (2.36“) or 12 × Ø60 mm (in 400 mm 3×R8i M12 (½”) 70 N·m (52 lbf·ft) -
Page 164: Electrical Power Network Specification
Electrical power network specification Voltage (U 380/400/415 V AC 3-phase ± 10% for 400 V AC units 380/400/415/440/460/480/500 V AC 3-phase ± 10% for 500 V AC units 525/550/575/600/660/690 V AC 3-phase ± 10% for 690 V AC units Short-circuit withstand Units without grounding switch: Maximum allowable prospective short-circuit current is strength (IEC 60439-1) 65 kA when protected by fuses given in the fuse tables. -
Page 165: Control Unit (Rdcu/Rmio) Connection Data
Control unit (RDCU/RMIO) connection data Analog inputs With Standard Control Program two programmable differential current inputs (0 mA / 4 mA ... 20 mA, R = 100 ohm) and one programmable differential voltage input (- 10 V / 0 V / 2 V ... +10 V, R = 200 kohm). -
Page 166: Relay Outputs
Maximum continuous current 2 A rms Insulation test voltage 4 kV AC, 1 minute DDCS fibre optic link With optional communication adapter module RDCO. Protocol: DDCS (ABB Distributed Drives Communication System) 24 V DC power input Voltage 24 V DC ± 10%... -
Page 167: Isolation And Grounding Diagram
Isolation and grounding diagram (Test voltage: 500 V AC) VREF- AGND VREF+ AGND AI1+ Common mode AI1- voltage between AI2+ channels ±15 V AI2- AI3+ AI3- AO1+ AO1- AO2+ AO2- Jumper J1 settings: DGND1 All digital inputs share a common ground. -
Page 168: Ambient Conditions
Efficiency > 97% (at rated current and nominal supply voltage) Degree of protection IP42 (UL Type 1), IP54, (UL Type 12) Ambient conditions Environmental limits for the drive are given below. The drive must be used in a heated, indoor controlled environment. Operation Storage Transportation... - Page 169 EU. They must be removed and handled according to local regulations. For further information on environmental aspects and more detailed recycling instructions, please contact your local ABB distributor. Technical data...
-
Page 170: Auxiliary Circuit Current Consumption
Auxiliary circuit current consumption The table below shows the current consumption of the main components in the auxiliary circuit. See also section Connecting external power supply for the auxiliary circuits on page for instructions. Drive/Load Current consumption (A) Externally supplied fan circuits Externally supplied Externally supplied fan and control circuits... -
Page 171: Applicable Standards
Applicable standards The drive complies with the following standards. • EN ISO 13849-1:2008 Safety of machinery – Safety-related parts of control systems – Part 1: General principles for design • EN 60204-1:2006 Safety of machinery. Electrical equipment of machines. Part 1: General requirements. •... -
Page 172: Ce Marking
CE marking A CE mark is attached to the drive to verify that the unit follows the provisions of the European Low Voltage, and EMC Directives. The CE marking also verifies that the drive, in regard to its safety functions (such as Safe torque off), conforms with the Machinery Directive as a safety component. -
Page 173: Category C2
Drive of category C4: drive of rated voltage equal to or above 1000 V, or rated current equal to or above 400 A, or intended for use in complex systems in the second environment. Category C2 The 400 and 500 V drives comply with the standard with the following provisions: 1. -
Page 174: Category C4
(victim) Equipment Equipment 2. An EMC plan for preventing disturbances is drawn up for the installation. A template is available from the local ABB representative. 3. The motor and control cables are selected as specified in chapter Planning the electrical installation. -
Page 175: Ul Marking
(normally associated with quickly decelerating a motor). UL standards – See Applicable standards on page 165. CSA marking The ACS800-17LC is CSA marked. Approvals The ACS800-17LC+C121 units are type approved by American Bureau of Shipping, Det Norske Veritas and Lloyd’s Register of Shipping. Technical data... -
Page 176: Cyber Security Disclaimer
ABB and its affiliates are not liable for damages and/or losses related to such security breaches, any unauthorized access, interference, intrusion, leakage and/or theft of data or information. -
Page 177: What This Chapter Contains
This chapter contains example dimension drawings and a table of dimensions. Table of dimensions Drive type Height 1 Height 2 Width 1 Width 2 Width 3 (basic) (+H353) (+H359) = 400 V ACS800-17LC-0110-3 2003 2315 1200 1500 ACS800-17LC-0140-3 2003 2315 1200 1500 ACS800-17LC-0170-3 2003... - Page 178 Drive type Height 1 Height 2 Width 1 Width 2 Width 3 (basic) (+H353) (+H359) ACS800-17LC-0390-7 2003 2315 1200 1500 ACS800-17LC-0470-7 2003 2315 1200 1500 ACS800-17LC-0630-7 2003 2315 1200 1500 ACS800-17LC-0950-7 2003 2315 1900 2200 ACS800-17LC-1240-7 2003 2315 1900 2200...
-
Page 179: Frame Sizes R7I+R7I And R8I+R8I (Bottom Entry/Exit)
Frame sizes R7i+R7i and R8i+R8i (bottom entry/exit) Dimensions... -
Page 180: Frame Sizes R7I+R7I And R8I+R8I (Marine Units, +C121)
Frame sizes R7i+R7i and R8i+R8i (marine units, +C121) Dimensions... -
Page 181: Product And Service Inquiries
Product and service inquiries Address any inquiries about the product to your local ABB representative, quoting the type designation and serial number of the unit in question. A listing of ABB sales, support and service contacts can be found by navigating to www.abb.com/searchchannels. - Page 182 Contact us www.abb.com/drives www.abb.com/drivespartners 3AUA0000065339 Rev B (EN) 2016-06-07...