Table of Contents
Advertisement
Available languages
Available languages
www.homscales.com
TM
PRO PLUS
ELECTRONIC SCALES
MODELS 1100KL, 2650KL, & 2700KL
1
1
0
0
K
L
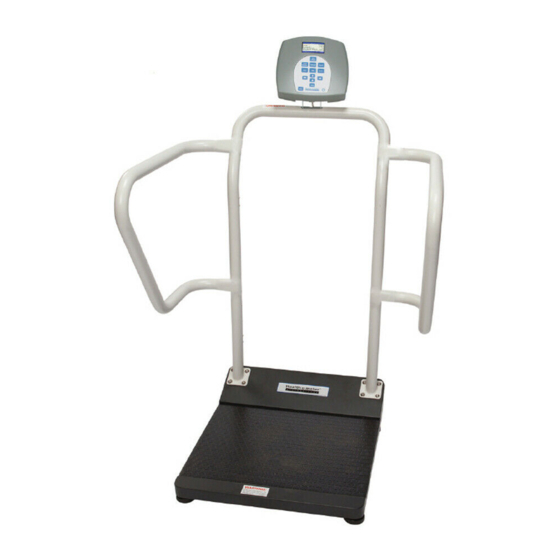
HANDRAIL SCALE
2
7
0
0
K
L
2
6
5
0
K
L
WHEELCHAIR SCALE
FOLDING WHEELCHAIR SCALE
PLEASE REGISTER YOUR PRODUCT FOR WARRANTY AT
WWW.HOMSCALES.COM
Patents: US: D508655, D523367, Europe:0149984/1-8, China: 200430004551.2
Pelstar LLC 2009
Advertisement
Chapters
Table of Contents

Related Manuals for Health O Meter PRO PLUS 1100KL


Summary of Contents for Health O Meter PRO PLUS 1100KL
- Page 1 www.homscales.com PRO PLUS ELECTRONIC SCALES MODELS 1100KL, 2650KL, & 2700KL HANDRAIL SCALE WHEELCHAIR SCALE FOLDING WHEELCHAIR SCALE PLEASE REGISTER YOUR PRODUCT FOR WARRANTY AT WWW.HOMSCALES.COM Patents: US: D508655, D523367, Europe:0149984/1-8, China: 200430004551.2 Pelstar LLC 2009...
-
Page 2: Table Of Contents
OPERATION MANUAL www.homscales.com PROPLUS ELECTRONIC SCALES MODELS 1100KL, 2650KL AND 2700KL Thank you for your purchase of this product. Please read this manual carefully and keep it handy for ready reference. ENGLISH......................1 FRANÇAIS ......................38 ESPAÑOL ......................77 TABLE OF CONTENTS ASSEMBLY INSTRUCTION ....................2 CAUTION AND WARNING ....................7 SPECIFICATIONS .........................7... -
Page 3: Assembly Instruction
ASSEMBLY INSTRUCTIONS 1100KL) Parts List: (1) Platform Assembly (1) Handle (1) Display Assembly (4) Ramp Holder (4) Rubber Feet Assemblies (1) Display Support (1) AC Adapter (4) Screws (1) LC Cable Connector (1) Power Cord (2) Wheels Tools required: Phillips head screwdriver (not included), Allen wrenches (included). Remove each piece from the carton and unwrap packing material carefully to prevent scratching the unit’s parts. - Page 4 1100KL Assembly Instructions 1. Remove the base of the scale from the box and screw in the 4 Feet into the underside of the Platform. 2. Place the Platform on the floor and adjust the feet to level Platform. (DO NOT OVERTIGHTEN).
- Page 5 ASSEMBLY INSTRUCTIONS(2650KL & 2700KL) Parts List: (1) Platform Assembly (plus 2 ramps) (1) Handle e i l (2) Wheels Tools required: Phillips head screwdriver (not included). Remove each piece from the carton and unwrap packing material carefully to prevent scratching the unit’s parts.
- Page 6 ASSEMBLY INSTRUCTIONS (2650KL & 2700KL) Figure 2 Re er ge 25 r e i Insert the power cord into the retaining slot. Align the rear cover tabs with the slots on the rear of the display assembly. Secure with 4 screws. ently tip the scale.
- Page 7 ASSEMBLY INSTRUCTIONS (2650KL & 2700KL) Figure Folding the Ra p Both ramps (left and right) can fold onto the platform. The indicator is mounted onto one of the folded ramps by sliding the slots in the back of the indicator into raised pins.. Lift the scale platform onto its side using the handle, and it is now able to be transported on two wheels see Figure 4.
-
Page 8: Caution And Warning
SPECIFICATIONS GENERAL Electronic Scales Models 1100KL, 2650KL and 2 00KL use highly Health o meter’s Pro Plus sophisticated microprocessor technology. Each precision instrument is designed to provide accurate, reliable and repeatable weight measurements and features that make the weighing process simple, fast and convenient. -
Page 9: Set Up
Plug the scale’s AC adapter into the power source. Make sure there is no ob ect on the weighing platform Press the ON OFF button to turn the scale on. The display will show Health o Meter Pro Plus and then 000 Place a weight not to e ceed the capacity on the scale. -
Page 10: Operation Instructions
WEIGHING A PATIENT Make sure there is no ob ect on the weighing platform Press the ON OFF button to turn the scale on. Health o Meter Pro Plus Wait until 000 ERO on the left side of the display appear. - Page 11 OPERATION INSTRUCTIONS MANUAL TARE 1. Make sure there is no object on the weighing platform. 2. Press the ON/OFF button to turn the scale on. 3. Wait until ”000LB00oz” and “ZERO” on the left side of the display appear. 4. Press the TARE button (9). The user will be prompted to enter the TARE value. 5.
- Page 12 OPERATION INSTRUCTIONS ITEM DESCRIPTION FUNCTION POWER Turns scale ON and OFF. ZERO Zeros the scale prior to weighing. Holds the value of the weighed object on the display until HOLD/RELEASE the button is pressed again to clear the value. Also used to scroll down in the menu.
- Page 13 OPERATION INSTRUCTIONS NOTE: The default mode of the scale is set so the menu option is locked out. If the menu button is pushed before activating the menu option, “MenuLock” will show on the display. To temporarily reactivate the use of the MENU key, press and hold the MENU key for 5 seconds. During the menu access delay, the menu will display “MenuLock”.
- Page 14 OPERATION INSTRUCTIONS 02 TARE WEIGHT Before making changes to this scale setting, please refer to page 12 “Menu” to temporarily activate the Menu key. NOTE: Due to the scale’s sensitivity, we recommend using the REWEIGH function prior to setting the TARE weight, in order to eliminate any operator interference with the item to be tared out.
- Page 15 OPERATION INSTRUCTIONS DATA MANAGEMENT Before making changes to this scale setting, please refer to page 12 “Menu” to temporarily activate the Menu key. The scale manages patient data including patient ID, weight, height, tare and BMI. The value is stored in memory or transferred to PC. This function is performed by opening a new data file. OPENING A NEW DATA FILE: 1.
- Page 16 OPERATION INSTRUCTIONS Store in memory The value is stored in memory for later download to PC. If the memory is close to full the user will be warned and given the option to transfer all values to the PC to chan e Enter or to clear the memory of all values.
- Page 17 OPERATION INSTRUCTIONS SCALE SETTINGS Before making changes to this scale setting, please refer to page 12 “Menu” to temporarily activate the Menu key. Auto Hold Time The user can determine how long to display the weight reading once it is determined, regardless of whether the patient remains on the platform.
- Page 18 OPERATION INSTRUCTIONS Tone Volume There is an option to adjust the beeping tone of the scale. This tone should sound when the scale has determined the weight on the platform, when a key is pressed, after the scale is turned on, at the end of self-test, or in the case of fault or warning.
- Page 19 OPERATION INSTRUCTIONS Live Weight By selecting “Yes” the user can set the Live Weight mode to deactivate the motion-sensing mode. In the Live Weight mode the weight displayed will fluctuate with the patient’s movement; the scale will not lock on to the weight as is the case in the motion-sensing mode.
- Page 20 OPERATION INSTRUCTIONS About This screen displays the software version of the scale. Display 24 Hour There are two options display the time: 12 hour (AM/PM) or 24 hour. SYSTEM TEST Before making changes to this scale setting, please refer to page 6 “Menu” to temporarily activate the Menu key.
- Page 21 OPERATION INSTRUCTIONS USB Connection The scale will test the connection to the PC and will display a message “Connection is OK” or ”NO Connection”. If “NO Connection” is displayed, check your USB connections on the scale and on your PC and retest the connection. Refer to qualified service personnel if problem persists.
- Page 22 OPERATION INSTRUCTIONS Retain Entered Values This option allows the user to use the same values for ID, height and TARE between weighing. If this option is disabled, the user has to re-enter these values for each reading. If the values are not entered, only the weight is stored. NOTE: These values cannot be retained by ID number.
-
Page 23: Maintenance
MAINTENANCE GENERAL This section provides instructions for maintenance, cleaning, troubleshooting and operator replaceable parts for Pro Plus Electronic Scales Models 1100KL, 2650KL and 2700KL. Maintenance operations other than those described in this section should be performed by qualified service personnel. MAINTENANCE Before first use and after periods of non-use, check the scale for proper operation and function. -
Page 24: Troubleshooting
TROUBLESHOOTING Refer to the following instructions to check and correct any failure before contacting service personnel. SYMPTOM POSSIBLE CAUSE CORRECTIVE ACTION Scale does not turn on Dead Battery Replace batteries Faulty electrical outlet Use a different outlet Bad power supply Replace adapter Questionable weight or External object interfering... -
Page 25: Calibration Path
Factor OK! or Factor Fail! 8. If successful the process will clear the weight. Rebooting… Please wait 9. The scale will reboot after wait for about 1-2 Health o Meter seconds. Pro-Plus 10. Please wait until the scale resumes normal Health o Meter operation. -
Page 26: Exploded View Of Display Module
EXPLODED DIAGRAMS The 1100KL, 2650KL and 2700KL ProPlusTM scales all share the same display module. Please refer to page 20 for display module parts for these scales. Exploded diagrams and parts lists are included for the remainder of the scale parts on the pages following the display module parts list. -
Page 27: 1100Kl Exploded View
MODEL 1100KL EXPLODED VIEW OF SCALE... -
Page 28: 1100Kl Parts List
MO EL 1100 L PARTS LIST Key no. Part no. Description Qty. Remark B1109401-0 DISPLAY ASSEMBLY B2266901 PIPE NUT, 3/4" B2266901 PLASTIC WASHER, B2266901 WAVE SPRING WASHER, B2266901 SELF- LOCK NUT,M6 B2266901 PLASTIC WASHER, B2266901 WAVE SPRING WASHER, B2266901 BOLT, M6X20 B2266901 SWIVEL PLATE 1# B2266901... -
Page 29: 2650Kl Exploded View
MODEL 2650KL EXPLODED VIEW OF SCALE... -
Page 30: 2650Kl Parts List
MO EL 2650 L PARTS LIST Key No. Part No. Description Qty. remark B1109401-0 DISPLAY ASSEMBLY HEAD CLIP 1# 1.5mmT SPCC B2266901 SCREW,M4X10 HEAD CLIP 2# 1.5mmT SPCC SELF-LOCK NUT,M3 PLASTIC WASHER, 3 SCREW,M3X10 B3245801-0 INPUT/OUTPUT POSTS LABEL ANTI-SLIP BLOCK WIRE B3827401-0 RAMP 1#... -
Page 31: 2700Kl Exploded View
MODEL 2700KL EXPLODED VIEW OF SCALE View of Scale in Folded Position... -
Page 32: 2700Kl Parts List
MO EL 2700 L PARTS LIST Key No. Part No. Description Qty. remark B1109401-0 DISPLAY ASSEMBLY HEAD CLIP 1# 1.5mmT SPCC B2266901 SCREW M4X10 HEAD CLIP 2# 1.5mmT SPCC SELF-LOCK NUT,M3 PLASTIC WASHER, 3 SCREW,M3X10 B3245801-0 INPUT/OUTPUT POSTS LABEL ANTI-SLIP BLOCK WIRE RAMP 1# FOOT MAT... -
Page 33: Communication Protocol
PC Communication Protocol This scale uses an escape protocol for communicating with a PC and over the USB and serial port 2 serial port 1 : connecting to the printer . In an Escape protocol, the escape (<esc> or ASCII 27) is used to indicate that there is a command, and not data, following. - Page 34 ESC value character with Description Name parameters Response This will be the scales response to the request mentioned above Pccc=ccc cccc Diagnostics(1) Accc This is the request for a diagnostic test on certain parts of the scale (such as battery life, loadcells, keypad, LCD etc.). (See Table B) Diagnostics(2) This will be the response of the diagnostics done on the scale.
- Page 35 The different tables on the scale: There will be two data tables on the scale. The first will store the sub ect record data (patient related data that does not change) and the second will store the data recorded during the readings made. Sub ect record data Fields: ID, TARE, HEI HT Readings...
- Page 36 Direction of communication SCALE ESC R ESC I1234 ESC W200.1 ESC H 0. ESC B2 ESC T0.0 ESC Nm ESC R ESC I123 ESC E Reading (First patient’s data) Patient ID 1234 Weight 200.1 (Pounds) Height 0. (inches) TARE 0.0 (Pounds) Unit of measure Constitutional Reading (second patient’s data)
- Page 37 Printer Parameters Direction of communication <SCALE> <PRINTER> Pinter model: CT-S280 Working voltage: DC8.5V-2.5A This scale is featured with printing function by connecting the printer XXXXX: 1. Connect the printer cable to the PORT 1 of the scale 2. Turn on the printer power 3.
-
Page 38: Warranty
Health o meter ProPlus products are manufactured, designed and owned by Pelstar LLC. Health o meter® is a registered trademark of Sunbeam Products Inc., Boca Raton, FL 33431. Pelstar LLC 2009 ProPlus® is a registered trademark of Pelstar LLC Patents: US: D508655, D523367, Europe: 0149984/1-8, China: 200430004551.2... - Page 39 ho s ales o BALANCES ELECTRONI UES PRO PLUS MO ELES BALANCE A MAINS COURANTEST BALANCE CHAISE ROULANTE BALANCE CHAISE ROULANTE PLIABLE EUILLE ENREGISTRER OTRE PRO UIT POUR BENEFICIER E LA GARANTIE A L A RESSE WWW OMSCALES COM Nr de re et: US: Europe: China: 2 Pelstar LLC 2009...
- Page 40 GUIDE D’UTILISATION www.homscales.com BALANCES ELECTRONIQUES PRO PLUS MODELES 1100KL, 2650KL ET 2700KL TABLE DES MATIERES INSTRUCCIONES DE MONTAJE .................. 40 PRECAUTIONS ET PREVENTION ................45 SPECIFICATIONS......................45 INSTALLATION ........................46 MODE DE FONCTIONNEMENT..................47 MAINTENANCE .......................61 LOCALISATION DES PANNES ..................62 MODE DE CALIBRAGE ....................63 SCHEMA DU BLOC D'AFFICHAGE EN PIECES DETACHEES ........64 LISTE DES PIECES DU BLOC D'AFFICHAGE...............64 1100 KL SCHEMA DE LA BALANCE EN PIECES DETACHEES ........65...
-
Page 41: Instrucciones De Montaje
INSTRUCTIONS E MONTAGE 1100KL) Liste des pi ces: (1) Plate forme principale (1) Poign e (1) Bloc d’affichage (4) Support de rampes (4) Pieds en caoutchouc (1) Support de l’affichage (1) Adaptateur secteur (4) Vis (1) C ble de conne ion du CP (1) Cordon secteur (2) Roues Outils n cessaires : tournevis... - Page 42 Instructions de montage de 1100 KL Retirer la plate-forme de base de l’emballage, puis visser les 4 pieds la partie inférieure de la plate-forme. Placer la plate-forme sur le sol et régler les pieds pour niveler la plate- forme. (NE PAS SERRER TROP FORT). Localiser le câble de la cellule de charge, puis tirer-le par le bas de la barre d’appui centrale.
- Page 43 INSTRUCTIONS E MONTAGE 2 Liste des pi ces : (1) Ensemble plateforme (avec 2 rampes d acc s) (1) Poign e (1) Bloc d affichage (4) Support de rampes (4) Pieds en caoutchouc (1) Support de l affichage (1) Adaptateur secteur (4) Vis (1) Conne ion du capteur de poids (1) Cordon secteur...
- Page 44 INSTRUCTIONS E MONTAGE 2 ADAPTATEUR SECTEUR BLOC D’AFFICHA E CABLE DE LA CELLULE DE CHAR E CORDON SECTEUR COUVERCLE DES PILES Figure 2 (cf. la liste des pi ces en page 4 , pour plus de d tails sur les pi ces) Ins re le c ble lectrique dans la fente de fi ation.
- Page 45 INSTRUCTIONS E MONTAGE 2 Figure Pliage de la ra pe d a Les 2 rampes d acc s (gauche droite) peuvent tre repli es sur la plateforme. L’indicateur peut tre fi sur l une des rampes repli es en coulissant les languettes situ es l’arri re de l’indicateur dans les ergots relev s.
-
Page 46: Precautions Et Prevention
PRECAUTION ET PREVENTION Pour prévenir toute blessure ou tout dégât accidentels, veuillez vous conformer scrupuleusement aux instructions suivantes: Ne déplacez pas la balance électronique lorsque son plateau est chargé. Pour obtenir une lecture du poids exacte, placez la balance électronique sur une surface plane et stable. -
Page 47: Installation
Assure vous qu’il n’y a aucun ob et sur la plateforme peser. Appuye sur la touche de Marche Arr t (ON OFF) pour allumer l appareil. L cran affiche le Health o Meter Pro Plus suivi de 000Lb00o .(a) Place un poids ne d passant pas la capacit sur la balance. -
Page 48: Mode De Fonctionnement
A Assurez-vous qu’il n’y a aucun objet sur la plateforme à peser. Appuyez sur l'interrupteur de Marche/ Arrêt (ON/OFF) pour allumer l'appareil. Health o Meter Pro-Plus Attendez que les mentions « 000Lb00oz » et « ZERO » apparaissent sur le côté... - Page 49 MODE DE FONCTIONNEMENT MESURE MANUELLE DE TARE 1. Assurez-vous qu’il n’y ait aucun objet sur la plateforme de pesage. 2. Appuyez sur le bouton ON/OFF pour mettre la balance en marche. 3. Attendez que ”000LB00oz” et “ZERO” sur le côté gauche de l’affichage apparaisse. 4.
- Page 50 MODE DE FONCTIONNEMENT TOUCHE DESCRIPTION FONCTION POWER Allume (ON) et éteint (OFF) l’apareil. ZERO Met la balance à zéro avant la pesée. Permet de maintenir le poids de l'objet pesé affiché à l'écran. Pour effacer cette valeur, appuyez à nouveau sur HOLD/RELEASE cette touche.
- Page 51 MODE DE FONCTIONNEMENT REMAR UE : Le mode par d faut de la balance est r gl de mani re ce que le menu des options soit verrouill . Si le bouton du menu est press avant l’activation du menu des options, MenuLock s affiche sur l cran.
- Page 52 MODE DE FONCTIONNEMENT POIDS DE LA TARE Avant de modifier les réglages de cette balance, veuillez vous référer au «Menu » de la page 50 afin d’activer temporairement la touche Menu. REMARQUE: Etant donné le degré de sensibilité de la balance, nous recommandons d'utiliser fonction de repesée (REWEIGH) avant de régler le poids de la TARE, afin toute interférence éventuelle de l'opérateur avec l'objet à...
- Page 53 MODE DE FONCTIONNEMENT Effacement de la Tare Une pression supplémentaire sur la touche TARE effacera la valeur de la tare qui se trouve actuellement en mémoire, la mention TARE disparaîtra de l'écran et la balance reprendra son fonctionnement normal. 03 GESTION DES DONNEES Avant de modifier les réglages de cette balance, veuillez vous référer au «Menu »...
- Page 54 MODE DE FONCTIONNEMENT Téléchargement automatique Le téléchargement automatique est l'option par défaut, il transfère la valeur au PC dès que le patient descend de la balance ou quand l'utilisateur appuie sur la touche HOLD/RELEASE (Maintien/ Libération) si celle-ci était en position «...
- Page 55 MODE DE FONCTIONNEMENT REGLAGES DE LA BALANCE Avant de modifier les réglages de cette balance, veuillez vous référer au «Menu » de la page 50 afin d’activer temporairement la touche Menu. Temps de Maintien Automatique L'utilisateur peut déterminer la durée d'affichage du poids une fois que celui-ci est défini, et ce, que le patient reste ou non sur la plateforme.
- Page 56 MODE DE FONCTIONNEMENT Volume du son Il existe une option permettant de régler le bip de la balance. Ce son se déclenche quand la balance a déterminé le poids se trouvant sur la plateforme, quand une touche est appuyée, lors de l'allumage de l'appareil, à...
- Page 57 MODE DE FONCTIONNEMENT Poids Vif En appuyant sur « Yes » (Oui), l'utilisateur sélectionne le mode Poids Vif et désactive le mode de lecture du poids par sensibilité au mouvement. En mode Poids Vif, le poids affiché variera avec les mouvements du patient; la balance n'appliquera pas le blocage rapide pour fixer la lecture du poids comme elle le fait en mode sensible au mouvement.
- Page 58 MODE DE FONCTIONNEMENT Réglez la date en utilisant les touches fléchées tapez les valeurs sur le clavier. Version Cet écran affiche la version du logiciel installé sur la balance. Affichage 24 heures Il existe deux options d’affichage horaire : 12 heures (AM/PM) ou 24 heures.
- Page 59 MODE DE FONCTIONNEMENT Test des Piles La balance affiche la durée de vie estimée restante avant que les piles actuelles n'aient besoin d'être remplacées. REMARQUE : pour tester les piles, la balance ne doit être alimentée que sur piles. Débranchez le cordon secteur avant d'effectuer ce test.
- Page 60 MODE DE FONCTIONNEMENT REGLAGES UTILISATEUR Avant de modifier les réglages de cette balance, veuillez vous référer au «Menu » de la page 50 afin d’activer temporairement la touche Menu. Conservation des Valeurs introduites Cette option permet à l'utilisateur de retrouver les mêmes valeurs ID, hauteur et TARE d'une pesée à...
- Page 61 MODE DE FONCTIONNEMENT Message guide pour la taille Quand cette option est activée, un message guide demandera à l'utilisateur d'introduire la hauteur du patient après chaque pesée. L’opérateur dispose de 30 secondes pour entrer la taille. Message guide pour le numéro d'identification (ID) Quand cette option est activée, un message guide demandera à...
-
Page 62: Maintenance
MAINTENANCE GENERALITES Ce chapitre fournit les instructions pour la maintenance, le nettoyage, la localisation des pannes et indique les pièces remplaçables par l'opérateur, pour les balances électroniques Pro PlusTM. Toutes opérations de maintenance autres que celles décrites dans ce chapitre doivent être exécutées par un technicien qualifié. MAINTENANCE Avant la première utilisation et après de longues périodes d'inutilisation, vérifiez le bon état de marche de la bascule balance balance. -
Page 63: Localisation Des Pannes
LOCALISATION DES PANNES Reportez-vous aux instructions suivantes pour vérifier et rectifier une panne avant de contacter un technicien qualifié. SYMPTOME CAUSE POSSIBLE ACTION CORRECTIVE La balance ne s'allume pas. Les piles sont mortes Remplacez les piles. Prise électrique défectueuse Utilisez une autre prise. Mauvaise alimentation Remplacez l'adaptateur Le poids affiché... -
Page 64: Mode De Calibrage
8. Si le processus de calibrage réussit, le poids Rebooting…(Réinitialisation) sera effacé. Please wait (Veuillez patienter) 9. La balance se réinitialisera après environ 1-2 Health o Meter (Compteur santé) secondes. Pro-Plus (Compteur Pro-Plus) 10. Veuillez patienter pendant que la balance Health o Meter (Compteur santé) retourne à... -
Page 65: Schema Du Bloc D'affichage En Pieces Detachees
SCHEMAS EN PIECES DETACHEES Les balances 1100KL, 2650KLet 2700KL ProPlusTM partagent toutes le même module d’affichage. Veuillez vous référer à cette page pour les pièces des blocs d’affichage de ces balances. Des schémas en pièces détachées et les listes des pièces sont inclus pour le reste des pièces des balances, dans les pages faisant suite à... -
Page 66: 1100 Kl Schema De La Balance En Pieces Detachees
MODELE 1100KL SCHEMA DE LA BALANCE EN PIECES DETACHEES... -
Page 67: 1100 Kl Liste Des Pieces
MODELE 1100KL LISTE DES PIECES Clé n° Pièce n° Description Qté Remarque B1109401-0 ÉCRAN B2266901 ÉCROU DE TUYAU, 3/4 po. B2266901 RONDELLE EN PLASTIQUE, B2266901 RONDELLE-FREIN ONDULÉE, B2266901 ÉCROU À VERROUILLAGE AUTOMATIQUE,M6 B2266901 RONDELLE EN PLASTIQUE, B2266901 RONDELLE-FREIN ONDULÉE, B2266901 BOULON, M6X20 B2266901 PLAQUE PIVOTANTE N°... -
Page 68: 2650 Kl - Schema De La Balance En Pieces Detachees
MODELE 2650KL SCHEMA DE LA BALANCE EN PIECES DETACHEES... -
Page 69: 2650 Kl - Liste Des Pieces
MODELE 2650KL LISTE DES PIECES Clé n° Pièce n° Description Qté B1109401-0 ÉCRAN ATTACHE DE TÊTE N° 1 1,5 mmT SPCC B2266901 VIS, M4X10 ATTACHE DE TÊTE N° 2 1,5 mmT SPCC ÉCROU À VERROUILLAGE AUTOMATIQUE,M3 RONDELLE EN PLASTIQUE, VIS, M3X10 B3245801-0 ÉTIQUETTE DES MONTANTS D'ENTRÉE/DE SORTIE BLOC ANTIDÉRAPANT... -
Page 70: 2700Kl - Schema De La Balance En Pieces Detachees
MODELE 2700KL SCHEMA DE LA BALANCE EN PIECES DETACHEES... -
Page 71: 2700Kl - Liste Des Pieces
MODELE 2700KL LISTE DES PIECES Clé n° Pièce n° Description Qté B1109401-0 ÉCRAN ATTACHE DE TÊTE N° 1 1,5 mmT SPCC B2266901 VIS, M4X10 ATTACHE DE TÊTE N° 2 1,5 mmT SPCC ÉCROU À VERROUILLAGE AUTOMATIQUE,M3 RONDELLE EN PLASTIQUE, VIS, M3X10 B3245801-0 ÉTIQUETTE DES MONTANTS D'ENTRÉE/DE SORTIE BLOC ANTIDÉRAPANT... -
Page 72: Protocole De Communication Pc
Protocole de communication Cette balance utilise un protocole de sortie pour communiquer avec un PC via un câble USB et le port série 2 (le port série 1 est utilisé pour le raccord à une imprimante). Dans un protocole de sortie, la touche Echap (<esc>... - Page 73 Caractère Valeur ESC avec Description des paramètres Réponse Ceci est la réponse de la balance à la demande mentionnée Pccc=cccccc ci- dessus Diagnostics(1) Accc I lI s’agit de la demande pour un test de diagnostique sur certaines parties de la balance (telles que la durée de vie de la batterie, les capteurs de poids, le clavier, l'écran LCD, etc.) (Voir Tableau B) Diagnostics(2)
- Page 74 Tableau A liste des valeurs globales de la balance et identifiants Nom des composants Code d’erreur identificant tester Capteur de poids A Capteur de poids B Capteur de poids C Capteur de poids D Batterie E4L (Batterie faible (L Low), mais encore utilisable) ou E4U (Batterie faible (L Low) et E4U (Batterie faible (L Low) et instable...
- Page 75 Sens de communication BALANCE ESC R ESC I1234 ESC W200.1 ESC H 0. ESC B2 ESC T0.0 ESC Nm ESC R ESC I123 ESC E Lecture (Donn es du premier patient) ID Patient 1234 Poids 200.1 (livres) Taille 0. (pouces) TARE 0.0 (livres) Unitmeasure de mesure...
- Page 76 Paramètres de l’imprimante Sens de communication <BALANCE > <IMPRIMANTE > Modèle d’imprimante : CT-S280 Tension de fonctionnement : 8.5 V c.c. - 2,5 A Cette balance vous offre une possibilité d'impression en connectant l'imprimante XXXXX: Branchez le câble de l’imprimante au PORT 1 de la balance. Allumez l’imprimante.
- Page 77 Les produits Health o meter sont fabriqués, conçus et la propriété de Pelstar LLC. Health o meter® est une marque déposée de Sunbeam Products Inc., Boca Raton, FL 33431 Pelstar LLC 2009 ProPlus® est une marque déposée de of Pelstar LLC Brevet : US: D508655, D523367, Europe: 0149987/1-8, Chine: 200430004551.2...
-
Page 78: Garantía
ho s ales o BALANZAS ELECTRÓNICAS PRO PLUS MODELOS 1100KL, 2650KL Y 2700KL BALANZA PARA SILLA DE RUEDAS BALANZA PARA SILLA DE RUEDAS PLEGABLE REGISTRE SU PRODUCTO PARA OBTENER LA CORRESPONDIENTE GARANTÍA EN WWW.HOMSCALES.COM º Patente N : US: D508655, D523367, Europa: 0149984/1-8, China: 200430004551.2 Pelstar LLC 2009... - Page 79 MANUAL DE OPERACIÓN www.homscales.com BALANZAS ELECTRONICAS PROPLUS MODELOS 1100KL, 2650KL, Y 2700KL ÍNDICE INSTRUCCIONES DE MONTAJE ...................79 PRECAUCIÓN Y ADVERTENCIA ...................84 ESPECIFICACIONES ......................84 CONFIGURACIÓN ......................85 INSTRUCCIONES DE OPERACIÓN ................86 MANTENIMIENTO ......................99 SOLUCIÓN DE PROBLEMAS ..................100 TRAYECTORIA DE CALIBRACIÓN ................101 VISTA DETALLADA DE LA UNIDAD DE PANTALLA .............102 LISTA DE PIEZAS DE LA UNIDAD DE PANTALLA............102 1100KL - VISTA DETALLADA DE LA BALANZA ............103 1100KL - LISTA DE PIEZAS ....................104...
- Page 80 INSTRUCCIONES E MONTA E Lista de PIE AS (1) Con unto principal (1) Mango (1) Unidad de pantalla (4) Soporte de rampa (4) Con unto de patas de caucho (1) Soporte de la pantalla (1) Adaptador de CA (4) Tornillos (1) Conector de cable LC (1) Cable de alimentaci n (2) Ruedas...
-
Page 81: Instrucciones De Montaje
Instrucciones de montaje de 1100KL Retirar la base de la escalera desde la caja y atornillar los cuatro pies de la parte inferior de la plataforma. Colocar la plataforma sobre el suelo y ajustar las patas para nivelas la plataforma. (NO APRETAR DEMASIADO). - Page 82 INSTRUCCIONES E MONTA E 2 Lista de Pie as : (1) Unidad de la Plataforma (incluye 2 Rampas) (1) Mani a (1) Unidad de la pantalla (4) Soporte de la rampa (4) Unidades de Pies de (1) Soporte para pantalla (1) Adaptador CA (4) Tornillos (1) Conector del Cable LC...
- Page 83 INSTRUCCIONES E MONTA E 2 ADAPTADOR CA UNIDAD DEL DISPLAY CABEL DEL LA CELULA DE CAR A CABLE DE ENER IA TAPA DE LA BATER A TORNILLOS Figura 2 (refi rase a la Lista de Pie as en la p gina 102 para detalles) Inserte el cable de alimentaci n en la ranura de retenci n.
- Page 84 INSTRUCCIONES E MONTA E 2 Figura o plegar la ra pa E iste la posibilidad de plegar las 2 rampas sobre la plataforma. El indicador se monta en una de las rampas plegadas desli ando las ranuras de la parte posterior del indicador en los pasadores elevados.
-
Page 85: Precaución Y Advertencia
PRECAUCIÓN Y ADVERTENCIA Para evitar lesiones y daños a su balanza, por favor siga estas instrucciones con mucho cuidado. No traslade la balanza mientras la plataforma esté cargada. Para un pesaje exacto, la balanza debe ser colocada en una superficie plana, estable. Para un pesaje exacto, verifique antes de cada uso el funcionamiento correcto según los procedimientos descritos en este manual. -
Page 86: Configuración
Enchufe el adaptador CA de la balanza en la fuente de energía. Asegúrese de que no haya ningún objeto sobre la plataforma de peso. Presione la tecla ON/OFF para activar la balanza. La pantalla muestra “Health o Meter Pro Plus” y después ”000Lb00oz”. -
Page 87: Instrucciones De Operación
L A PONDERACIÓN DE UN PACIENTE Asegúrese de que no haya ningún objeto sobre la plataforma de peso. Presione la tecla ON/OFF para activar la balanza. Health o Meter Pro-Plus Espere que aparezca ”000Lb00oz” y “ZERO” en el lado izquierdo de la pantalla. - Page 88 INSTRUCCIONES DE OPERACIÓN INTRODUCCIÓN DE LA TARA MANUALMENTE 1. Asegúrese de que no hay ningún objeto sobre la plataforma para pesar. 2. Pulse el botón de encendido/apagado "ON/OFF" para encender la báscula. 3. Espere hasta que aparezca "000LB00oz" y "ZERO" en el lado izquierdo de la pantalla. 4.
- Page 89 INSTRUCCIONES DE OPERACIÓN ITEM DESCRIPCIÓN FUNCIÓN POWER Conecta (ON) y desconecta (OFF) la balanza. ZERO Pone en cero la balanza antes del pesaje. Mantiene el valor del objeto pesado en la pantalla hasta HOLD/RELEASE que se presione el botón otra vez para borrar el valor. También usado para moverse hacia abajo en el menú.
- Page 90 INSTRUCCIONES DE OPERACIÓN COMENTARIO: El modo predeterminado de la balan a se a usta de manera tal que la opci n de men quede bloqueada. Si se pulsa el bot n Men antes de activar la opci n de men , Bloqueodemen aparecer en pantalla.
- Page 91 INSTRUCCIONES DE OPERACIÓN PESO TARA Antes de efectuar cambios a esta configuración de la balanza, consulte la página 89, "Menú" para activar temporalmente la tecla “Menú”. NOTA: Debido a la sensibilidad de la balanza, recomendamos usar la función REWEIGH (VOLVER A PESAR) antes de establecer el peso TARA, a fin de eliminar cualquier interferencia del operador en el elemento cuyo peso tara se establecerá.
- Page 92 INSTRUCCIONES DE OPERACIÓN ADMINISTRACIÓN DE DATOS Antes de efectuar cambios a esta configuración de la balanza, consulte la página 89, "Menú" para activar temporalmente la tecla “Menú”. La balanza administra los datos del paciente, como ID, peso, altura, tara y BMI (índice de masa corporal).
- Page 93 INSTRUCCIONES DE OPERACIÓN Almacenar en la memoria El valor se almacena en memoria para ser más tarde descargado al PC. Si la memoria se está por llenar, el usuario será informado y tendrá la opción de transferir todos los valores to chan e Enter al PC o eliminar todos los...
- Page 94 INSTRUCCIONES DE OPERACIÓN Tiempo de Espera Automático El usuario puede determinar cuanto tiempo durará la pantalla del peso una vez determinado, sin importar si el paciente permanece en la plataforma o no. El valor predeterminado de la balanza es sin Tiempo de Espera Automático.
- Page 95 INSTRUCCIONES DE OPERACIÓN 05 Exhibir Fecha y Hora Esta opción activa o desactiva la pantalla de la fecha y hora. Luz de Fondo de la pantalla El usuario puede establecer el brillo de la luz de fondo. Contraste del Display El usuario puede ajustar el contraste de la pantalla LCD.
- Page 96 INSTRUCCIONES DE OPERACIÓN CONFIGURACIONES DEL SISTEMA Antes de efectuar cambios a esta configuración de la balanza, consulte la página 89, "Menú" para activar temporalmente la tecla “Menú”. Fijar Hora y Fecha El usuario puede fijar la hora y la fecha usando el teclado. Para ajustar la hora, desplácese por las horas, los minutos y los segundos utilizando las teclas arriba y abajo...
- Page 97 INSTRUCCIONES DE OPERACIÓN 03 Visualización de 24 horas Existen dos opciones de visualización de hora: 12 horas (AM/PM) y 24 horas. PRUEBA DEL SISTEMA Antes de efectuar cambios a esta configuración de la balanza, consulte la página 89, "Menú" para activar temporalmente la tecla “Menú”. Prueba de la Batería La balanza presenta la vida de servicio restante estimada de las baterías hasta que haya que reemplazadas.
- Page 98 INSTRUCCIONES DE OPERACIÓN Conexión USB La balanza prueba la conexión al PC y presenta el mensaje “Conexión OK” o ”SIN conexión”. En caso de visualización de “SIN conexión”, verifique las conexiones USB de la balanza y del PC y vuelva a probar la conexión.
- Page 99 INSTRUCCIONES DE OPERACIÓN Conservar los Valores Introducidos Esta opción permite al usuario usar los mismos valores de ID, altura y TARA entre pesajes. Si esta opción es desactivada, el usuario debe volver a ingresar estos valores para cada lectura. Si no se introducen los valores, solamente se almacena el peso.
-
Page 100: Mantenimiento
MANTENIMIENTO GENERAL Esta sección da instrucciones de mantenimiento, limpieza, solución de problemas y piezas que el operador puede cambiar, para la Balanza Electrónica Pro Plus Las demás operaciones de mantenimiento, no descritas en esta sección, deben ser realizadas por el personal de servicio calificado. MANTENIMIENTO Antes de usarla por primera vez y después de periodos sin usarla, verifique el funcionamiento y uso apropiados de la balanza. -
Page 101: Solución De Problemas
SOLUCIÓN DE PROBLEMAS Consulte las siguientes instrucciones para verificar y corregir cualquier fallo antes de contactar el personal de servicio. SÍNTOMA POSIBLE CAUSA ACCIÓN CORRECTIVA La balanza no se prende Batería terminada Cambie las baterías Tomacorriente Use otro tomacorriente defectuoso Cambie el adaptador Fuente de energía Peso cuestionable o la balanza... -
Page 102: Trayectoria De Calibración
8. Al finalizar el proceso, se borra el peso. Reiniciando… Espere La balanza se reiniciará después de 1 a 2 Health o Meter segundos aproximadamente. Pro-Plus 10. Espere hasta que la balanza reanude su Health o Meter funcionamiento normal. Quite el peso de la Pro-Plus plataforma. -
Page 103: Vista Detallada De La Unidad De Pantalla
VISTA DETALLADA Las balanzas 1100KL, 2650KL y 2700KL ProPlus™ tienen el mismo módulo de pantalla. Consulte esta página para ver las piezas del módulo de pantalla de estas balanzas. Se incluyen vistas detalladas y listados de piezas para los demás componentes de la balanza en las páginas que siguen al listado de piezas del módulo de pantalla. -
Page 104: 1100Kl - Vista Detallada De La Balanza
MODEL0 1100KL VISTA DETALLADA DE LA BALANZA... -
Page 105: 1100Kl - Lista De Piezas
MODEL 1100KL PARTS LIST N.º clave N.º de pieza Descripción Cant. B1109401-0 MECANISMO DE PANTALLA B2266901 TUERCA PARA TUBO, 3/4" B2266901 ARANDELA DE PLÁSTICO, B2266901 ARANDELA ELÁSTICA ONDULADA, B2266901 TUERCA AUTOBLOQUEANTE, M6 B2266901 ARANDELA DE PLÁSTICO, B2266901 ARANDELA ELÁSTICA ONDULADA, B2266901 PERNO, M6X20 B2266901... -
Page 106: 2650Kl - Vista Detallada De La Balanza
MODEL0 2650KL VISTA DETALLADA DE LA BALANZA... -
Page 107: 2650Kl - Lista De Piezas
MODELO 2650KL LISTA DE PARTES N.º clave N.º de pieza Descripción Cant. Observación B1109401-0 DISPLAY ASSEMBLY ABRAZADERA DE CABEZAL 1# 1,5mmT SPCC B2266901 TORNILLO, M4X10 ABRAZADERA DE CABEZAL 2# 1,5mmT SPCC ALFOMBRILLA TUERCA AUTOBLOQUEANTE, M3 ARANDELA DE PLÁSTICO, TORNILLO, M3X10 B3245801-0 INPUT/OUTPUT POSTS LABEL BLOQUEO ANTIDESLIZANTE... -
Page 108: 2700Kl - Vista Detallada De La Balanza
MODELO 2700KL VISTA DETALLADA DE LA BALANZA Vista de la Balanza en Posición Plegada... -
Page 109: 2700Kl - Lista De Piezas
MODELO 2700KL LISTA DE PARTES N.º clave N.º de pieza Descripción Cant. Observación B1109401-0 DISPLAY ASSEMBLY HEAD CLIP 1# 1.5mmT SPCC B2266901 TORNILLO, M4X10 HEAD CLIP 2# 1.5mmT SPCC SELF-LOCK NUT,M3 PLASTIC WASHER, 3 SCREW,M3X10 B3245801-0 INPUT/OUTPUT POSTS LABEL ANTI-SLIP BLOCK WIRE RAMP 1# FOOT MAT... -
Page 110: Protocolo De Comunicaciones
Protocolo de comunicación de PC Esta balanza utiliza un protocolo de escape para comunicarse con un PC a través de los puertos serial 2 y USB (puerto serial 1: conexión a la impresora). En el protocolo de escape, la función de escape (<esc> o ASCII 27) se utiliza para indicar que sigue un comando y no datos. - Page 111 Nombre Carácter Valor ESC con Descripción parámetros Respuesta Pccc=ccccccc Se trata de la respuesta de la balanza a la solicitud mencionada anteriormente Diagnóstico(1) Corresponde a la solicitud de una prueba de diagnóstico para Accc ciertas piezas de la balanza (por ejemplo, vida útil de las pilas, células de carga, teclado, pantalla LCD, etc.).
- Page 112 Nombre del control Unidad Identificador Tiempo de espera automático nn (Segundos) Tiempo de apagado automático nn (Minutos) Temporizador de apagado nn (Segundos) Volumen del teclado nn (01..10) Volumen de peso estable nn (01..10) Volumen de la alarma nn (01..10) Visualización de fecha/hora nn (01 ó...
- Page 113 E emplo y e plicaci n del protocolo de escape 1. Cuando la balan a mide el peso de un paciente y lo env a a trav s de la l nea de comunicaciones al PC, se ve del siguiente modo: Direcci n de comunicaci n BALAN A ESC R ESC I1234...
- Page 114 Direction of communication BALAN A ESC R ESC I1234 ESC W200.1 ESC H 0. ESC B2 ESC T0.0 ESC Nm ESC R ESC I123 ESC E Lectura (datos del primer paciente) Identificaci n del paciente 1234 Peso 200,1 (Libras) Altura 0, (pulgadas) TARA 0,0 (Libras)
- Page 115 Parámetros de la impresora Dirección de comunicación < BALANZA > < Parámetros > Modelo de la impresora: CT- S280 Voltaje de trabajo: CC8.5V- 2.5A Esta balanza incluye una función de impresión que se activa al conectar la impresora XXXXX: Conecte el cable de la impresora al PUERTO 1 de la balanza. Encienda la impresora.
-
Page 116: Garantía
11800 South Austin Avenue Unit B ALSIP, IL 60803, U.S.A •1 800 638-3722 or +1 708 377-0600. www.homscales.com Los productos Health o meter ProPlus son fabricados, proyectados y de propiedad de Pelstar LLC. Health o meter® es una marca registrada de Sunbeam Products Inc., Boca Raton, FL 33431 Pelstar LLC 2009 ProPlus®...