Table of Contents
Advertisement
Available languages
Available languages
Quick Links
Introduction
Adding a RainSensor or RainSensor + Freeze
to your automatic sprinkler system is an
effective means of conserving water and
lowering your monthly water bill, while
promoting a healthier lawn and garden.
Designed for ease of installation, your sensor-
controlled irrigation system will be up and
running in minutes.
Prior to installing the RainSensor, take a few
moments to read through the instructions in
their entirety. Since the RainSensor is designed
to work with most makes and models of
automatic sprinkler timers, you should also refer
to the instructions provided with your timer for
specific information regarding the connection
and use of a rain sensor or rain switch.
Important:
The RainSensor is rated for 24 VAC power only. Connecting to a higher
voltage may result in severe equipment damage.
Installation methods must comply with all applicable national and local
electrical codes. If you are unsure about proper wiring practices, have a
qualified contractor perform the installation for you.
The RainSensor must not be submerged. Do not install the sensor inside a
rain gutter or any location where water can accumulate.
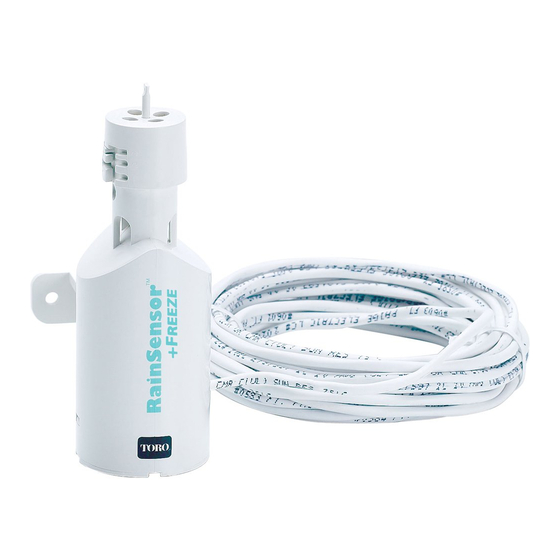
RainSensor Components
1 - Test Spindle - Pressed to manually test
RainSensor operation.
2 - Rainfall Adjustment Cap - Adjusts
RainSensor sensitivity from 3mm to 25mm
of detected rainfall.
TM
3 - Quick-Clip
for easy installation.
4 - Connection Cable - 25ft (7.6m) of connec-
tion cable included.
5 - Access Cover - Easily removed for access
to internal components.
Wired RainSensor
RainSensor
Installation Guide
- Universal mounting bracket
- Model 53769
TM
+ Freeze - Model 53853
TM
Figure 1
3
4
1
2
5
Advertisement
Table of Contents

Related Manuals for Toro RainSensor + Freeze 53853


Summary of Contents for Toro RainSensor + Freeze 53853
- Page 1 Introduction Adding a RainSensor or RainSensor + Freeze to your automatic sprinkler system is an effective means of conserving water and lowering your monthly water bill, while promoting a healthier lawn and garden. Designed for ease of installation, your sensor- controlled irrigation system will be up and running in minutes.
-
Page 2: Installation Procedure
If a normally-open sensor is required (for example, when used with a Toro ECx the RainSensor as shown in Figure 3. Model 53853 only: If using the Freeze version, model 53853, and your controller requires Normally Open Sensor operation, the sensor connection can not be used. - Page 3 v Select the Installation Site: To operate properly, the RainSensor must be installed in an outdoor location that provides the following conditions: • As close to the timer as possible. If the connection wire will not reach the timer, it can be extended to 100ft (30m) using 18 AWG (1.0mm •...
- Page 4 v Connect RainSensor Wiring: Route the RainSensor connection wire into the timer through the access hole in the base of the timer cabinet. Note: Avoid routing the wire over any sharp edges where damage to the wire insulation may occur. For best results, hide the wire as much as possible by tucking it under shingles and/or moldings.
- Page 5 Timer without Sensor terminals, with pump start/master valve: To Valves Common Wire From Valves • Remove all common wires from the common terminal(s) and join to one RainSensor wire lead using a twist-on wire connector. (Be sure to include the common wire from the pump start relay or master valve in this connection).
-
Page 6: Automatic Operation
Neither The Toro Company nor Toro Warranty Company is liable for failure of products not manu- factured by them even though such products may be sold or used in conjunction with Toro products. During such warranty period, we will repair or replace, at our option, any part found to be defective. - Page 7 Introducción La incorporación de un sensor de lluvia o de uno de lluvia y helada en el sistema automático de riego por aspersión contribuye de manera eficaz a ahorrar agua y reducir los costos mensuales de riego, además de ayudar a mantener el césped y el jardín en un óptimo estado.
-
Page 8: Procedimiento De Instalación
Si es necesario un sensor normalmente abierto (por ejemplo, cuando se lo utiliza con un temporizador Toro ECx sensor Cuando mostrado en la figura 3. 1. Con la ayuda de un pequeño desatornillador, presione las dos lengüetas de sujeción para... - Page 9 v Seleccione el lugar de instalación: Para que el sensor funcione correctamente, debe instalarse en un lugar de exteriores que reúna las siguientes condiciones: • Encontrarse lo más cerca posible del temporizador. Si el cable de conexión no llega al temporizador, se lo puede alargar hasta 30 m con un cable aislado de 1 mm •...
- Page 10 v Conecte los cables del sensor: Introduzca el cable de conexión del sensor en el temporizador a través del orificio de acceso de la base del gabinete del temporizador. Nota: Evite pasar el cable por bordes filosos ya que puede dañarse el aislamiento del cable.
- Page 11 Temporizador sin terminales del sensor, con arranque de bomba/válvula maestra: A las válvulas Relé de arranque de bomba/válvula maestra Cable común de las válvulas • Retire todos los cables comunes del terminal común y conéctelos a un conductor del sensor con la ayuda de un conector de bloqueo por rotación. (Recuerde incluir el cable común del relé...
-
Page 12: Especificaciones
Esta garantía no tendrá validez en los casos en que el equipo se use, o la instalación se haya realizado, de una manera contraria a las especificaciones o instrucciones de Toro, así como tampoco si el equipo ha sido alterado o modificado.