Table of Contents
Advertisement
Quick Links
Advertisement
Table of Contents

Related Manuals for Toshiba SD-V592SU


Summary of Contents for Toshiba SD-V592SU
- Page 1 DVD VIDEO PLAYER & VIDEO CASSETTE RECORDER SD-V592SU SD-V596SU OWNER’S MANUAL Before connecting, operating or adjusting this product, please read this instruction booklet carefully and completely. ©2004 Toshiba Corporation This device does not tape-record copy protected DVD Video Discs.
-
Page 2: Safety Precautions
Safety Precautions CAUTION RISK OF ELECTRIC SHOCK DO NOT OPEN CAUTION: TO REDUCE THE RISK OF ELECTRIC SHOCK DO NOT REMOVE COVER (OR BACK) NO USER-SERVICEABLE PARTS INSIDE REFER SERVICING TO QUALIFIED SERVICE PERSONNEL. This lightning flash with arrowhead symbol within an equilateral triangle is intended to alert the user to the presence of uninsulated dangerous voltage within the product’s enclosure that may be of... -
Page 3: Important Safety Instructions
IMPORTANT SAFETY INSTRUCTIONS CAUTION: PLEASE READ AND OBSERVE ALL WARNINGS AND INSTRUCTIONS IN THIS OWNER’S MANUAL. AND THOSE MARKED ON THE PRODUCT. RETAIN THIS BOOKLET FOR FUTURE REFERENCE. This product has been designed and manufactured to assure personal safety. Improper use can result in electric shock or fire hazard. -
Page 4: Table Of Contents
Table of Contents Introduction Safety Precautions ......2 IMPORTANT SAFETY INSTRUCTIONS ..3 Table of Contents . -
Page 5: Before Use
Before Use Playable Discs (8 cm/12 cm disc) Video CD (VCD) (8 cm / 12 cm disc) Audio CD (8 cm/12 cm disc) In addition, this unit can plays DVD -R, DVD +R, DVD - RW, DVD +RW, SVCD, and CD-R / CD-RW that con- tains audio titles, MP3, WMA, and/or JPEG files. -
Page 6: Precautions
Before Use (Continued) Precautions Handling the unit When shipping the unit The original shipping carton and packing materials come in handy. For maximum protection, re-pack the unit as it was originally packed at the factory. When setting the unit The picture and sound of a nearby TV or radio may be distorted during playback. -
Page 7: Front Panel
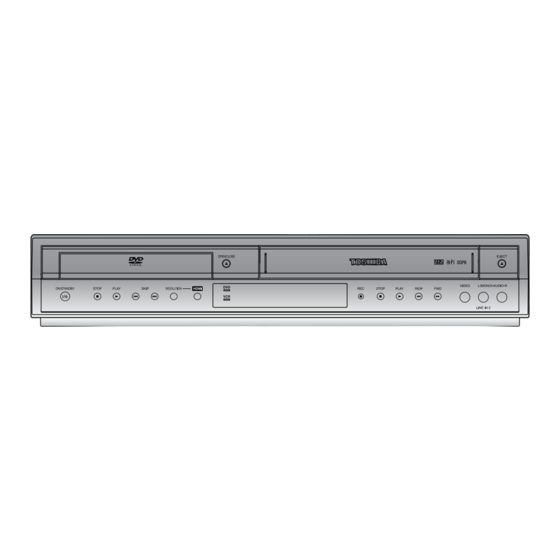
Front Panel ON/STANDBY Switches the DVD+VCR ON and OFF. Disc Tray (DVD deck) Insert a disc here. STOP (x x ) Stops playback of disc. PLAY (B B ) Starts playback of a disc in the DVD deck. SKIP (./> ) - Skip to beginning of current chapter or track, press twice in quick successions to go to... -
Page 8: Display Window
Display Window The DVD deck is selected. A disc is in the DVD deck. (Lights when a disc is in the DVD deck and Flashes when no disc.) Indicates when the Progressive scan is active. Indicates repeat mode. DVD+VCR is in timer recording or a timer recording is programmed.(VCR part only) A cassette is in the VCR deck. -
Page 9: Rear Panel
Rear Panel VCR IN LINE 1 (VIDEO IN/AUDIO IN (Left/Right)) Connect the audio/video output of an external source (Audio system, TV/Monitor, Another VCR). DVD/VCR OUT (VIDEO/AUDIO (Left/Right)) Connect to a TV with video and audio inputs. COMPONENT/PROGRESSIVE SCAN VIDEO OUT (Y Pb Pr) (DVD OUT) Connect to a TV with Y Pb Pr inputs. -
Page 10: Remote Control
Remote Control POWER Switches DVD+VCR ON and OFF. INPUT SELECT To select the VCR deck’s source (Tuner, LINE 1, or LINE 2). CLK/CNT, DISPLAY Accesses On-Screen display. Switches among the clock, tape counter and tape remaining modes on the display. DVD/VCR To control DVD+VCR operating. -
Page 11: Connections
Connections TiP : Depending on your TV and other equipment you wish to connect, there are various ways you could connect the DVD+VCR. Use connections described on pages 11-13. Please refer to the manuals of your TV, VCR, Stereo System or other devices as necessary to make the best connections. -
Page 12: Basic Tv Connections
Connections (Continued) Basic TV Connections Make one of the following connections, depending on the capabilities of your existing equipment. RF coaxial connection Connect the RF.OUT jack on the DVD+VCR to the antenna in jack on the TV using the 75-ohm Coaxial Cable supplied (R). - Page 13 Connections (Continued) Optional, Preferred TV Connections If you have a HDMI TV or monitor, you can connect it to this DVD+VCR using a HDMI cable. HDMI connection Connect the HDMI OUT jack on the DVD+VCR to the HDMI jack on a HDMI compatible TV or mon- itor (H).
- Page 14 Connections (Continued) Optional, Preferred TV Connections Note: You can ONLY listen to DVD playback using COAXIAL (X), OPTICAL (O) and AUDIO OUT (A2) connections. The tuner and VCR will still be heard through the RF.OUT (R) or DVD/VCR AUDIO OUT (A1) jack. (See page 12.) Connecting to an amplifier equipped with two channel analog stereo or Dolby Surround...
-
Page 15: Before Operation - Vcr Part
Before Operation - VCR Part On-Screen Display (OSD) Select VCR as the viewing source by pressing DVD/VCR SELECT until the VCR indicator appears in the display window. Some of these functions will be displayed every time the VCR is operated. ❶... -
Page 16: Setting The Vcr Setup Menu
Before Operation - VCR Part (Continued) Setting the VCR Setup Menu Press VCR MENU and the MAIN menu will appear. Press v/V to select the SETUP menu, then press ENTER. The SETUP menu will appear. Press v/V to choose a desired option on the SETUP menu. -
Page 17: Setting The Clock
Before Operation - VCR Part (Continued) Setting the Clock The DVD+VCR gives you two ways to set the time and date: the Auto Clock Feature or manually. The Auto Clock Feature enables the DVD+VCR to set up the clock when the DVD+VCR is turned off. -
Page 18: Before Operation - Dvd Part
Before Operation - DVD Part DVD On-Screen Display Select DVD as the viewing source by pressing DVD/VCR SELECT until the DVD indicator appears in the display window. You can display the general playback status on the TV screen. Some items can be changed using the menu. To use the on-screen display: Press DISPLAY during playback. -
Page 19: Initial Settings
Before Operation - DVD Part (Continued) Initial Settings By using the Setup menu, you can make various adjust- ments to items such as picture and sound. You can also set a language for the subtitles and the Setup menu, among other things. For details on each Setup menu item, see pages 19 to 22. -
Page 20: Display
Before Operation - DVD Part (Continued) DISPLAY DISPLAY 4 : 3 TV Aspect Display Mode Panscan Move TV Aspect 4:3 : Select when a standard 4:3 TV is connected. 16:9 Wide: Select when a 16:9 wide TV is connected. Display Mode Display Mode setting works only when the TV Aspect mode is set to “4:3”. -
Page 21: Others
Before Operation - DVD Part (Continued) OTHERS The PBC, Auto Play, B.L.E., Pluge and DNR settings can be changed. OTHERS Auto Play B.L.E. Pluge Move Set Playback Control (PBC) to On or Off. On: Video CDs with PBC are played according to the PBC. -
Page 22: Lock (Parental Control)
Before Operation - DVD Part (Continued) LOCK (Parental Control) LOCK Rating Unlock Password Country Code Move Rating Some movies contain scenes that may not be suitable for children to view. Many of these discs contain parental control information that applies to the complete disc or to certain scenes on the disc. -
Page 23: Operation With Tape
Operation with tape Normal Playback Preparation: Turn on the TV. Tune the TV to the DVD+VCR output channel (CH 3 or 4) or set the TV’s source selector to VIDEO. If a direct VIDEO/AUDIO connection is made between the DVD+VCR and the TV, set the TV’s source selector to VIDEO. -
Page 24: Viss (Vhs Index Search System)
Operation with tape (Continued) VISS (VHS Index Search System) The VHS INDEX SEARCH SYSTEM enables you to locate the beginning of any recording made on this VCR. Whenever a recording begins, an invisible INDEX mark is recorded on the tape. VISS Scan VISS SCAN lets you search out each VISS mark on the recorded tape and play 5 seconds before advancing to... -
Page 25: Timer Recording
Operation with tape (Continued) Timer Recording This DVD+VCR can be programmed to record up to 8 programs within a period of 1 year. For unattended recording, the timer needs to know the channels to be recorded and the starting and ending times. Things to know before starting If you try to set the program timer before setting the clock, PLEASE SET THE CLOCK appears for a moment and... -
Page 26: One Touch Timer Recording(Otr)
Operation with tape (Continued) Checking (Erasing) the Timer Program Programming can be checked whenever the DVD+VCR is turned on. 1 Press VCR MENU and the MAIN menu will appear. 2 Use v/V to choose the PROGRAM menu. Press ENTER and the PROGRAM menu will appear. 3 Use b/B to select a program you want to check or erase. -
Page 27: Dubbing And Editing
Operation with tape (Continued) Dubbing and Editing If you wish to edit or dub your camcorder (or another VCR) recordings to this DVD+VCR, the rear (or Front) panel mounted Audio and Video (A/V) input jacks make the connections quick and easy. These direct A/V jacks will also provide better picture results than using the RF jack on the rear panel. -
Page 28: Vhs Hi-Fi Stereo System/Mts Broadcast
Operation with tape (Continued) VHS Hi-Fi Stereo System/ MTS Broadcast This DVD+VCR is equipped with the VHS Hi-Fi audio sound system for recording and playback. The informa- tion below gives a brief description of Hi-Fi audio and how to record and play a tape in the Hi-Fi audio mode. Playback with Hi-Fi Stereo Audio Sound A stereo TV with AUDIO/VIDEO input jacks or a stereo audio system is required for true stereo playback. -
Page 29: Tape Counter Memory Feature
Operation with tape (Continued) Tape Counter Memory Feature Real-Time Counter Shows length of tape run in hours, minutes, and sec- onds. Press CLK/CNT to select the real-time counter display. Every press of CLK/CNT changes the TV screen as illustrated below. 2:15 AM 0:05:25 CLOCK... -
Page 30: Operation With Dvd And Video Cd
Operation with DVD and Video CD Playing a DVD and Video CD Playback Setup VCD2.0 VCD1.1 Turn on the TV and select the video input source connected to the DVD+VCR. Audio system: Turn on the audio system and select the input source connected to the DVD+VCR. Set the output source to DVD as shown in Selecting the Viewing Source on page 6. -
Page 31: Slow Motion
Operation with DVD and Video CD (Continued) General Features (continued) Slow Motion VCD2.0 VCD1.1 1 Press SLOW T during playback or still mode. The player will enter SLOW mode. 2 Press SLOW T repeatedly to select the required speed : T 1/16, T 1/8, T 1/4 or T 1/2 (forward). 3 To exit slow motion mode, press PLAY N. -
Page 32: General Features
Operation with DVD and Video CD (Continued) General Features (continued) Zoom VCD2.0 VCD1.1 Use zoom to enlarge the video image. 1 Press ZOOM during playback or still playback to acti- vate the Zoom function. The square frame appears briefly in the right bottom of the picture. 2 Each press of the ZOOM button changes the TV screen in the sequence: 100% size →... -
Page 33: Operation With Audio Cd And Mp3/Wma Disc
Operation with Audio CD and MP3/WMA Disc Playing an Audio CD or MP3/WMA Disc The DVD+VCR can play MP3/WMA formatted record- ings on CD-ROM, CD-R, or CD-RW discs. Audio CD Once you insert an audio CD a menu appears on the TV screen. -
Page 34: Pause
Operation with Audio CD and MP3/WMA Disc (Continued) Pause 1 Press PAUSE/STEP X X / / C C during playback. 2 To return to playback, press PLAY N or press PAUSE/STEP X X / / C C again. Moving to another Track Press SKIP >... -
Page 35: Operation With Jpeg Disc
Operation with JPEG Disc Viewing a JPEG Disc Using this DVD+VCR you can view JPEG files. 1. Insert a disc and close the tray. The PHOTO menu appears on the TV screen. PHOTO Preview List JPEG Folder 1 JPEG Folder 2 >>>... -
Page 36: Programmed Playback
Programmed Playback Programmed Playback The program function enables you to store your favourite tracks from any disc in the player memory. A program can contain 30 tracks. 1. Insert a disc. Audio CD or MP3/WMA Discs: AUDIO CD or MUSIC menu appears. 2. -
Page 37: Additional Operation
Additional Operation Playing a DVD VR format Disc This unit will play DVD-R/RW discs recorded using the DVD-Video format that have been finalized using a DVD-recorder. • This unit will play DVD-RW discs recorded using the Video Recording (VR) format. 1. -
Page 38: Controlling Your Tv With The Supplied Remote
Controlling Your TV with the Supplied Remote The remote control can be compatible with various brands of TV/Cable box/DSS satellite receiver by setting their control codes. The TOSHIBA code has initially been set to control TOSHIBA TVs. Setting TV Control Codes 1. -
Page 39: Table Of Tv Brand Codes
Controlling Your TV with the Supplied Remote (Continued) Table of TV Brand Codes Brand name of your TV Brand Code Toshiba Bell & Howell Carver Celebrity Citizen Curtis Mathes 09, 12 Dumont Electro band Emerson 09, 11 Fisher 02, 07, 11... -
Page 40: Controlling Your Cable Box/Dss Satellite Receiver
Controlling Your Cable Box/DSS Setting Cable Box/DSS Satellite ® Receiver Control Codes 1. Press CABLE BOX to set the remote control operating your Cable box/DSS ® Receiver. 2. While holding down PROGRAM button, enter the two digits of your Cable box/DSS Receiver Brand Code (listed on page 41) using number buttons. -
Page 41: Table Of Cable Box Brand Codes
Controlling Your Cable Box/DSS Table of Cable Box Brand Codes Brand name of your Cable box Brand Code Toshiba Anvision 13, 20, 21, 22, 23, 24, 25, 26, 58, 62, 84 Archer 1, 20, 21, 29, 42, 44, 63, 88, 91... -
Page 42: Troubleshooting
Troubleshooting Check the following guide for the possible cause of a problem before contacting service. Symptom The power cord is disconnected. No power. The power is on, but the No disc is inserted. No tape is inserted. DVD+VCR does not work. - Page 43 Troubleshooting (Continued) Symptom The remote control The remote control is not pointed at the does not work properly. remote sensor of the DVD+VCR. The remote control is too far from the DVD+VCR. There is an obstacle in the path of the remote control and the DVD+VCR.
-
Page 44: Language Code List
Language Code List Enter the appropriate code number for the initial settings “Disc Audio”, “Disc Subtitle” and/or “Disc Menu” (See page 19). Code Language Code 6566 Abkhazian 7074 6565 Afar 7073 6570 Afrikaans 7082 8381 Albanian 7089 6577 Amharic 7176 6582 Arabic 7565... -
Page 45: Country/Area Code List
Country/Area Code List Enter the appropriate code number for the initial setting Code Country/Area Code Country/Area Andorra Eritrea United Arab Emirates Spain Afghanistan Ethiopia Antigua and Barbuda Finland Anguilla Fiji Albania Falkland Islands Armenia Micronesia Netherlands Antilles Faroe Islands Angola France Antarctica France (European... -
Page 46: Specifications
Specifications General Power requirements Power consumption Dimensions (approx.) Mass (approx.) Operating temperature Operating humidity Signal system Inputs ANTENNA IN VHS VIDEO IN (LINE1, 2) VHS AUDIO IN (LINE1, 2) Outputs VIDEO OUT S-VIDEO OUT COMPONENT VIDEO OUT (Progressive Scan) Audio output (digital audio) Audio output (optical audio) Audio output (analog audio) RF OUT... -
Page 47: Limited United States Warranty
Limited United States Warranty DVD/VCR COMBINATION - Exchange Warranty Toshiba America Consumer Products, L.L.C. (“TACP”) makes the following limited warranties to original consumers in the United States. THESE LIMITED WARRANTIES EXTEND TO THE ORIGINAL CONSUMER PURCHASER OR ANY PERSON RECEIVING THIS DVD/VCR COMBINATION AS A GIFT FROM THE ORIGINAL CONSUMER PURCHASER AND TO NO OTHER PURCHASER OR TRANSFEREE PRODUCTS PURCHASED IN THE U.S.A. - Page 48 SPECIFIED by transportation and insurance charges for the DVD Product to and from the Service Station. For additional information, visit TACP’s web site: www.tacp.toshiba.com ALL WARRANTIES IMPLIED BY THE LAW OF ANY STATE OF THE U.S.A., INCLUDING THE IMPLIED WARRANTIES OF MERCHANTABILITY AND FITNESS...
- Page 49 P/NO: 3834RV0004N Printed in Indonesia...