
Related Manuals for Philips CID3292/00


Summary of Contents for Philips CID3292/00
- Page 1 Register your product and get support at www.philips.com/welcome CID3292 EN User manual ZH-CN...
-
Page 2: Table Of Contents
Contents 1 Important Safety Notice 2 Your in-car entertainment system Introduction What’s in the box Overview of the main unit 3 Get started Install the car audio Turn on Set date and time Adjust screen 4 Use map Upgrade the navigation map 5 Listen to radio Tune to a radio station Store radio stations in memory... -
Page 3: Important
1 Important Safety Read and understand all instructions before you use the apparatus. If damage the warranty does not apply. Use of controls or adjustments or performance of procedures other than herein may result in hazardous radiation exposure or other unsafe operation. This unit is designed for negative ground (earth) 12 V DC operation only. - Page 4 Please observe the local regulations regarding the disposal of old equipment. device that are not expressly approved by Philips Consumer Lifestyle may void the user’s authority to operate the equipment. 2010 © Koninklijke Philips Electronics N.V. All rights reserved.
-
Page 5: Your In-Car Entertainment System
2 Your in-car entertainment system at www.philips.com/welcome. Introduction Quickly found routine through the navigation system And you can also enjoy: Audio/video/JPEG pictures from USB devices External devices FM or AM (MW) radio Audio from Bluetooth-enabled devices Bluetooth-enabled devices. What’s in the box... -
Page 6: Overview Of The Main Unit
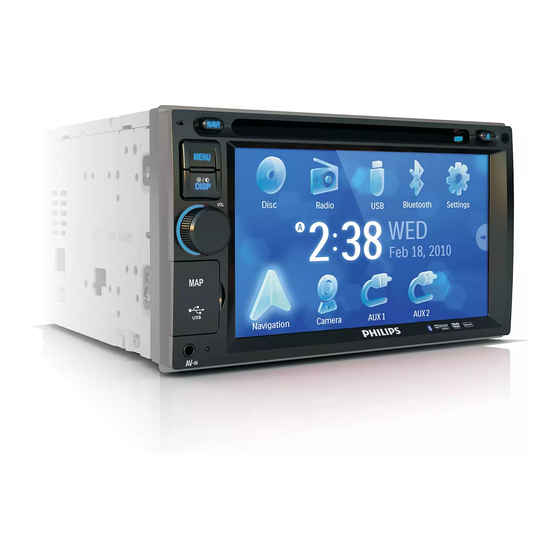
Overview of the main unit a RESET Reset when it hangs up. the unit b AV IN External equipment audio/video in socket. /MAP Open the cover to insert/remove USB device or map card. d VOL/ /MUTE Adjust volume. Turn the unit on or off. Turn mute on or off. -
Page 7: Get Started
Install the car audio These instructions are for a typical installation. make the corresponding adjustment. If you have your Philips car audio dealer. Caution This unit is designed for negative ground (earth) 12 V DC operation only. Always install this unit in the car dashboard. - Page 8 section). Take off the two screws on the top side of the unit. Slide the unit into the dashboard until a click sound is heard. Fix the unit onto the dashboard with screws. Reconnect the negative terminal of the car battery.
-
Page 9: Turn On
Connect wires Caution Ensure that all loose leads are insulated with electrical tape. the other connections: Yellow Green Blue Yellow Connect to the positive (+) terminal of reverse driving light Gearbox Turn on Caution Risk of road accidents! Never watch video or adjust settings while you drive. -
Page 10: Set Date And Time
Set date and time Press MENU. » The main menu is displayed. Tap [Settings]. Tap [Time]. » The date/time setup menu is displayed. Set date Tap [Date]. Tap the displayed date information. » A submenu is displayed. Set time mode Tap [Time mode]. -
Page 11: Use Map
4 Use map Note You may need to upgrade the map (sold separately) before using it (see “Upgrade the Tap the upper left corner to display home menu. Tap [Navigation]. » The navigation menu is displayed in a few seconds. Refer to the map manual to operate the navigation tool. -
Page 12: Listen To Radio
5 Listen to radio Tune to a radio station to display home menu. Tap [Radio]. » Band and frequency information is displayed. Tap on FM or AM to select band: FM band options: FM1, FM2, FM3 AM band options: AM1, AM2 to tune to a radio station by step. -
Page 13: Tune To A Preset Station
Tap one of the channels 01 to 06 to save the select band. Store stations automatically which broadcasts a 10-second preview of each detected radio station. Select band. Tap [Search]. » Auto search starts. The six strongest stations of the selected band are saved in preset channels 1-6 automatically. -
Page 14: Connect Usb Device
Connect USB device Note Ensure that the device contains playable content. Open the USB door. Insert the USB device to the USB socket. » Play starts automatically. Note Play/Pause play starts automatically. to start play. Skip/search Direct select Tap anywhere except for the upper left necessary. -
Page 15: Repeat One/All
Repeat one/all modes. For DVD/VCD movie disc: Tap anywhere except for the upper left necessary. to display the 2nd menu. to select: [Repeat chapter]: play the current chapter repeatedly. [Repeat title]: play all chapters in the title repeatedly. [Repeat off]: cancel repeat play. For VCD karaoke: to select: [Repeat one]: play the current track... -
Page 16: Select Audio Language
Select audio language For video discs that contain two or more audio channels. upper left corner to display menu on the to display the 2nd menu. repeatedly. » The audio channel information is displayed on the upper line of the screen. -
Page 17: Play With Bluetooth Device
7 Play with Bluetooth device You can make or receive phone calls with Bluetooth-enabled phones through the unit. You can also listen to music from a Bluetooth- enabled device. Pair the Bluetooth-enabled devices you need to pair the device to the unit. Pairing needs only to be done once. -
Page 18: Receive Call
[Missed calls] [Received calls] [Dialed calls] [Phone book] [Sim phone book] [Local phone book] Or tap to dial. Receive call automatically. [Incoming call...] Bluetooth microphone. to terminate the call. You can select to receive calls manually by set [Auto answer] to [Off] status. Switch phone call to the mobile If you do not want your passenger to hear the mobile. -
Page 19: Adjust Bluetooth Settings
Adjust Bluetooth settings You can change below Bluetooth settings: [Bluetooth] function [Auto connect]: to turn on or off “Auto [Auto answer]: to turn on or off “Auto [Pairing code]: to set paring code [Phone Book Sync]: to synchronize phone book »... -
Page 20: Adjust Fader/Balance
to select an EQ. to adjust below settings: [Bass] bass range: -14 to +14. [Mid] middle range: -14 to +14. [Treb] treble range: -14 to +14. [LPH] [MPF] [HPF] to restore the above settings into default settings. to exit. Adjust fader/balance You can also adjust the front and rear speaker subwoofer settings. -
Page 21: Adjust Settings
9 Adjust settings Display system setup menu to display main menu. Tap [Settings]. » The settings menu is displayed. Adjust general settings Tap [General] to highlight a setting. Tap an option to display/select the option. General Options Description settings [Radio [USA] Select one that region]... -
Page 22: Adjust Sound Settings
General Options Description settings [Beep] [On] Turn on the beep sound. Each time you press a beeps. [Off] Turn off the beep sound. [WallPaper] [Blue] Turn background color to blue. [Black] Turn background color to black. [Red] Turn background color to red. [F1] Select F1 picture as wall paper. -
Page 23: Adjust Video Settings
to exit. Adjust video settings Tap [Video]. Tap an option repeatedly to select: Video Options Description settings [Aspect [Full] For widescreen ratio] display. [Normal] For normal display. [Video [Auto] The correct format input] is set automatically. Select this option if you are not sure which format should be selected. -
Page 24: Adjust Language Settings
Bluetooth Options Description settings [Off] Answer phone call manually. [Pairing Set code for pairing code] the unit with other Bluetooth devices. to exit. Adjust language settings Tap [Language]. Tap an option repeatedly to select: Language Options Description settings [OSD] [English] Select on-screen- display language. -
Page 25: Adjust Dvd Rating
Adjust DVD rating Tap [DVD rating]. Tap an option repeatedly to select: DVD rating Options Description [Set Set password to password] restrict the play of discs. The default password is 0000. [Rating [Kid Acceptable for level] safe] children. Acceptable for general viewers. -
Page 26: Replace Fuse
unchanged. Replace fuse and need to be replaced. Take out the unit from dashboard. Check the electric connection. Buy a fuse that matches the voltage of the damaged fuse (15A) Replace the fuse. If the fuse gets damaged immediately after it dealer. -
Page 27: Radio
Radio Frequency range - FM 87.5 - 108.0 MHz Frequency range - 522 - 1620 KHz AM (MW) Usable sensitivity - FM 5 uV Usable sensitivity - 50 uV AM (MW) Screen size 6.2 inches (16:9) Display resolution 800 x 480 dots Contrast ratio Brightness 400 cd/m2... -
Page 28: Troubleshooting
Never remove the casing of this apparatus. the system yourself. If you encounter problems when using before requesting service. If the problem (www.philips.com/welcome). When you contact and the model number and serial number are available. No power Car engine has not been started. Start the car engine. -
Page 29: Glossary
The paired mobile phone connects and disconnects constantly. The Bluetooth reception is poor. Move the mobile phone closer to the system or remove any obstacle between the mobile phone and the system. Some mobile phones may connect and disconnect constantly when you make or end calls. - Page 30 © 2010 Koninklijke Philips Electronics N.V. All rights reserved. Document order number: CID3292_00_UM_V2.0...