LG V-WA266ND Owner's Manual
Hide thumbs
Also See for V-WA266ND:
- Owner's manual (52 pages) ,
- Service manual (17 pages) ,
- Service manual (23 pages)

Related Manuals for LG V-WA266ND


Summary of Contents for LG V-WA266ND
- Page 1 V-WA266ND Please read all of the information on page 3 carefully. This information contains important instructions for the safe use and the maintenance of the appliance.
-
Page 2: Table Of Contents
Table of contents Information for Your Safety ................3 How to Use ...................... 4 Assembling cleaner ..................4 Using Carpet/Floor Nozzle and Carpet Master ............5 Using Accessory Nozzles ................... 5 Dry Vacuuming ....................6 Wet Cleaning ....................9 Carpet Cleaning ..................... -
Page 3: Information For Your Safety
30 minutes, plug the cleaner back in and turn on the switch. • Do not treat the appliance or plug with wet hands. If the pump still does not run, contact an authorized LG Service • If the supply cord is damaged, it must be replaced by the Agent. -
Page 4: How To Use
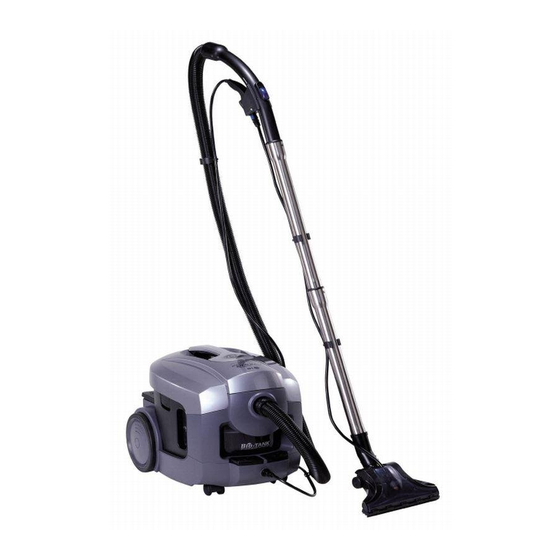
How to Use Assembling Cleaner Handle Cover Clamp Shampoo Hose Lever Dust Tank Hose Handle Shampoo Tank Cap Pipe Shampoo Tank Inlet Dust Cord Reel Button Yellow Mark Red Mark Switch Button Shampoo Button Pipe Power Cord If you can see red mark on power cord when you pull the cord out of the appliance, Tips you must stop pulling out the cord immediately. -
Page 5: Using Carpet/Floor Nozzle And Carpet Master
How to Use Using Carpet/Floor Nozzle and Carpet Master Carpet Master Carpet/Floor Nozzle Floor Carpet Long type Carpet Hard Floor & Short type Carpet : use for hard floor & short type carpet. : use for long type carpet. Air Control Lever How to Use Using Accessory Nozzles Upholstery Nozzle... -
Page 6: Dry Vacuuming
How to Use Dry Vacuuming The Air Flow Regulator allows you to change the vacuum suction for different fabric and carpet weight. Adjust the suction power with Air Flow Regulator in the handle. Connecting the Air Filter Closing the Top Cover Assy Assembling Hose and Pipes Connecting the Hose Turning on the Power Switch... - Page 7 After Cleaning Opening the Top Cover Assy Pouring the Cleaning Liquid Separating the Air Filter Separating the Air Filter...
- Page 8 WARNING! Gently rinse air filter separately under a cold running water until the water runs clear. Do not use detergent or a washing machine or dishwasher. Shake off excess water from the filter. Do not tumble/spindry, microwave or place in oven or on direct heat. Ensure the filter is completely dry. Re-assemble and place it back in your machine, filter frame.
-
Page 9: Wet Cleaning
How to Use Wet Cleaning If there is a strange sound in the pump, put the cleaning fluids into the shampoo tank. Because it indicates that there is no cleaning fluid in the shampoo tank. Connecting the Air Filter Opening the Tank Cap Pouring Water &... - Page 10 When you hear the big noise from the main body during the operation, empty the dust tank. Because it indicates that the safety float automatically closes the suction inlet and you will notice that no more liquid is sucked up. Wet Cleaning Checking the Cleaning Liquid Opening the Top Cover Assy...
- Page 11 WARNING! Gently rinse both parts separately under a cold running water until the water runs clear. Do not use detergent or a washing machine or dishwasher. Shake off excess water from the filter. Do not tumble/spindry, microwave or place in oven or on direct heat. Ensure the filter is completely dry.
-
Page 12: Carpet Cleaning
How to Use Carpet Cleaning It is possible that the pump's thermal security mechanism has been acticated to protect the pump from overheating in case that the shampoo tank is empty or the shampoo button has remained in the (ON) position without any operation of the trigger. -
Page 13: Tile Cleaning
How to Use Tile Cleaning Connecting the Frame Brush Tube Connecting/Disconnecting Cleaning the Tile Button How to Use Window Cleaning Connecting the Window Master Turning on the Power & Shampoo Switch Cleaning the Window... -
Page 14: Sofa Cleaning
Rotating the Frame Turning off the Power & Shampoo Switch Cleaning Window How to Use Sofa Cleaning Connecting the Small Shompoo Nozzle Cleaning the Sofa Cleaning the Tile... -
Page 15: Blow Cleaning
How to Use Blow Cleaning Separating the Hose & Exhaust Cover Connecting the Hose Turning on the Power Switch Blow Cleaning Leaves on the steps Dust between window frames... -
Page 16: Dust Tank Cleaning
How to Use Dust Tank Cleaning Separating Plates Cleaning the Dust Tank Pouring the Water Connecting Plates How to Use Clean Filter Cleaning CAUTION! Remove the moisture and dry the filter sufficiently in shade about a day. Separating the Clean Filter Cleaning the Clean Filter Connecting the Cleaning Filter Cleaning Filter... -
Page 17: Exhaust Filter Cleaning
How to Use Exhaust Filter Cleaning CAUTION! Remove the moisture and dry the filter sufficiently in shade about a day. Separating the Exhaust Cover Separating the Washing & Drying the Connecting the Sponge Sponge. Exhaust Cover Sponge Reuse the Sponge after drying How to Use Carpet Master Cleaning Separating the Viewing Window... -
Page 18: Shampoo Tank Net Cleaning
How to Use Shampoo Tank Net Cleaning Separating the Net Washing the Net Putting the Net into the Shampoo Tank How to Use Storage... - Page 19 Memo...
- Page 20 Memo...
- Page 21 V-WA266ND P/No.: 3828FI3853G Made in KOREA...
- Page 22 3..................4..................4................. 5........ 5................ 6.................... 9................... 12..................13.................... 13................... 14.................... 15................... 16..................16.................. 17................. 17................. 18............18....................