
Related Manuals for Bosch MUM 7000 UC


Summary of Contents for Bosch MUM 7000 UC
- Page 1 Owner’s Manual Concept Series Kitchen Machines for models: MUM 7000 UC • MUM 7100 UC MUM 7010 UC • MUM 7150 UC MUM 7220 UC READ THIS MANUAL thoroughly for important safety and operating instructions before using this appliance.
-
Page 2: Important Safeguards
IMPORTANT SAFEGUARDS WARNING: A risk of fire and electrical shock exists in all electrical appliances and may cause personal injury or death. When using electrical appliances, basic safety precautions should always be followed, including the following: 1. Read all instructions before using the kitchen machine. 2. -
Page 3: Table Of Contents
Use of mixing bowl with twin beating whisks ... 13 Placing into operation with twin beating whisks ... 14 Care and cleaning of bowl and its accessories ... 14 Blender with unbreakable plastic jar ... 15 How to use blender ... 15 Placing blender into operation ... 16 Example of use of blender ... -
Page 4: About Your Kitchen Machine
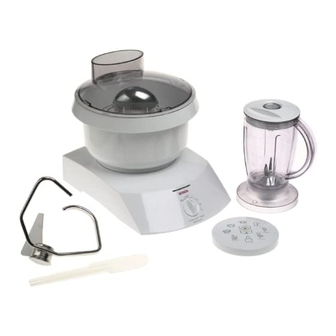
Bosch Concept Series Kitchen Machine The Bosch Concept Series Kitchen Machine is available in 5 models: • The MUM 7000 UC comprised of the electronic power unit with integral cord storage, six-quart capacity mixing bowl, bowl lid with... - Page 5 MUM 7220 UC MUM 7010 UC MUM 7100 UC MUM 7150 UC MUM 7000 UC Figure 1...
-
Page 6: Getting To Know Your Bosch Kitchen Machine
> The blender’s blade/base assembly should be washed under running water and dried. Note: It is recommended that the blender’s blade/base assembly never be left to stand in water or soap solution to prevent the bearing lubricant from being washed out. -
Page 7: Getting Started
Gentle start a special feature that brings the motor up to speed over a two-second period; limiting splashing. Convenient cord storage Convenient cord storage is located on the back of the power unit, see 2d. Integrated hand grips Side recesses provide for easy lifting and carrying of power unit when not in use, see Four rubber feet Four rubber feet with formed suction cups... - Page 8 Specific instructions are located on pages listed below: Attachment Mixing bowl w/dough hook ... 9-11 Mixing bowl w/twin whisks ... 11-14 Blender ... 15-17 Slicer/shredder ... 17-20 Food processor ... 20-24 Table 1. 5. Operate unit with rotary switch. Once the attachment is in place, the...
-
Page 9: Standard Attachments
to perform with the attachment, remove the attachment from the power unit per the instructions for the specific attachment being used. 10. Place contents (batch feed type) If the attachment is the batch feed type, disassemble per the specific attachment’s instructions and place the contents in a suitable container. -
Page 10: How To Use Dough Hook
Figure 4. 4a. Bowl (either stainless steel or plastic) with anti-splash cover and filling funnel cap 4b. Standard dough hook (all systems except MUM 7010 UC) 4c. Twin beating whisks 4d. Professional dough hook (MUM 7010 UC model only) 4e. Bowl scraper How to Use Dough Hook The dough hook and mixing bowl are intended to be used to knead yeast doughs... -
Page 11: Placing Into Operation With Dough Hook
Plastic Bowl Stainless Steel Bowl Figure 6. 3. There are two styles of dough hook used with the Bosch Machine, the standard and the professional, but no matter which one you have they are mounted in the mixing bowl in the same way: engage the dough hook on the driveshaft of the mixing bowl by placing it over the center column, as shown in... -
Page 12: Operation With Dough Hook And Whisk Assembly
OPERATION WITH DOUGH HOOK AND WHISK ASSEMBLY Below you will find a table listing examples of how the dough hook and the whisk assembly are to be used for various typical applications. Attachment Ingredients Twin Beating Egg Whites (2) Whisks Whipping Cream Sponge Cake (any recipe) Combine all ingredients... -
Page 13: Use Of Mixing Bowl With Twin Beating Whisks
The dough hook should be used for all heavier substances such as cookie doughs, yeast doughs, pastry doughs and other heavy doughs.The dough hook should always be used when adding nuts, chocolate chips, dried fruits, hard butter or other fats, hardened brown sugar, etc. to a mixture. -
Page 14: Placing Into Operation With Twin Beating Whisks
to add ingredients, but the cover and cap should be in place whenever the power unit is in operation. The anti-splash cover and cap serve to prevent the escape of flour dust at the beginning of the stirring process as well as prevent splatter, and also serves to prevent accidental contact with the moving whisks. -
Page 15: Blender With Unbreakable Plastic Jar
1. There is a risk of injury from sharp blades when using the blender attachment. 2. Keep hands and utensils out of the blender jar while it is attached to the power unit. 3. Blades are sharp. Handle carefully. 4. To avoid injury, never place blade assembly on power unit without blender jar properly attached. -
Page 16: Placing Blender Into Operation
1, then quickly pour the oil in through the opening in the cover in a uniformly thick stream, as shown in figure 14b. Operate the blender at speeds 1 or 4 until mixture is thick and smooth (approximately 10-20 seconds). -
Page 17: Care And Cleaning Of Blender
1/2 cup of material to be blended. If the blender does not start (even after trying the highest speed) after having switched it On and the control status indicator is flashing, the blade has become blocked by the contents. -
Page 18: Slicer/Shredder, Intended Use
Figure 15. Slicer/shredder, intended use The slicer/shredder attachment has been designed for slicing, shredding and/or grating of vegetables, as well slicing/ shredding of soft cheeses and sausages or meat and grating of vegetables and hard cheese. Use of Slicer/Shredder Before beginning to use this or any other attachment, make sure that the power unit is on a smooth, clean, suitable work surface and switched to Off position,... -
Page 19: Placing Slicer/Shredder Into Operation
Figure 16. d. If stabilizing pin is not in cover, insert pin, see 15e. Then place cover on bowl, making sure the tabs on the cover enter the recesses in the bowl, and turn counterclockwise to stop, see figure 17. Figure 17. -
Page 20: Care And Cleaning Of Slicer/Shredder
If the slicer/shredder does not start (even after trying the highest speed) and the indicator above the rotary dial is flashing: the disc has become blocked by the contents. The power unit should be: 1. Switched to Off position, “O/Off,” and unplugged. - Page 21 How to Use the Food Processor Blade The food processor blade and its bowl are intended to be used for mincing, pureeing and pulverizing of fruit, vegetables, meat, nuts and dried bread (for bread crumbs) and the preparation of sauces, special diet and infant foods and mixing.
-
Page 22: Placing Into Operation With Food Processor Blade
4 or “M” until desired result is obtained (approx. 1 minute). • Mayonnaise Using the recipe from the blender section, place ingredients into the food processor bowl, except the final 2/3 cup of vegetable oil. Mix all the ingredients briefly, then add the rest of the vegetable oil. -
Page 23: Care And Cleaning Of Food Processor Blade And Bowl
Removing Contents Before beginning to remove the contents from the food processor, make sure that the power unit has been turned to the Off position, “O/Off.” Remove the top cover from the bowl by depressing the interlock button on the handle, step 1, and turning the cover clockwise, step 2, while lifting, see figure 21a. -
Page 24: Placing Into Operation With Discs And Disc Holder
4. Place the cover on the bowl, as shown in figure 22b. There is a safety interlock in the handle of the 5-cup capacity bowl that is engaged by the cover. Push up on the interlock button, step 1, and turn the cover, step 2, counterclockwise until it stops and the interlock is engaged. -
Page 25: Service And Repair
2. Restart. Status The power unit has been Indicator overloaded; for example, the Flashing blender blade may have become blocked. 1. Turn the power unit to Off and unplug. 2. Remove contents of attachment being used and loosen whatever has caused the jam. -
Page 26: Sample Recipes
Sample Recipes Salsa Chop the following ingredients in Bosch blender or food processor, on speed 3 or 4: 1 - 4 Dried Arabol Chilies (start with one, add more for increased spiciness) clove garlic cup water ounces tomato sauce (add... - Page 27 Oatmeal Chocolate Cookies cups packed brown sugar cup shortening eggs teaspoon vanilla 1 - 3/4 cups flour teaspoon baking soda teaspoon salt cups quick-cooking rolled oats cup chocolate chips Cream the brown sugar, shortening, eggs and vanilla in the mixing bowl, on speed 1 or 2.
-
Page 28: Important Notes
Important Notes... - Page 29 Important Notes...
-
Page 30: Special Accessories
SPECIAL ACCESSORIES... -
Page 31: Bosch Small Appliance Warranty
Should you require service of your BOSCH small appliance, please contact customer service at 1-866-44-BOSCH. Repair of BOSCH appliances should only be performed by qualified technicians. - Page 32 Looking for more information about BOSCH products? Visit our Web site: www.boschsmallappliances.com...