Advertisement
Quick Links
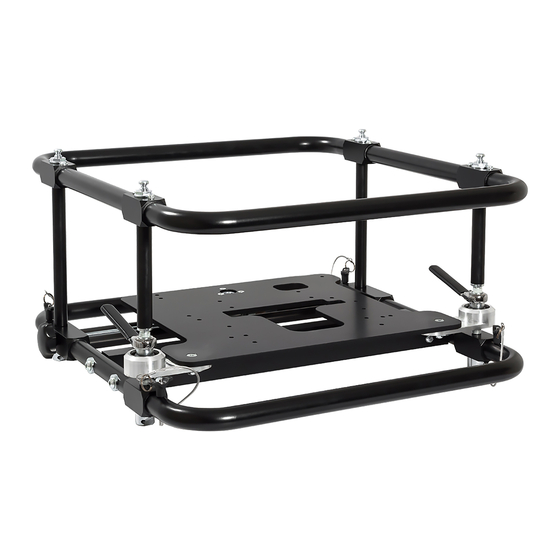
INSTALLATION MANUAL
Projector Frame ET-PFD560
For use with Panasonic DLP® projector models:
PT-RZ21KU, PT-RQ13KU, PT-RZ12KU, PT-RS11KU
PT-DZ21KU/K2U, PT-DS20KU/K2U, PT-DW17KU/K2U, PT-DW16KU/K2U
Only a qualified installer should install this product.
Read these instructions carefully before installing the ET-PFD560 Projector Frame.
These installation instructions must always be provided to the customer.
2
3
3
4
4
6
6
7
Advertisement

Related Manuals for Panasonic ET-PFD560


Summary of Contents for Panasonic ET-PFD560
-
Page 1: Table Of Contents
For use with Panasonic DLP® projector models: PT-RZ21KU, PT-RQ13KU, PT-RZ12KU, PT-RS11KU PT-DZ21KU/K2U, PT-DS20KU/K2U, PT-DW17KU/K2U, PT-DW16KU/K2U Only a qualified installer should install this product. Read these instructions carefully before installing the ET-PFD560 Projector Frame. These installation instructions must always be provided to the customer. -
Page 2: Important Safety Notice
Minimum 2 people are required to install the frame. -The weight of one frame ET-PFD560 is 19kg ( 42 lb.) and one projector PT-RZ21KU is 50 kg (110 lb). Total is 69kg (152 lb.) For safety, at least 2 people are required to perform any kind of installation. -
Page 3: Product Description
PRODUCT DESCRIPTION Parts name Image/Drawing Purpose Frame Holds projector for stacking and hanging. Screws (M6x3) x 6 Screws and Secures the projector base to the washers frame. Flat washers (M6) x 12 Provides backup support Safety cable to the frame. FINISHED ASSEMBLY DIAGRAM Do not stack or hang three frames. -
Page 4: Assembly Procedure
ASSEMBLY PROCEDURE Prepare the tools. (1)Adjustable spanner or Allen key (2)Screwdriver Preparation. (3)Soft cloth or other soft fabric Check the load capacity of the set-up location. Check the structural components. Check the frame. Select the position for the projectors based on the size and location of the screen as well as the lens (sold separately) Determine the setting-up position. - Page 5 INSTALLING THE PROJECTOR INSTALLATION PROCEDURE Use the enclosed steel wire to secure the projector to the frame by drawing the wire around the securing bar (1) of the projector as shown in image 1. Fix both end latches with the enclosed carabiner.
-
Page 6: Installing Tandem Projections
INSTALLING TANDEM PROJECTIONS INSTALLATION PROCEDURE female bolt locking pin male bolt Place the upper framed projector on top of the lower framed projector. Make sure the four male bolts seat into the correspondent female bolts. To secure, push the locking pin through both bolts, and confirm the snap. -
Page 7: Dimensions
DIMENSIONS 720 mm / 28.35 Inches 419.95 mm / 16.53 Inches 690 mm / 27.17 Inches...