Panasonic PressIT TY-WPS1 Operating Instructions Manual
Wireless presentation system
Hide thumbs
Also See for PressIT TY-WPS1:
- Operating instructions manual (49 pages) ,
- Operating instructions (functional manual) (65 pages) ,
- Operating instructions (functional manual) (60 pages)
Table of Contents
Advertisement
Quick Links
Thank you for purchasing the Panasonic product.
• Please read these instructions before operating this product and retain
them for future reference.
• Be sure to read "Safety Precautions " (page 2 to 4) before use.
• These Operating Instructions are shared by TY-WPS1, TY-WP2B1,
TY-WPB1, TY-WP2BC1 and TY-WPBC1.
English
DA0920TS0 -PB
Wireless Presentation System
TY-WPS1
Model No.
WPS Basic Set
TY-WP2B1
WPS Transmitter Set
* WPS is an abbreviation of "Wireless
Presentation System".
Operating Instructions
TY-WPB1
WPS Transmitter
TY-WP2BC1
WPS USB-C Transmitter Set
Safety Precautions
Accessories
Part Names
Connection
Basic Use
Fixing the Transmitter Connection
Transmitter Extension Method (Pairing) 13
Installing the Receiver
Notes on Using Wireless LAN
Request Regarding Security
Specifications
Basic Guide
For business use
TY-WPBC1
WPS USB-C Transmitter
2
5
6
8
10
12
15
17
19
21
DPQX1530ZA/X1
Advertisement
Table of Contents

Related Manuals for Panasonic PressIT TY-WPS1


Summary of Contents for Panasonic PressIT TY-WPS1
- Page 1 Safety Precautions Presentation System”. Accessories Part Names Connection Thank you for purchasing the Panasonic product. Basic Use • Please read these instructions before operating this product and retain Fixing the Transmitter Connection them for future reference. Transmitter Extension Method (Pairing) 13 •...
-
Page 2: Safety Precautions
Safety Precautions ■ WARNING: About AC adaptor Stop using the product immediately when an Do not use an AC adaptor or AC adaptor cable other abnormality or malfunction occurs. than those supplied with this product. Remove the power plug in the case of an Using an AC adaptor or AC adaptor cable other than abnormality. - Page 3 Do not damage the AC adaptor and power plug. * Persons with poor bloodstream (due to vascular by damaging, modifying, forcibly bending, twisting, impairment, poor blood circulation, diabetes or strong pulling or bundling them, bringing them close to heat compression) or poor skin sensitivity (elderly persons) appliances, placing heavy items on them, etc.
- Page 4 Safety Precautions Continued CAUTION: Do not pull or hang the connection cables. Doing so may cause the product to fall over or drop, Do not block the vent hole of this product. resulting in an injury. Do not push the product into a narrow and poorly •...
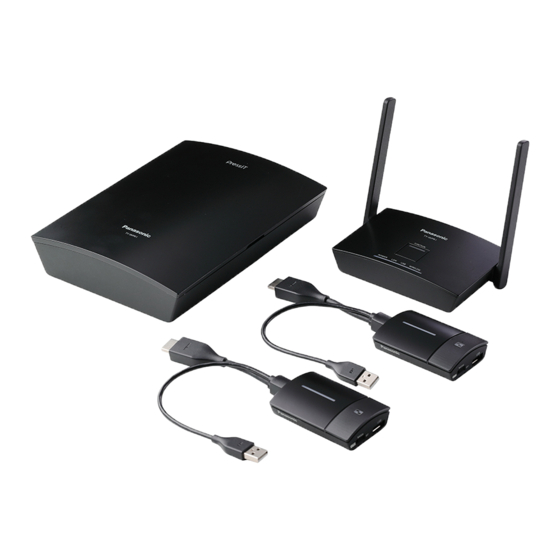
- Page 5 Accessories WPS USB-C Transmitter Check that you have the accessories and items shown. TY-WPBC1 WPS Basic Set WPS USB-C Conversion adaptor TY-WPS1 Transmitter for pairing WPS Receiver WPS Transmitter Transmitter case (TY-WPBC1) ..1 (DPVF3516ZA/X1)...1 (TY-WPR1) ...1 (TY-WPB1) ...2 (TY-WPC1) ...1 AC adaptor AC adaptor cable HDMI cable...
-
Page 6: Part Names
Part Names ■ Receiver Antenna FUNCTION button / LED Used to save a pairing file to the USB memory. Indicator Displays the power supply status, and connection statuses of LAN and USB. Screw holes for mounting bracket (page 15) Used to attach the receiver to the mounting bracket. ▼ Connection terminals / Controls Security Slot This security slot is compatible with a Noble Wedge... - Page 7 ■ Transmitter HDMI input terminal Connect to an imaging device equipped with HDMI output. USB terminal (Type-A) Connect to a USB power supply device. Main button / LED Switches between on and off of image display. Sub button / LED Switches to the multi-screen mode.
-
Page 8: Connecting The Receiver
Connection Connect a display device such as a display Before connection, carefully read the operation manual of the device to be connected to this system. and projector to the receiver with HDMI Turn off the power of each device before connecting cable. -
Page 9: Connecting The Transmitter
Press the power button of the receiver. When a standby screen is displayed on the USB terminal display device, the receiver has completed preparation. HDMI input terminal For the USB-C transmitter, connect the USB terminal 09:40 (Type-C) to the image output device. Main LED changes from red blinking (connecting) to white illumination (standby). -
Page 10: Basic Use
Basic Use Single connection Multi connection This section describes how to display an image using This section describes how to display images one transmitter. simultaneously using multiple transmitters. Images of up to 4 transmitters can be displayed Press the main button of the transmitter simultaneously. - Page 11 For details of usage, read “Operating Instructions - The image is added. Functional Manual”. Download the “Operating Instructions - Functional Manual” from the following URL. https://panasonic.net/cns/prodisplays/wps2/ Full screen display Multi-screen display White Sub LED Green...
- Page 12 Fixing the Transmitter Connection While multiple transmitters are paired and used, you can Other transmitters connect only one transmitter to the receiver and disable switching to another transmitter. This setting prevents accidental transmitter-switching operation. Setting the fixed mode White illumination Red illumination Press and hold the main button of the (standby)
- Page 13 Transmitter Extension Method (Pairing) Wait for a while until the LED of the receiver blinks in Pairing settings have been made for transmitter and white. Then, pairing starts automatically. receiver of TY-WPS1 Basic Set. “Pairing…” (pairing in progress) is displayed on the Pairing by connecting the receiver and standby screen.
- Page 14 Transmitter Extension Method (Pairing) Continued Remove the USB memory. Pairing by saving a file to the USB memory Supported device Slide the mode switch to the EXT side. ● Commercially available USB memory devices are supported. (Those with security functions are not supported.) ●...
-
Page 15: Installing The Receiver
Installing the Receiver Components for receiver mounting bracket Installing on the ceiling or wall Check the following parts are included. Place the base bracket (A-1) aligning it with Base bracket (A-1) ....1 Sheet A (B-1) ......1 the 4 screw holes on the bottom surface of (DPVF3503ZA/X1) (DPVF3507ZA/X1) the receiver. - Page 16 For details of installation method, read “Operating Instructions - Functional Manual”. Download the “Operating Instructions - Functional Manual” from the following URL. https://panasonic.net/cns/prodisplays/wps2/ Other installation method The receiver can be installed on the display or projector. ● Installing on the display...
-
Page 17: Notes On Using Wireless Lan
Notes on Using Wireless LAN Wireless LAN uses radio waves in the 5 GHz bands. Using the product outside the country ● It is forbidden to take the product outside the country Be sure to read and fully understand the following items or region where you purchased it, so use it only in before use. - Page 18 Authorized Representative: Panasonic Testing Centre Panasonic Service Europe, a division of Panasonic Marketing Europe GmbH Winsbergring 15, 22525 Hamburg, Germany Indoor use restrictions are to be followed for the following countries if using 5 GHz frequency band.
-
Page 19: Request Regarding Security
Request Regarding Security When using this product, take safety measures • A malicious third-party may access your personal against the following incidents. or corporate network without authorization and ● Personal information being leaked via this product engage in the following types of behaviour. ●... - Page 20 Depending on the specifications of the wireless LAN, a malicious third-party may be able to break security settings by special means. Please contact Panasonic if you need help taking care of security settings or other such. If you cannot perform security settings for your wireless LAN by yourself, please contact the Panasonic Support Center.
-
Page 21: Specifications
Specifications ■ ■ Receiver Transmitter Model No. TY-WPR1 Model No. TY-WPB1 TY-WPBC1 WPS USB-C Product name WPS Receiver Product name WPS Transmitter Transmitter Video output HDMI × 1 (HDCP1.4) HDMI × 1 USB Type-C × 1 1920 x 1080/60p, Video input Output resolution (HDCP1.4) (HDCP1.4) -
Page 22: Software License
Web setting screen of this product. At least three (3) years from delivery of this product, Panasonic will give to any third party who contacts us at the contact information provided below, for a charge no more than our cost of physically performing source code distribution, a complete machine-readable copy of the corresponding source code covered under GPL V2.0, LGPL... - Page 23 Any changes or modifications Operation is subject to the following two conditions: (1) not expressly approved by Panasonic Corp. of North This device may not cause harmful interference, and America could void the user’s authority to operate (2) this device must accept any interference received, this device.
- Page 24 Whenever the date of original purchase cannot be satisfactorily determined, the date of manufacture of the unit will be deemed to be the effective date of the warranty. Panasonic reserves the right to audit and reject any warranty claim that cannot be substantiated.
- Page 25 Whenever the date of original purchase cannot be satisfactorily determined, the date of manufacture of the unit will be deemed to be the effective date of the warranty. Panasonic reserves the right to audit and reject any warranty claim that cannot be substantiated.
-
Page 26: Trademark Credits
• USB Type-C and USB-C are trademarks or registered trademarks of USB Implementers Forum. • PressIT is a trademark of Panasonic Corporation. Even if no special notation has been made of company or product trademarks, these trademarks have been fully respected. -
Page 27: Customer's Record
Unit of Panasonic Corporation of North America Executive Office : Two Riverfront Plaza, Newark, New Jersey 07102 Panasonic Testing Centre Panasonic Service Europe, a division of Panasonic Marketing Europe GmbH Winsbergring 15, 22525 Hamburg, F.R. Germany English Web Site: https://panasonic.net/cns/prodisplays/ ©...