Advertisement
Quick Links
Thank you for purchasing a Sealey product. Manufactured to a high standard this product will, if used according to these instructions
and properly maintained, give you years of trouble free performance.
IMPORTANT: PLEASE READ THESE INSTRUCTIONS CAREFULLY. NOTE THE SAFE OPERATIONAL REQUIREMENTS, WARNINGS AND CAUTIONS.
USE THE PRODUCT CORRECTLY AND WITH CARE FOR THE PURPOSE FOR WHICH IT IS INTENDED. FAILURE TO DO SO MAY CAUSE
DAMAGE AND/OR PERSONAL INJURY AND WILL INVALIDATE THE WARRANTY. PLEASE KEEP INSTRUCTIONS SAFE FOR FUTURE USE.
1.
SAFETY INSTRUCTIONS
WARNING! Ensure Health & Safety, local authority, and general workshop practice regulations are adhered to when using this equipment.
F
Familiarise yourself with the applications and limitations of the mortising attachment, as well as the potential hazards.
!
WARNING! Disconnect the drill from the mains power and ensure the spindle is at a complete standstill before changing accessories.
F
Maintain the mortising attachment in good condition.
!
Replace or repair damaged parts. Use genuine parts only. Unauthorised parts may be dangerous and will invalidate the warranty.
!
WARNING! Keep all guards and holding screws in place, tight and in good working order. Check regularly for damaged parts. A guard or
F
any other part that is damaged must be repaired or replaced before the tool is next used.
Keep the work area clean, uncluttered and ensure there is adequate lighting.
!
Keep tool bits and chisels clean and sharp for best and safest performance.
!
WARNING! Always wear approved eye or face protection when using the mortising attachment. Use a face or dust mask if dust is generated.
F
WARNING! DO NOT wear gloves when operating a pillar drill.
F
Keep hands and body clear of the work table when operating the mortising attachment.
!
Maintain correct balance and footing. Ensure the floor is not slippery and wear non-slip shoes.
!
Remove ill fitting clothing. Remove ties, watches, rings and other loose jewellery and contain and/or tie back long hair.
!
Keep children and unauthorised persons away from the work area.
!
Ensure the workpiece is correctly secured before operating the mortising attachment.
!
Remove adjusting keys and wrenches from the machine and its vicinity before turning it on.
!
DO NOT use the mortising attachment for any purpose other than that for which it is designed.
%
DO NOT operate the mortising attachment if any parts are damaged or missing, as this may cause failure and/or personal injury.
%
DO NOT switch the mortising attachment on whilst the bit or chisel is in contact with the workpiece.
%
DO NOT hold the workpiece by hand. Use the clamps provided to secure the workpiece.
%
DO NOT allow untrained persons to operate the mortising attachment.
%
DO NOT operate the mortising attachment when you are tired or under the influence of alcohol, drugs or intoxicating medication.
%
When not in use store in a safe, dry, childproof area.
!
2.
INTRODUCTION & CONTENT
The MA10 Mortising Attachment is designed to fit the following Sealey Pillar Drills: PDM100B, PDM155B, PDM170F, PDM210F. GDM50BX,
GDM90B, GDM95BX, GDM120BX, GDM150BX, GDM140F, GDM160FX, GDM200F and also drills from other leading suppliers.
Content
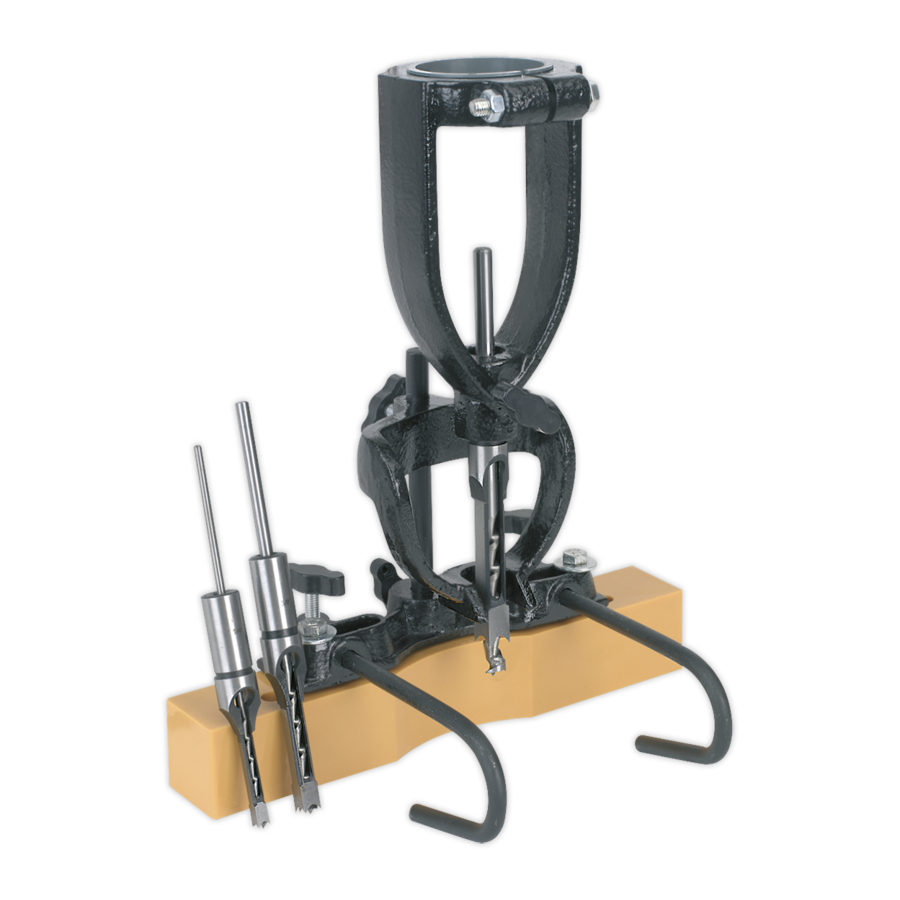
Numbers refer to the item numbers as shown in the assembly diagram.
1. Chisel Holder
4. Thumb Screw (4)
2. Bolt, 5/16 - 18 x 2-1/2” 5. Arm
3. Nut, 5/16” - 18
6. Wing Nut, 5/16” - 18 (2) 9. Rod Holder
3.
ASSEMBLY & USE
3.1.
Loosely fit bolt (2) and nut (3) to chisel holder (1).
3.2.
Mount the chisel holder (1) over the base of the drill quill, using one of the three reducers (14) if necessary, and clamp in place by tightening
nut (3) and bolt (2). Threaded hole for thumb screw (4a), at base of chisel holder (1), should be facing directly forward.
3.3.
Screw thumb screw (4a) into the threaded hole.
3.4.
Insert the drill bit shaft and the chisel shaft up through the hole at the base of the chisel holder (1) so that drill bit shaft enters chuck.
3.5.
With the shoulder on the chisel approximately 1/32” (0.8mm) from the base of the chisel holder (1) lightly clamp the chisel by tightening
the thumb screw (4a).
3.6.
Push the drill bit up as far as it will go and tighten chuck jaws. Release thumb screw (4a) and push chisel up so that shoulder contacts
chisel holder (1), tighten thumb screw (4a). This procedure will give the correct relationship between the cutting edges of the bit and the
points of the chisel.
3.7.
Place 7/8” washers (13) on bolts (12) and then pass bolts up through drill table and through fence (11) and rod holder (9). Clamp with
1-1/4” washers (7) and wing nuts (6).
3.8.
Slide steel rod (10) into central boss in rod holder (9) and clamp with thumb screw (4b). Slide arm (5) onto rod (10) and clamp with
thumb screw (4c).
3.9.
Clamp workpiece against fence (11) by using the two hooked rods (8) through the rod holder (9), retained with thumb screws (4d).
3.10.
Lower arm (5) onto top of workpiece and clamp in position with thumb screw (4c).
Note: If mortise is to go right through workpiece remember to place a strip of wood under workpiece to prevent chisel and bit striking
the drill table.
3.11.
Align chisel with workpiece and commence cutting mortise.
NOTE: It is our policy to continually improve products and as such we reserve the right to alter data, specifications and component parts without prior notice.
IMPORTANT: No liability is accepted for incorrect use of product. WARRANTY: Guarantee is 12 months from purchase date, proof of which will be required
for any claim. INFORMATION: For a copy of our latest catalogue and promotions call us on 01284 757525 and leave your full name and address, including postcode.
Sole UK Distributor, Sealey Group,
Bury St. Edmunds, Suffolk.
INSTRUCTIONS FOR:
WOOD MORTISING ATTACHMENT
Model:
7. Washer, 5/16 x 1-1/4” (2)
8. Curved Rod (2)
01284 757500
MA10
10. Steel Rod
13. Washer, 5/16 x 7/8”(2)
11. Fence
14. Reducer (3)
12. Bolt, 5/16 - 18 x 4” (2)
01284 703534
E-mail: sales@sealey.co.uk
• Chisel & Bit, 1/4”, 3/8”, 1/2”
MA10 - F2030 - (1) - 190301
Advertisement

Related Manuals for Sealey MA10


Summary of Contents for Sealey MA10
- Page 1 MA10 Model: Thank you for purchasing a Sealey product. Manufactured to a high standard this product will, if used according to these instructions and properly maintained, give you years of trouble free performance. IMPORTANT: PLEASE READ THESE INSTRUCTIONS CAREFULLY. NOTE THE SAFE OPERATIONAL REQUIREMENTS, WARNINGS AND CAUTIONS.
- Page 2 ASSEMBLY DIAGRAM FOR: Sole UK Distributor, MORTISING ATTACHMENT Sealey Group, MA10 Bury St. Edmunds, Model: Suffolk. 01284 757500 01284 703534 E-mail: sales@sealey.co.uk MA10 - F2030 - (1) - 190301...