
Related Manuals for Panasonic SF4D-TM1


Summary of Contents for Panasonic SF4D-TM1
- Page 1 Communication Module for the SF4D Series SF4D-TM1 User’s Manual WUME-SF4DTM1-5 2020.3 panasonic.net/id/pidsx...
- Page 2 (MEMO) © Panasonic Industrial Devices SUNX Co., Ltd. 2020...
- Page 3 Thank you for purchasing an SF4D-TM1 communication module for the SF4D series. Before using this product, read and understand this User's Manual and the manual for the light curtain. Use the product correctly and in the optimum manner. Keep this manual in a convenient place for quick reference.
-
Page 4: Table Of Contents
4-14 Function settings / configuration settings ······································· 41 4-15 Muting function ········································································ 42 4-15-1 Timing settings ·····································································42 4-15-2 Each beam axis setting ··························································43 4-16 Blanking function ······································································ 44 4-17 Interlock / external device monitor function ···································· 45 © Panasonic Industrial Devices SUNX Co., Ltd. 2020... - Page 5 5-7-4 Indication linked to test function ·················································83 5-7-5 Interrupt display function ··························································83 5-7-6 Synchronization method and application indication ························84 5-7-7 List of indication colors and ON / Blinking settings ·························84 5-8 Operation monitor function ··························································· 85 © Panasonic Industrial Devices SUNX Co., Ltd. 2020...
- Page 6 5-10 Password-based prevention function of writing to light curtain ············ 87 5-11 Initialization function ·································································· 88 Chapter 6 Troubleshooting ································································89 Chapter 7 Specifications and Dimensions ············································91 7-1 Specifications ············································································ 92 7-2 Dimensions ··············································································· 93 © Panasonic Industrial Devices SUNX Co., Ltd. 2020...
-
Page 7: Chapter 1 Introduction
Chapter 1 Introduction 1-1 Safety Cautions ···········································································8 1-2 Contents of Package ·································································· 10 © Panasonic Industrial Devices SUNX Co., Ltd. 2020... -
Page 8: Safety Cautions
● In the event that the device does not operate correctly, the operator should immediately stop operation and report the problem to the responsible person for use. Do not operate the machine until it has been verified that normal operation has been restored. © Panasonic Industrial Devices SUNX Co., Ltd. 2020... - Page 9 ♦ Maintenance ● When cleaning the device, use a clean cloth. Never use volatile chemicals. ♦ Other matters ● Never modify the device. Risk of death or serious injury due to impaired functionality. © Panasonic Industrial Devices SUNX Co., Ltd. 2020...
-
Page 10: Contents Of Package
1-2 Contents of Package □ Main unit: 1 pc. □ Quick Instruction Manual (Japanese, English, Chinese) 1 pc. for each language □ General Information for Safety, Compliance, and Instructions (23 languages) 1 pc. © Panasonic Industrial Devices SUNX Co., Ltd. 2020... -
Page 11: Chapter 2 Before Using The Device
2-3-2 Disconnecting from the light curtain ············································16 2-3-3 Connecting to a PC ·································································17 2-3-4 Disconnecting from the light curtain ············································18 2-3-5 Connecting to the light curtain and PC ········································19 2-3-6 Disconnecting from the light curtain and PC ·································20 © Panasonic Industrial Devices SUNX Co., Ltd. 2020... -
Page 12: Features
● WRITE This function writes settings saved in the device to a light curtain. Saved data initialization function This function initializes the settings and log data that are saved in the device. © Panasonic Industrial Devices SUNX Co., Ltd. 2020... - Page 13 To change the overall settings of the light curtain, you must change both the settings of the emitter and the settings of the receiver. © Panasonic Industrial Devices SUNX Co., Ltd. 2020...
-
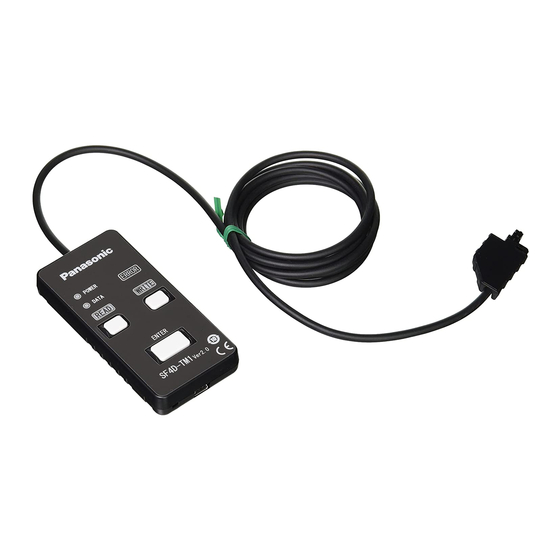
Page 14: Description Of Parts
Lights up when the WRITE key is pressed. Blinks during WRITE communica- 10 WRITE indicator (Orange) tion. 11 ERROR indicator (Yellow) Lights up when an error occurs. 12 Connection cable (1.5m) For connection to the light curtain. © Panasonic Industrial Devices SUNX Co., Ltd. 2020... -
Page 15: Connections
Step 2: Connect the connection cable of the device to the connector inside the light curtain. Connection cable Connector Step 3: Turn ON the light curtain power. Step 4: The device starts. © Panasonic Industrial Devices SUNX Co., Ltd. 2020... -
Page 16: Disconnecting From The Light Curtain
Tighten to a torque of 0.3N·m or less. CAUTION Packing is fitted on the indicator cover. If the packing is not fitted properly, fit as shown below be- fore attaching to the device. © Panasonic Industrial Devices SUNX Co., Ltd. 2020... -
Page 17: Connecting To A
2-3-3 Connecting to a PC Step 1: Connect the device to a PC using a USB 2.0 cable (A: mini-B) (Purchase separately). USB 2.0 cable (A: mini-B) (Purchase separately) Device Step 2: The device starts. © Panasonic Industrial Devices SUNX Co., Ltd. 2020... -
Page 18: Disconnecting From The Light Curtain
Connections 2-3-4 Disconnecting from the light curtain Step 1: Disconnect the USB cable from the device or the PC. Step 2: All indicators on the device turn OFF. © Panasonic Industrial Devices SUNX Co., Ltd. 2020... -
Page 19: Connecting To The Light Curtain And
Step 3: Connect the device to a PC using a USB 2.0 cable (A: mini-B) (Purchase separately). USB 2.0 cable (A: mini-B) (Purchase separately) Device Step 4: The device starts. Step 5: Turn ON the light curtain power. © Panasonic Industrial Devices SUNX Co., Ltd. 2020... -
Page 20: Disconnecting From The Light Curtain And
Tighten to a torque of 0.3N·m or less. CAUTION Packing is fitted on the indicator cover. If the packing is not fitted on the connector properly, fit as shown below before connecting to the device. © Panasonic Industrial Devices SUNX Co., Ltd. 2020... -
Page 21: Chapter 3 Procedures For Operation
Chapter 3 Procedures for Operation 3-1 Procedures for operating the device ··············································· 22 3-2 Copy functions ·········································································· 23 3-2-1 Copy functions: READ function ·················································23 3-2-2 Copy functions: WRITE function ················································24 3-2-3 Saved data initialization function ················································25 © Panasonic Industrial Devices SUNX Co., Ltd. 2020... -
Page 22: Procedures For Operating The Device
When using the device as a standalone unit, you can copy functions set in the light curtain and initialize the device. Description of parts Power indicator (Green) ERROR indicator (Yellow) Data indicator (Orange) WRITE indicator (Orange) READ indicator (Orange) WRITE key READ key ENTER key © Panasonic Industrial Devices SUNX Co., Ltd. 2020... -
Page 23: Copy Functions
The settings and log data in the connected light curtain are copied to the device. Disconnect the connection cable of the device from the connector inside the light curtain. © Panasonic Industrial Devices SUNX Co., Ltd. 2020... -
Page 24: Copy Functions: Write Function
Disconnect the connection cable of the device from the connector inside the light curtain. Note: Data copied by the copy function may disappear due to external causes. After copying, check the operation of the light curtain before use. © Panasonic Industrial Devices SUNX Co., Ltd. 2020... -
Page 25: Saved Data Initialization Function
The data indicator (orange) turns OFF. The settings and logs saved in the device are erased and initialized. Disconnect the connection cable of the device from the connector inside the light curtain. © Panasonic Industrial Devices SUNX Co., Ltd. 2020... - Page 26 Procedures for Operation (MEMO) © Panasonic Industrial Devices SUNX Co., Ltd. 2020...
-
Page 27: Chapter 4 Software Tool
4-18-1 How to set the application indicator function ·······························46 4-18-2 How to set the interrupt display function ····································47 4-19 Light curtain configuration function ··············································· 48 4-20 Input / output wire setting function ················································ 49 © Panasonic Industrial Devices SUNX Co., Ltd. 2020... -
Page 28: System Configuration
The software tool can be used to configure settings for various functions of the light curtain. You can download the software tool from our Website. URL: https://industrial.panasonic.com/ac/e/dl_center/software/index.jsp Enter "SF4D-TM1" in "Filter by part number / model number type" to search for the tool. 2. USB cable Use a commercially available USB cable. -
Page 29: System Requirements
The following two items can be uninstalled. 1. Configurator Light Curtain 2. Windows Driver Package - SF-TM1 (usbser) Ports (11/15/2007 ** ) Select "Start" - "Control Panel" - "Programs and Functions" to uninstall. © Panasonic Industrial Devices SUNX Co., Ltd. 2020... -
Page 30: Connection And Disconnection Procedures
The device is intended to be connected to the light curtain temporarily for the purpose of configur- ing light curtain functions and diagnosing problems. The device is not intended to be connected permanently to the light curtain. © Panasonic Industrial Devices SUNX Co., Ltd. 2020... -
Page 31: Starting And Exiting The Software Tool
Follow the steps below to start the "Configurator Light Curtain" software tool. Step 1 Click the Windows start button. Step 2 From All Programs, select "Panasonic-ID SUNX Safety" - "Configurator Light Curtain" - "Configurator Light Curtain". Step 3 The "Configurator Light Curtain" software tool starts and the Start screen appears. -
Page 32: Creating A New File
5. Copy the settings of the currently selected channel to all other channels. 6. Finalize the settings. The settings can be changed after you finalize them. 7. Cancel the settings and return to the start screen. © Panasonic Industrial Devices SUNX Co., Ltd. 2020... -
Page 33: Opening An Existing File
When you select a file and click "Open", the following screen appears. Check the contents. Click "OK" to move to the function settings / configuration settings screen. To return to the start screen, click "Cancel". © Panasonic Industrial Devices SUNX Co., Ltd. 2020... - Page 34 Software Tool When you click "OK", the function settings / configuration settings screen appears. © Panasonic Industrial Devices SUNX Co., Ltd. 2020...
-
Page 35: Reading Data From The Light Curtain
If ON, a dialog box will appear asking for approval. If OFF, the next screen will appear. Check the contents. Click "OK" to move to the function settings / configuration settings screen. To return to the start screen, click "Cancel". © Panasonic Industrial Devices SUNX Co., Ltd. 2020... - Page 36 Software Tool When you click "OK", the function settings / configuration settings screen appears. © Panasonic Industrial Devices SUNX Co., Ltd. 2020...
-
Page 37: Reading Data From The Communication Module
The following screen will appear. Check the contents. Click "OK" to move to the function settings / configuration settings screen. To return to the start screen, click "Cancel". © Panasonic Industrial Devices SUNX Co., Ltd. 2020... - Page 38 Software Tool When you click "OK", the function settings / configuration settings screen appears. © Panasonic Industrial Devices SUNX Co., Ltd. 2020...
-
Page 39: Monitoring Light Curtain Operation
6. Return to the start screen. The screen color changes in response to the light reception state of the light curtain. Stable light reception state Unstable light reception state Light blocked state © Panasonic Industrial Devices SUNX Co., Ltd. 2020... -
Page 40: Opening A File From The "Recently Opened Files" List
Use either of the methods below to exit the software tool. Method 1 Select "Exit" from " " at the left end of the toolbar. Method 2 Click " " in the upper right corner of the screen. © Panasonic Industrial Devices SUNX Co., Ltd. 2020... -
Page 41: Function Settings / Configuration Settings
6. Configure and edit the application indicator function and interrupt display function settings. 7. Configure and edit the light curtain configuration settings. 8. Select the connection cable to be used and configure / edit the input / output function set- tings. © Panasonic Industrial Devices SUNX Co., Ltd. 2020... -
Page 42: Muting Function
10. Finalize the settings and return to the function settings / configuration settings screen. 11. Cancel the settings and return to the function settings / configuration settings screen. For function details, refer to "5-3 Muting function (12-core cable)". © Panasonic Industrial Devices SUNX Co., Ltd. 2020... -
Page 43: Each Beam Axis Setting
7. Finalize the settings and return to the function settings / configuration settings screen. 8. Cancel the settings and return to the function settings / configuration settings screen. For function details, refer to "5-3 Muting function (12-core cable)". © Panasonic Industrial Devices SUNX Co., Ltd. 2020... -
Page 44: Blanking Function
7. Finalize the settings and return to the function settings / configuration settings screen. 8. Cancel the settings and return to the function settings / configuration settings screen. For function details, refer to "5-4 Blanking function". © Panasonic Industrial Devices SUNX Co., Ltd. 2020... -
Page 45: Interlock / External Device Monitor Function
7. Cancel the settings and return to the function settings / configuration settings screen. For function details, refer to "5-5 Interlock Function" and "5-6 External device monitor setting (8-core cable, 12-core cable)". © Panasonic Industrial Devices SUNX Co., Ltd. 2020... -
Page 46: Application Indicator Function And Interrupt Display Function
Step 3 If the color button becomes valid, click the color button and select the display color. (Se- lection is restricted in some cases.) Step 4 Select "Lights" or "Blinking" for application indicator input 1 and application indicator in- put 2. © Panasonic Industrial Devices SUNX Co., Ltd. 2020... -
Page 47: How To Set The Interrupt Display Function
Step 2 If the color button becomes valid, click the color button and select the display color. (Selection is restricted in some cases.) Step 3 Select "Lights" or "Blinking" for muting and override. For function details, refer to "5-7 Application Indicator Function". © Panasonic Industrial Devices SUNX Co., Ltd. 2020... -
Page 48: Light Curtain Configuration Function
5. Copy the settings of the currently selected channel to all other channels. 6. Finalize the settings. The settings can be changed after you finalize them. 7. Cancel the settings and return to the start screen. © Panasonic Industrial Devices SUNX Co., Ltd. 2020... -
Page 49: Input / Output Wire Setting Function
7. Cancel the settings and return to the function settings / configuration settings screen. For function details, refer to "5-1 Input / output wire settings" and "5-2 Input / output speci- fications". © Panasonic Industrial Devices SUNX Co., Ltd. 2020... - Page 50 Software Tool (MEMO) © Panasonic Industrial Devices SUNX Co., Ltd. 2020...
-
Page 51: Chapter 5 Functions
5-7-3 Indication linked to interlock ······················································83 5-7-4 Indication linked to test function ·················································83 5-7-5 Interrupt display function ··························································83 5-7-6 Synchronization method and application indication ························84 5-7-7 List of indication colors and ON / Blinking settings ·························84 © Panasonic Industrial Devices SUNX Co., Ltd. 2020... - Page 52 5-9-2 Locking the read function ·························································86 5-9-3 Locking the initialization function ················································86 5-9-4 Locking writing of settings from a PC ··········································86 5-10 Password-based prevention function of writing to light curtain ············ 87 5-11 Initialization function ·································································· 88 © Panasonic Industrial Devices SUNX Co., Ltd. 2020...
- Page 53 To change the overall settings of the light curtain, you must change both the settings of the emitter and the settings of the receiver. © Panasonic Industrial Devices SUNX Co., Ltd. 2020...
-
Page 54: Input / Output Wire Settings
Optical synchronization / standard specification Optical synchronization Optical synchronization / application indicator-based speci- Optical synchronization 5-core cable fication / PNP output Optical synchronization / application indicator-based speci- Optical synchronization fication / NPN output © Panasonic Industrial Devices SUNX Co., Ltd. 2020... -
Page 55: Auxiliary Output Function Assignment (12-Core Cable, 8-Core Cable)
When test input is valid, the light curtain emitter stops emission, causing the receiver to change to the light blocked state, but the receiver cannot distinguish between this state and the normal light blocked state. © Panasonic Industrial Devices SUNX Co., Ltd. 2020... -
Page 56: Input / Output Specifications
ON when light − − − − − − − is received OFF when locked out ON when locked out (The symbol "−" indicates either ON or OFF depending on the light curtain state.) © Panasonic Industrial Devices SUNX Co., Ltd. 2020... - Page 57 Switch S1 Vs to Vs-2.5V (source current 5mA or less): Emission halt (Note), Open: Emission K1, K2: External device (forcible guide relay or magnetic conductor), etc. Note: Vs is the supply voltage. © Panasonic Industrial Devices SUNX Co., Ltd. 2020...
- Page 58 (Gray) NC (Red) Auxiliary output 2 *Symbols Switch S1 0 to +2.5V (sink current 5mA or less): Emission halt, Open: Emission K1, K2: External device (forcible guide relay or magnetic conductor), etc. © Panasonic Industrial Devices SUNX Co., Ltd. 2020...
-
Page 59: Parallel Interference Prevention Specification (12-Core Cable)
Auxiliary output 2 Parallel interference prevention output When set to the parallel interference prevention specification (12-core cable), auxiliary output 1 of the light curtain emitter operates as indicated in the table below. © Panasonic Industrial Devices SUNX Co., Ltd. 2020... - Page 60 ON when light − − − − − − − is received OFF when locked out ON when locked out (The symbol "−" indicates either ON or OFF depending on the light curtain state.) © Panasonic Industrial Devices SUNX Co., Ltd. 2020...
- Page 61 (Pale blue) Output polarity setting / Lockout release input (Blue) 0V Gray cable (with black line) (Pink) Muting input A (Yellow) Muting input B (Red) Parallel interference prevention output (Gray) not used © Panasonic Industrial Devices SUNX Co., Ltd. 2020...
- Page 62 (Pale blue) Output polarity setting / Lockout release input (Pale purple) External device monitor input (Blue) 0V Gray cable (with black line) (Pink) Muting input A (Yellow) Muting input B (Red) Parallel interference prevention output (Gray) Not used © Panasonic Industrial Devices SUNX Co., Ltd. 2020...
-
Page 63: Optical Synchronization / Standard Specification (12-Core Cable)
ON when light − − − − is received OFF when locked out ON when locked out (The symbol "−" indicates either ON or OFF depending on the light curtain state.) © Panasonic Industrial Devices SUNX Co., Ltd. 2020... - Page 64 ● Test / reset input (receiver), application indicator input 1 / 2, interlock setting input Vs to Vs-2.5V (sink current 5mA or less): Valid (Note), Open: Invalid K1, K2: External device (forcible guide relay or magnetic conductor), etc. Note: Vs is the supply voltage. © Panasonic Industrial Devices SUNX Co., Ltd. 2020...
- Page 65 ● Test / reset input (receiver), application indicator input 1 / 2, interlock setting input 0 to +2.5V (source current 5mA or less): Valid, Open: Invalid K1, K2: External device (forcible guide relay or magnetic conductor), etc. © Panasonic Industrial Devices SUNX Co., Ltd. 2020...
- Page 66 ON when test − input is valid OFF when locked out ON when locked out (The symbol "−" indicates either ON or OFF depending on the light curtain state.) © Panasonic Industrial Devices SUNX Co., Ltd. 2020...
- Page 67 ● Override input Vs to Vs-2.5V (sink current 5mA or less): Invalid (Note), Open: Valid K1, K2: External device (forcible guide relay or magnetic conductor), etc. Note: Vs is the supply voltage. © Panasonic Industrial Devices SUNX Co., Ltd. 2020...
- Page 68 ON when test − input is valid OFF when locked out ON when locked out (The symbol "−" indicates either ON or OFF depending on the light curtain state.) © Panasonic Industrial Devices SUNX Co., Ltd. 2020...
- Page 69 0 to +2.5V (source current 5mA or less): Valid, Open: Invalid Switch S5 ● Override input 0 to +2.5V (source current 5mA or less): Invalid, Open: Valid K1, K2: External device (forcible guide relay or magnetic conductor), etc. © Panasonic Industrial Devices SUNX Co., Ltd. 2020...
-
Page 70: Standard Specification (8-Core Cable)
ON when light is − − − − − received OFF when locked ON when locked out (The symbol "−" indicates either ON or OFF depending on the light curtain state.) © Panasonic Industrial Devices SUNX Co., Ltd. 2020... - Page 71 (Black) Control output 1 (OSSD 1) (White) Control output 2 (OSSD 2) Gray cable (with black line) (Pale blue) Output polarity setting / Lockout release input (Blue) 0V *Symbols K1, K2: Safety relay unit, etc. © Panasonic Industrial Devices SUNX Co., Ltd. 2020...
-
Page 72: Optical Synchronization / Standard Specification (5-Core Cable)
(Black) Control output 1 (OSSD 1) (White) Control output 2 (OSSD 2) 24V DC (Pale blue) Output polarity setting / Lockout release input (Blue) 0V Gray cable (with black line) *Symbols K1, K2: Safety relay unit, etc. © Panasonic Industrial Devices SUNX Co., Ltd. 2020... -
Page 73: Pnp Output (5-Core Cable)
Vs to Vs-2.5V (sink current 5mA or less): Emission halt (Note), Open: Emission Switch S2 ● Application indicator input 1 Vs to Vs-2.5V (sink current 5mA or less): Valid (Note), Open: Invalid K1, K2: Safety relay unit, etc. Note: Vs is the supply voltage. © Panasonic Industrial Devices SUNX Co., Ltd. 2020... -
Page 74: Npn Output (5-Core Cable)
0 to +2.5V (source current 5mA or less): Emission halt, Open: Emission Switch S2 ● Application indicator input 1 0 to +2.5V (source current 5mA or less): Valid, Open: Invalid K1, K2: Safety relay unit, etc. © Panasonic Industrial Devices SUNX Co., Ltd. 2020... -
Page 75: Muting Function (12-Core Cable)
Not incorporated Not incorporated 12-core cable specification synchronization Optical synchronization / muting Optical Incorporated Valid specification / PNP output synchronization Optical synchronization / muting Optical Incorporated Valid specification / NPN output synchronization © Panasonic Industrial Devices SUNX Co., Ltd. 2020... -
Page 76: Muting Mode
0.1 sec. to 60 sec. The value can be set in increments of 0.1 sec. The factory settings are 0 sec. for the minimum value and 3 sec. for the maximum value. © Panasonic Industrial Devices SUNX Co., Ltd. 2020... -
Page 77: Muting Maximum Continuous Valid Time
To set by specifying beam axes, set muting function valid / invalid separately for each beam axes. © Panasonic Industrial Devices SUNX Co., Ltd. 2020... -
Page 78: Blanking Function
OFF then ON.) ● When the fixed blanking function is used, the light curtain's digital indicator / received light amount (green) remains OFF regardless of the intensity of light received. © Panasonic Industrial Devices SUNX Co., Ltd. 2020... -
Page 79: Floating Blanking Function
<Minimum sensing object> Floating blanking function Settings Not set 1 beam channel 2 beam channel 3 beam channel SF4D-F□ ø14mm ø24mm ø34mm ø44mm SF4D-H□ ø25mm ø45mm ø65mm ø85mm SF4D-A□ ø45mm ø85mm ø125mm ø165mm © Panasonic Industrial Devices SUNX Co., Ltd. 2020... -
Page 80: Interlock Function
Not incorporated Not possible Optical synchronization / application indicator-based Not incorporated Not possible 5-core cable specification / PNP output Optical synchronization / application indicator-based Not incorporated Not possible specification / NPN output © Panasonic Industrial Devices SUNX Co., Ltd. 2020... -
Page 81: Interlock Mode
Set the maximum allowed response time for an external device connected to the light curtain. Settable range: 100 to 600ms (increments of 10ms) The factory setting is 300ms. If the set allowed delay time is exceeded, the light curtain lockout state activates. © Panasonic Industrial Devices SUNX Co., Ltd. 2020... -
Page 82: Application Indicator Function
Notes: 1) The light curtain emitter is only equipped with application indicator input 1. 2) In the case of optical synchronization, indication only takes place on the light curtain emitter. 3) The light curtain emitter and receiver are each equipped with application indicator input 1. © Panasonic Industrial Devices SUNX Co., Ltd. 2020... -
Page 83: Indication Linked To Control Output (Ossd 1 / 2)
“5-7-1 Indi- cation by application indicator input”, “5-7-2 Indication linked to control output (OSSD 1 / 2)”, or “5-7-3 Indication linked to interlock”. ● Lockout ● Muting ● Override © Panasonic Industrial Devices SUNX Co., Ltd. 2020... -
Page 84: Synchronization Method And Application Indication
Lockout, muting, and override can be selected at the same time as the above settings. If application indicator inputs 1 / 2 are input at the same time, the indication color will be a mix- ture of the selected colors. © Panasonic Industrial Devices SUNX Co., Ltd. 2020... -
Page 85: Operation Monitor Function
● Fixed blanking beam axis ● Floating blanking beam axis The following outputs can be forced ON or OFF. ● Auxiliary output 1 (emitter) ● Auxiliary output 2 (receiver) ● Muting auxiliary output (emitter) © Panasonic Industrial Devices SUNX Co., Ltd. 2020... -
Page 86: Protection Functions
PC. When "Look writing of settings from a PC" is set in the device, settings can still be initialized and read from and written to the light curtain. © Panasonic Industrial Devices SUNX Co., Ltd. 2020... -
Page 87: Password-Based Prevention Function Of Writing To Light Curtain
We recommend that you set a password and enable the protection functions to prevent third parties from changing settings. ● Manage the password carefully to ensure that you do not forget it. In the event that you forget the password, contact us. © Panasonic Industrial Devices SUNX Co., Ltd. 2020... -
Page 88: Initialization Function
To change over- all settings, you must change both the settings of the emitter and the settings of the receiver. © Panasonic Industrial Devices SUNX Co., Ltd. 2020... -
Page 89: Chapter 6 Troubleshooting
Chapter 6 Troubleshooting © Panasonic Industrial Devices SUNX Co., Ltd. 2020... - Page 90 When the light curtain is configured for optical synchronization, data was synchronization, always read / write to both the only written to either the emitter and the receiver. emitter or the receiver. © Panasonic Industrial Devices SUNX Co., Ltd. 2020...
-
Page 91: Chapter 7 Specifications And Dimensions
Chapter 7 Specifications and Dimensions 7-1 Specifications ············································································ 92 7-2 Dimensions ··············································································· 93 © Panasonic Industrial Devices SUNX Co., Ltd. 2020... -
Page 92: Specifications
2) If the SF4D Ver3.0 product is used with this product, restrictions will apply to the version of this product. When using the SF4D Ver. 3.0 product with this product, use this product of Ver.2.0 or later. © Panasonic Industrial Devices SUNX Co., Ltd. 2020... -
Page 93: Dimensions
Dimensions 7-2 Dimensions (Units: mm) 20.4 ø3.7 cable (0.6) 15.4 © Panasonic Industrial Devices SUNX Co., Ltd. 2020... - Page 94 Revision History First edition January 10, 2017 Second edition March 24, 2017 Third edition October 13, 2017 Fourth edition September 28, 2018 Fifh edition March 27, 2020 © Panasonic Industrial Devices SUNX Co., Ltd. 2020...
- Page 95 3. DISCLAIMERS (1) Panasonic Industrial Devices SUNX’s sole obligation and liability under this warranty is limited to the repair or re- placement, or refund of the purchase price, of a defective Product, at Panasonic Industrial Devices SUNX’s option.
- Page 96 Please contact ..Panasonic Industrial Devices SUNX Co., Ltd. https://panasonic.net/id/pidsx/global Please visit our website for inquiries and about our sales network. © Panasonic Industrial Devices SUNX Co., Ltd. 2020 March, 2020 PRINTED IN JAPAN WUME-SF4DTM1-5...