Table of Contents
Advertisement
Quick Links
Advertisement
Table of Contents

Related Manuals for Brother CS-8072


Summary of Contents for Brother CS-8072
- Page 1 ® ewing achine OPERATION MANUAL...
-
Page 2: Important Safety Instructions
IMPORTANT SAFETY INSTRUCTIONS When using this machine, basic safety precautions should always be taken, including the following: Read all instructions before using. DANGER - To reduce the risk of electric shock: 1. The machine should never be left unattended while plugged in. Always unplug the machine from the electrical outlet immediately after using and before cleaning. - Page 3 FOR USERS IN THE UK, EIRE, MALTA If this machine is fitted with a three-pin non-rewireable BS plug then please read the following. IMPORTANT If the available socket outlet is not suitable for the plug supplied with this equipment, it should be cut off and an appropriate three-pin plug fitted.
- Page 4 In the event a malfunction occurs or adjustment is required, first follow the troubleshooting table in the back of the operation manual to inspect and adjust the machine yourself. If the problem per- sists, please consult your local authorized Brother dealer. For additional product information and updates, visit our web site at www.brother.com...
-
Page 5: Table Of Contents
CONTENTS CHAPTER 1 BEFORE USE ... 4 PART NAMES ... 4 STANDARD ACCESSORIES ... 6 OPTIONAL ACCESSORIES ... 6 OPERATION PANEL ... 7 OPERATION BUTTONS ... 8 Using the operation buttons ... 8 POWER SUPPLY ... 9 BOBBIN WINDING / BOBBIN THREAD SETTING ... - Page 6 MAINTENANCE ... 67 CLEANING THE MACHINE ... 67 Cleaning the operation panel ... 67 Cleaning the machine casing ... 67 Cleaning the race and shuttle ... 67 CHANGING THE LIGHT BULB ... 69 TROUBLE SHOOTING ... 70 Trouble with threads and stitches ... 70 Mechanical trouble ...
-
Page 7: Before Use
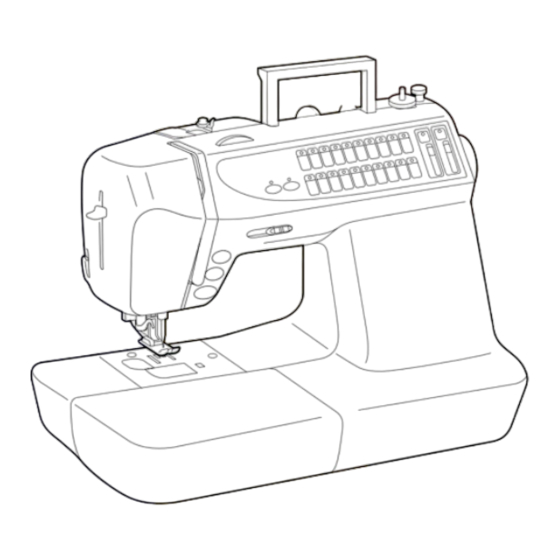
BEFORE USE PART NAMES 1– Handle 2– Spool cap 3– Thread guide for bobbin winding 4– Needle threader lever 5– Thread cutter 6– Buttonhole lever 7– Needle threader 8– Presser foot 9– Feed dog 10– Bobbin cover 11– Feed dog position switch 12–... - Page 8 A. MAIN POWER SWITCH AND CONNECTORS 1 Main power switch Use to turn on/off the main power. 2 Foot controller jack Use to connect the foot controller. 3 Power cord Use to connect the machine to the power supply. CAUTION –...
-
Page 9: Standard Accessories
STANDARD ACCESSORIES OPTIONAL ACCESSORIES Needle set 75/11: 90/14: 90/14 Ball point needle (gold colored) (for stretch fabrics): Cleaning brush Screwdriver (large) Screwdriver (small) Bobbin (3) Spool cap (small) Spool cap (large) Eyelet punch Spool net* Extra spool pin* Spool felt Disc-shaped screwdriver Foot controller Hard case... -
Page 10: Operation Panel
OPERATION PANEL 21 22 23 24 C. OPERATION PANEL 1 Needle stop position switch key Touch this key to select the needle stop position (the needle position when the machine is not operating) to be up or down. When the LED lamp is lit, the needle stop position is down. When the LED lamp is turned off, the needle stop position is up. -
Page 11: Operation Buttons
OPERATION BUTTONS Using the operation buttons D. OPERATION BUTTONS 1 Sewing speed controller Slide this lever to change the sewing speed. 2 “NEEDLE POSITION” button Press this button to move the needle either up or down. 3 “REVERSE STITCH” button Hold down this button to sew either backwards or in the same place at a slow speed. -
Page 12: Power Supply
POWER SUPPLY WARNING • Use only regular household electricity for the power source. Using other power sources may result in fire, electric shock, or damage to the machine. • Turn off the main power and remove the plug in the following circumstances: - When you are away from the machine - After using the machine - When the power fails during use... -
Page 13: Bobbin Winding / Bobbin Thread Setting
BOBBIN WINDING / BOBBIN THREAD SETTING Winding the bobbin and setting the bobbin thread CAUTION Use only bobbins recommended by the manufacturer of this machine (see page 5). Using other bobbins may result in damage or injury. 1. Connect the machine to the power supply and turn on the main power. - Page 14 3. Pass the thread through the thread guide as shown by the 4. Align the groove in the bobbin with the spring on the shaft and 1 Spring on the shaft 2 Groove of the bobbin 5. Wind the thread clockwise around the bobbin four or five times, 1 Bobbin winder seat 6.
-
Page 15: Setting The Bobbin
Setting the bobbin CAUTION Setting the bobbin improperly may cause the thread tension to loosen, breaking the needle and resulting in injury. 1 Wound evenly 2 Wound poorly 1. Slide open the bobbin cover. 1 Bobbin cover 2 Bobbin cover release button 2. -
Page 16: Upper Threading
UPPER THREADING CAUTION Be sure to thread the machine properly. Improper threading can cause the thread to tangle and break the needle, leading to injury. Note When threading the sewing machine, be sure that one of the presser feet mentioned in this Operation Manual is installed. - Page 17 4. While holding the end of the thread with your left hand, pass the thread through the guides in the order shown by the num- bers. Note If the thread is pushed down at 1 to make it taut, it can be passed around the other thread guides more easily.
- Page 18 8. Lower the needle threader lever all the way down using your left index finger. Check that the thread is held by the guide (large hook) and that the third hook on the needle threader has passed through the eye of the needle. 1 Second set of hooks 2 Third hook 9.
-
Page 19: Using The Extra Spool Pin And The Net
Using the extra spool pin and the net Extra spool pin Use when sewing with metallic thread. 1. Insert the extra spool pin onto the end of the bobbin winder shaft. 2. Install the spool felt and the thread spool in that order, and then thread the upper thread. -
Page 20: Starting And Stopping Sewing
STARTING AND STOPPING SEWING “START/STOP” button Foot controller 1 Place the fabric under the presser foot, lower the presser foot, and then press the “START/STOP” button. The sewing ma- chine starts sewing. Slide the sewing speed controller to adjust the sewing speed. Hold down the “START/STOP”... -
Page 21: Selecting A Stitch Pattern
SELECTING A STITCH PATTERN 21 22 23 24 25 26 This sewing machine is equipped with 40 built-in utility and decorative stitches. Press the stitch selection key that shows the stitch you want to sew. The LED lamp will light up. If the stitch you want to sew is shown on the right side of the stitch selection key, touch the stitch pat- tern switch key. -
Page 22: Quick Adjustment Reference Chart For Stitch Width And Stitch Length
Quick adjustment reference chart for stitch width and stitch length Stitch width [mm (in.)] STITCH Auto Manual Straight stitch 0.0–7.0 (Left) (0–1/4) Straight stitch — — (Middle) 0.0–7.0 Zigzag stitch (1/8) (0–1/4) 3 step elastic 1.5–7.0 zigzag (3/16) (1/16–1/4) Triple stretch 0.0–7.0 stitch (0–1/4) -
Page 23: Thread Tension
THREAD TENSION Correct upper thread tension Loosening the upper thread tension The thread tension is normally set on “4” for gen- eral sewing applications. (Refer to the FABRIC/ THREAD/NEEDLE COMBINATION CHART on page 26.) However, the thread tension dial can be used to adjust the tension of the upper thread in the follow- ing cases. -
Page 24: Tightening The Upper Thread Tension
Tightening the upper thread tension Turn the thread tension dial to the right to tighten the upper thread tension. 1 Upper thread 2 Bobbin thread 3 Wrong side 4 If the upper thread tension is too weak, locks appear on the wrong side of the fabric. -
Page 25: Presser Foot
PRESSER FOOT Changing the presser foot CAUTION • Always turn off the power before changing the presser foot. If the power is on and the “Start/ Stop” button or another button is pressed, the machine will start and may cause injury. •... -
Page 26: Attaching The Optional Walking Foot
ATTACHING THE OPTIONAL WALKING FOOT This foot is very useful for sewing materials such as vinyl cloth, synthetic leather, thin leather, etc. These materials are difficult to feed when sewing but this foot can prevent such materials from crumpling, slipping or sticking to presser foot thanks to even feeding of upper and lower materials. -
Page 27: Feed Dog
FEED DOG With the accessory compartment off of the machine, the feed dog position switch can be seen on the base of the sewing machine. Sliding the switch to the right will lower the feed dog, for example during button sewing. If you wish to continue sewing normally, slide the lever to the left in order to raise the feed dog. -
Page 28: Needle
NEEDLE Checking the needle CAUTION • Turn the main power switch to OFF before changing the needle. If the main power is left on and the “START/STOP” button or another operation button is pressed accidentally, the machine will start and injury may result. •... -
Page 29: Fabric/Thread/Needle Combination Chart
FABRIC/THREAD/NEEDLE COMBINATION CHART About the Needle The sewing machine needle is probably the most important part of the sewing machine. Choosing the proper needle for your sewing project will result in a beautiful finish and fewer problems. Below are some things to keep in mind about needles. -
Page 30: Sewing
1. SEWING TRIAL SEWING Sewing using a utility stitch CAUTION • To avoid injury, pay special attention to the needle while the machine is in operation. Keep your hands away from moving parts while the machine is in operation. • Do not stretch or pull the fabric during sewing. Doing so may lead to injury. •... - Page 31 3. While pressing down on the thread and the fabric with your left hand, turn the balance wheel with your right hand to move the needle to the sewing start position. 1 Thread You can begin sewing without drawing up the bobbin thread. 4.
-
Page 32: Setting The Needle Stop Down Position
SETTING THE NEEDLE STOP DOWN POSITION If you set the needle stop position to the down position when you select a stitch, the needle stops in the down position when sewing is finished. It is not necessary to press the “NEEDLE POSITION” button to lower the needle before rotating the fabric when continuously starting and stopping sewing. -
Page 33: Stitch Width And Length
STITCH WIDTH AND LENGTH Generally suitable stitch width and length values are set automatically when a stitch is selected. If you prefer to use other values, follow the instructions below to change the values. Adjusting the stitch width Adjusting the stitch length In the following cases, the stitch width manual change key and the stitch length manual change key’s LED lamps will be off, and the stitch width and length will return to the default values When the main power switch is turned to ON. -
Page 34: Useful Skills
USEFUL SKILLS Sewing corners Sewing curves Stop the sewing machine with the needle in the fabric at the cor- ner, then raise the presser foot and turn the fabric. When sewing seams which are less than 5.0 mm (13/64" in width), baste the corner, then continue sewing while slowly changing the sewing direction and pulling the basting thread toward the rear of the machine. -
Page 35: Sewing Heavyweight Fabrics
Sewing heavyweight fabrics Sewing lightweight fabrics The sewing machine can sew fabrics up to 6 mm(1/4 '') thick. If the thickness of a seam causes sewing to occur on an angle, help guide the fabric by hand and sew on the downward slope. CAUTION Do not forcefully push fabrics more than 6 mm (1/4'') thick through the sewing machine. -
Page 36: Using The Needle Plate
Using the needle plate Free-arm sewing Align the edge of the fabric with a line on the needle plate to sew even seam allowances. 1 15 mm (9/16") Free-arm sewing is convenient for sewing tubular areas such as pant hems and cuffs. -
Page 37: Utility Stitches
2. UTILITY STITCHES STRAIGHT STITCHES 1: Straight stitch (left needle position) for normal sewing 2: Straight stitch (middle needle position) for normal sew- 5: Triple stretch stitch for reinforced sewing 1. Baste or pin the fabrics together. 2. Attach presser foot “J”, sew three or four reverse stitches at the beginning, then start sewing. -
Page 38: Sewing Stretch Fabrics
Sewing stretch fabrics Changing the stitch length Changing the needle position (only “ Baste the fabric pieces together, then sew along the basting with- out pulling the fabric. Do not pull the fabric while sewing. 1 Basting Press the stitch length manual change key to light up the LED lamp. -
Page 39: Zigzag Stitches
ZIGZAG STITCHES Overcasting (using a zigzag stitch) Appliqué (using a zigzag stitch) Patchwork (for crazy quilts) Sewing curves (using a zigzag stitch) 3: Zigzag stitch 4: Elastic zigzag stitch Sew the overcasting along the edge of the fabric so that the right- hand side needle drop point is over the edge of the fabric. -
Page 40: Overcasting Stitches
OVERCASTING STITCHES Sewing using stitch Sewing using stitch 4: For sewing stretch fabrics 6: For sewing stretch fabrics 7: For sewing light and medium weight fabrics 8: For sewing heavyweight fabrics Sew the fabric with the fabric edge against the guide of presser foot “G”. -
Page 41: Optional Side Cutter)
OVERCASTING (WHEN USING THE OPTIONAL SIDE CUTTER) 1: Normal sewing 7: Overcasting stitch for light and medium weight fabrics 8: Overcasting stitch for heavyweight fabrics 1. Push the “NEEDLE POSITION” button to raise the needle, then turn off the power. 2. - Page 42 7. Make a cut of about 20 mm (3/4'') in the fabric. 1 20 mm (3/4'') 8. Place the fabric on foot as shown in figure B. Right side of cut: on top of the guide plate Left side of cut: underneath the presser foot 1 Guide plate (lower knife) 2 Presser foot 9.
-
Page 43: Blind Hem Stitching
BLIND HEM STITCHING 9: For woven fabrics 10: For stretch fabrics (jersey, knit fabrics) 1. Place the fabric wrong side up. Fold and baste the fabric as illustrated. 1 5 mm (3/16'') 2 Basting stitches 3 Wrong side of the fabric 2. -
Page 44: Adjusting The Needle Drop Point
Adjusting the needle drop point Press the stitch width manual change key to light up the LED lamp. Use the stitch width adjustment lever to adjust the needle drop point so that the needle slightly catches the fold of the hem. A- If the needle catches too much of the hem fold, move the stitch width adjustment lever down. -
Page 45: Buttonhole Stitching
BUTTONHOLE STITCHING Note Before sewing a buttonhole on your project, practice on a scrap piece of the same type of fabric. 11: Rounded buttonhole on light to medium weight fabric 12: Squared buttonhole for light and medium weight fab- rics *1 13: Squared heavy-duty buttonhole with reinforced bar tacks in medium to heavyweight fabrics *3 14: Stretch buttonhole with reinforced bar tacks in light to... - Page 46 4. Lower the buttonhole lever so that it is positioned behind the metal bracket on the buttonhole foot. 1 Metal bracket 5. Gently hold the end of the upper thread, and then start sew- ing. Feed the fabric carefully by hand while the buttonhole is sewn.
-
Page 47: Buttonhole Sewing Order
Buttonhole sewing order Sewing stretch fabrics (“ ” and “ ”) When sewing on stretch fabric with over a gimp thread. 1. Hook the gimp thread onto the back of presser foot “A”. Insert the ends into the grooves at the front of the presser foot, and then temporarily tie it there. -
Page 48: Odd Shaped Buttons/Buttons That Do Not Fit Into The Button Holder Plate
Odd shaped buttons/Buttons that do not fit into the button holder plate 3. Once sewing is completed, gently pull the gimp thread to re- move any slack, and trim off any excess. After using the seam ripper to cut open the threads over the buttonhole, trim off the threads. -
Page 49: Changing The Stitch Length
Changing the stitch length Changing the stitch width Press the stitch length manual change key to light up the LED lamp. Move the stitch length adjustment lever up or down to ad- just the stitch length. 1 Up: Longer 2 Down: Shorter If the fabric does not feed (for example, because the fabric is too thick), move the stitch length adjustment lever up to in- crease the stitch length. -
Page 50: Eyelet Stitch
EYELET STITCH Size of eyelet (actual size) For sewing eyelets on belts, etc. 1. Press the stitch width manual change key to turn on the LED lamp. 2. Use the stitch width adjustment lever to select the eyelet size. 1 Large 2 Medium 3 Small When the stitch width is at the default setting (the stitch width... -
Page 51: Zipper Insertion
ZIPPER INSERTION Centered zipper For attaching zippers CAUTION Make sure you sew using the middle needle position. 1. Attach presser foot “J” and sew straight stitches up to the zip- per opening. Change to a basting stitch and sew to the top of the fabric. -
Page 52: Inserting A Side Zipper
Inserting a side zipper CAUTION Make sure you sew using the middle needle position. 1. Attach presser foot “J” and sew straight stitches up to the zip- per opening. Change to a basting stitch and sew to the top of the fabric. - Page 53 5. Close the zipper, turn the fabric over, and sew a basting stitch. 1 Front of the skirt (wrong side of fabric) 2 Basting stitches 3 Front of the skirt (right side of fabric) 4 Back of the skirt (right side of fabric) 6.
-
Page 54: Dart Seam
DART SEAM 1. Attach presser foot “J”, then sew a reverse stitch at the begin- ning of the dart and sew from the wide end to the narrow end without stretching the fabric. 1 Basting 2. Do not sew a reinforcement stitch at the end. Cut the thread at the end leaving an excess 50 mm(2"), and then tie both ends together. -
Page 55: Gathering
GATHERING For the waists of skirts, the sleeve openings of shirts, etc. 1. Press the stitch length manual change key to turn on the LED lamp. 2. Move the stitch length adjustment lever up to increase the stitch length (about 4 mm (1/16")) as shown left figure, and select a weak thread tension. -
Page 56: Pulling Up The Bobbin Thread
Pulling up the bobbin thread 1. Pass the thread along the groove in the direction of the arrow, and leave it there without cutting it. 1 Shuttle The bobbin cover should still be removed. 2. While holding the upper thread, press the “NEEDLE POSI- TION”... -
Page 57: Pintuck
PINTUCK For decorating blouses, etc. 1. Mark along the folds on the wrong side of the fabric. 1 Wrong side of fabric 2. Fold the fabric so that the right side faces upward and iron only the folded parts. 1 Right side of fabric 3. -
Page 58: Flat Fell Seam
FLAT FELL SEAM For reinforcing seams and neatly finishing edges 1. Attach presser foot “J”. Sew the seam line, then cut half of the seam allowance from the side that the flat fell seam will lie against. 1 About 12 mm (1/2") 2 Wrong side of fabric 2. -
Page 59: Finished Flat Fell Seam
Finished flat fell seam 1 Right side of fabric... -
Page 60: Appliqués
APPLIQUÉS Sewing sharp curves 1. Use a temoprary spray adhesive, fabric glue or a basting stitch to attach the appliqué to the fabric. This will keep the fabric from moving during sewing. 1 Appliqué 2 Fabric glue 2. Attach presser foot “J”. Check that the needle drops slightly off the edge of the appliqué, then begin sewing. -
Page 61: Scallop Stitch
SCALLOP STITCH For decorating the collars of blouses, the edges of tablecloths, etc. 1. Attach presser foot “N”, then sew the edge of the fabric so that the stitches are not right on the edge of the fabric. 1 Right side of fabric 2. -
Page 62: Smocking Stitch
SMOCKING STITCH For making decorative stitching 1. Select “ ” press the stitch length manual change key to turn on the LED lamp. Move the stitch length adjustment lever up to increase the stitch length (about 4 mm (3/16")) as shown left figure, and select a weak thread tension. -
Page 63: Fagoting
FAGOTING For fagoting, decorating, etc. 1. Baste two pieces of fabric onto thin paper, leaving a space of 4 mm (3/16'') between the fabrics. 1 4 mm (3/16'') 2 Paper 3 Basting stitches 2. Attach presser foot “J”. Align the center of the presser foot with the middle of the space between the fabrics and begin sewing. -
Page 64: Decorative Stitching
DECORATIVE STITCHING Decorative stitching Changing the size of a decorative stitch These stitches are used as decorative hem stitches or to deco- rate the seams of crazy quilts. Use a contrasting thread color or decorative embroidery thread. Use the stitch width or stitch length keys to adjust the zigzag stitch width and the stitch length. -
Page 65: Hemstitch (Heirloom Stitch)
HEMSTITCH (HEIRLOOM STITCH) Hemstitching 1 27 28 29 30 31 32 For sewing tablecloths, decorative hems on clothes and deco- rative stitching on shirtfronts. A more attractive finish can be obtained if you use the “130/705H Wing” needle when sewing these patterns. If using a wing needle and the stitch width has been set to manual, check that the needle will not touch the presser foot before start- ing sewing. -
Page 66: Hemstitching 2
Hemstitching 2 25 26 27 28 29 30 5. Illustration of finished product. 27 28 1. Press the key to turn on the LED lamp, and press the stitch pattern switch key to select the stitch for hemstitching. Check that the stitch pattern switch key's LED lamp is lit. 1 Lamp is lit 2 Lamp is lit 2. -
Page 67: Twin Needle
TWIN NEEDLE CAUTION • Use only twin needles made for this machine (part code X59296-001). Other needles could break, resulting in damage. • Do not sew with bent needles. The needle could break and cause injury. • When using the twin needle, use the presser foot “J” regardless of what kind of sewing will be carried out. - Page 68 4. Set the extra spool pin into the hole on the end of the bobbin winder shaft on the top of the machine. Follow the instructions for single-needle threading. 1 Extra spool pin for right needle threading. 2 Push the spool pin securely into place. 5.
-
Page 69: Sewing
SEWING Sewing attractive finishes Refer to the table below and the “FABRIC/THREAD/NEEDLE COMBINATION CHART” for recommended fabrics, threads and needles to use in order to obtain attractive sewing finishes. Furthermore, pattern slippages may occur when using different fabric thicknesses or types of stabilizers. Be sure to carry out a test sewing beforehand to check. -
Page 70: Maintenance
MAINTENANCE CLEANING THE MACHINE CAUTION Be sure to unplug the machine before cleaning it. Otherwise, electric shock or injury may result. Cleaning the operation panel If the operation panel is dirty, gently wipe it with a soft, dry cloth. Do not use organic solvents or detergents. Cleaning the machine casing If the surface of the machine is dirty, lightly soak a cloth in a neutral detergent, squeeze it out firmly and then wipe the surface. - Page 71 4. Remove the race. While pushing the race towards the back of the machine, lift the edge nearest you and remove the race. 1 Race 5. Remove accumulated lint and thread from the inner shuttle and race with a brush or vacuum cleaner.
-
Page 72: Changing The Light Bulb
CHANGING THE LIGHT BULB CAUTION • Turn off the main power switch and unplug the machine before changing the light bulb. If the machine is on and the “Start/Stop” button is pressed accidentally, injuries may result. • To avoid burns, give the light bulb time to cool before changing it. 1. -
Page 73: Trouble Shooting
TROUBLE SHOOTING Trouble with threads and stitches Before calling for service, check the following items. If the problem still persists, contact your nearest author- ized Brother dealer. Symptom 1. Upper thread breaks 2. Bobbin thread breaks 3. Skipped stitches 4. Fabric puckers 5. -
Page 74: Mechanical Trouble
Mechanical trouble Symptom 1. Fabric is not fed properly 2. Needle breaks 3. Machine does not start Note – If the power goes out while the sewing machine is being operated: Turn off the sewing machine and unplug its power cord. When the sewing machine is restarted, operate it correctly according to the operating procedure. -
Page 75: Sewing Chart
SEWING CHART STRAIGHT STITCH (LEFT) STRAIGHT STITCH (MIDDLE) ZIGZAG STITCH 3 STEP ELASTIC ZIGZAG TRIPLE STRETCH STITCH OVERCASTING STITCH BLIND HEM STITCH BLIND HEM STITCH STRETCH ROUNDED BUTTONHOLE SQUARED BUTTONHOLE STRETCH BUTTONHOLE HEIRLOOM BUTTONHOLE KEYHOLE BUTTONHOLE BLANKET STITCH FEATHER STITCH FAGOTING CROSS STITCH General sewing, gathering, pintuck, etc. - Page 76 SCALLOP STITCH Decorating collar of blouse, edge of handkerchief EYELET For making eyelet on belt,etc SATIN STITCH For decoration, etc. CROSS STITCH For decoration etc. HEMSTITCHING Decorative and heirloom stitching Decorative topstitching For decoration, etc. DECORATIVE STITCH For decoration, etc.
- Page 77 DECORATIVE STITCH The machine sews in reverse while the “REVERSE STITCH” button is pushed. The machine sews three reinforcement stitches and stops when the “REVERSE STITCH” button is pushed. Adjustments can be made. – : Adjustments cannot be made. CAUTION Make sure to use the correct presser foot for each stitch pattern.
-
Page 78: Patterns (Programmed In Machine)
PATTERNS (PROGRAMMED IN MACHINE) Utility stitches Decorative stitches Satin stitches Cross stitches Heirloom Decorative stitch... - Page 82 ENGLISH 194953-011 0012 Printed in Taiwan...