
Related Manuals for LG BU20N


Summary of Contents for LG BU20N
- Page 1 OWNER’S MANUAL Ultra Slim Blu-ray/DVD Writer To enjoy fully all the features and functions of your product, please read this owner’s manual carefully and completely. BU20N www.lg.com...
-
Page 2: Safety Instructions
Safety Instructions The laser used in the writer can damage your eyes. Do not CAUTION: attempt to open the cover. To reduce the risk of electric shock, do not remove the cover (or back). There are no user-serviceable parts inside. Refer servicing to qualified service personnel. -
Page 3: Table Of Contents
Information in this document is subject to change without notice. © 2015 HLDS, Inc. All rights reserved. Trademarks used in this text: HLDS is a trademark of HLDS, Inc.; LG and the LG logo are trademarks of LG Electronics., Inc. Microsoft and Windows are registered trademarks of... -
Page 4: Introduction
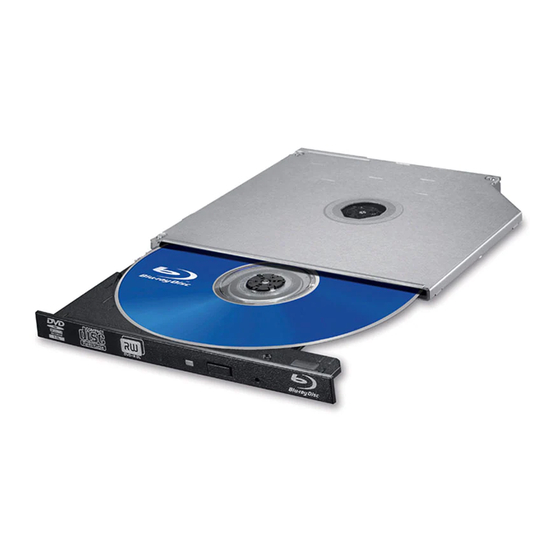
Introduction Drive Description This drive reads and writes to CD, DVD, and BD media. Features of the Drive • 9.5 mm height internal Ultra Slim BD/DVD Writer Drive. • CD-R/RW, DVD-R/-R DL/ -RW/ +R/ +R DL/ +RW, DVD-RAM, BD-RE/R read and write compatible. -
Page 5: Using The Drive
Using the Drive Front Panel This following is the general figure of the design of the drive. The drive’s appearance and specifications may change without prior notice. 1. E mergency Eject Hole If the disc tray does not open when you press the eject button, power off the computer, insert a pin or unfolded paper clip in the hole and push firmly. - Page 6 Drive Operation Inserting a Disc • Press the eject button. The disc tray will be ejected. • Place the disc in the center of the tray with the label side facing up. • Push disc onto hub until secure. • Push the disc tray by hand and close completely. Removing a Disc •...
- Page 7 Emergency Eject The procedure described below can be used to remove a disc from the drive if the eject button is disabled by software or a power failure occurs. 1. Turn the computer off. 2. Insert a small diameter rod or a stiff wire (a straightened paper clip about 1.2 mm [0.047 in] in diameter) into the emergency eject hole and push firmly.
-
Page 8: Drive Connectors
Drive Connectors Slim SATA Drive Connectors... -
Page 9: Troubleshooting
Troubleshooting Please refer to the Introduction section to determine if the drive in your system is a slim device. Symptoms and Solutions Symptoms Solutions 1. Drive is not 1-1. Turn off the system, remove the drive, and re-insert back recognized by system. to the system. - Page 10 Symptoms Solutions 7. Cannot write to disc 7-1. Is the disc loaded in the drive with the read/write surface (for drives with write facing the right direction? The label should be up. If a disc capability). does not have a label, the disc code on the inner side of the disc should be properly oriented for reading when looking from the top of the disc.
-
Page 11: Specifications
Specifications System Interface Host Interface T13 ATA/ATAPI-8 MMC-6, INF-8090i v8 BD-ROM (SL/DL), BD-R (SL/DL), Applicable disc BD-R (TL/QL), BD-RE (SL/DL), BD-RE TL formats DVD-ROM, DVD-R, DVD-R DL, DVD-RW, DVD-RAM (Ver. 2.2), DVD+R, DVD+R DL, DVD+RW CD-ROM Mode-1 data disc, CD-ROM Mode-2 data disc , CD-ROM XA, CD-I, Photo-CD Multi-Session, Video CD, CD-Audio Disc, Mixed mode CD-ROM disc (audio), CD-Extra, CD-Text, CD-R (“Orange... - Page 12 Specifications Read BD-ROM 6 x max. Read BD-R 6 x max. SL/DL/TL/QL/SL LTH Read BD-RE SL/DL 6 x max. Read BD-RE TL 4 x max. Write BD-R SL/DL 6 x max. Write BD-R SL(M-DISC) 4 x max. Write BD-R TL/QL 4 x max.
- Page 13 2015 Made by LG Electronics. ©...