
Related Manuals for LG WD12590D6


Summary of Contents for LG WD12590D6
- Page 1 OWNER’S MANUAL WASHING MACHINE Please read this manual carefully before operating your washing machine and retain it for future reference. WD12590D6 WD12595D6 www.lg.com P/No.: MFL48165948...
-
Page 2: Table Of Contents
Contents........2 Thank you for buying a LG Fully Product feature......3 Automatic Washing Machine. Warnings Important safety instructions ....4 Please read your owner’s manual Save these instructions......4 carefully, it provides instruction on safe installation, use and maintenance. Specification ......5 Retain it for future reference. -
Page 3: Product Feature
roduct Feature Direct Drive System The advanced Brushless DC motor directly drives the drum without belt and pulley. Water Circulation Sprays detergent solution and water onto the load over and over. Clothes are soaked more quickly and thoroughly during wash cycle. The detergent suds can be removed more easily by the water shower during rinse cycle. -
Page 4: Warnings
arnings READ ALL INSTRUCTIONS BEFORE USE For your safety, the information in this manual must be followed to minimize WARNING! the risk of fire or explosion, electric shock, or to prevent property damage, personal injury, or loss of life. IMPORTANT SAFETY INSTRUCTIONS WARNING : To reduce the risk of fire, electric shock, or injury to persons when using the washer, follow basic precautions, including the following: •... -
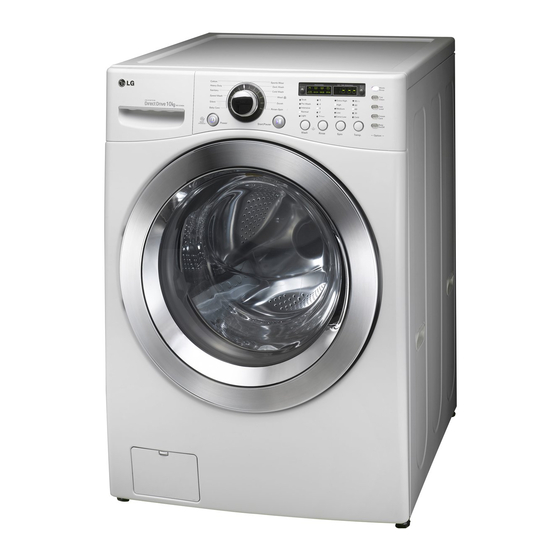
Page 5: Specification
pecification Shipping Bolts Power Plug Inlet Hose If the supply cord is damaged, it must be replaced by the manufacturer or its authorized Dispenser service technician in order to avoid a hazard. Control Panel Drum Back of Washer Cold Water Inlet Door Air Vent for Safety Hot Water Inlet... -
Page 6: Transit Bolts
nstallation Install or store where it will not be exposed to temperatures below freezing or exposed to the weather. Properly ground washer to conform with all governing codes and ordinances. The base opening must not be obstructed by carpeting when the washing machine is installed on a carpeted floor. -
Page 7: Installation Place Requirement
nstallation Installation place requirement Level floor : Drain Hose Allowable slope under entire washer is 1° Washer Power outlet : Must be within 1.5 meters of either side of location of washer. Do not overload the outlet with more than one Laundry appliance. -
Page 8: Electrical Connection
nstallation Electrical connection 1. Do not use an extension cord or double adapter. 2. If the supply cord is damaged, it must be replaced by the manufacturer or its service agents or similarly qualified person in order to avoid a hazard. 3. -
Page 9: Connecting Water Supply Hose
nstallation Connecting water supply hose • Water supply pressure must be between 7.3 ~ 116 PSI (50 ~ 800 kPa). • Do not strip or crossthread when connecting inlet hose to the valve. • If the water supply pressure is more than 800 kPa, a decompression device should be installed. •... - Page 10 nstallation Type-C : Connecting one touch type hose to tap without thread 1. Unscrew the adapter ring plate and the 4 adapter retaining screws. 2. Remove the guide plate if the tap is Ring plate too large to fit the adapter. Guide plate 3.
-
Page 11: Installation Of Drain Hose
nstallation This equipment is not designed for maritime use or for use in mobile installations such as caravans, aircraft etc. Turn off the tap if the machine is to be left for any length of time (e.g. holiday), especially if there is no floor drain(gully) in the immediate vicinity. -
Page 12: Level Adjustment
• If possible install the washer in one of the corners of the room, where the floor is more stable. ※ ※ Insert the rubber cups to reduce vibration. ※ ※ Rubber cups ( p/no. 4620ER4002B ) can be purchased from the LG spare parts department. Important! •... -
Page 13: Care Before Washing
are before washing Before the first washing Select a cycle (COTTON 60°C, add a half load of detergent) allow the unit to wash without clothing. This will remove residues from the drum that may have been left during manufacturing. Caring before washing 1. -
Page 14: Adding Detergent
dding detergent Adding detergent and fabric softener 1. The Dispenser Drawer • Main wash only ➔ • Pre Wash + Main Wash ➔ 2. Adding Fabric Softener • Do not exceed the maximum fill line. Close the dispenser drawer slowly. Overfilling can cause early dispensing of the fabric softener which could stain clothes. - Page 15 dding detergent ❋ Tips 3. Detergent dosage Full load : according to • The detergent should be used according to the manufacturer’s recommendation. instruction of the detergent manufacture. Part load : 3/4 of the normal amount. • If too much detergent is used, too many suds Minimum load : 1/2 of full load.
-
Page 16: Function
unction Recommended courses according to the laundry type Proper Temp. Additional Maximum Program Fabric Type (Option) Option Load Soak Pre Wash 40˚C Intensive Color fast garments (shirts, nightdresses, Medium Soiled (Cold, 30˚C, Cotton pajamas, etc) and normally soiled cotton Rating Light 60˚C) No Wash... -
Page 17: How To Use Washer
ow to use washer • Water Temperature: Select water temperature to suit wash cycles. Always follow garment manufacture’s care label or instructions when washing. • Set program at “Cotton 40°C, Intensive, 3 Rinses, Extra High Spin” is for normally soiled load (10 kg) and test in accordance or in conformity with AS/NZS 2040.2. -
Page 18: Power
ow to use washer (10) (11) (1)Button: Power (4)Button: Wash (7)Button: Spin (10)Button: Favorite (2)Dial: Program (5)Child lock (8)Button: Temperature (11)Button: Delay Wash (3)Button: Start/Pause (6)Button: Rinse (9)Button: Option Power Program 1. Power • Press the Power( ) button to turn power on and off. -
Page 19: Start/Pause
ow to use washer Start/Pause Wash • By pressing the Wash button, the Wash type can be selected. 1. Start NOTE: Depending on the selected • This Start/Pause button is used to start program cycle, not all wash cycle or pause the wash cycle. Options may be selectable. -
Page 20: Child Lock
ow to use washer Child lock Rinse • By pressing the Rinse button, the Rinse type can be selected. If you choose to lock the buttons on the control assembly to prevent tampering, this function may be selected. • Child lock can be set by pressing and holding the Wash and Rinse button •... -
Page 21: Spin
ow to use washer Spin Water Temperature • By pressing the Spin button, • By pressing the Temp. the spin speed can be button, the water chosen. temperature can be selected. - Cold - 30˚C / 40˚C / 60˚C / 95˚C •... -
Page 22: Medic Rinse
ow to use washer Medic Rinse Add Load For best results or for Use this function to add loads or remove the foreign cleaner rinsing. material. This allows the final rinse to be heated to 40 degrees. • How to use “Add Load” 1. -
Page 23: Crease Care
ow to use washer Crease Care Delay Wash If you want to prevent creasing, select Crease Care option. 1. Press the Power button. 2. Select a cycle. Preparing washing before starting “DELAY WASH” - Turn on the water tap. 3. Press the Crease Care button. - Load laundry and close the door. -
Page 24: Display
ow to use washer Display 3. Completion of washing • When washing cycle is completed, “ ” is displayed on the “Multi display”. 1. Special function display 4. Time left • When time delay is selected, it shows the • During washing cycle, the remaining washing remaining times to finish the selected time is displayed. -
Page 25: The Water Inlet Filter
aintenance ❋ Before cleaning the washer interior, unplug the electrical power cord to avoid electrical shock to avoid electrical shock hazards. ❋ When disposing of the appliance, cut off the mains cable, and destroy the plug Disable the door lock to prevent young children being trapped inside. The water inlet filter - "... -
Page 26: The Drain Pump Filter
aintenance The drain pump filter ❋ The drain filter collects threads and small objects left in the laundry. Check regularly that the filter is clean to ensure smooth running of your machine. CAUTION First drain using the drain hose and then open the pump filter to remove whatever any threads or objects. -
Page 27: Dispenser Drawer
aintenance Dispenser drawer ❋ After a while detergents and fabric softeners leave a deposit in the drawer. • It should be cleaned from time to time with a jet of running water. • If necessary it can be removed completely from the machine by pressing the catch downward and by pulling it out. -
Page 28: The Water Circulation Nozzle
aintenance The water circulation nozzle • Clean the water circulation nozzle, if clogged. Cleaning your washer 1. Exterior Proper care of your washer can extend its life. The outside of the machine can be cleaned with warm water and a neutral non abrasive household detergent. -
Page 29: Trouble Shooting Guide
roubleshooting guide ❋ This washing machine is equipped with automatic safety functions which detect and diagnose faults at an early stage and react appropriately. When the machine does not function properly or does not function at all, check the following points before you contact your service provider. Symptom Possible Cause Solution... - Page 30 roubleshooting guide Symptom Possible Cause Solution Water in the washer • Drain hose is kinked or Clean and straighten the drain hose. does not drain or clogged. drains slowly. • The drain filter is clogged. Clean the drain filter. Washer does not •...
- Page 31 roubleshooting guide Symptom Possible Cause Solution Check another tap in the house. • Water supply is not adequate in area Fully open tap. • Water supply taps are not completely open. Straighten hose(s). • Water inlet hose(s) are kinked. Check the filter of the inlet hose(s). •...
-
Page 32: Using Smartdiagnosis
Accordingly, LG does not guarantee that Smart Diagnosis would accurately troubleshoot any given issue.