Table of Contents
Advertisement
Available languages
Available languages
Quick Links
WP-DC32
キヤノンデジタルカメラ ウォータープルーフケース
ユーザーガイド
Canon Digital Camera Waterproof Case
User Guide
Wasserdichtes Gehäuse für Canon Digitalkamera
Benutzerhandbuch
Canon Funda impermeable para cámara digital
Guía del usuario
Boîtier étanche pour appareils photo numériques Canon
Guide d'utilisation
Canon Custodia Impermeabile per Fotocamera Digitale
Guida dell'utente
日本語
ENGLISH
DEUTSCH
ESPAÑOL
FRANÇAIS
ITALIANO
中文
Advertisement
Table of Contents

Related Manuals for Canon WP-DC32


Summary of Contents for Canon WP-DC32
- Page 1 Canon Digital Camera Waterproof Case User Guide DEUTSCH Wasserdichtes Gehäuse für Canon Digitalkamera Benutzerhandbuch ESPAÑOL Canon Funda impermeable para cámara digital Guía del usuario FRANÇAIS Boîtier étanche pour appareils photo numériques Canon Guide d’utilisation ITALIANO Canon Custodia Impermeabile per Fotocamera Digitale Guida dell’utente 中文...
- Page 2 日本語 本書と保証書をよくお読みのうえ、正しくお ●取り扱い上の不注意により、万一、水漏れ 使いください。また、お読みになった後は、 事故を起こした場合、内部機材(カメラや 大切に保管してください。 バッテリー、メモリーカードなど)の損 保証書は必ず「購入店・購入日」などの記入 傷、および記録内容や撮影に要した諸費用 を確かめて、購入店でお受け取りください。 などの補償はご容赦ください。また、本製 品の不具合により撮影されなかった場合の お使いになる前に 付随的損害(撮影、撮影に要した諸費用お ●お買い上げいただきありがとうございま よび得るべき利益の損失など)について す。キヤノンデジタルカメラにウォーター は、補償いたしかねます。 プルーフケースを装着すると、雨天時や海 ●カメラに付属のカメラユーザーガイドもよ 辺、スキ-場での撮影のほか、水深 40m くお読みください。 以内での水中撮影を楽しむことができま す。 ●ご使用前に、必ず、正常に動作するか、 水漏れはないかを確認してください。水 漏れを確認するには、カメラを入れる前 に、ウォータープルーフケースを閉じ、 約 15cm の深さの水に 3 分間ほど沈め てください。さらに、カメラを入れた状 態でも同様の確認をしてください。水漏 れが起きたときは、修理受付窓口へお持 ちください。...
- Page 3 付属品の確認 安全上のご注意 本製品のパッケージには、以下の製品が入っ ●ご使用の前にこの「安全上のご注意」をよ ています。万一、不足のものがありましたら、 くお読みのうえ、正しくお使いください。 お手数ですがお買い求めの販売店までご連絡 ●ここに示した注意事項は、製品を安全に正 ください。 しくお使いいただき、あなたや他の人々へ の危害や損害を未然に防止するためのもの • ウォータープルーフケース WP-DC32 です。その表示と意味は次のようになって • ネックストラップ います。内容をよく理解してから本文をお • リストストラップ 読みください。 • 拡散板 • 防水パッキン用シリコングリース この表示を無視して、誤った取り扱 • ユーザーガイド(本書) いをすると、人が死亡または重傷を • 保証書 警告 負う可能性が想定される内容です。 必ずお守りください。 この表示を無視して、誤った取り扱 いをすると、人が重傷を負う可能性 注意 が想定される内容および物的損害の みの発生が想定される内容です。必 ずお守りください。...
- Page 4 注意 警告 ウォータープルーフケースを使用したあとは、 分解や改造をしないでください。水漏れの原 因となります。 必ずカメラを取り出してください。カメラを入 れたまま、直射日光のあたる場所や高温になる 防水パッキンやその接触面に傷を付けたり、 ところに放置しておくと、発火や破裂などの原 異物(砂やゴミ、頭髪など)を挟み込まない 因になることがあります。 ようにしてください。水漏れの原因となりま す。 ウォータープルーフケースを浮き袋代わりに使 用しないでください。 40 ℃を超える温水の中では使用しないでくだ さい。熱によって変形し、水漏れの原因とな 水中でのネックストラップのご使用は、ネック ります。 ストラップが首に巻きつくなど、思わぬ怪我や 事故の恐れがありますので、水中では、ネック 直射日光が当たる場所、熱器具の近く、夏季 の密閉した車内などの高温になる所に放置し ストラップを外して、リストストラップをお使 ないでください。熱によって変形し、水漏れ いください。 の原因となります。直射日光の当たる所では、 タオルなどをかけて遮光してください。 注意 水深 40m を超える水中では使用しないでくだ さい。動作不良や故障、水漏れの原因となり ます。 水中でウォータープルーフケースのボタンや レバーを必要以上に強く押さないでください。 ケースがゆがんで、水漏れの原因となります。 洗浄する際、防水パッキンに水道水を勢いよ く当てないでください。水漏れの原因となり ます。...
- Page 5 取り扱い上のご注意 の原因となりますので、ご注意ください。な お、結露してしまったときは、ウォータープ ●ウォータープルーフケースを投げたり、落と ルーフケースからカメラを取り出し、ウォー したりしないでください。 タープルーフケースとカメラについた水滴を ●付属のシリコングリース以外のオイル、薬品 乾いたやわらかい布で拭き取り、それぞれ数 などは、ウォータープルーフケースの強度を 時間放置してください。 損なうことがありますので、使用しないでく ださい。付着した場合は、すぐに拭き取って ください。 ●海辺や海上でのウォータープルーフケースの 開閉は、できるだけ避けてください。カメラ の取り付けやメモリーカード、バッテリーの 交換などは、湿気の少ない、潮風の当たらな い場所で行ってください。 ●高温での長時間のご使用は避けてください。 ●寒冷地でお使いのときは、バッグに入れるな どして極端に冷えないようにし、撮影すると きのみ出して使用するようにしてください (寒冷地では、通常よりもバッテリーの使用時 間が短くなります) 。また、周囲温度0℃以下 でのご使用はおすすめできません。 ●短い時間で寒暖の差が大きい場所へ移動する と、ウォータープルーフケースの内部に水滴 がつくこと(結露)があります。結露は故障...
- Page 6 水漏れについて ●防水パッキンをウォータープルーフケース 万一、水漏れが確認された場合には、ただち から取り外すときは、防水パッキンに傷を に撮影を中止してください。そのまま使用す 付けないよう、指で外してください(図 1 ると発火や感電の原因となりますので、絶対 参照) 。爪を立てたり、先のとがったものや に使用しないでください。ウォータープルー 金属などをお使いにならないでください。 フケース内部とカメラの水分を十分に拭き取 ●防水パッキンは、引っ張らないようにして ください。防水パッキンを引っ張ると伸び り、至急、お近くの修理受付窓口へお持ちく てしまい、ケースが閉まりにくくなり、水 ださい。 漏れの原因になります。 ●防水パッキンをウォータープルーフケース 防水パッキンについて に取り付けるときは、よじれたり、無理に 引っ張ったり、高さが違わないよう十分に ●防水パッキンに異物(砂やゴミ、頭髪な ご注意のうえ、正しく装着しているかを必 ど)が付いていると、水漏れの原因になり ずご確認ください。 ます。髪の毛一本、また微小な砂粒一個が 挟まっているだけで水漏れする場合があり ます。 防水パッキン 図 1...
- Page 7 ●シリコングリースを塗りすぎると、水漏れ お手入れのしかた の原因になります(米粒 1 粒程度が適量で ●使用後は、ウォータープルーフケースの外 す) 。塗りすぎないように注意してくださ 部を、なるべく早く真水(30 ℃以下の水 い。 道水など)で十分に洗ってください。海で ●シリコングリースを塗るときには、布や紙 使用した場合は、塩分を落とすため真水に などを使わないでください。 数時間漬けておくことをおすすめします。 ●防水パッキンの傷やひび割れは水漏れの原 ケース内部に水が入らないように、バック 因となります。ただちに修理受付窓口へお ルがしっかりロックされていることを確認 持ちください。有償で新しい防水パッキン してください。水洗い終了後は、乾いたや と交換します。 わらかい布で水分を十分に拭き取ってくだ さい。砂などが付いたまま直接拭くと表面 ウォータープルーフケースの防水性能を維 に傷を付ける恐れがあります。また、塩分 持するために、1 年に 1 度は下記の方法 が付いたままにしておくと、金属部分がさ で防水パッキンの交換をおすすめします。 びたり、ボタンが動きにくくなることがあ • 修理受付窓口で、有償にて交換させてい ります。ウォータープルーフケース内部 ただきます。 は、乾いた布で拭き、水洗いしないでくだ • 修理受付窓口で販売しておりますので、 さい。...
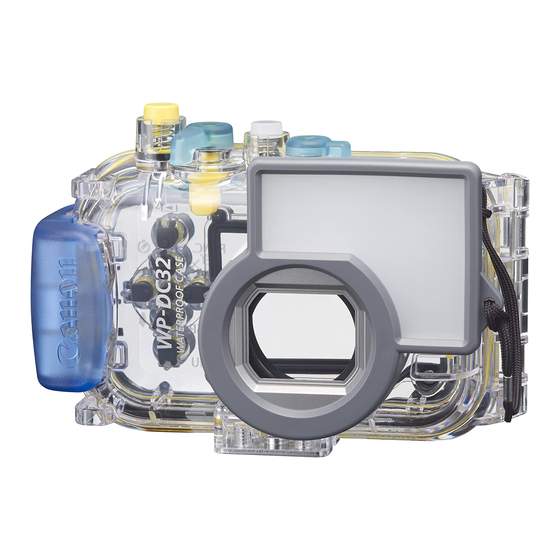
- Page 8 各部の名称 背面 前面 (再生)ボタン ストラップ取り付け部 モード シャッターボタン スイッチ ズームレバー 電源ボタン Q(セルフタイ マー)/o ボタン ロック解除 スイッチ (ストロボ)/ r ボタン n(メニュー)ボタン 拡散板 l(ディスプレイ) / p ボタン レンズ窓 グリップ / mFUNC./SET(ファンクション / バックル 三脚ねじ穴 セット)ボタン レンズ窓についてのご注意 (マクロ)/ (遠景)/q ボタン レンズ窓が汚れていると、撮影画像に汚れが 写り込んでしまう場合がありますので、乾い たやわらかい布で軽く拭き取ってください。...
- Page 9 準備 カメラを準備します バッテリーとメモリーカードを入れます。 • カメラで使用するバッテリーの型番およ びバッテリーとメモリーカードの入れか たは、カメラユーザーガイドでご確認く ださい。 • 十分に充電されたバッテリーをお使いく ださい。 • メモリーカードの撮影可能枚数をご確認 ください。...
- Page 10 ウォータープルーフケースを準備します ネックストラップを図のように 2ヶ所に取 カメラのストラップを外します。 り付け、首にかけやすい長さに調節してく ださい。 ストラップ ストラップを付けた ままカメラを入れる と、ウォータープ ウォータープルーフケースのリス トストラップを取り付ける場合 ルーフケース開閉部 にストラップを挟み、 水漏れの原因となり ます。...
- Page 11 ロック解除スイッチを矢印の方向へずらし ネックストラップは、海辺でカメラを首にか ながら、バックルを外してケースを開きま けるときにお使いください。水中では、ネッ す。 クストラップを外して、リストストラップを • くもり止め(市販)をお使いになる場合は、 お使いください。ネックストラップをお使い になると、首に巻きつくなど、思わぬけがや レンズ窓の内側のみにお使いください。く 事故の恐れがあります。 もり止めを塗る際には、乾いたやわらかい 布をお使いください。くもり止めがレンズ ウォータープルーフケースに、カメラに付 窓の内側以外に付着した場合、ウォーター 属のストラップを使用しないでください。 プルーフケースの劣化をまねく恐れがあり ますので、すぐに拭き取ってください。...
- Page 12 ウォータープルーフケースにカメラ 防水パッキンの摩耗や劣化を防ぐためウォー を入れます タープルーフケースを使用する前に、パッキ ン全面にごく薄くシリコングリースを塗って カメラを図のように入れます。 ください。 防水パッキンの取り扱い上の注意について は、 「防水パッキンについて(p.5) 」を参照 してください。 1. 防水パッキンを取り外します。 2. 防水パッキンと防水パッキンが埋め込ま れていた溝の異物(砂やゴミ、頭髪など) を綿棒などで拭き取ります。 3. 指にシリコングリースを少量 (米粒 1 粒程 度)取ります。 4. 傷を付けないように注意しながら、防水 パッキン全面に均一にシリコングリース ウォータープルーフケースを閉じます。 を塗ります。 • 防水パッキンやその接触面、接点部に異 5. 防水パッキンを溝に取り付けます。 物(砂やゴミ、頭髪など)が付いていな いことをよく確認してください。髪の毛 一本、また微小な砂粒一個が挟まってい るだけで、水漏れすることがあります。...
- Page 13 撮影 • バックルがしっかりロックされているこ とを確認してください。 モードスイッチ 電源ボタン ズームレバー シャッターボタン モードスイッチを矢印のように回し、カメ (ストロボ)/r ボタン ラのモードスイッチとかみ合わせます。 n(メニュー)ボタン mFUNC./SET (ファンクション / セット) ボタン q ボタン...
- Page 14 電源ボタンを押して、電源を入れます。 画面を見ながら構図を決めます。シャッ ターボタンを半押しし、ランプ(背面)が 緑または橙になったら全押しします。 目的のモードにします。 • 撮影するときは、レンズ窓はいつもきれ • 必要に応じて、各設定を行います。 いにしておいてください。 • ズームレバーで画角を調整できます。 • 撮影時に指がレンズ窓やストロボ、拡散 板にかからないように注意してください。 撮影モードを (水中)に設定する 水中で撮影するときに、撮影モードを S に • 節電機能が働いて電源が切れたときは、 設定すると、水中に最適なホワイトバランス 再度電源ボタンを押してください。 に設定され、青みをおさえた自然な色あいで 撮影できます。 1. モードスイッチを 4 に合わせます。 使 い終 わ った ら、 電 源 ボタ ン を押 し て 2.
- Page 15 ストロボを使って撮影する場合 拡散板をウォータープルーフケースに取り 付けます。 ストロボ光が均一に被写体にあたるように、 拡散板を取り付けて撮影してください。 • 拡散板の表面に傷を付けないでくださ い。ストロボ光が正しく拡散できなくな る場合があります。 • ストロボ撮影したとき、画像の周辺が暗く なることがありますので、拡散板を取り付 けて撮影してください。ただし、被写体が 近すぎる場合には拡散板を使っても十分に 効果が表われないことがあります。 取り外しかた 拡散板を持ち、矢印の方向に取り外します。 取り付けかた 取り付け部に、 拡散版のひもを取り付けま す。 拡散板...
- Page 16 再生 ウォータープルーフケースを使用したあと は、必ずカメラを取り出してください。カ メラを入れたまま、直射日光のあたる場所 1(再生)ボタンを押します。 や高温になるところに放置しておくと、発 火や破裂などの原因になることがありま 電源ボタン す。 1(再生)ボタン 使い終わったら、カメラの電源を切ります。...
- Page 17 カメラを取り出す 使用後は、ウォータープルーフケースに付 いている水滴を十分に拭き取ります。 • ウォータープルーフケースに付いている ゴミや砂、頭髪などは取り除いてくださ い。また、真水でよく洗い流して、塩分 などが残らないようにしてください。 ロック解除スイッチを矢印の方向へずらし ながらバックルを外し、後部カバーを開 け、カメラを取り出します。 • ウォータープルーフケースを開ける際 に、体や頭髪から、ケース内またはカメ ラに水滴が落ちないように注意してくだ さい。 • ウォータープルーフケース内部は、乾い た布で拭き、水洗いしないでください。...
- Page 18 主な仕様 保管するときは 耐圧水深: 40m(JIS 保護等級 8(水中型) 準拠) • 防水パッキンの変形を防いだり、防水効果 防水構造: パッキン、O リングなど を保つため、ウォータープルーフケースを 主要材質: ポリカーボネート、ABS、白板 開いた状態で保管してください。 ガラス、EPDM • 防水パッキンにほこりや傷を付けないよう に保管してください。 カメラ性能保証温度範囲:0 ~ 40 ℃ • 高温、低温、多湿な場所や、ナフタリンな 大きさ: 135.3 × 80.8 × 66.1mm ど防虫剤のある所での保管は避けてくださ (突起部を除く) い。 体積: 約 395cm 質量: 約 255g *...
- Page 19 MEMO...
- Page 20 • While every effort has been made to ensure that the information contained in this guide is accurate and complete, no liability can be accepted for any errors or omissions. Canon reserves the right to change the specifications of the hardware and software described herein at any time without prior notice.
- Page 21 Once installed in the Waterproof Case, you can you have put the camera into the case. use your Canon Digital Camera in the rain, at If it leaks, contact your Canon Customer the beach or on the ski slopes. You can also use Support Help Desk.
-
Page 22: Safety Precautions
Before you use the Waterproof Case, thoroughly listed below. Please check your package now to read these precautions to ensure correct use. confirm that it is complete. Contact your Canon The precautions described below are for ensuring dealer if anything is missing. -
Page 23: Handling Precautions
Handling Precautions • Do not press the buttons or the lever of the Waterproof Case with unnecessary force when • Do not drop or throw the Waterproof Case. in the water. This may warp the casing and • Use only the supplied silicone grease. Use of cause leaks. - Page 24 Thoroughly wipe the Waterproof Case should be taken to ensure the waterproof interior and the camera dry. Please contact your seal is level around the mounting groove. Canon Customer Support Help Desk. Please check to ensure that the waterproof seal is working.
-
Page 25: Care And Maintenance
• A damaged or cracked waterproof seal may cause leaks. Please contact your Canon Customer Support Help Desk. To ensure that the Waterproof Case remains waterproof, it is recommended to replace the seal once a year. Please contact your Canon Customer Support Help Desk. - Page 26 Back Components (Playback) Button Front Strap Mounts Shutter Button (Self-timer)/ Zoom Lever Button Power Button Mode Switch Lock Release Switch (Flash)/ Button Button Diffusion Plate Lens Window Grip/Catch (Display) / Button Tripod Socket FUNC./SET(Function/Set) Button Lens Window (Macro)/ (Infinity)/ Button Since dirt or smudges on the lens window may show in photographs, keep the lens window clean by wiping it gently with a soft, dry cloth.
-
Page 27: Preparing The Camera
Preparations Preparing the Camera Insert the battery and the memory card. • Please refer to the Camera User Guide for information regarding the type of battery to use with the camera and installation methods for the battery and memory card. •... - Page 28 Preparing the Waterproof Case Remove the strap from the Fasten both ends of the neck strap camera. to the strap mounts as shown, and adjust it to a comfortable length. Strap If you put the camera in the Waterproof Case without When attaching the wrist strap first removing the strap, of the Waterproof Case...
- Page 29 Use the neck strap when carrying the camera on the beach. Remove the neck strap and attach the wrist strap before use underwater. There is danger that the neck strap will become entangled and cause strangulation or another mishap. Apply a thin coat of grease to the entire seal Do not use the strap included with the camera before using the Waterproof Case in order to with the Waterproof Case.
- Page 30 Putting the Camera In the • Make sure that the catch is fastened properly. Waterproof Case Insert the camera into the Waterproof Case as shown. Turn the mode switch in the direction of the arrow to engage the camera’s mode switch. Close the Waterproof Case.
- Page 31 Press the power button to turn on Shooting the power. Turn the mode switch to the Mode Switch Power Button desired mode. Zoom Lever • Adjust settings as required. Shutter Button • You can adjust the zoom with the zoom lever.
- Page 32 • Make sure that the lens window is always Setting the shooting mode to S clean. (Underwater) • Ensure that your fingers do not obstruct the lens window, flash or diffusion plate when You can obtain more natural appearing shooting. coloration underwater if you set the shooting mode to S.
-
Page 33: Using The Flash
Using the Flash Attaching the Diffusion Plate In order to evenly distribute light from the flash, Thread the cord of the diffusion please attach the diffusion plate. plate through the strap mount. • Do not scratch the surface of the diffusion plate, as this may prevent flash light from being diffused properly. - Page 34 Removing the Diffusion Plate Fit the diffusion plate onto the Waterproof Case. Grip the diffusion plate and detach it by pulling in the direction shown by the arrow.
-
Page 35: Removing The Camera
Playback Removing the Camera Press the 1 (Playback) button. After use, be sure to completely dry all the water from the Power Button Waterproof Case. • Remove any dirt, sand, hair or other debris 1 (Playback) Button from the Waterproof Case, and wash it with clean, running tap water to remove salt deposits. - Page 36 Storage • Store your Waterproof Case carefully, in an opened state to prevent the waterproof seal from deforming and to maintain its waterproof properties. • Protect the waterproof seal from dust or scratches during storage. • Do not store the Waterproof Case in hot, cold or humid places, or near substances such as naphthalene or insecticides.
-
Page 37: Specifications
• All data noted here are based on Canon's Specifications testing standards. • Product specifications and appearance are Maximum Depth: 40 m (130 ft.) (Meets JIS subject to change without prior notice. protection class 8 for waterproofing.) Waterproofing: Seal, O-ring, etc. - Page 38 Canon behält sich das Recht auf unangekündigte jederzeitige Änderung der hier beschriebenen Hard- und Softwaremerkmale vor. • Dieses Handbuch darf ohne vorherige schriftliche Genehmigung von Canon weder ganz noch teilweise in irgendeiner Form oder mit irgendwelchen Mitteln vervielfältigt, übermittelt, abgeschrieben, in Informationssystemen gespeichert oder in andere Sprachen übersetzt werden.
- Page 39 Digitalkamera bei Regen, am Strand oder auf der Falls es eine undichte Stelle aufweist, Skipiste einsetzen. Sie können sie auch unter wenden Sie sich bitte an Ihren Canon- Wasser in Tiefen bis zu 40 Metern und in Kundendienst. feuchten oder staubigen Umgebungen benutzen.
- Page 40 Gegenständen geliefert. Bitte des wasserdichten Gehäuses gründlich, um den überprüfen Sie die Vollständigkeit. Wenden Sie korrekten Gebrauch sicherzustellen. Die unten sich an Ihren Canon-Händler, falls etwas fehlt. beschriebenen Sicherheitsmaßnahmen dienen dem sicheren Gebrauch des wasserdichten • Wasserdichtes Gehäuse WP-DC32 Gehäuses und der Verhütung von Gefahr und...
- Page 41 der Schulterriemen sich verfängt, jemanden • Lagern Sie das wasserdichte Gehäuse nicht in stranguliert oder andere Unfälle verursacht. direktem Sonnenlicht, in einem Auto bei heißem • Verwenden Sie das wasserdichte Gehäuse nicht Wetter oder nahe einer Heizung. Hitze kann das in Wassertiefen von mehr als 40 Metern.
-
Page 42: Vorsichtsmaßnahmen Bei Der Bedienung
Orten benutzen, halten Sie es warm, indem Sie Kamera niemals unter diesen Umständen. Wischen es immer in eine Tasche legen, wenn Sie nicht Sie das Innere des wasserdichten Gehäuses und fotografieren. Der Gebrauch des wasserdichten die Kamera gründlich trocken. Bitte wenden Sie sich an Ihren Canon-Kundendienst. - Page 43 Dichtungsring über den gesamten Umfang Dichtungsring einmal pro Jahr auszuwechseln. flach in die Rille eingepasst ist. Vor der Wenden Sie sich dazu an Ihren Canon- Verwendung vergewissern Sie sich, dass der Kundendienst. Dichtungsring einwandfrei abdichtet.
-
Page 44: Pflege Und Wartung
Pflege und Wartung • Waschen Sie die Außenseite des wasserdichten Gehäuses nach dem Gebrauch so bald wie möglich mit reichlich klarem Wasser ab, z. B. mit Leitungswasser, das nicht wärmer als handwarm ist (maximal 30 °C). Besonders nach der Verwendung in Salzwasser ist mehrstündiges Einweichen des geschlossenen wasserdichten Gehäuses in Leitungswasser zu empfehlen, um Salzablagerungen zu entfernen. -
Page 45: Bezeichnung Der Teile
Rückseite Bezeichnung der Teile (Wiedergabe)-Taste Vorderseite Riemenbefestigung Auslöser (Selbstauslöser)/ Zoom-Hebel -Taste Ein/Aus-Schalter Modus- Schalter Entriegelungstaste (Blitz)/ -Taste (Menü)-Taste Streuscheibe Objektivfenster Griff/Verriegelung Stativgewinde (Anzeige)-Taste / -Taste FUNC./SET (Funktion/Einstell)-Taste Objektivfenster Da Schmutz oder Verunreinigungen auf dem (Makro)/ (Unendlich)/ -Taste Objektivfenster auf Fotos zu sehen sind, halten Sie das Objektivfenster sauber, indem Sie es behutsam mit einem trockenen, weichen Tuch abwischen. -
Page 46: Vorbereitung Der Kamera
Vorbereitungen Vorbereitung der Kamera Legen Sie den Akku und die Speicherkarte ein. • Lesen Sie die Installationsanweisungen für den Akku und die Speicherkarte im Benutzerhandbuch für die Kamera durch. • Benutzen Sie einen Akku, der ausreichend geladen ist. • Überprüfen Sie die geschätzte Kapazität (Anzahl der speicherbaren Bilder) Ihrer Speicherkarte, und vergewissern Sie sich, dass genügend Speicherplatz auf der Karte... - Page 47 Vorbereitung des Nehmen Sie die Handschlaufe von wasserdichten Gehäuses der Kamera ab. Befestigen Sie beide Enden des Schulterriemens an den Riemenösen, wie gezeigt, und stellen Sie ihn auf eine bequeme Länge ein. Handschlaufe Wenn Sie die Kamera in das wasserdichte Gehäuse einsetzen, ohne die Handschlaufe zu entfernen, kann sich die...
- Page 48 Benutzen Sie den Schulterriemen, wenn Sie die Kamera am Strand tragen. Vor dem Einsatz unter Wasser nehmen Sie den Schulterriemen ab und bringen die Handschlaufe an. Es besteht die Gefahr, dass sich der Schulterriemen verheddert und zu Strangulation oder anderen Zwischenfällen führt.
- Page 49 Einsetzen der Kamera in das Schließen Sie das wasserdichte wasserdichte Gehäuse Gehäuse. • Stellen Sie sicher, dass die Dichtung und Setzen Sie die Kamera so in das ihre Kontaktflächen frei von Ablagerungen (z. B. Sand, Schmutz oder Haaren) sind. Ein wasserdichte Gehäuse ein, wie in einziges Haar oder Sandkorn in der der Abbildung gezeigt.
- Page 50 Um den Modus-Schalter der Aufnahme Kamera zu bedienen, drehen Sie ihn in Pfeilrichtung. Modus-Schalter Ein/Aus-Schalter Zoom-Hebel Auslöser (Blitz)/ -Taste (Menü)-Taste FUNC./SET(Funktion/Einstell)-Taste -Taste...
- Page 51 Betätigen Sie den Ein/Aus-Schalter, Einstellen des Aufnahmemodus um das Gerät einzuschalten. auf S (Unterwasser) Durch Einstellen des Aufnahmemodus auf S Stellen Sie den Modus-Schalter erhalten Sie noch natürlichere Farben bei durch Drehen in den gewünschten Unterwasseraufnahmen. Dieser Modus Modus. erzeugt einen optimalen Weißabgleich bei den Lichtverhältnissen im Meer und schwächt die •...
- Page 52 Handhabung des Blitzes Wählen Sie den Bildausschnitt mit dem LCD-Monitor. Drücken Sie Für eine gleichmäßige Lichtverteilung des den Auslöser halb hinunter, und Blitzlichts verwenden Sie die Streuscheibe. warten Sie, bis die Anzeige in Grün oder Orange leuchtet. Wenn • Vermeiden Sie Kratzer auf der Oberfläche der Streuscheibe, da dies die gleichmäßige sie leuchtet, drücken Sie den Streuung des Blitzlichts verringert.
- Page 53 Anbringen der Streuscheibe Bringen Sie die Streuscheibe am Gehäuse an. Ziehen Sie die Schnur durch die Riemenöse. Streuscheibe...
- Page 54 Abnehmen der Streuscheibe Wiedergabe Ziehen Sie die Streuscheibe in Pfeilrichtung, um diese zu entfernen. Drücken Sie die Taste 1 (Wiedergabe). Ein/Aus-Schalter 1 (Wiedergabe)-Taste Wenn keine weitere Wiedergabe erfolgen soll, schalten Sie die Kamera aus.
- Page 55 Herausnehmen der Kamera Denken Sie nach dem Gebrauch des wasserdichten Gehäuses daran, die Kamera Trocknen Sie das wasserdichte aus diesem herauszunehmen. Wenn die Gehäuse nach Gebrauch auf Kamera in dem wasserdichten Gehäuse jeden Fall gründlich ab. verbleibt und direkter Sonneneinstrahlung oder hohen Temperaturen ausgesetzt wird, kann •...
- Page 56 Lagerung • Lagern Sie das wasserdichte Gehäuse sorgsam in geöffnetem Zustand, um eine Verformung des Dichtungsrings zu vermeiden und seine Wasserdichtwirkung aufrechtzuerhalten. • Schützen Sie die Dichtung während der Lagerung vor Staub oder Kratzern. • Lagern Sie das wasserdichte Gehäuse nicht an heißen, kalten oder feuchten Orten oder in der Nähe von chemischen Substanzen wie Naphthalin oder Insektiziden.
-
Page 57: Technische Daten
395 cm ca. 255 g Gewicht: (nur wasserdichtes Gehäuse*) * Einschließlich Streuscheibe • Alle hier angegebenen Daten basieren auf den Teststandards von Canon. • Änderungen am Aussehen und an den Spezifikationen des Produkts können jederzeit ohne vorherige Benachrichtigung vorgenommen werden. - Page 58 • A pesar de que no se han escatimado esfuerzos para garantizar que la información de esta guía sea precisa y completa, no se aceptará ninguna responsabilidad por los errores u omisiones que pudiera haber. Canon se reserva el derecho a cambiar en cualquier momento y sin previo aviso las especificaciones del hardware y software aquí descritos.
- Page 59 Realice una comprobación similar funda impermeable, podrá utilizar su cámara después de haber introducido la cámara en digital Canon bajo la lluvia, en playas o en pistas la funda. de esquí. También podrá utilizarla bajo el agua Si se infiltra agua, póngase en contacto con hasta una profundidad de 40 metros (130 pies) y el Centro de Atención al Cliente de Canon.
-
Page 60: Precauciones De Seguridad
Si falta algo, • No utilice la funda impermeable como flotador o póngase en contacto con su proveedor Canon. chaleco salvavidas. • No utilice la correa de cuello bajo el agua. Extraiga • Funda impermeable WP-DC32 la correa de cuello y coloque la correa de muñeca... -
Page 61: Precauciones De Manejo
• No dañe la junta hermética, no raye sus tarjeta de memoria o la batería, elija un lugar con superficies de contacto, ni permita que se acumule poca humedad alejado del aire salino del mar. suciedad, arena, pelos, ni otros restos entre la •... - Page 62 Póngase en contacto con su Centro de (como se muestra en la Fig. 1). No clave las Atención al Cliente de Canon. uñas en ella ni utilice objetos puntiagudos ni metálicos para retirarla.
-
Page 63: Cuidado Y Mantenimiento
Para evitar rayar la funda impermeable, no póngase en contacto con su Centro de Atención al la seque mientras quede algún resto de arena o de Cliente de Canon. polvo. Si quedan rastros de sal, las piezas metálicas podrían oxidarse y los botones podrían volverse más difíciles de pulsar. -
Page 64: Parte Frontal
Parte posterior Componentes Botón (Reproducir) Parte frontal Anillas para la correa Palanca de zoom Disparador Botón Botón de ( Temporizador ) / encendido Conmutador Interruptor para de modo soltar el bloqueo Botón (Flash)/ Botón (Menú) Placa de difusión Lente Empuñadura/Cierre Rosca para trípode Botón (Pantalla) /... -
Page 65: Preparación De La Cámara
Preparativos Preparación de la cámara Inserte la batería y la tarjeta de memoria. • Confirme los métodos de instalación de la batería y de la tarjeta de memoria en la Guía del usuario de la cámara suministrada con su cámara. •... - Page 66 Preparación de la funda Quite la correa de la cámara. impermeable Fije ambos extremos de la correa de cuello a las anillas de la correa como se muestra y ajústela a una longitud cómoda. Correa La correa de la cámara puede quedar pillada en la junta hermética al abrir o cerrar la funda...
- Page 67 que, de lo contrario, podría deteriorar la Utilice la correa de cuello cuando lleve la funda impermeable. cámara en la playa. Extraiga la correa de cuello y coloque la correa de muñeca antes de utilizarla debajo del agua. Existe el peligro de que la correa de cuello pudiera enredarse y causar una estrangulación u otro accidente.
- Page 68 Colocación de la cámara en la Aplique una fina capa de grasa a toda la junta funda impermeable antes de utilizar la funda impermeable a fin de evitar la abrasión y el deterioro. En cuanto a las precauciones de manejo de la Inserte la cámara en la funda junta hermética, vea el apartado Junta protectora impermeable como se...
- Page 69 diminuto grano de arena en la junta Gire el conmutador de modo en el hermética, podría producirse una sentido de la flecha para operar el infiltración. conmutador de modo de la • Cerciórese de que el cierre haya quedado cámara. perfectamente cerrado.
-
Page 70: Toma De Fotografías
Gire el conmutador de modo al Toma de fotografías modo deseado. • Realice los ajustes necesarios. Botón de encendido Conmutador • Puede ajustar el zoom con la palanca de de modo zoom. Palanca de zoom Disparador Botón (Flash)/ Botón (Menú) Botón FUNC./SET (Función/ajuste) Botón... - Page 71 presione completamente el Ajuste del modo de disparo en S disparador. (Bajo el agua) • Cerciórese de que la lente esté siempre limpia. Se puede conseguir una coloración más • Cerciórese de que sus dedos no obstruyan natural bajo el agua si se ajusta el modo de ni la lente del objetivo, ni el flash, ni la placa disparo en S.
-
Page 72: Utilización Del Flash
Utilización del flash Fijación de la placa de difusión Para distribuir uniformemente la luz procedente Enhebre el cordón y sujételo a la del flash, fíjele la placa de difusión. anilla tal como se muestra. • No raye la superficie de la placa de difusión, ya que esto podría evitar que la luz del flash se difundiese adecuadamente. - Page 73 Extracción de la placa de difusión Fije la placa de difusión en la funda impermeable. Sujete la placa de difusión y extráigala tirando en la dirección que indica la flecha.
- Page 74 Reproducción Extracción de la cámara Presione el boton 1 (Reproducir). Después de usarla, cerciórese de secar completamente el agua de la Botón de encendido funda impermeable. • Elimine cualquier suciedad, arena, pelo y Botón 1 (Reproducir) demás partículas de la funda impermeable, y lávela con agua corriente limpia para eliminar los depósitos de sal.
- Page 75 Almacenamiento • Guarde la funda impermeable con cuidado, abierta para impedir que la junta hermética se deforme y para mantener el efecto de impermeabilización. • Proteja la junta hermética de polvo y arañazos durante el almacenamiento. • No guarde la funda impermeable en un lugar cálido, frío o húmedo, ni cerca de substancias como naftalina o insecticidas.
-
Page 76: Especificaciones
(excluyendo las partes salientes) Volumen: Aprox. 395 cm 13,3 onzas fluidas (EE.UU.)) Peso: Aprox. 255 g (8,90 onzas) (Funda impermeable solamente*) * Incluida la placa de difusión • Todos los datos indicados se basan en los niveles de prueba de Canon... - Page 77 MEMO...
-
Page 78: Clause De Non-Responsabilité
écrite préalable de Canon. • Canon n’offre aucune garantie pour les dommages résultant de la perte ou de l’altération des données par suite d’une erreur ou d’un dysfonctionnement de l’appareil, des cartes mémoire, des ordinateurs personnels, des périphériques, ou de l’utilisation de cartes mémoire provenant d’autres... - Page 79 étanche, vous pouvez utiliser votre appareil En cas de fuite, contactez le service clientèle photo numérique Canon sous la pluie, à la plage Canon. ou sur les pistes de ski. Vous pourrez même l’utiliser sous l’eau jusqu’à 40 mètres •...
-
Page 80: Contenu De L'emballage
éclater. suivants. Veuillez vérifier qu’ils figurent dans • N’utilisez pas le boîtier étanche comme un l’emballage et contactez votre revendeur Canon si dispositif flottant (bouée de sauvetage). l’un d’entre eux devait manquer. • N’utilisez pas le collier sous l’eau. Enlevez le collier et fixez la dragonne avant d’utiliser... -
Page 81: Précautions D'emploi
Précautions d’emploi • N’endommagez pas le joint d’étanchéité, ne rayez pas ses surfaces de contact et ne laissez • Ne faites pas tomber ni ne jetez le boîtier aucune accumulation de saletés entre le joint et étanche. le boîtier. Cela pourrait provoquer des •... - Page 82 Faites extrêmement attention à ce que le étanche et l’appareil photo jusqu’à ce qu’ils soient joint d’étanchéité soit placé à l’horizontale secs et contactez le service clientèle Canon. sur toute la rainure de montage. Assurez- vous que le joint d’étanchéité remplit bien sa...
-
Page 83: Entretien Du Boîtier
Essuyez aussi peut provoquer une infiltration d’eau dans le l’intérieur du boîtier avec un chiffon doux et sec. boîtier. Contactez le service clientèle Canon. Ne le lavez pas à l’eau. Pour que le boîtier reste toujours bien étanche, il est recommandé... -
Page 84: Face Avant
Face arrière Désignations Bouton (Lecture) Face avant Attaches de bandoulière Bouton d’alimentation Bouton Levier du zoom (retardateur)/ Déclencheur Sélecteur de mode Bouton de verrouillage Bouton (flash)/ Bouton Plaque de diffusion Fenêtre d’objectif Poignée/Cliquet Filetage pour trépied Bouton (affichage) / Bouton FUNC./SET(fonction/réglages) Fenêtre d’objectif Comme les poussières ou les saletés sur la... -
Page 85: Préparation De L'appareil Photo
Préparations Préparation de l’appareil photo Insérez la batterie et la carte mémoire. • Pour les méthodes d’installation de la batterie et de la carte mémoire, veuillez vous reporter au Guide d’utilisation de l’appareil photo. • Utilisez une batterie qui est correctement chargée. - Page 86 Préparation du boîtier étanche Retirez la bandoulière de l’appareil photo. Fixez les deux extrémités du collier aux attaches comme indiqué, et ajustez-le à la longueur adéquate. Bandoulière Si elle n’est pas retirée, la bandoulière de l’appareil photo peut se coincer dans le joint d’étanchéité...
- Page 87 un chiffon doux et sec pour éviter Utilisez le collier quand vous portez l’appareil d’endommager le boîtier étanche. à la plage. Enlevez le collier et fixez la dragonne avant d’utiliser l’appareil sous l’eau. Le collier pourrait s’enchevêtrer et donner ainsi lieu à un risque d’étranglement ou autre accident.
- Page 88 Installation de l’appareil photo Pour éviter l’usure du joint d’étanchéité, dans le boîtier étanche enduisez toute la surface du joint d’une fine couche de graisse. Installez l’appareil photo dans le Pour de plus amples informations concernant boîtier étanche, comme illustré. les précautions de manipulation du joint d’étanchéité, reportez-vous à...
- Page 89 Refermez le boîtier étanche. Tournez la sélecteur de mode dans le sens de la flèche pour • Assurez-vous que le joint d’étanchéité et ses utiliser la molette de sélection des surfaces de contact ne sont pas souillés par des saletés (grains de sable, poussières, modes de l’appareil.
- Page 90 Appuyez sur le bouton Prise de vue d’alimentation pour mettre l’appareil photo sous tension. Sélecteur de mode Déclencheur Tournez la sélecteur de mode Levier du zoom jusqu’au mode souhaité. Bouton • Faites les réglages nécessaires. d’alimentation • Vous pouvez ajuster le zoom à l’aide du levier du zoom.
- Page 91 orange. Lorsqu’il est allumé, Réglage du mode de prise de vue appuyez à fond sur le déclencheur. sur S (Sous-marin) • Veillez toujours à la propreté de la fenêtre Le mode de prise de vue S permet d’obtenir d’objectif. des couleurs plus naturelles lors de prises •...
-
Page 92: Utilisation Du Flash
Utilisation du flash Fixation de la plaque de diffusion Afin que la lumière du flash soit répartie Attachez la plaque de diffusion à uniformément, fixez la plaque de diffusion. l’aide du cordon comme illustré. • Ne rayez pas la surface de la plaque de diffusion car cela pourrait empêcher le flash d’être diffusé... - Page 93 Retrait de la plaque de diffusion Fixez la plaque de diffusion sur le boîtier étanche. Saisissez la plaque de diffusion et détachez-la en tirant dans le sens indiqué par la flèche.
- Page 94 Lecture Retrait de l’appareil photo Appuyez sur le bouton 1 (Lecture). Prenez soin d’enlever toute trace d’eau du boîtier étanche. Déclencheur • Éliminez les saletés, le sable, les cheveux ou autres particules du boîtier étanche et lavez- Bouton 1 (Lecture) le à...
- Page 95 Stockage • Rangez soigneusement le boîtier étanche en le laissant entrouvert pour éviter une déformation de son joint d’étanchéité et pour préserver ses performances d’étanchéité. • Protégez le joint d’étanchéité contre la poussière et les éraflures pendant les périodes d’inactivité. •...
-
Page 96: Fiche Technique
(hors parties saillantes) Volume : Env. 395 cm (13,3 oz. liq. (États-Unis)) Poids : Env. 255 g (8,90 onces) (Boîtier étanche uniquement*) * Incluant la plaque de diffusion • Toutes les données indiquées ici reposent sur les normes d’essai de Canon. - Page 97 MEMO...
-
Page 98: Dichiarazione Di Non Responsabilità
Canon. • Canon non risponde dei danni derivanti da alterazioni o perdite di dati dovute ad un uso errato o al malfunzionamento del prodotto, del software, delle schede di memoria, dei personal computer, delle periferiche o all’utilizzo di schede di memoria diverse da quelle Canon. - Page 99 Assistenza Canon più vicino. Potrete anche utilizzarla sott’acqua fino a 40 metri di profondità e in ambienti umidi o • Canon Inc., le sue consociate e affiliate, e i polverosi. distributori della Custodia Impermeabile non sono responsabili per eventuali danni indiretti,...
-
Page 100: Precauzioni Di Sicurezza
Se dovesse potrebbe incendiarsi mentre la custodia mancare qualcosa, contattate il rivenditore Canon potrebbe esplodere. da cui avete acquistato la Custodia Impermeabile. • Non utilizzate la Custodia Impermeabile come salvagente personale (giubbotto di •... - Page 101 Precauzioni di impiego • Quando lavate la custodia, evitate getti violenti direttamente su di essa. Ciò potrebbe causare • Non fate cadere la Custodia Impermeabile. infiltrazioni d’acqua. • Utilizzate solamente il grasso al silicone fornito. • Non smontate o modificate la Custodia L’utilizzo di altri prodotti impermeabilizzanti Impermeabile.
- Page 102 Controllate con parte interna della Custodia Impermeabile e la estrema attenzione che la guarnizione fotocamera. Contattate il Centro Assistenza impermeabile sia a livello attorno alla Canon più vicino. scanalatura per l’installazione. Controllate che la guarnizione impermeabile funzioni.
- Page 103 • Una guarnizione impermeabile danneggiata e Pulitela con un panno morbido e asciutto dopo incrinata potrebbe causare infiltrazioni d’acqua. averla lavata. Contattate il Centro Assistenza Canon più Pulite la parte interna della custodia con un vicino. panno morbido e asciutto. Non lavatela con acqua.
-
Page 104: Parte Anteriore
Parte posteriore Componenti Pulsante (Riproduzione) Parte anteriore Gancetti per l’inserimento della cinghia Leva dello zoom Pulsante Pulsante Pulsante ON/ dell’otturatore (Autoscatto) / Selettore di modalità Interruttore di rilascio blocco Pulsante (Flash)/ Pulsante Diffusore Finestra Impugnatura/Fermo Attacco per il treppiedi Pulsante (Display) Pulsante FUNC./SET... -
Page 105: Operazioni Preliminari
Operazioni preliminari Preparazione della fotocamera Inserite la batteria e la scheda di memoria. • Verificate il metodo di installazione per la batteria e la scheda di memoria sulla Guida dell’utente della fotocamera in uso. • Usate una batteria adeguatamente caricata. •... - Page 106 Preparazione della Custodia Rimuovere la cinghietta della Impermeabile fotocamera. Inserite entrambe le estremità della cinghia da collo negli appositi gancetti e regolatela a una lunghezza comoda. Cinghietta Se si inserisce la fotocamera nella Custodia Impermeabile senza prima rimuovere la cinghietta, essa potrebbe impigliarsi nella guarnizione impermeabile quando si apre o si chiude la Custodia...
- Page 107 e asciutto in quanto potrebbe essere causa Quando trasportate la fotocamera in spiaggia, di deterioramento della Custodia utilizzate la cinghia da collo. Prima di utilizzare Impermeabile. la Custodia in acqua, rimuovete la cinghia da collo e montate la cinghietta da polso. Vi è il rischio che la cinghia da collo si attorcigli causando strangolamento o altre situazioni pericolose.
- Page 108 Inserimento della fotocamera Prima di usare la Custodia Impermeabile, nella Custodia Impermeabile applicate uno strato sottile di grasso su tutta la guarnizione in modo da prevenire rischi di Inserite la fotocamera all’interno abrasioni e deterioramento. Per le precauzioni su come maneggiare la della Custodia Impermeabile guarnizione impermeabile, leggete come mostrato.
- Page 109 Chiudete la Custodia Impermeabile. Spostate il selettore di modalità in direzione della freccia per attivare • Assicuratevi che non vi sia alcun materiale il selettore di modalità della estraneo sulla guarnizione impermeabile e sulle sue superfici di contatto (ad es. sabbia, fotocamera.
- Page 110 Per accendere la fotocamera, Ripresa premete il Pulsante ON/OFF. Spostate il selettore di modalità Selettore di modalità Pulsante ON/OFF sulla modalità desiderata. Leva dello zoom • Regolate le impostazioni come richiesto. Pulsante • È possibile regolare lo zoom usando la leva ’...
- Page 111 premete completamente il pulsante Impostazione della modalità di dell’otturatore. scatto su S (Subacqueo) • Assicuratevi che la finestra per l’obiettivo sia È possibile ottenere una colorazione sempre pulita. dell’ambiente subacqueo di aspetto più • Assicuratevi di non ostruire con le dita la naturale impostando la modalità...
- Page 112 Utilizzo del Flash Attacco del diffusore Per distribuire uniformemente la luce del flash, Infilate la cordicella attraverso il fissate il diffusore. gancetto. • Non graffiate la superficie del diffusore, perché ciò potrebbe impedire alla luce del flash di diffondersi correttamente. •...
- Page 113 Rimozione del diffusore Agganciate il diffusore sulla Custodia Impermeabile. Tirate la piastra di diffusione verso di voi e rimuovetela tirando nella direzione indicata dalla freccia.
- Page 114 Riproduzione Rimozione della fotocamera Premete il pulsante 1 Dopo l’utilizzo, asciugate (Riproduzione). completamente la Custodia Impermeabile. Pulsante ON/OFF • Rimuovete la polvere, la sabbia, i capelli o altro tipo di sporcizia dalla Custodia Pulsante 1 Impermeabile e lavatela con acqua corrente pulita per rimuovere i depositi di sale.
- Page 115 • Non lavate la parte interna della Custodia Conservazione Impermeabile con acqua. Pulitela con un panno morbido e asciutto. • Riponete la Custodia Impermeabile con cura, lasciandola aperta per evitare che la guarnizione impermeabile si deformi e per mantenere la sua impermeabilità. •...
-
Page 116: Specifiche Tecniche
Circa 395 cm Peso: Circa 255 g (Solo Custodia Impermeabile*) * Incluso il diffusore • Tutti i dati elencati qui si basano su standard di collaudo di Canon. • Le specifiche di prodotto e l’aspetto sono soggetti a modifiche senza preavviso. - Page 117 MEMO...
- Page 118 中文 免责声明 • 本书所包含的数据已力求内容的准确与完整,如有任何错误或遗漏恕不承担任何责任。佳能公司保留 随时变更本说明书所提及的硬件及软件的规格的权利而无须事先声明。 • 未经佳能公司事先书面授权,不得以任何形式,任何手段将本书的任何部分复制、传输、转录、存储 于可检索系统中或翻译为任何语言。 • 佳能公司对于因本相机、软件、存储卡、个人计算机、外围设备的错误使用或故障,或使用非佳能公 司的存储卡所导致的数据损坏或丢失所带来的任何损害,概不负责。 版权所有 © Canon Inc.2009 保留所有权利。...
- Page 119 在使用本产品之前,请务必先仔细阅读本使用说 • 使用前,请务必检查本防水套是否能正常操 明书。 作,并确保没有漏水。将相机装入防水套之 请务必妥善保管好本书,以便日后能随时查阅。 前,先关闭防水套,将防水套浸入水深约 15 请在充分理解内容的基础上,正确使用。 厘米处三分钟左右,检查是否漏水。装入相 机后请执行同样的防漏检查程序。 简介 如果漏水,请与佳能客户支持中心联系。 感谢您购买本防水套。您的佳能数码相机装上防 • 佳能及其子公司和分支机构、及防水套经销商 水套后,便能在雨中、海滩或滑雪场拍照。您也 等,对于因错误操作防水套、相机、电池、存 可以在深度不超过 40 米的水中以及潮湿或多尘的 储卡或因以上产品的故障导致无法记录图像, 环境中使用相机。 而造成数据毁坏或丢失所带来的任何损害概不 负责。 • 也请仔细阅读相机随附的 相机使用者指南 。...
- Page 120 检查包装内的物品 • 请勿在水中使用背带。在水中使用前,请解下 背带并系上腕带。否则会有背带缠绕引起窒息 防水套的包装中应有下列物品。请检查包装中的 或其他伤害的危险。 物品以确认其是否齐全。如果不齐全,请与售出 • 请勿在水深超过 40 米的水中使用防水套。否则 该产品的佳能经销商联系。 可能会导致防水套故障、损坏或漏水。 • 防水套 WP-DC32 • 在水中时,请勿用过大的力按压防水套的按钮 • 背带 或杆。否则可能会使外壳变形,导致漏水。 • 腕带 • 在清洗时,请勿用湍急的自来水冲洗防水封条, 否则可能会导致漏水。 • 扩散闪光板 • 请勿拆卸或改装防水套。否则可能会导致漏水。 • 防水封条用硅润滑脂 • 请勿损坏防水封条、擦伤其接触表面,或让脏 • 使用说明书 (本书) 物、沙尘、毛发或其他异物积聚在防水封条和 防水套之间。这可能会导致漏水。 安全注意事项...
- Page 121 使用时的注意事项 关于漏水 • 请勿投掷或摔落防水套。 如果防水套漏水,请立即停止拍摄。若在这种情 况下继续使用相机,可能会导致起火或触电,故 • 请勿使用随附的硅润滑脂之外的防水产品,否 切勿在这种情况下继续使用相机。请彻底擦干防 则可能会降低防水套的防水强度。若意外沾上 水套内部和相机。请联系佳能客户支持中心。 时请立即擦去。 • 请避免在水边打开或关闭防水套。在安装数码 相机、更换存储卡或电池时,请选择低湿度的 防水封条 地方且避开海上含盐分的空气。 • 沾在防水封条上的异物 (例如沙尘、脏物或毛 • 请避免长时间在高温环境下使用防水套。 发)可能会造成漏水。封条上的一丝头发或一 • 在低温下,电池的寿命会缩短。在非常寒冷的 粒细沙也会造成漏水。 地方使用防水套时,请在不拍照的时候将其放 在包内保温。不可在低于结冰点的温度下使用 防水套。 • 要取出防水套的防水封条时,请用手指进行 • 短时间内在温差很大的场所间移动可能会使防 (如图 1 所示) ,才不会损坏防水封条。切勿 水套的内表面出现结露 (小水珠) 。此时,请 用指甲挑起,或使用尖利物或金属物取出防...
- Page 122 保养方法 • 使用后请尽快用足够的清水 (低于 30 ℃的自来 防水封条 水等)彻底清洗防水套的外部。在海水中使用 过后,为了去除沉积的盐分,特别建议在清水 中浸泡几小时。请确保已将扣环锁紧以防漏水。 清洗后,请用软的干布擦干防水套。为避免刮 伤防水套,请勿在防水套上有任何沙子或砂砾 时擦防水套。如果盐分残留,金属部分可能会 生锈或者按钮难以按下。 图 1 请用柔软干布擦拭防水套的内部,不要用水洗 涤。 • 注意请勿涂抹过多的润滑脂。将过多的润滑脂 涂抹在封条上可能会造成漏水 ( 约一小滴已足 够 )。 • 请勿用纸张或布片将润滑脂涂抹在封条上。 • 损坏或破裂的防水封条会导致漏水。请联系佳 能客户支持中心。 为了保证防水套的防水性能,建议一年更换一 次防水封条。更换时,请联系佳能客户支持中 心。...
- Page 123 背面 部件 (播放)键 正面 背带/腕带带扣 Q (自拍)/ 快门按钮 o 键 变焦杆 电源键 模式开关 锁定解除开关 h (闪光灯)/ r 键 n (菜单)键 扩散闪光板 镜头窗 把手 扣环 l (显示) p 键 三脚架螺丝孔 FUNC./SET (功能 / 设置)键 镜头窗 (无限远)/ q 键 (微距)/ 由于镜头窗上的污垢会在照片上显示,所以请 用柔软的干布轻轻地擦拭,以保持镜头窗清 洁。...
- Page 124 准备 准备相机 插入电池和存储卡。 • 请参阅相机随附的 相机使用者指南 ,以确定 电池和存储卡的安装方式。 • 请用已充足电的电池。 • 检查存储卡的估计容量 (可拍摄张数 ),确 定存储卡上有足够储存空间可用于拍摄图 像。...
- Page 125 准备防水套 取下相机的系带。 请将背带两端如图示般系入背带扣,然 后调整至舒适的长度。 系带 如果在将相机装入 防水套时不先取下 系带,打开或关闭 防水套时,系带可 连接防水套的腕带时 能会被夹在防水封 条中,从而导致漏 水。...
- Page 126 在海边时请使用背带携带相机。在水中使用 使用防水套之前,请在整个封条上涂一层薄薄 前,请解下背带并系上腕带。否则会有背带缠 的润滑脂,以防擦伤和损坏。 绕引起窒息或其他伤害的危险。 防水封 有关处理防水封条的注意事项,请参照 条 ( 第 4 页 )。 1. 把防水封条取出。 请勿将相机随附的系带用于防水套。 2. 用棉花球清除所有出现在封条上和防水套 的封条安装槽内的异物 (如脏物、沙尘或 毛发等) 。 如下图所示滑动锁定解除开关,解开扣 3. 用手指沾上少许 (一小滴)润滑脂。 环以打开防水套。 4. 将润滑脂均匀地涂满整个防水封条表面, • 使用市面销售的防结露产品时,只能用软布 注意不要擦伤表面。 将防结露溶液涂抹在镜头窗的内表面。如果 5. 将防水封条装回防水套的安装凹槽内。 防结露溶液沾在镜头窗内表面之外的地方, 请立即用柔软的干布将其擦去,否则会损坏 防水套。...
- Page 127 将相机放入防水套 • 请检查扣环是否锁紧。 如图所示,将相机插入防水套。 按照箭头方向转动模式开关来操作相机 模式开关。 关闭防水套。 • 请检查防水封条和其接触面是否有异物 (沙 尘、脏物和毛发等) 。封条上的一丝头发或 一粒细沙也会造成漏水。...
- Page 128 拍摄 按下电源键打开电源。 模式开关 电源键 将模式开关转到所需模式。 变焦杆 • 根据需要调整各种设置。 快门按钮 • 可用变焦杆调节变焦。 将拍摄模式设置为 S( 潜水 ) 如果将拍摄模式设置为 S,可以拍摄到水下 更自然的色彩。该模式会选择适于海底照明的 最佳白平衡,并使蓝色显得更加柔和。 1. 将模式开关设置为 4。 2. 按下 m 键, 使用 o 或 p 键选择 G, 然后按 下 m 键。 (闪光灯)/ r 键 3. 使用 o 或 p 键选择 S, 然后按下 m 键。 n (菜单)键...
- Page 129 使用闪光灯 用屏幕取景。先半按快门按钮,待指示 灯变为绿色或橙色后,才将快门按钮完 为了要使闪光灯的光线平均分布,请加装扩散闪 全按下。 光板。 • 请确保镜头窗始终保持干净。 • 切勿刮擦扩散闪光板表面,否则会阻碍闪光 • 拍摄时,请留意手指不要挡住镜头窗、闪光 灯光线均匀扩散。 灯或扩散闪光板。 • 由于用闪光灯拍摄,图像边缘可能出现阴 影,请安装扩散闪光板。但是,请注意,如 • 如果节电功能启动并且关闭了相机电源,请 果拍摄目标太接近相机时,扩散闪光板的作 再次按下电源键。 用则可能削弱。 使用完毕后,按下电源键关闭相机电 源。...
- Page 130 加装扩散闪光板 将扩散闪光板安装在防水套上。 将扩散闪光板的细绳穿过防水套的背带 / 腕带带扣。 扩散闪光板...
- Page 131 取下扩散闪光板 播放 握住扩散闪光板,向着箭头所指的方向拉,将其 取下。 按下 1( 播放 ) 键。 电源键 (播放)键 相机用完后,请关闭相机电源。 用完防水套后,请务必取出相机。将装有相机 的防水套放在阳光下直射或高温处,可能会导 致起火或使防水套破裂。...
- Page 132 取出相机 使用后,请将沾在防水套上的水滴全部 擦干。 • 请将沾在防水套上的脏物、沙子、头发或其 他碎屑去掉,并用清洁的流动的自来水冲掉 盐渍。 按照图示滑动锁定解除开关,解开扣环 以打开防水套。从防水套中取出相机。 • 打开防水套时,请注意不要使水滴从身上或 头发上掉落进防水套内或相机上。 • 用软的干布擦拭防水套内部,请勿用水洗 涤。...
- Page 133 规格 存放 防水深度 : 40 米 (符合 JIS 防水保护规 格第 8 级。 ) • 请小心存放防水套,为维持其防水性能,使其 防水结构 : 防水封条、O 形环等 处于打开状态,以免防水封条变形。 • 存放防水封条时请注意不要沾上灰尘,或擦伤 主要材料 : 聚碳酸酯、ABS、透明平板玻 防水封条。 璃、EPDM 等 • 请勿将防水套存放在高温、低温或者潮湿的地 相机的操作温度 : 摄氏 0 - 40 度 方,勿使其靠近卫生球或杀虫剂之类的物质。 尺寸 : 135.3 x 80.8 x 66.1 毫米...
- Page 134 MEMO...
- Page 135 MEMO...
- Page 136 MEMO...
- Page 137 MEMO...
- Page 138 MEMO...
- Page 139 MEMO...
- Page 140 MEMO...
- Page 141 MEMO...
- Page 142 MEMO...
- Page 143 MEMO...
- Page 144 MEMO...
- Page 145 MEMO...
- Page 146 PRINTED IN JAPAN CDI-M438-010 XXXXXXX © CANON INC. 2009 IMPRIMÉ AU JAPON...