Table of Contents
Advertisement
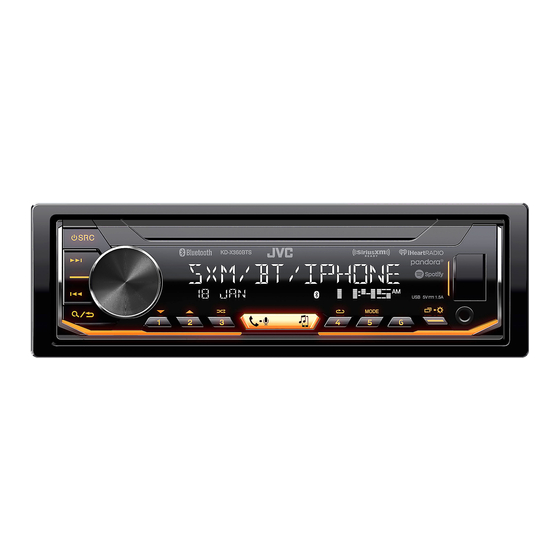
KD-X360BTS / KD-X260BT / KD-SX25BT
DIGITAL MEDIA RECEIVER
INSTRUCTION MANUAL
RÉCEPTEUR MULTIMÉDIA NUMÉRIQUE
MANUEL D'INSTRUCTIONS
RECEPTOR DE MEDIOS DIGITALES
MANUAL DE INSTRUCCIONES
JS_JVC_KD_X360BTS_K_C.indd 1
For customer Use:
Enter below the Model No. and Serial No. which are
located on the top or bottom of the cabinet. Retain this
information for future reference.
Model No.
Serial No.
ENGLISH
FRANÇAIS
ESPAÑOL
B5A-2626-10 [K]
8/24/2018 4:31:45 PM
Advertisement
Table of Contents

Related Manuals for JVC KD-X360BTS


Summary of Contents for JVC KD-X360BTS
- Page 1 ENGLISH FRANÇAIS ESPAÑOL KD-X360BTS / KD-X260BT / KD-SX25BT DIGITAL MEDIA RECEIVER INSTRUCTION MANUAL RÉCEPTEUR MULTIMÉDIA NUMÉRIQUE MANUEL D’INSTRUCTIONS RECEPTOR DE MEDIOS DIGITALES MANUAL DE INSTRUCCIONES For customer Use: Enter below the Model No. and Serial No. which are located on the top or bottom of the cabinet. Retain this information for future reference.
- Page 2 See www.dtsc.ca.gov/hazardouswaste/perchlorate Supplier's Declaration of Conformity Trade Name: Products: DIGITAL MEDIA RECEIVER Model Name: KD-X360BTS/KD-X260BT/KD-SX25BT Responsible Party: JVCKENWOOD USA CORPORATION 2201 East Dominguez Street, Long Beach, CA 90810, U.S.A. PHONE: 310 639-9000 THIS DEVICE COMPLIES WITH PART 15 OF THE FCC RULES. OPERATION IS SUBJECT TO THE FOLLOWING...
- Page 3 IC (Industry Canada) Notice CAUTION This equipment complies with FCC/IC radiation exposure limits set forth for an uncontrolled This device complies with Industry Canada’s licence-exempt RSSs. Operation is subject to the following two conditions: environment and meets the FCC radio frequency (RF) Exposure Guidelines and RSS-102 of the IC radio (1) This device may not cause interference;...
- Page 4 SOFTWARE LICENSE AGREEMENT Article 4 Right pertaining to the Licensed Software Any and all copyrights and other rights pertaining to the Licensed Software and related documents The software embedded in the Product (hereinafter the "Licensed Software") provided by Licensor is shall belong to the Licensor or the original holder of the right who granted to the Licensor the license or copyrighted to or sublicensable by the Licensor, and this Agreement provides for the terms and conditions sublicense for the Licensed Software (hereinafter the "Original Rightholder"), and the User shall not be...
- Page 5 Important Notice concerning the Software Article 10 Protection of Copyright -jansson 1. The copyright and all the other intellectual property rights relating to the Licensed Software shall belong to the Licensor Copyright (c) 2009-2012 Petri Lehtinen <petri@digip.org> and the Original Rightholder, and in no event shall they be Permission is hereby granted, free of charge, to any person obtaining a copy of this software and associated documentation files (the "Software"), under the ownership of the User.
-
Page 6: Table Of Contents
How to read this manual CONNECTION • Operations are explained mainly using buttons on the faceplate of KD-X360BTS. SPECIFICATIONS • English indications are used for the purpose of explanation. You can select the display language from the menu. (Page 5) •... -
Page 7: Basics
BASICS Faceplate Remote control (RM-RK52) (except for KD-SX25BT) Display window This unit can be remotely controlled with an optionally KD-X260BT/ purchased remote control. KD-SX25BT Volume knob Remote sensor (Do not expose to bright sunlight.) Pull out the insulation sheet when using for the first time. -
Page 8: Getting Started
GETTING STARTED To return to the previous setting item, press Set the basic settings Press and hold Turn the volume knob to select an item (see the following table), then press the knob. Repeat step 2 until the desired item is selected or activated. Cancel the demonstration Press to exit. -
Page 9: Radio
[NO]: Cancels (upgrading is not activated). For details on how to update the firmware, visit <http://www.jvc.net/cs/car/>. • “ST” or “STEREO” lights up when receiving an FM stereo broadcast with sufficient signal strength. [FACTORY [YES]: Resets the settings to default (except the RESET] stored station). - Page 10 Default: [XX] have selected, that station is tuned in. [TUNER SETTING] *1 KD-X360BTS: Selectable only when SiriusXM Vehicle Tuner is connected. (Page 12) *2 Selectable only when [ONCE] or [WEEKLY] is selected in step 1. [RADIO TIMER] Turns on the radio at a specific time regardless of the current source.
-
Page 11: Usb/Ipod/Android
USB/iPod/ANDROID Start playback The source changes automatically and playback starts. USB input terminal Selectable source: • KD-X360BTS: USB/iPod USB/ANDROID USB 2.0 cable*1 • KD-X260BT/KD-SX25BT: USB/ANDROID (commercially available) On the faceplate On the remote control Reverse/Fast-forward*3 Press and hold S / T. - Page 12 • Select “OTHERS” if the first character is other than A to Z, 0 to 9. Preparation: • Install the latest version of JVC Remote application on your device before connecting. • To return to the previous setting item, press •...
-
Page 13: Pandora
Create and store a new station (see the following) or via Bluetooth (page 23). Press KD-X360BTS: iPhone/iPod (via Bluetooth or via USB input Turn the volume knob to select [NEW STATION], then press the knob. terminal) or Android smartphone (via Bluetooth) -
Page 14: Iheartradio
On the remote control (see the following) or via Bluetooth (page 23). Press d. Play back/pause Press the volume knob. KD-X360BTS: iPhone/iPod (via Bluetooth or via USB input Skip a track for custom Press T. Press I. terminal) or Android smartphone (via Bluetooth) -
Page 15: Spotify
On the faceplate On the remote control the following) or via Bluetooth (page 23). Press 4 B repeatedly. Repeat play*3 KD-X360BTS: iPhone/iPod (via Bluetooth or via USB input ( Not available ) [ALL REPEAT], [ONE REPEAT]*1, terminal) or Android smartphone (via Bluetooth) [REPEAT OFF]... -
Page 16: Siriusxm® Radio
SiriusXM® Radio (for KD-X360BTS) Only SiriusXM® brings you more of what you love Start listening to listen to, all in one place. Get over 140 channels, including commercial-free music plus the best sports, Press B SRC repeatedly to select SIRIUS XM. - Page 17 SiriusXM® Radio (for KD-X360BTS) Using SiriusXM tuner models later than SXV200: This unit can assign SiriusXM Replay™ a maximum of 18 SmartFavorites channels. Initially, all preset channels are assigned as SmartFavorites. While listening to a channel... • “ ” appears following the last character of the channel name for the Press the volume knob.
- Page 18 SiriusXM® Radio (for KD-X360BTS) TuneScan™ [CODE SET] 1 Press the volume knob to enter [NEW CODE]. 2 Turn the volume knob to select a number. You can get a short preview of the songs that you have missed on each of 3 Press S / T to move to the entry position.
-
Page 19: Bluetooth
“PAIRING COMPLETED” appears when pairing is completed and “O” will light up when the Rear panel Bluetooth connection is established. For KD-X360BTS, the battery and signal strength of the connected Bluetooth device is shown (see [FORMAT] on page 30). • This unit supports Secure Simple Pairing (SSP). - Page 20 • Refer to the instruction manual of the Bluetooth device for more Receive a call information. When there is an incoming call: • KD-X360BTS: Auto Pairing (for KD-X360BTS) The buttons will blink in the color you have selected in [RING COLOR].
- Page 21 BLUETOOTH® The following operations may differ or be unavailable depending on the connected Improve the voice quality phone. While talking on the phone... Press and hold On the faceplate On the remote control Turn the volume knob to select an item (see the following First incoming call...
- Page 22 • “NO HISTORY” appears if there is no recorded call history or call number. 2 Press the volume knob to call. [RING COLOR] KD-X360BTS: [COLOR 01] to [COLOR 49] ([COLOR 08]): Selects the illumination color for [PHONEBOOK] (Applicable only if the phone supports PBAP.) the buttons as notification when there is an incoming call and during a call.
- Page 23 BLUETOOTH® Default: [XX] Settings in memory [BT MODE] Store a contact in memory [PHONE SELECT]* Selects the phone or audio device to connect or disconnect. You can store up to 6 contacts into the number buttons (1 to 6). “ ” appears in front of the device name when connected. Press to enter Bluetooth mode.
- Page 24 BLUETOOTH® The connectivity result flashes on the display. Bluetooth compatibility check mode “PAIRING OK” and/or “HANDS-FREE OK”*1 and/or “AUD.STREAM OK”*2 and/ or “PBAP OK”*3: Compatible You can check the connectivity of the supported profile between the Bluetooth device and the unit. *1 Compatible with Hands-Free Profile (HFP) •...
- Page 25 BLUETOOTH® BLUETOOTH — Audio On the faceplate On the remote control Press 4 B repeatedly. Repeat play ( Not available ) [TRACK REPEAT], [ALL REPEAT], [REPEAT OFF] Random play Press 3 A repeatedly. ( Not available ) [GROUP RANDOM], [ALL RANDOM], [RANDOM OFF] While in BT AUDIO source, you can connect to five Bluetooth audio devices Select a file from a Refer to “Select a file from a and switch between these five devices.
- Page 26 [ANDROID CONNECTED]: You are able to use the application using the Android smartphone connected via Bluetooth. Preparation: [ANDROID NOT CONNECTED]: No Android device is connected to use • Install the latest version of JVC Remote application on your device before the application. connecting. • For more information, visit <http://www.jvc.net/cs/car/>.
- Page 27 • Make sure the USB input terminal is not connected to any device. Start up the Spotify application on your device. Connect your device via Bluetooth connection. (Page 15) KD-X360BTS: iPhone/iPod touch/Android device Press B SRC repeatedly to select SPOTIFY (for iPhone/iPod) or KD-X260BT/KD-SX25BT: Android device SPOTIFY BT (for Android device).
-
Page 28: Aux
AUDIO SETTINGS Preparation: You can listen to music from a portable audio player via the auxiliary input jack. • Select [ON] for [BUILT-IN AUX] in [SOURCE SELECT]. (Page 4) Start listening Press and hold Connect a portable audio player (commercially available). Turn the volume knob to select an item (see the following table), then 3.5 mm (1/8") stereo mini plug with “L”... - Page 29 AUDIO SETTINGS [PRO EQ] Adjusts your own sound settings. [BALANCE]*4 [POSITION L15] to [POSITION R15] ([POSITION 00]): Adjusts the left and • The settings are stored to [USER] in [PRESET EQ]. right speaker output balance. • The settings made may affect the current settings of [EASY EQ]. [VOLUME [LEVEL –15] to [LEVEL +06] ([LEVEL 00]): Presets the initial volume level [62.5HZ]...
- Page 30 – [120HZ] is selected in [SUBWOOFER LPF] and [THROUGH] is not available. For connections through an external amplifier. (Page 41) (Page 28) KD-X360BTS: – [POSITION R02] is selected in [FADER] and selectable range is [POSITION R15] to [POSITION 00]. (Page 25)
- Page 31 AUDIO SETTINGS 2-way crossover setting items Crossover settings Below are the available setting items for 2-way crossover and 3-way [SPEAKER SIZE] crossover. [FRONT] [SIZE] [3.5"]/[4"]/[4.75"]/[5"]/[6.5"]/[6.75"]/[7"]/ Caution [4×6]/[5×7]/[6×8]/[6×9]/[7×10] Select a crossover type according to how the speakers are connected. [TWEETER] [SMALL]/[MIDDLE]/[LARGE]/[NONE] (not (Page 40, 41) connected) If you select a wrong type:...
- Page 32 AUDIO SETTINGS [SUBWOOFER [SW LPF FRQ] [30HZ]/[40HZ]/[50HZ]/[60HZ]/[70HZ]/[80HZ]/ [MID RANGE] [HPF FRQ] [30HZ]/[40HZ]/[50HZ]/[60HZ]/[70HZ]/[80HZ]/[90HZ]/ LPF]*2*3 [90HZ]/[100HZ]/[120HZ]/[150HZ]/[180HZ]/ [100HZ]/[120HZ]/[150HZ]/[180HZ]/[220HZ]/[250HZ]/ [220HZ]/[250HZ]/[THROUGH] [THROUGH] [SW LPF SLOPE] [–06DB]/[–12DB]/[–18DB]/[–24DB] [HPF SLOPE] [–06DB]/[–12DB] [SW LPF PHASE] [REVERSE] (180°)/ [NORMAL] (0°) [LPF FRQ] [1KHZ]/[1.6KHZ]/[2.5KHZ]/[4KHZ]/[5KHZ]/[6.3KHZ]/ [8KHZ]/[10KHZ]/[12.5KHZ]/[THROUGH] [SW LPF GAIN] [–08DB] to [00DB] [LPF SLOPE] [–06DB]/[–12DB] [PHASE] [REVERSE] (180°)/[NORMAL] (0°)
- Page 33 AUDIO SETTINGS Digital Time Alignment settings Determining the value for [DISTANCE] and [GAIN] of [DTA SETTINGS] If you specify the distance from the center of the Digital Time Alignment sets the delay time of the speaker output to create a currently set listening position to every speaker, the more suitable environment for your vehicle.
-
Page 34: Display Settings
[TEXT SCROLL]*2 [SCROLL ONCE]: Scrolls the display information once. ; [SCROLL AUTO]: Repeats scrolling at 5-second intervals. ; [SCROLL OFF]: Cancels. [FORMAT]*3 KD-X360BTS: Below information is shown on the supplementary display when Bluetooth device is connected. (Page 33) [BATT/SIGNAL]: Shows the strength of the battery and signal. ;... -
Page 35: References
REFERENCES DISPLAY SETTINGS Maintenance [COLOR] (for KD-X360BTS) Cleaning the unit Wipe off dirt on the faceplate with a dry silicone or soft cloth. Cleaning the connector Detach the faceplate and clean the connector gently [PRESET] Selects illumination color for the buttons. - Page 36 Accordingly, compatibility may be impaired or some or all of the services may become • You cannot operate iPod if “JVC” or “ ” is displayed on iPod. unavailable. • Depending on the version of the operating system of the iPod/iPhone, some functions may not •...
- Page 37 (eg. station name) appears or display will be blank. Effect*2 Song title (Album title) Song title (Date) Playing time (Date) back to the beginning KD-X360BTS: ANDROID Source name (Date) Source name (Date) with Music Synchronization Effect*2 back to the beginning Main display...
- Page 38 REFERENCES Source name Display information: Main (Supplementary) Source name Display information: Main BT AUDIO Song title (Artist) Song title (Artist) with Music Synchronization For MP3/WMA/WAV/FLAC files: Effect*2 Song title (Album title) Song title (Date) Playing Song title/Artist Song title/Artist with Music Synchronization time (Date) back to the beginning Effect*...
-
Page 39: Troubleshooting
TROUBLESHOOTING Symptom Remedy Symptom Remedy Sound cannot be heard. • Adjust the volume to the optimum level. “UNSUPPORTED DEVICE” • Check whether the connected USB device is compatible • Check the cords and connections. appears. with this unit and ensure the file systems are in supported formats. - Page 40 TROUBLESHOOTING Symptom Remedy Symptom Remedy • Sound cannot be heard • Reconnect the Android device. “RATING ERR” Registration of thumbs up/thumbs down has failed due to during playback. • Launch any media player application on the Android insufficient network connectivity. •...
- Page 41 TROUBLESHOOTING Symptom Remedy Symptom Remedy “CHECK ANTENNA” Check that the antenna and its connection are in good Voice calling method is not • Use voice calling method in a more quiet environment. condition. successful. • Reduce the distance from the microphone when you speak the name.
-
Page 42: Installation/Connection
• Connect speakers with a maximum power of more than 50 W. If the maximum power of the Contact (USA only) speakers is lower than 50 W, change the [AMP GAIN] setting to avoid damaging the speakers. Call: 1-800-252-5722 ( or ) visit: <http://www.jvc.com> (Page 25) • Mount the unit at an angle of less than 30º. - Page 43 INSTALLATION/CONNECTION Part list for installation Installing the unit (in-dash mounting) (A) Faceplate (×1) (B) Trim plate (×1) Do the required wiring. (Page 40) (C) Mounting sleeve (×1) (D) Wiring harness (×1) Hook on the top side Orientate the trim Dashboard of plate as illustrated your car before fitting.
- Page 44 INSTALLATION/CONNECTION Wiring connection IMPORTANT We recommend installing the unit with a commercially available custom wiring harness specific for your car and leave this job to professionals for your safety. Consult your car audio dealer. Antenna terminal Vehicle Fuse (10 A) dashboard Factory wiring harness (vehicle)
- Page 45 INSTALLATION/CONNECTION Connecting external components KD-X360BTS: MIC (Microphone input terminal) (page 15) KD-X360BTS: Expansion port (12 V 500 mA): To the optional SiriusXM Vehicle Tuner (commercially available) (page 12) KD-X260BT/KD-SX25BT: Microphone input jack (page 15) Connecting external amplifiers via output terminals...
-
Page 46: Specifications
USB: 2 500 mV/10 kΩ load WMA Decode Compliant with Windows Media Audio Preout Impedance ≤ 600 Ω AAC Decode AAC-LC “.aac”, “.m4a” files (for KD-X360BTS) WAV Decode Linear-PCM FLAC Decode FLAC file, up to 24 bit/96 kHz ENGLISH JS_JVC_KD_X360BTS_K_EN_5.indd 42... - Page 47 12 V DC car battery Installation Size (W × H × D) 182 mm × 53 mm × 100 mm (7-3/16" × 2-1/8" × 3-15/16") Net Weight (includes Trimplate, KD-X360BTS: Mounting Sleeve) 0.7 kg (1.5 lbs) KD-X260BT/KD-SX25BT: 0.6 kg (1.3 lbs) Subject to change without notice.
- Page 48 SUBSTITUTE GOODS OR SERVICES; LOSS OF USE, DATA, OR PROFITS; OR BUSINESS INTERRUPTION) any use of such marks by JVC KENWOOD Corporation is under license. Other trademarks and trade HOWEVER CAUSED AND ON ANY THEORY OF LIABILITY, WHETHER IN CONTRACT, STRICT LIABILITY, names are those of their respective owners.
- Page 49 ENGLISH FRANÇAIS ESPAÑOL KD-X360BTS / KD-X260BT / KD-SX25BT DIGITAL MEDIA RECEIVER For detailed operations and information, refer to the INSTRUCTION MANUAL on the following Quick Start Guide website: RÉCEPTEUR MULTIMÉDIA NUMÉRIQUE Pour les opérations et les informations détaillées, reportez-vous au MANUEL D’INSTRUCTIONS sur Guide de démarrage rapide...
- Page 50 • Consult the dealer or an experienced radio/TV technician for help. Supplier's Declaration of Conformity Trade Name: JVC Products: DIGITAL MEDIA RECEIVER Model Name: KD-X360BTS/KD-X260BT/KD-SX25BT Responsible Party: JVCKENWOOD USA CORPORATION 2201 East Dominguez Street, Long Beach, CA 90810, U.S.A. PHONE: 310 639-9000 THIS DEVICE COMPLIES WITH PART 15 OF THE FCC RULES.
- Page 51 IC (Industry Canada) Notice CAUTION This equipment complies with FCC/IC radiation exposure limits set forth for an uncontrolled This device complies with Industry Canada’s licence-exempt RSSs. Operation is subject to the following two conditions: environment and meets the FCC radio frequency (RF) Exposure Guidelines and RSS-102 of the IC radio (1) This device may not cause interference;...
- Page 52 SOFTWARE LICENSE AGREEMENT Article 4 Right pertaining to the Licensed Software Any and all copyrights and other rights pertaining to the Licensed Software and related documents The software embedded in the Product (hereinafter the "Licensed Software") provided by Licensor is shall belong to the Licensor or the original holder of the right who granted to the Licensor the license or copyrighted to or sublicensable by the Licensor, and this Agreement provides for the terms and conditions sublicense for the Licensed Software (hereinafter the "Original Rightholder"), and the User shall not be...
- Page 53 Important Notice concerning the Software Article 10 Protection of Copyright -jansson 1. The copyright and all the other intellectual property rights relating to the Licensed Software shall belong to the Licensor Copyright (c) 2009-2012 Petri Lehtinen <petri@digip.org> and the Original Rightholder, and in no event shall they be Permission is hereby granted, free of charge, to any person obtaining a copy of this software and associated documentation files (the "Software"), under the ownership of the User.
- Page 54 INSTALLATION/CONNECTION Basic procedure Remove the key from the ignition switch, then disconnect the terminal of the car battery. Warning Connect the wires properly. See “Wiring connection” on page 3. • The unit can only be used with a 12 V DC power supply, negative ground. Install the unit to your car.
- Page 55 Installing the unit (without mounting sleeve) Wiring connection Remove the mounting sleeve and trim plate from the unit. Vehicle dashboard Antenna terminal Align the holes in the unit (on both sides) with the vehicle mounting bracket and secure the unit with screws (commercially available).
- Page 56 BEFORE USE BASICS IMPORTANT Faceplate • To ensure proper use, please read through this Guide before using Display window this product. It is especially important that you read and observe KD-X260BT/ Warnings and Cautions in this Guide. KD-SX25BT • Please keep the Guide in a safe and accessible place for future Volume knob reference.
- Page 57 GETTING STARTED Set the basic settings Press and hold Cancel the demonstration Turn the volume knob to select an item (see the following table), then press the knob. When you turn on the power for the first time (or [FACTORY RESET] is set to Repeat step 2 until the desired item is selected or activated.
- Page 58 RADIO USB/iPod/ANDROID Selectable source: Search for a station • KD-X360BTS: USB/iPod USB/ANDROID Press B SRC repeatedly to select FM or AM. • KD-X260BT/KD-SX25BT: USB/ANDROID Press S / T to search for a station automatically. (or) Start playback Press and hold S / T until “M” flashes, then press repeatedly to search for a station manually.
- Page 59 • Refer to the INSTRUCTION MANUAL on the following website for the detailed explanation of each item: <http://www.jvc.net/cs/car/> • The availability of each item vary depending on the model. Turn the volume knob clockwise to select [SUBWOOFER SET], then press the knob.
- Page 60 [SUB.W/SUB.W] before you can make the subwoofer level settings. Press to exit the setting menu. Illumination Color Setting For KD-X360BTS, you can set your preferred illumination color for the buttons. OTHER INFORMATION For playback operations of AUX, SPOTIFY, Pandora®, iHeartRadio®, SiriusXM®...
- Page 61 BLUETOOTH® (B) “[Device Name]” “VOL – YES” “BACK – NO” Press the volume knob to start pairing. • If “PAIRING” “PIN 0000” scrolls on the display, enter the PIN code “0000” into the Bluetooth device. Depending on the operating system and the firmware version of your •...
- Page 62 • Android is a trademark of Google LLC. • The Bluetooth® word mark and logos are registered trademarks owned by the Bluetooth SIG, Inc. and any use of such marks by JVC KENWOOD Corporation is under license. Other trademarks and trade names are those of their respective owners.