Advertisement
Quick Links
Download this manual
See also:
User Manual
This product can be used with
the following operating systems:
Windows XP, Me, 2000, 98SE
Before You Begin
You must have at least the following:
• Intel Pentium III 550 MHz or Higher (PIII 1 GHz Recommended)
• Microsoft Windows XP/Me/2000/98SE
• 128 MB RAM or Higher
• VGA Card with 16 MB RAM
• An available USB port (USB 2.0 Recommended)
Check Your Package Contents
These are the items included with your purchase:
If any of the below items are missing, please contact your reseller.
Run the Driver CD before you install the
DUB-AV200
For the first-time installation of DUB-AV200, two steps are
involved: USB 2.0 Driver and software. See below for detailed
descriptions of these installations.
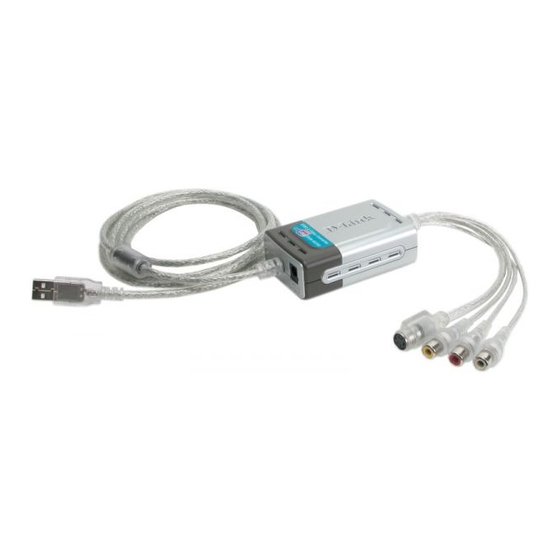
DUB-AV200 USB 2.0 MPEG1/2/4 Video Converter
CD-ROM (containing Drivers, Installation Guide,
Manual, Application Software and Warranty)
One 5V/2.0A AC Power Adapter
DUB-AV200
DUB-AV200
DUB-AV200
DUB-AV200
DUB-AV200
1
USB 2.0 MPEG1/2/4
Video Converter
Advertisement

Related Manuals for D-Link DUB-AV200


Summary of Contents for D-Link DUB-AV200
-
Page 1: Before You Begin
Manual, Application Software and Warranty) One 5V/2.0A AC Power Adapter Run the Driver CD before you install the DUB-AV200 For the first-time installation of DUB-AV200, two steps are involved: USB 2.0 Driver and software. See below for detailed descriptions of these installations. DUB-AV200... -
Page 2: Usb Driver Installation
USB Driver Installation Turn on your computer Insert the D-Link DUB-AV200 Driver CD in the CD-ROM drive. Click Install DUB-AV200 Driver If the Autorun screen does not automatically start, click on Start > Run, enter “D:\Bin\Autorun.exe” and click OK. “D” represents the letter of your CD-ROM drive. - Page 3 USB Driver Installation (Continued) Click Click Finish Install DVD Plus Click Install DVD Plus...
- Page 4 Install DVD Plus The DVD Plus InstallShield Wizard dialog box will appear to prepare for the installation. Click Next Click Click...
- Page 5 Install DVD Plus Click Next Choose Reinstall All Components, and then click Next. Click Next Click Next...
- Page 6 Install DVD Plus Click Next Click Finish Click Next...
- Page 7 Install DVD Plus Click Click Next...
- Page 8 Your Setup is Complete ! Click Finish Now on your computer desktop, you will find the DVD Plus desktop icon. Double click In the opened Serial Number Check dialog box, enter the texts - on your CD paper bag. When finished, click OK.
-
Page 9: Technical Support
Technical Support Technical Support You can find software updates and user documentation on the D-Link website. D-Link provides free technical support for customers within the United States and within Canada for the duration of the warranty period on this product.