Table of Contents
Advertisement
Quick Links
Advertisement
Table of Contents

Related Manuals for Siemens milltronics WEIGHFEEDER 1200 Series


Summary of Contents for Siemens milltronics WEIGHFEEDER 1200 Series
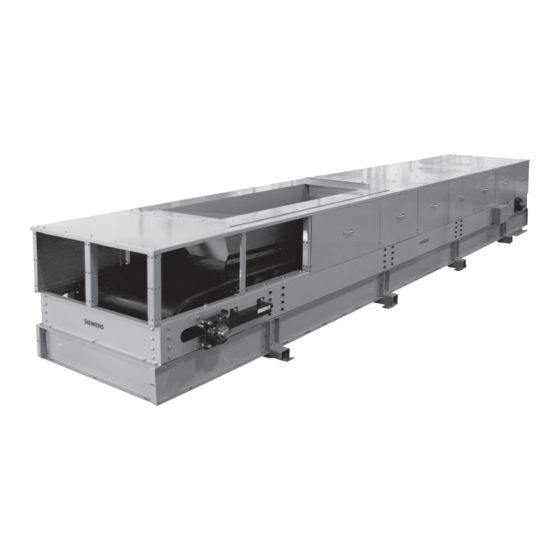
- Page 1 Instruction Manual May 2008 milltronics WEIGHFEEDER 1200...
- Page 2 The user is responsible for all changes and repairs made to the device by the user or the user’s agent. • All new components are to be provided by Siemens Milltronics Process Instruments Inc. • Restrict repair to faulty components only.
-
Page 3: Table Of Contents
Table of Contents Milltronics Weighfeeder 1200 Series ................1 Safety Notes .............................1 The Manual ...............................1 Safety ............................. 2 Safety and General Precautions ......................2 Specifications ........................3 Operation ..........................5 Weighfeeders ............................5 Mechanical Installation ....................6 Installation ..............................7 Calibration ..........................8 Test Load ..............................8... - Page 4 Dimensions ........................18 Open Unit ..............................18 Enclosed Unit ............................19...
-
Page 5: Milltronics Weighfeeder 1200 Series
If you have any questions, comments, or suggestions about the manual contents, please email us at techpubs.smpi@siemens.com. For the complete library of Siemens manuals, go to www. siemens.com/processautomation. 7ML19985EH02... -
Page 6: Safety
Safety Safety and General Precautions WARNINGS: Always follow safe practices when working on or around the Milltronics Weighfeeder 1200, especially in wet environments and when adjacent to conductive steel mounting framework. ALWAYS STOP the belt, lock-out, and/or place a "Do Not Energize" tag on the main disconnect before working on or around the weighfeeder. -
Page 7: Specifications
Specifications Accuracy • ± 0.5% Operating Temperature • -10 to +60 °C (+14 to +140 °F) with higher temperatures available Materials • mild steel with stainless steel/AR contact parts optional Load Cells • stainless steel strain gauge load cell(s) with mechanical overload protection •... - Page 8 Belt Cleaning • spring tension UHMW blade at head pulley • return plow Drive • 0.37 kW (0.5 HP), TEFC, 208/230/460/575 V AC, three phase or 90/180 V DC permanent magnet - both with shaft mounted gear reducer • larger motor sizes and other drive packages available Shipping Weight •...
-
Page 9: Operation
Operation Weighfeeders Weighfeeders weigh bulk material while it is conveyed. An accurate rate of flow and totalized weight measurement is received without interrupting the flow of material in process. A weighfeeder can also control the rate of flow of the conveyed product. In-motion weighing requires accurate transmission of the product load to a strain gauge load cell(s). -
Page 10: Mechanical Installation
Mechanical Installation Perform a thorough and systematic inspection of containers immediately upon receipt of your weighfeeder. The containers are packed to separate each item and provide protection during shipping. Do not remove equipment from shipping crates or boxes until you check for Note: possible shipping damage. -
Page 11: Installation
Installation Only qualified personnel are authorized to install and operate this equipment. Note: Installation shall be in accordance with local regulations, standards and established safety practices. Read and understand the instructions before installing, operating or maintaining the equipment. Align the in-feed section of the weighfeeder with the discharge of the feed device. Prevent twisting or misalignment that could induce stress on the weighing section. -
Page 12: Calibration
Calibration After Milltronics Weighfeeder 1200 has been properly installed, calibration of the weighing system must be done in conjunction with the integrator. Refer to the integrator instruction manual for programming and calibration. The calibration is initially done using the supplied test load. Material tests are recommended to achieve maximum accuracy. Test Load The test load value for your Milltronics Weighfeeder 1200 is given on the accompanying test sheet. -
Page 13: Wiring
’ A ’ ’B’ ‘B’ ‘ A ’ ’B’ ‘ A ’ ’ A ’ ’B’ to integrator SIEMENS MILLTONICS LC/SP JUNCTION BOX TB 1 +Excitation TB 2 +Sense TB 3 -Sense Black TB 4 -Excitation TB 5 +Load Cell A Green... -
Page 14: Start Up
11. Shear Gate The shear gate on the inlet of the weighfeeder needs to be set to allow the maximum feedrate capacity requested by the customer. Consult your Siemens representative if feed rate changes are required. Skirtboards The skirtboards have also been factory set to proper specifications. Note that near the inlet, the skirtboards are very close to the belt. -
Page 15: Belt Tension
At the discharge end of the conveyor, find the belt scraper spring tensioner. Unhook the spring on both sides of the belt scraper arm and let the belt scraper swing down away from the belt. Skirtboard removal or adjustment is not normally necessary to perform belt Note: removal or installation, nor is it recommended. -
Page 16: Telescoper Adjustment
Re-tighten the jam nut located on the telescoper to maintain the new telescoper position after completing the tracking procedure. If you are having problems tracking the belt, consult your Siemens representative. Common causes of belt tracking problems are: uneven or improperly distributed product loading, twisted frame, or product build up on head or tail pulleys. -
Page 17: Load Cell Replacement
Please read and understand all of the instructions before proceeding with the Note: replacement. Contact your Siemens representative for assistance if you have any questions or problems. Removing Old Load Cell 1. -
Page 18: Weighing Idler Alignment
3. Span calibrate the unit using the integrator manual for reference. Record span calibration procedure results. 4. Re-check zero calibration. Run another zero calibration and record the results. Verify that the zero repeated to the same value recorded in step 2. 5. -
Page 19: Troubleshooting
• weigh idler alignment. Verify weigh idler alignment is as accurate as possible. Improper alignment is the most common mechanical problem affecting scale accuracy. Contact your Siemens representative if you find a problem here (should be 1/32” aligned with approach and retreat). -
Page 20: Maintenance
Maintenance WARNING: ALWAYS STOP the belt, lock-out, and/or place a "Do Not Ener- gize" tag on the main disconnect before working on or around the weigh- feeder. Preventative Maintenance The maintenance schedule below is recommended to maintain top performance and accuracy of the system. -
Page 21: General Maintenance
General Maintenance The equipment should be cleaned periodically and any excess accumulation of product should be removed to minimize potential damage to the mechanical components and scale accuracy. Abrasions, cuts, or ragged edges on the belt will create performance problems. Replace the belt if it becomes ragged or torn. - Page 22 Dimensions Open Unit 241 mm (9.5”) varies per drive belt width shown with optional sheargate and skirtboards belt scraper 1140 mm (45”) 2134 mm max. inlet (84”) discharge 1035 mm (40.75”) 123 mm (4.84”) 1524 mm (60”) Open Unit Belt Width 457 mm (18”) 1092 mm (43”) 838 mm (33”)
- Page 23 Enclosed Unit belt width belt scraper 3664 mm (144.25”) 2134 mm (84”) discharge inlet 1035 mm (40.75”) 745 mm 1524 mm (60”) (29.33”) Enclosed Unit Belt Width 457 mm (18”) 1092 mm (43”) 838 mm (33”) 610 mm (24”) 1245 mm (49”) 991 mm (39”) 762 mm (30”) 1397 mm (55”)
- Page 24 Siemens Milltronics Process Instruments Inc. Siemens Milltronics Process Instruments Inc. 2008 1954Technology Drive, P .O. Box 4225 Subject to change without prior notice Peterborough, ON, Canada K9J 7B1 Rev. 2.2 Tel: (705) 745-2431 Fax: (705) 741-0466 *7ml19985EH02* Email: techpubs.smpi@siemens.com...