Table of Contents
Advertisement
Quick Links
Advertisement
Table of Contents

Related Manuals for Husqvarna DCR 100


Summary of Contents for Husqvarna DCR 100
- Page 1 Workshop manual DCR 100/300 v1.0...
- Page 2 115 75 36 - 27...
-
Page 3: Table Of Contents
3. Checks/Troubleshooting Maintenance..............5 Troubleshooting guide..........7 4. Common service tasks Hydraulic lines/couplings........9 5. Components – orientation DCR 100 Basic functional components........11 6. Dismantling into basic modules Jaw unit & cylinder—adaptor plate......13 Adaptor plate & cylinder........14 7. Main and hydraulic swivel Adaptor plate swivel..........15 Hydraulic swivel............16... -
Page 5: Spare Parts
Introduction 1.Introduction Workshop Manual The Workshop Manual includes virtually all rel- evant workshop procedures on the DCR 100 and DCR 300. The page footer indicates which model the content refers to. Some very simple and self-evident repairs have been omitted. -
Page 6: Technical Data
Jaw adjustment pins in outer position Jaw adjustment pins in inner position Mountings & Tightening torque Torque for occurring metric fasteners SS—ISO 8981/1 rating Type 8.8 [Nm] [Nm] [Nm] 10.9 12.9 Coarse pitch threads 1120 DCR 100 | DCR 300... -
Page 7: General Precautions
• This symbol indicates when risk of machine damage should be avoided. WEIGHT • This indicates that risky weights are to be considered. Take proper precaution! HIGH PRESSURE • This symbol indicates risk of spray from high pressure hydraulic fluid. Take pre- cautions and wear protection. DCR 100 | DCR 300... -
Page 8: Occurring Symbols In The Manual
SPILL OF FLUIDS • Keep vessels and absorbent sheets at hand. COVER OPENINGS • Protect exposed hydraulic parts from contamination. • Cover opening wit plastic caps or wrap area in plastic bag. DCR 100 | DCR 300... -
Page 9: Maintenance
Preparations • Position machine with the concrete crusher at a convenient working height Lubrication of: Weekly: 1. Hydraulic swivel Daily: 2. Contact surfaces of orbital flanges 3. Cylinder shafts 4. Jaws pivoting shafts DCR 100 | DCR 300... - Page 10 • Close crusher jaws completely, while holding them continuously closed: DCR100: 200bar should be displayed in the remote control terminal. DCR300: 500bar should be displayed on pressure dial connected to lower measure port of booster. DCR 100 | DCR 300...
-
Page 11: Troubleshooting Guide
Damaged hose and/or coupling and/or couplings. External oil Replace damaged rod wiper(s). Chap.9 DCR100 leaks Damaged rod wiper seal Chap.15 DCR300 Damaged O-rings between hy- DCR 100 Replace damaged O-ring. Chap.8 DCR100 draulic manifold and cylinder DCR 100 | DCR 300... -
Page 12: Hydraulic Lines/Couplings
DCR 300: attach the shackles to lifting lugs – one on each side of the adaptor plate DCR 100: attach two shackles to frame of adaptor plate • hoist to vertical position: – stabilise unit by slightly resting jaw(s) on e.g. - Page 13 Clean surface to be sealed with brush, solvent and compressed air as in step I. above. III. Apply the recommended sealant: • Thread-locking compound: – T1, T2 or T3 • Retainer compound: – R DCR 100 | DCR 300...
-
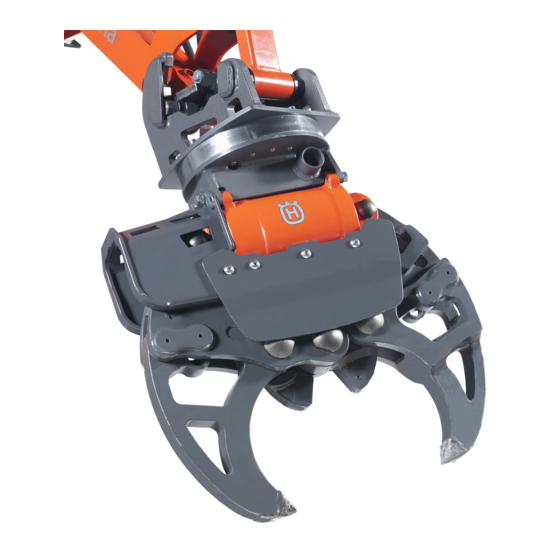
Page 14: Basic Functional Components
• Features quick couplings 6. Cylinder 7. Protective shield 8. Jaw link • Two shaft positions on either side for adjustable crusher width Jaws 9. Jaw cutter – for cutting rebar(s) 10. Jaw tip • reshapable crushing surface DCR 100... - Page 15 Components – orientation DCR 100...
-
Page 16: Jaw Unit & Cylinder-Adaptor Plate
Prepare shafts, contact surfaces and lock screws following the principle described in chapter “Common service tasks”: I. Shafts: apply a thin coat of grease II. Contact surfaces: apply a thin coat of grease III. Nuts: apply thread-locking compound DCR 100... -
Page 17: Adaptor Plate & Cylinder
– loosen with a shallow wrench; ca 30mm deep – use a balled end for continued unscrewing 5. Lift off adaptor plate REASSEMBLING Reassemble by reversing the above steps. Follow advice on thread-locking compound from chapter “Common service tasks”. DCR 100... -
Page 18: Adaptor Plate Swivel
5. Reassembling, apply a thin coat of grease to all contact surfaces of swivel parts. Replace brass rings if worn - use heat gun and Allen key: 3mm - tightening torque: 5Nm 5 Nm REASSEMBLING Reverse the above steps. DCR 100... -
Page 19: Hydraulic Swivel
(b) lift out the hydraulic swivel Channels: P=Pressure, T=Tank, G=Grease (c) two swivel seals may be removed by 47Nm means of a pick-tool (d) take care of the swivel washer Protect all hydraulic openings with plugs or covers! REASSEMBLING Reverse the above steps. DCR 100... -
Page 20: Swivel-Cylinder Frame
6. Lift off hydraulic manifold – cover all hydraulic openings – check condition of O-rings, change if defect. 7. Manifold & hydraulic swivel – remove hydraulic swivel as de- scribed in previous chapter REASSEMBLING Reverse the above steps. DCR 100... - Page 21 Hydraulic manifold DCR 100...
- Page 22 N.B. Before mounting: Always add Hydraulic Fluid to flexible parts, seals, O-rings etc. 5. Cylinder barrel interior 6. Remove seals – use a fine tool to carefully pick and remove each seal REASSEMBLING Simply reverse the above procedures. DCR 100...
- Page 23 (c) pick rod wiper seal with a fine tool – check position according to illus- tration REASSEMBLING Simply reverse the above procedures N.B. Before mounting: Always add Hydraulic Fluid to flexible parts, seals, O-rings etc. 4. Shape internal seals as illustrated to fa- cilitate insertion DCR 100...
- Page 24 Prepare shafts, contact surfaces and lock screws as described in chapter “Common service tasks”: I. Shafts: apply a thin coat of grease 56mm II. Contact surfaces: apply a thin coat of grease G III. Shaft nuts: apply thread-locking com- pound T1 DCR 100...
-
Page 25: Cutter Pads
Removing the cutter pad (b) 1. Remove the two fasteners – Allen wrench: 6mm T1: Reassembling, apply thread- locking compound to screws τ : 25—27 Nm ×2 REASSEMBLING Simply reverse the above steps and apply thread-locking compound where indicated. 25—27 Nm DCR 100... - Page 26 VALVE COMPONENTS (a) valve cap (8mm Allen) (b) valve body (c) adjusting screw (3/16” Allen) will adjust relief pressure (d) closing spring tighten to increase relief pressure loosen to decrease relief pressure (e) spring seat (f) poppet with sealing DCR 100...
- Page 27 – correct reading should be 225 bar, with silent (closed) valve. 4. Dismantle pressure limiting valve • use a 27mm deep socket wrench to remove the valve body 27mm REASSEMBLING Reassemble by reversing the above steps of disassembling. DCR 100...
-
Page 28: Machine Overview
Components – orientation 12.Components – orientation Machine overview 1. Adaptor plate: • Attaches to the stick of DXR 2xx or 3xx 2. Swivel system: • Adaptor plate swivel to permit full passive rotation of the crusher • Interior hydraulic swivel 3. - Page 29 Components – orientation DCR 300...
-
Page 30: Frame-Jaw Shaft
Crusher jaw 13.Crusher jaw DISMANTLING OF CRUSHER JAW Preparation 1. Secure the crusher unit vertically by means of e.g. a hoist pulley (see chap. Common service tasks): (a) attach a strap to lifting lugs (b) stabilise unit by slightly resting jaw(s) on e.g. - Page 31 Crusher jaw THE CRUSHER JAW BUSHING Preparation For service of bushings (a—b), first remove the crusher jaw as on previous page. SERVICE POINTS: (a) cylinder—claw shaft bushing – two replaceable low friction nylon strips – the seam should be placed within the illustrated sec- (b) claw—frame shaft bushing –...
-
Page 32: External Hydraulic Hoses
Adaptor plate & connections 14.Adaptor plate & connections Preparations Position the crusher unit vertically by using a hoist device (see previous chapters). Thoroughly clean areas con- cerned to minimise risk of con- taminating the hydraulic sys- tem. ×2 32mm External hydraulic hoses 1. -
Page 33: Adaptor Plate Swivel
Adaptor plate & connections Adaptor plate swivel This allows crusher unit to rotate 360°. DISMANTLING Preparations To remove the swivel, first dismantle the adaptor plate as described on previous page. Swivel top 1. Remove swivel fasteners (16) 86Nm – Allen key: 10mm –... -
Page 34: Hydraulic Swivel
Adaptor plate & connections Hydraulic swivel The hydraulic swivel comprises the visible male unit, which rotates inside the female unit. Preparations Remove swivel top, following step 1—3 on previous page. Disassembling Thoroughly clean areas con- cerned to minimise risk of contaminating the hydraulic system. - Page 35 Adaptor plate & connections DCR 300...
- Page 36 Cylinders 15.Cylinders Removing a cylinder Preparations Position the crusher unit vertically by using a hoist device (see previous chapter) OPENING FRAME LID 1. Remove all 10 lid fasteners – Allen key: 6mm 2. Remove frame lid ×10 (a) detach wire clip to fully remove lid Thoroughly clean frame in- 25Nm terior to minimise risk of con-...
- Page 37 Cylinders CYLINDER COMPONENTS Principal cylinder components (and flow): I. Cylinder rod-end head II. Cylinder barrel III. Piston rod (runs inside barrel) IV. Piston V. Cylinder head Disassembling Replace seals with signs of wear or damage! Preparations Remove the cylinder(s) as described on pre- vious page and clean the carefully.
- Page 38 Cylinders ROD GLAND INTERIOR The rod gland is the interface between cyl- inder barrel and the rod. 7. The rod gland internal seals comprise: I. rod wiper (exterior) II. rod wear ring (linear motion bear- ing) N.B. Before mounting: Always add Hydraulic Fluid to flexible parts, seals, O-rings etc.
- Page 39 Internal hydraulics & booster 16.Internal hydraulics & booster lönsboda Flow: Pressure Flow: to Tank Normally Hydraulic Component Function Picture open/closed symbol 1 Normal pressure Control hydraulic flow for extending block, 0—200 bar or contracting the cylinders 2 Pressure reducing valve, max 200bar Controls inlet pressure to the booster 3 Sequence valve, 180bar Enables booster at ≥180bar...
- Page 40 Internal hydraulics & booster 1. PRINCIPAL INTERNAL COMPONENTS (a) hydraulic swivel (male unit visible) (b) hydraulic manifold (c) pressure booster Dismantling internal hydraulics Preparations • thoroughly clean all internal parts and have absorbent and vessels at hand to collect fluid spill ×1 32mm 55Nm...
-
Page 41: Hydraulic Manifold
Internal hydraulics & booster 1. PRINCIPAL INTERNAL COMPONENTS (a) hydraulic swivel (male unit) (b) hydraulic swivel (female unit) and normal pressure manifold (200 bar) (c) pressure booster: 2,5/1 (d) high pressure (500 bar) hydraulic manifold Hydraulic manifold 2. Preparations • remove manifold as described on previous page •... -
Page 42: Booster
Internal hydraulics & booster PRESSURE LIMITING VALVE 7. Unscrew the valve τ (a) 22mm spanner / =40Nm NB. the adjustment screw is for fixing level of pressure limitation. ×1 22mm 40Nm HOSE ADAPTER 8. Unscrew to detach hose 55Nm τ (b) 22mm spanner / =55Nm REASSEMBLING... - Page 43 Internal hydraulics & booster continued from previous page... 5. Inlet & drain/return seals (a) booster unit (b) seal spacers (c) seal mounting bracket (d) inlet seal plugs NORMAL PRESSURE BLOCK VALVES 6. Dismantling of block valves: – 26mm spanner (65Nm) ×2 26mm –...
- Page 44 Internal hydraulics & booster DCR 300...
-
Page 45: Testing Booster Pressure
Hydraulic pressure tuning 17.Hydraulic pressure tuning Troubleshooting flow chart CORRECT TUNING: Pressure reducer valve = 200bar Sequence valve = 180bar Pressure limiting valve = 520bar P=Booster pressure at Measure Point (MP) (a) Booster pressure too low: I. if P≤ 200bar: –... - Page 46 Hydraulic pressure tuning Booster tuning principles The following valves should be tuned ac- cordingly: Reference depth of a new DCR300 Required level of balance pressure X – ref. Y-pres- Valve depth sure (mm) (bar) Pressure limiting 11.0 valve Pressure reduce 19.5 valve Sequence valve...
-
Page 47: Valve Tuning
Hydraulic pressure tuning Valve tuning PRESSURE LIMITING VALVE 10mm Preparation • Set reference depth (see previous =11.0 mm page): =11.0mm – untighten the counter-nut with a 10mm spanner – set reference depth with a flat head screwdriver • If needed (see next page): –... - Page 48 Hydraulic pressure tuning ADJUSTING PRESSURE REDUCE VALVE Preparation Set reference depth of valve. (see second page of this chapter): =19,5mm • Remove valve cap: • use an extended 5/16” Allen wrench • Insert a 3/16” Allen wrench WORK Crusher 1. Set machine work mode From terminal menu system: •...
- Page 49 Hydraulic diagrams Hydraulic diagrams DCR 100 PRINCIPAL COMPONENTS 1. Quick couplings – Max: 250 bar 2. Valve housing 3. Pressure limiting valve – 235 bar | 45 l/m 4. Actuator (cylinder) DCR 100 | DCR 300...
- Page 50 10. By pass “large” valve 11. Low pressure block max: 200 bar 0—200bar 5. Check valve; 12. High pressure block & 0—500bar 6. Booster, max 500bar 13. Actuator (cylinder) Ratio of 2,5:1 14. Measure port DCR 100 | DCR 300...
-
Page 51: Service Tools - Supplied
¾” Allen ½” & ¾ ” 17mm ● Various bolts and screws. ● For tightening high-load bolts. Torque wrench Allen set (½”) 1—200Nm ● Tightening torque of various ● Various Allen keys for high-load mountings. bolts. DCR 100 | DCR 300... - Page 52 KPF2N-25 (DIN 51502) Thread-locking compound Grease gun ● Occurring types: T1: thread-locking (e.g. Loctite 243) ● gun for applying lubrication to shearers' grease nipples. T2: thread sealing (e.g. Loctite 542) T3: axial retainer (e.g. Loctite 638) DCR 100 | DCR 300...
- Page 53 www.husqvarnacp.com English 115 75 36 - 27 2015-11...