Table of Contents
Advertisement
Quick Links
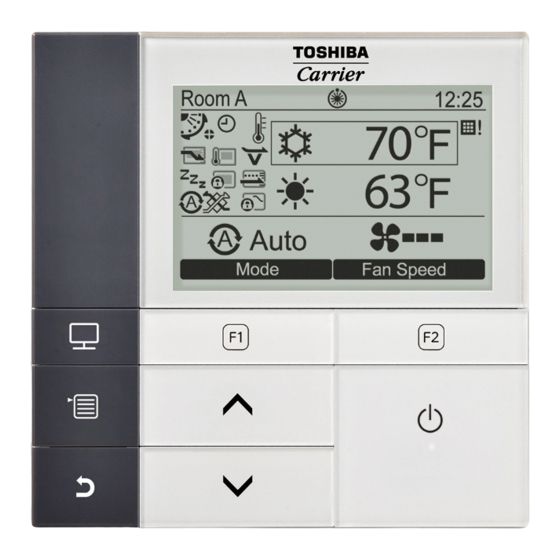
Model name:
RBC-AMS54E-UL
• Read this manual before using the RBC-
AMS54E-UL remote control.
• Refer to the Owner's Manual supplied with the
indoor unit for any instructions other than
operations of the remote control.
Owner's Manual
Wired Remote Control
Owner's Manual
Manuel du propriétaire
Manual del propietario
English
1
Français
45
Español
English
89
Advertisement
Table of Contents

Related Manuals for Toshiba RBC-AMS54E-UL


Summary of Contents for Toshiba RBC-AMS54E-UL
- Page 1 Owner’s Manual Wired Remote Control Model name: RBC-AMS54E-UL • Read this manual before using the RBC- AMS54E-UL remote control. • Refer to the Owner’s Manual supplied with the indoor unit for any instructions other than operations of the remote control.
-
Page 2: Table Of Contents
Owner’s Manual Contents 1 Precautions for Safety..........2 2 Before Use . -
Page 3: Precautions For Safety
Owner’s Manual Precautions for Safety • Read these “Precautions for Safety” carefully before using. • The precautions described below include important items regarding safety. Observe them without fail. Understand the following details (indications and symbols) before reading the body text, and follow the instructions. -
Page 4: Before Use
Owner’s Manual CAUTION Installation • Do not install the remote control unit where there are high levels of moisture, oils, grease or vibration. Failure to heed this caution may cause trouble. • Do not install the remote control unit direct sunlight or near a heat source. Failure to heed this caution may cause malfunctioning. -
Page 5: Part Names And Functions
Owner’s Manual Part Names and Functions Room A 12:00 Cool Mode Fan Speed The button LED lights while the air conditioning unit is running. Temperature sensor Model name label ∨ MONITOR] button ] button Displays the monitoring screen. During normal operation: adjusts the temperature. (page 9) On the menu screen: selects a menu item. - Page 6 Owner’s Manual Switching between the normal display and detailed display Push and hold the [ CANCEL] button and [ MONITOR] button at the same time for more than 4 seconds to switch the display mode. The normal display mode is selected as a factory default setting. Normal display mode (factory default) (*1) Energy saving icon...
- Page 7 Owner’s Manual ▼ Ventilation icon list Ventilation icons appear on the display only when a ventilation unit is connected. Automatic mode 24-hour ventilation mode Bypass mode Nighttime heat purge mode Total heat exchange mode – 6 –...
-
Page 8: Operation
Owner’s Manual Operation Running operation * Some operation modes are not available depending on the type of indoor unit. Push the [ ON/OFF] button to start Room A 12:00 running. Push the “ Mode” [ F1] button Mode to select the operation mode. Cool The operation mode changes as follows each Mode... -
Page 9: Changing The Temperature
Owner’s Manual Changing the temperature ∧ ∨ Push the [ ] / [ ] button to adjust the temperature. ∧ Push the [ ] button to raise the ∨ temperature setting, push the [ ] button to lower it. •... -
Page 10: Monitor Screen
Owner’s Manual Monitor screen Check the current usage status. Push [ MONITOR] button. Room A 12:00 The monitor screen appears. Push [ CANCEL] button to return. Cool Mode Fan Speed Monitor (1) Displays the set temperature. (2) Displays the temperature measured by the indoor Set temp. -
Page 11: Menu Operation
Owner’s Manual Self clean operation (only for models equipped with the function) Room A 12:00 • The self clean operation is the function to dry inside the air conditioner after the “Auto” (cooling), “Cool”, or “Dry” operation so that the inside of air conditioner is kept clean. -
Page 12: Menu Items
Owner’s Manual Menu items MENU 1. Wind direction 2.Individual louver 3.Louver setting Swing type Louver lock 4.Off reminder timer Off reminder timer Timer setting 5.Schedule timer Schedule timer Condition setting Holiday setting 6.Night operation 7.Filter sign reset 8.Auto grille* 9.Energy saving Energy saving operation Set temp. - Page 13 Owner’s Manual 10. Initial setting Clock Name of room Screen contrast Back light Key lock Header/Follower Language Press & hold 4sec. 11. Ventilation ON/OFF Fan speed Mode 24H ventilation off 12.Soft Cooling 13. Occupancy sensor* 14.Information Model information Service information NOTE * “8.Auto grille”...
-
Page 14: Wind Direction
Owner’s Manual 1. Wind Direction Wind direction * Set the wind direction. CAUTION Refer to the instructions (for the wind direction adjustment) in the Owner’s Manual supplied with the indoor unit before setting. Before setting ∧ ∨ Push the [ ] / [ ] button to select “1. - Page 15 Owner’s Manual To stop the louver swing Wind direction Push the “ Swing OFF” [ Swing OFF button on the “Wind direction” screen. Push the “ Swing OFF” [ Swing OFF button to stop swinging. The louver stops in the position where the button is pushed.
-
Page 16: Individual Louver
Owner’s Manual 2. Individual louver Individual louver * For 4-way cassette types, the wind direction and swing operation of each louver can be set individually. ∧ ∨ Push the [ ] / [ ] button to select “2.Individual louver” on the menu screen, Individual louver push the “... - Page 17 Owner’s Manual Turning on/off the louver swing To swing the louver Individual louver Push the “ Swing ON” [ Swing ON button on the “Individual louver” screen. Push the [ CANCEL] button. The screen returns to the menu screen. Return Louver Louver No.
-
Page 18: Louver Setting
Owner’s Manual 3. Louver setting Swing type * Select the louver swing type from the standard swing, dual swing or cyclic swing. Carry out the setting operation while the indoor unit is stopped. (Turn off the air conditioning unit before starting the setting operation.) Before setting ∧... - Page 19 Owner’s Manual Louver lock * The direction of the louver can be locked individually. Carry out the setting operation while the indoor unit is stopped. (Turn off the air conditioning unit before starting the setting operation.) Before setting ∧ ∨...
-
Page 20: Off Reminder Timer
Owner’s Manual NOTE • “No function” appears on the display for the models not equipped with the Louver lock setting. • Push the [ CANCEL] button to stop the setting procedure. No setting has been made and the screen returns to “Louver setting”. - Page 21 Owner’s Manual NOTE • The air conditioner stops running after the specified time has elapsed. Elapsed time of the Off reminder timer Stop Running Off reminder timer Start No remaining time • “ ” appears on the detailed display when the Off reminder timer is used. •...
-
Page 22: Schedule Timer
Owner’s Manual 5. Schedule timer * Up to 8 different running patterns per day can be programmed with the schedule timer. Up to 3 patterns of settings that differ per day can be set. Days of the week when the schedule timer is not used can also be set in “Holiday setting”. ∧... - Page 23 Owner’s Manual While setting the functions When the central control is used (when the run and stop operation is prohibited) • The Schedule timer cannot be set on the Follower remote control when the dual remote control system is used. •...
- Page 24 Owner’s Manual Schedule timer1 (3/3) ↓” [ Push the “ F1] button to : Monday program the next running pattern. 5. ON 13:00 77°F Up to 8 different running patterns per day can 6. OFF 17:00 --°F be programmed. 7. ON 22:05 77°F 8.
- Page 25 Owner’s Manual To copy the settings of the previous day Schedule timer1 (1/3) Push the [ MONITOR] button on the day Tuesday selection screen. 10 :22 73 °F --:-- --°F Push the “ Yes” [ F1] button. --:-- --°F The schedule of the previous day is copied. --:-- --°F Push the “...
-
Page 26: Night Operation
Owner’s Manual 6. Night operation (Only for models equipped with the function) Set the operation time that suppressing the operation sound of the outdoor unit is preferable such as nighttime. ∧ ∨ Push the [ ] / [ ] button to select “6.Night operation”... -
Page 27: Filter Sign Reset
Owner’s Manual 7. Filter sign reset “ ” (filter sign) appears on the detailed display (not displayed when it is in the normal display mode) to tell the time for cleaning the filter. Room A 12:00 • Reset the filter sign after cleaning the filter. Refer to the Owner’s Manual supplied with the indoor unit about how to clean the filter. - Page 28 Owner’s Manual NOTE • “Clean the air filter” or “Filter check”appears on the display when there is no remaining time for filter cleaning. • “ ” (filter sign) appears on the detailed display. The sign is not displayed when the remote control is in the normal display mode.
-
Page 29: Energy Saving
Owner’s Manual 9. Energy saving Set for the energy saving operation: Energy saving operation, Set temp. range limit, Return back and Saving operation. ∧ ∨ Push the [ ] / [ ] button to select “9.Energy saving” on the menu screen, then Energy saving(1/2) 1.Energy saving operation push the “... - Page 30 Owner’s Manual Energy saving ratio Carry out the setting operation while the indoor unit is stopped. (Turn off the air conditioning unit before starting the setting operation.) ∧ ∨ Energy saving operation Push the [ ] / [ ] button to select 1.Energy saving operation “2.
- Page 31 Owner’s Manual Energy saving schedule ∧ ∨ Energy saving operation Push the [ ] / [ ] button to select 1.Energy saving operation “3. Energy saving schedule” on the “Energy ON / saving operation” screen, then push the 2.Energy saving ratio “...
- Page 32 Owner’s Manual Set temp. range limit Set the temperature range for each operation mode. ∧ ∨ Energy saving(1/2) Push the [ ] / [ ] button to select 1.Energy saving operation “2. Set temp. range limit” on the “Energy <ON>...
- Page 33 Owner’s Manual Return back The temperature setting returns back to the specified temperature automatically if the temperature has been changed on the remote control. The time and temperature to return can be set. ∧ ∨ Energy saving(1/2) Push the [ ] / [ ] button to select 1.Energy saving operation...
- Page 34 Owner’s Manual Saving operation ∧ ∨ Energy saving(2/2) Push the [ ] / [ ] button to select 4.Saving operation “4. Saving operation” on the “Energy saving ON / OFF setting” screen, then push the “ Set” [ F2] button. To set the saving operation, push the Return “...
-
Page 35: Initial Setting
Owner’s Manual 10.Initial setting Set the initial setting of the remote control. ∧ ∨ Push the [ ] / [ ] button to select “10. Initial setting” on the menu screen, then Initial setting(1/2) 1.Clock push the “ Set” [ F2] button. - Page 36 Owner’s Manual To adjust the clock Clock ∧ ∨ Push the [ ] / [ ] button to select “1. Clock” on the “Initial setting” screen, Month then push the “ Set” [ Year 2016 button. Hour Minute ∧ ∨ Push the [ ] / [ ] button to select...
- Page 37 Owner’s Manual Backlight Turn on or off the backlight of the LCD. ∧ ∨ Initial setting(1/2) Push the [ ] / [ ] button to select 1.Clock “4.Backlight” on the “Initial setting” screen, 2.Name of room then push the “ Set”...
- Page 38 Push the [ ] / [ ] button to select Return the language. Push the [ MENU] button. The screen returns to the “Initial setting” screen. These two screens appear for RBC-AMS54E-UL. Language(1/2) English French Français German Deutsch Spanish Español Portuguese Português...
- Page 39 Owner’s Manual Press & hold 4sec. Set the “press and hold 4 sec.” operation for the [ ON / OFF] button. ∧ ∨ Push the [ ] / [ ] button to select Initial setting(2/2) “8.Press & hold 4sec.” on the “Initial 6.Header/Follower setting”...
-
Page 40: Ventilation
Owner’s Manual 11.Ventilation (Only for models equipped with the function) Ventilation Set for the ventilation operation linked to the air conditioner. Select “11. Ventilation” on the menu screen, then push the “ Set” [ Ventilation 1.ON/OFF button. <OFF> 2.Fan speed <L>... -
Page 41: Soft Cooling Setting
Owner’s Manual 12.Soft cooling setting Soft cooling performs operation by limiting the operation range of the louver or suppressing the capacity to prevent discharge air fall down or excessive cooling. Soft Cooling ∧ ∨ Push the [ ] / [ ] button to select 1. -
Page 42: Information
Owner’s Manual 14.Information Model information Shows the model names and serial numbers. Information ∧ ∨ Push the [ ] / [ ] button to select 1.Model information “14. Information” on the menu screen, then 2.Service information push the “ Set”... - Page 43 Owner’s Manual Group control The following functions can be set individually for each unit when the group control is used: “Wind direction”, “Individual louver”, “Swing type”, “Louver lock” Operate the remote control according to the procedure below before setting each function. Select the group-controlled function on the menu screen, then push the “...
-
Page 44: Maintenance
Owner’s Manual Maintenance Turn off the power before maintenance. CAUTION Do not operate the unit with wet hands. Doing so may result in electric shocks. Daily maintenance Wipe the remote control with a dry, soft cloth. Using water to clean the remote control may result in a malfunction. ... -
Page 45: Troubleshooting
Owner’s Manual Troubleshooting Confirmation and check Check code When an error has occurred in the air conditioner, the check code and the unit number of the indoor Code : P10 Unit : 2–2 unit appear on the display of the remote control. Unit number of the malfunctioning indoor unit... - Page 46 EH97068601-2...