Table of Contents
Advertisement
Quick Links
Advertisement
Table of Contents

Related Manuals for Electrolux EYL85066WE


Summary of Contents for Electrolux EYL85066WE
- Page 1 EYL85066WE WATER HEATER USER MANUAL EYL95066WE EYL10566WE...
-
Page 2: Table Of Contents
9. TROUBLESHOOTING..................23 WE’RE THINKING OF YOU Thank you for purchasing an Electrolux appliance. You’ve chosen a product that brings with it decades of professional experience and innovation. Ingenious and stylish, it has been designed with you in mind. So whenever you use it, you can be safe in the knowledge that you’ll get great results every time. - Page 3 In the user manual and on our web site, www.electrolux.co.uk you will find some useful information on how to deal with minor faults and how to take care of your product. When contacting us for...
-
Page 4: Safety Information
1. SAFETY INFORMATION Before the installation and use of the appliance, carefully read the supplied instructions. The manufacturer is not responsible if an incorrect installation and use causes injuries and damages. Always keep the instructions with the appliance for future reference. - Page 5 ENGLISH The pressure relief device must be fitted during installation, unless it is incorporated in the appliance. The appliance must be permanently connected to fixed wiring. The appliance must be earthed. Do not install the appliance in locations where freezing can occur.
-
Page 6: Safety Instructions
Do not let the electricity mains cable tangle. All products manufactured and supplied by Electrolux are safe provided they are Make sure the appliance is installed installed, used correctly and receive regular correctly. Loose and incorrect electricity... - Page 7 Turn off at the mains electrical supply and refer to the Troubleshooting section (see page 23) or contact Electrolux Customer Services (see page 3). Do not crush or kink the shower hose, this could damage the hose, cause leaks and activate the pressure relief device.
-
Page 8: Electrical Requirements
3. Electrical Requirements Double pole switch Shower unit Temperature For cable capacity see cable current carrying capacity table on page 5 Consumer unit Mains electrical supply supply company. WARNING! This appliance MUST be earthed! The shower must be connected to its own independent electrical supply. - Page 9 ENGLISH 3. Electrical Requirements Where shower cubicles are located in any For close circuit protection DO NOT use a rooms other than bathrooms, all socket rewireable fuse. Instead use a suitably rated Miniature Circuit Breaker (MCB) or cartridge outlets in those rooms must be protected by fuse (see Circuit protection table).
-
Page 10: Water Requirements
4. Water Requirements Isolating stop valve Mains water Shower unit supply Temperature Hose retainer 1m minimum height from shower unit to floor Minimum 25mm between showerhead Bath spillover and spillover level This shower needs to be installed in If the shower is to be installed in a hard water... -
Page 11: Installation
ENGLISH 5. INSTALLATION WARNING! Water entry position: Before installation, make sure Bottom right inlet entry you read through the electrical requirements and water requirements section. Select the location and hang up the shower While planning your shower installation, make sure you allow sufficient clearance between the ceiling and walls to allow any future maintenance (cleaning the filter etc.) to be performed. - Page 12 5. INSTALLATION Top right inlet entry Left inlet entry Top left inlet entry Bottom left inlet entry To mark the drilling position Rear left inlet entry Using the installation template supplied, mark the positions of the three fixing holes.
- Page 13 ENGLISH 5. INSTALLATION Hook the backplate over the top screw and To remove the front cover Unscrew the screws that fixing the front DO NOT fully tighten the screws at this stage. cover (Fig. 2a), and pull out the front cover lightly, then disconnect the cable between front cover and the chassis (Fig.
- Page 14 Electrical wiring connection when making the connection. To select the wiring terminal position NOTE: This Electrolux shower heater has 2 wiring It is essential that all pipe work is flushed terminals and 2 earthing terminals shown through to remove debris and swarf that as Fig.
- Page 15 ENGLISH 5. INSTALLATION Fixing the front cover Fig. 8b 1. Before fixing the front cover to the shower, tighten the 3 screws to fix the shower on the wall firmly. 2. Adjust the spline spindle and the control knob to the correct position before replacing the cover Fig.
- Page 16 5. INSTALLATION 5.5 Install the bracket NOTE: proper position for the bracket if necessary. Bracket parts Put the wall plugs on the holes, then Sliding rail remove the sliding rail holder covers from Wall plug holder cover sliding rail holders on the upper position,...
- Page 17 ENGLISH 5. INSTALLATION b. Assemble the soap tray holder from the Fig. 13 bottom of the sliding rail as Fig. 12 shown. Fig. 12 The larger hole should Point the open be pointed outside gap upward c. Assemble the soap tay on the soap tray holder.
-
Page 18: Operation Instruction
6. OPERATION INSTRUCTION Fig. 15 CAUTION! Before normal operation of the shower, it is Pass the COLD Temperature essential that the following commissioning button to choose procedure is completed correctly. the cold setting. out any remaining debris, and to make sure the heater unit contains water before the heating elements are switched on. - Page 19 ENGLISH 6. OPERATION INSTRUCTION 7. Once flushing out has been completed, II: Uses the high power heating element stop the water flow by pressing the On/off within the shower unit. button. III: Uses both of the low/high heating 8. Fit the showerhead to the flexible hose and elements within the shower unit to provide place in the showerhead holder(Fig.
- Page 20 Shower head setting Massage Setting Concentrated spray impact, with pulse effects, suitable for part pulse massage on muscle. Spray+Massage Shower spray with massage feeling. Spray Have a broader area, suitable for large area shower. Spray-bubble plus spray water. Bubble...
-
Page 21: Maintenance
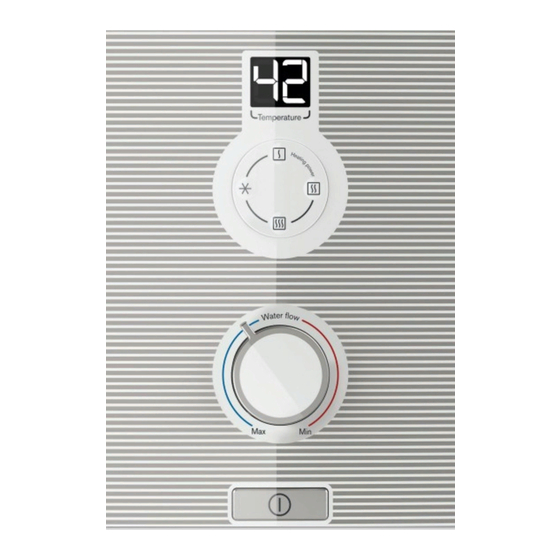
ENGLISH 7. MAINTENANCE To increase the shower temperature Fig. 18 Turn the temperature control clockwise - the shower and make the water hotter. NOTE: Total rotation distance of the temperature knob is 300°. It is advisable that the showering temperature is satisfactory by testing with your hand before stepping under the showerhead. -
Page 22: Helpful Hints And Tips
8. HELPFUL HINTS AND TIPS Cut off the power while not in use avoid block of internal water pipe and lime scale. In normal use, it is in order to leave the water supply permanently on to the shower unit,... -
Page 23: Troubleshooting
(see rating label). Fit pump to give minimum pressure (see rating label). Electrolux Contact Customer Service for advice. Water too cool or cold. Reduction in ambient select higher power. - Page 24 9. TROUBLESHOOTING Problem/Symptom Cause Action/Cure Shower varies from Water pressure has Wait until the water pressure resumes to normal temperature dropped below minimum normal. to cold during use. required. Clean or replace blocked sprayplate in Blocked showerhead. Pressure relief device Check for free passage through hose.
- Page 25 www.electrolux.com/shop...