Table of Contents
Advertisement
Quick Links
Operation/Installation Instructions
Operation/Installation Instructions
Thank you for choosing Panasonic products.
Please read Operation/Installation Instructions carefully before installing, operating and maintaining
Panasonic products.
Especially, pay attention to "Safety precautions" (pages 2 ~ 4)
manual may result in personal injury or property damage.
After installation, please explain to the user how to operate and maintain Panasonic products, and give
this manual to the customer for safekeeping.
Please keep the manual properly for future reference. (Kept for future use)
This unit contains reusable materials, so please assist in proper disposal or recycling when discarding
them to protect the environment.
The right of fi nal interpretation of this manual belongs to Panasonic Corporation.
Model No. FV-KTB2T61HK
"Safety precautions" (pages 2 ~ 4). Failure to follow the instructions in this
Household use
Contents
Safety precautions .........................
Precautions for use........................ 4
Part names and sizes .................... 5
How to use..................................... 6
Cleaning and maintenance ............ 7
faults .............................................. 8
Electrical schematic diagram ......... 8
Specifi cations ................................ 9
List of accessories ....................... 10
Installation method .......................11
Test operation .............................. 13
Range Hood
Range Hood
......................... 2
Page
Advertisement
Chapters
Table of Contents

Related Manuals for Panasonic FV-KTB2T61HK


Summary of Contents for Panasonic FV-KTB2T61HK
-
Page 1: Table Of Contents
"Safety precautions" (pages 2 ~ 4). Failure to follow the instructions in this manual may result in personal injury or property damage. After installation, please explain to the user how to operate and maintain Panasonic products, and give this manual to the customer for safekeeping. -
Page 2: Safety Precautions
Safety precautions Safety precautions Please make sure to Please make sure to follow these instructions ! follow these instructions ! To avoid harm to you and others, be sure to observe the following safety precautions herein, and refer to the meaning of various signs below. - Page 3 Be sure to use a 10 A, 220 V AC power socket separately. Be sure to use a 10 A, 220 V AC power socket separately. (So as not to cause fi res.) Be sure to remove the power plug before cleaning the product. Be sure to remove the power plug before cleaning the product.
-
Page 4: Precautions For Use
Safety precautions Safety precautions Please make sure to Please make sure to follow these instructions ! follow these instructions ! Wear gloves when cleaning. Wear gloves when cleaning. (So as not to cause hand injury by the edge of the product.) ... -
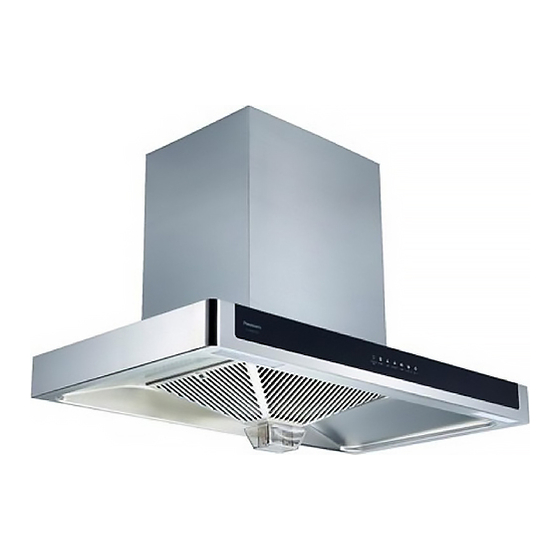
Page 5: Part Names And Sizes
Part names and sizes Part names and sizes Upper duct cover (Height 395 mm) Lower duct cover Control panel Fan guard Fan grille Oil cup ※ LED lamp ※Dimensions ( L×W ) :141.5 mm×29.5 mm Max. input power:1.5 W Voltage input:DC 12 V Protective cover Adapter PCB cover... -
Page 6: How To Use
How to use How to use Insert the plug into the power socket. With a beep, all the buttons on the control panel light up and last for about 2 seconds, and then go out. Power on/off Power on/off Touch the button, all the buttons light up (the button turns white highlight, and the other buttons turn... -
Page 7: Cleaning And Maintenance
Cleaning and maintenance Cleaning and maintenance Daily cleaning Daily cleaning To achieve the best operating performance and longer service life, this product must be cleaned and maintained frequently. Turn off the power before cleaning and maintenance. It is suggested that all surfaces be cleaned with a damp cloth (neutral detergent is applicable) to keep this product clean and tidy. -
Page 8: Troubleshooting Of Common Faults
Troubleshooting of common faults Troubleshooting of common faults In case that any fault occurs, check it according to the table below. If the problem still exists, contact the Customer Consulting Service Center. Symptom Possible causes Solutions The light is not lit 1.The power plug is not inserted into the 1.Insert it into the power socket. -
Page 9: Specifi Cations
Specifi cations Specifi cations Rated voltage 220 V Rated frequency 50 Hz Rated total input power 273 W Rated input power of main motor 270 W Max. input power of LED lamp 1.5 W×2 Number of fans Single fan Air volume 18 m /min Air pressure... -
Page 10: List Of Accessories
List of accessories List of accessories Appearance Name and usage Quantity Duct cover hang board (For fi xing the upper duct cover) Appliance hang board (For hanging the body) Plastic expansion tube Screw (Φ5×53) Slotted fi xing screw (M5×10) ... -
Page 11: Installation Method
Installation method Installation method 1.Checking before installation Suggested installation of the range hood is as shown in the fi gure below: Unit : mm Duct adapter Exhaust duct 61.2 Φ190 907~917 650~750 Tools required: a.Electric drill b.10 mm drill bit c.Screwdriver d.Hammer e.Tape measure... - Page 12 Installation method Installation method ③ According to Fig.3, align with the screw holes and place the sealing pad and the adapter on the outlet in sequence. After aligning with the screw holes, use 8 self-tapping screws removed in step ② to fi x the sealing pad and the adapter to the unit.
-
Page 13: Test Operation
Fig.7 Duct cover hang board Mounting hole for stop block Plane of hood Center line of cooker Plane of hood Countertop for cooker Schematic diagram of the unit 4.Installing the oil cup Install the oil cup at the bottom of the unit. Protective fi... - Page 15 規格 ..........23 包裝附件清單 ....... 24 安裝方法 ........25 試運轉 .......... 27 感謝您選用 Panasonic 產品。 安裝、使用和維護 Panasonic 產品前,請仔細閱讀本使用及安裝說明書。 特別留意“安全注意事項” (第 16 ~ 18 頁) “安全注意事項” (第 16 ~ 18 頁) 。不遵照此說明書進行操作有可能導致人員受傷 或財產損失。 安裝完成後,請向顧客說明如何使用和維護 Panasonic 產品,並將此說明書交給顧客保管。 請妥善保管好此說明書,以備日後參考。 (保留備用)...
-
Page 16: 安全注意事項
安全注意事項 安全注意事項 請務必遵守 ! 請務必遵守 ! 為避免給您及其他人造成傷害,這裡我們列出了以下安全指引,請務必遵守,各種標誌的含意請參見 以下內容。 ■ 無視或錯誤理解這些標誌,會產生下列兩種情況。 表示如不避免,則可能導致死亡或嚴重傷害的某種潛在危害情況。 表示如不避免,則可能導致輕微或中度傷害的某種潛在危害情況。 ■ 務必遵守的內容分類,標誌區分說明如下。 此符號表示不能進行,即“禁止”的內容。 此符號表示務必執行,即“強制”的內容。 禁止爐火直接烘烤本產品。 禁止爐火直接烘烤本產品。 (與煮食爐具同時使用時 , 可觸及的部件可能會變熱。 ) 禁止在潮濕的地方使用此產品。 禁止在潮濕的地方使用此產品。 (以免導致火災或故障。 ) 禁止用濕手觸摸電源插頭。 禁止用濕手觸摸電源插頭。 (以免導致觸電。 ) 禁止將尖銳的金屬插入機體的任何縫隙中。 禁止將尖銳的金屬插入機體的任何縫隙中。 (以免接觸機體內部,導致觸電。 ) 禁止自行安裝、拆卸、拆解、改造或重新安裝本產品。 禁止自行安裝、拆卸、拆解、改造或重新安裝本產品。... - Page 17 務必要單獨使用 10 A,220 V~ 交流電的電源插座。 務必要單獨使用 10 A,220 V~ 交流電的電源插座。 (以免導致火災。 ) 清潔本產品前,請務必先拔掉電源插頭。 清潔本產品前,請務必先拔掉電源插頭。 (以免導致觸電。 ) 請務必按說明書規定的方法清潔保養本產品,具體清潔保養方法和頻率請看本說明書。 請務必按說明書規定的方法清潔保養本產品,具體清潔保養方法和頻率請看本說明書。 (如果不按說明書規定方法清潔和保養,抽油煙機有起火的危險。 ) 插拔電源插頭時,請握住插頭本身,不要隨意拉扯電線。 插拔電源插頭時,請握住插頭本身,不要隨意拉扯電線。 (以免導致火災或觸電。 ) 當本產品與燃燒燃氣或其它燃料的爐具同時使用時,請務必確保房間通風良好。 當本產品與燃燒燃氣或其它燃料的爐具同時使用時,請務必確保房間通風良好。 (以免導致中毒。 ) 煮食時油著火,請立刻停止使用本產品。 煮食時油著火,請立刻停止使用本產品。 (以免導致火災。 ) 出現任何異常現象 / 故障時,請停止使用本產品,並關閉電源開關或拔下插頭。 出現任何異常現象...
-
Page 18: 使用注意事項
安全注意事項 安全注意事項 請務必遵守 ! 請務必遵守 ! 清潔時請戴上手套。 清潔時請戴上手套。 (以免產品的棱邊導致手部受傷。 ) 若電源線損壞,必須由製造商及其維修部或類似部門的專業人員更換。 若電源線損壞,必須由製造商及其維修部或類似部門的專業人員更換。 (以免導致觸電或危險。 ) 如需清潔內部,請委託專業人員進行。 如需清潔內部,請委託專業人員進行。 本產品不適合供下列人士(包括兒童)使用 : 身體官能或心智能力退化者,或是經驗 本產品不適合供下列人士(包括兒童)使用 : 身體官能或心智能力退化者,或是經驗 與使用知識缺乏者,除非有 與使用知識缺乏者,除非有 負 責他們安全的人員在旁邊監督或指導,方可使用。 責他們安全的人員在旁邊監督或指導,方可使用。 請注意避免讓兒童戲玩本產品。 請注意避免讓兒童戲玩本產品。 (以免導致燒傷,受傷或觸電。 ) 請務必確保爐具上煮食爐具的支撐面與本產品最低部位的最小距離在 650 mm 以上。 請務必確保爐具上煮食爐具的支撐面與本產品最低部位的最小距離在... -
Page 19: 部件名稱及尺寸
部件名稱及尺寸 部件名稱及尺寸 上裝飾罩 (高度 395 mm) 下裝飾罩 控制面板 集煙罩組件 油網 油杯 ※ LED 燈 ※ 尺寸(長 × 寬) :141.5 mm×29.5 mm 功率:1.5 W 輸入:DC 12 V 線束護罩 出風口組件 電氣盒 電源插頭 單位 : mm 正面 側面... -
Page 20: 使用方法
使用方法 使用方法 將插頭插入電源插座,伴隨蜂鳴聲,控制面板上所有按鍵將亮起約 2 秒後熄滅。 電源開 / 關 電源開 / 關 觸摸 鍵,所有的按鍵均點亮( 鍵顯示白色高亮,其餘按鍵顯示白色低亮 ),進入待機狀態。 風速設置 風速設置 待機狀態下,觸摸 鍵,設置風速( 鍵顯示白色高亮,觸摸的風速鍵顯示白色高亮, 沒有觸摸的風速鍵顯示白色低亮) 。風速可以觸摸風速鍵在“LOW” (低速) 、 “MEDIUM” (中速) 、 “HIGH” (高速) 、 “ULTRA HIGH” (爆炒)之間切換。 風機工作狀態下,觸摸白色高亮的風速鍵,伴隨蜂鳴聲,風機會停止運轉。 爆炒功能 爆炒功能 待機狀態下,觸摸 鍵,伴隨蜂鳴聲,按鍵背光閃爍顯示,風機在爆炒檔運行... -
Page 21: 清潔保養
清潔保養 清潔保養 日常清潔 為達到最佳操作性能和更長的使用壽命,本產品必須經常 進行清潔和保養。清潔保養前請先斷電。建議用濕布清潔 所有表面(可使用中性清潔劑) ,以保持本產品的外觀和 衛生。 提示 日常擦拭抽油煙機表面及四周即可。 建議每兩週擦拭一次。 油杯清潔 ① 參照右圖(油杯取下方向示意)取下油杯。 ② 倒掉已經收集的油,並將油杯浸泡在稀釋了的中性清洗劑 的溫水中,水溫 40 ℃~ 50 ℃,5 ~ 10 分鐘後清洗油杯。 ③ 參照右圖(油杯安裝方向示意)將油杯裝回原位。 油杯取下方向示意 提示 建議當集油量達到油杯的約 80% 容量時清潔油杯。 取下油杯過程中請用雙手抓取油杯,否則會造成油杯中 油污晃動溢出。 油杯安裝方向示意 提示 拆卸油網時需全程扶住,防止其掉落。 ... -
Page 22: 常見故障的識別與處理
常見故障的識別與處理 常見故障的識別與處理 發生故障時請按下表進行檢查,如果問題仍然未能解決,請與客戶諮詢服務中心聯繫。 症狀 可能的原因 處理 照明不亮且 1. 電源插頭沒有插入電源插座。 1. 插入電源插座。 電機不轉 2. 產品電線故障。 2. 聯繫客戶諮詢服務中心。 電機不轉 電機或電容出現故障。 聯繫客戶諮詢服務中心。 1. 照明線或連接出現故障。 照明不亮 2. 照明電路板出現故障。 聯繫客戶諮詢服務中心。 3. 照明燈故障。 排煙管鬆動或過多彎曲造成空氣 噪音異常 聯繫客戶諮詢服務中心,重新安裝排煙管。 流動不暢。 1. 排煙管鬆動或過多彎曲造成空氣 1. 聯繫客戶諮詢服務中心,重新安裝排煙管。 流動不暢。 吸煙效果 2. 調整到最高檔位。 2. 抽油煙機沒有設置在最高檔位。 不佳... - Page 23 規格 規格 額定電壓 220 V 額定頻率 50 Hz 額定輸入總功率 273 W 主電機額定輸入功率 270 W 照明燈最大輸入功率 1.5 W×2 風機數量 單風機 風量 18 m /min 風壓 310 Pa 最大靜壓 360 Pa 噪音 69 dB(A) 爆炒風量 20 m /min 爆炒風壓 330 Pa 爆炒最大靜壓 380 Pa 爆炒噪音...
-
Page 24: 包裝附件清單
包裝附件清單 包裝附件清單 代號 圖樣 名稱及用途 數量 裝飾罩掛板(用於固定上裝飾罩) 整機掛板(用於懸掛機體) 塑膠膨脹管 螺絲(Φ5×53) 一字槽固定螺絲(M5×10) 螺絲(ST5×19) 油杯 整機擋塊 使用及安裝說明書 排煙管(附鋁箔膠帶) 排氣喉換徑圈 短轉介面(已固定於排煙管一端) 出風口組件 出風口橡膠墊(預固定於出風口) 出風口蓋 ... -
Page 25: 安裝方法
安裝方法 安裝方法 1. 安裝前確認事項 抽油煙機的建議安裝方式,如下圖所示: 排氣喉換徑圈 單位 : mm 出風管 61.2 Φ190 907~917 650~750 所需工具: a. 電鑽 b.10 mm 鑽刀頭 c. 螺絲批 d. 錘子 e. 卷尺或鋼直尺 提示 本產品可能帶有鋒利的邊緣,在安裝時請務必戴上手套。 抽油煙機必須與爐具居中對齊。 不要安裝在陽光直射的地方。 需確保氣體能經排煙管排出室外或公共煙道。 單位 : mm 整機擋塊 2. 機體安裝 安裝孔... - Page 26 安裝方法 安裝方法 ③ 參照圖三將出風口橡膠墊、出風口組件依次放置到出風口上,放置時注意對準螺絲孔位。螺絲孔位 對準後使用步驟 ② 卸下的 8 個自攻螺絲將出風口橡膠墊和出風口組件固定到機體上。 注意:出風口組件安裝完成後的方向需要與圖四所示一致。 圖三 圖四 ④ 參照圖五取出排煙管和短轉介面(兩者已經使用鋁箔膠帶固定) ,使排煙管處於壓縮狀態。將出風口 蓋從上往下依次穿過排煙管和短轉介面至限位處待用,將上述部件通過出風口蓋的四個卡扣與出風 口座緊固互鎖。插上電源,啟動電機,檢查兩片金屬片是否翻起,關閉抽油煙機,兩金屬片應自然 回落。 ⑤ 撕掉下裝飾罩的保護膜,將整機可靠地掛到整機掛板上,機體與牆壁應傾斜 1°或 2°,以便整機 掛板的掛鉤完全插入。安裝完後請確保抽油煙機無晃動和脫鉤現象,並儘量保證抽油煙機處於水平 狀態。拉長排煙管,伸入牆洞內或者可靠連接公共煙道,調整排煙管,確保排煙管沒有膨脹或凹陷、 彎曲自如。 如將排煙管直接伸入公共煙道,請勿將排煙管伸入公共煙道太深,以免影響排煙效果; 若是對室外直接排煙,我們建議在室外排煙管端加裝一個百葉窗(五金店有售) 。 ⑥ 請將電源插頭可靠地插入插座,電源插座必須是帶有可靠接地線的專用插頭,請勿擅自更改插頭。 ⑦ 如圖六所示,用一個螺絲(ST5×19)通過塑膠膨脹管將整機擋塊固定在牆上,以防止抽油煙機在 受外力時在豎直方向上脫落。 圖五 圖六 整機擋塊 3. 安裝上裝飾罩 ① 若需要安裝上裝飾罩,根據安裝示意圖七,確定裝飾罩掛板固定孔的位置。 ②...
-
Page 27: 試運轉
圖七 裝飾罩掛板 整機擋塊 安裝孔 腔體平面 煮食爐具的中心線 腔體平面 煮食爐具的檯面 整機示意圖 4. 安裝油杯 將油杯安裝在整機底部。 裝飾罩保護膜 油杯 安裝完成後,請撕掉裝飾罩的保護膜。 試運轉 試運轉 安裝完成後,接通電源,按動控制面板上各個功能鍵,檢查以下項目: 扇葉是否正常旋轉 ? 是否有不正常的震動或者噪音 ? 控制面板上各個功能鍵的功能是否正常 ? - Page 28 Panasonic Appliances (China) Co., Ltd. Panasonic Appliances (China) Co., Ltd. No.2 SongQiao Street, Econmic&Technical Development Zone, Hangzhou, Zhejiang, China https://www.panasonic.com © Panasonic Corporation 2021...