Table of Contents
Advertisement
HE903PAW-AP_BUSALLK
2/1/08
7:54 PM
Unique Features
Page 1
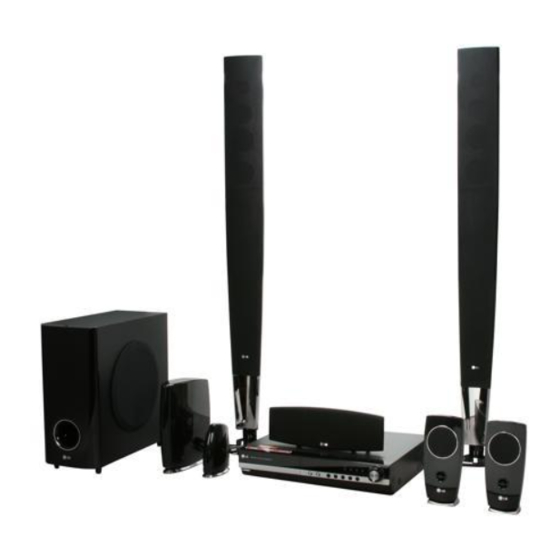
Model: LHT874
HDMI In
Simple connection with Set
Top Box through HDMI.
Go to page 10
Portable In
Listen to music from your
portable device (MP3,
Notebook, etc).
Go to page 20
© Copyright 2008, LG Electronics U.S.A., Inc.
Full HD up-scaling
5.1ch ez Set-up
(1080p)
View Full HD picture quality
Listen sound from TV, DVD
with simple setup.
and Digital Device with vivid
5.1ch mode.
Go to page 14
Go to page 20
Made for iPod
Enjoy music from iPod with
simple connection.
Go to page 22
Toll Free Number
1-800-243-0000
http://us.lgservice.com
For service/
support Call:
Advertisement
Table of Contents

Related Manuals for LG LHT874


Summary of Contents for LG LHT874
-
Page 1: Unique Features
Go to page 14 Made for iPod Enjoy music from iPod with simple connection. Go to page 22 © Copyright 2008, LG Electronics U.S.A., Inc. 5.1ch ez Set-up Listen sound from TV, DVD and Digital Device with vivid 5.1ch mode. -
Page 2: Safety Precaution
This declaration is based upon the compliance of the Audio data transceiver to the above standards. LG has determined that the models listed have been shown to comply with the applicable technical standards if no unauthorized change is made in the equipment and if the equipment is properly maintained and operated. -
Page 3: Important Safety Instructions
HE903PAW-AP_BUSALLK 2/1/08 7:54 PM Page 3 IMPORTANT SAFETY INSTRUCTIONS CAUTION: PLEASE READ AND OBSERVE ALL WARNINGS AND INSTRUCTIONS IN THIS OWNER’S MANUAL. AND THOSE MARKED ON THE PRODUCT. RETAIN THIS MANUAL FOR FUTURE REFERENCE. This product has been designed and manufactured to assure personal safety. Improper use can result in electric shock or fire hazard. The safeguards incorporated in this product will protect you if you observe the following procedures for installation, use, and servicing. -
Page 4: Table Of Contents
Some functions of this unit are controlled by TV’s remote control when this unit and LG TV with SIMPLINK are connected through HDMI connection. • Controllable functions by LG TV’s remote control; Play, Pause, Scan, Skip, Stop, Power Off, etc. -
Page 5: Setting Up
HE903PAW-AP_BUSALLK 2/1/08 7:54 PM Page 5 Setting up The speakers are detached from the speaker stands. Assembling to the Speakers 1 Draw the speaker cable through the hole on the bottom of base. 2 Draw the speaker cable through the hole on the speaker. 3 Attach the speakers to the speaker stands by rotating the screw. - Page 6 HE903PAW-AP_BUSALLK 2/1/08 7:54 PM Page 6 Setting up Attaching the Wireless Transmitter to the DVD receiver Connect the DC power cable to the unit and trans- mitter. Connect the SOUND SIG- NAL connector of the Wireless Transmitter and rear (right, left) speaker of the main set with the sound signal cable.
- Page 7 HE903PAW-AP_BUSALLK 2/1/08 7:54 PM Page 7 Be careful of the following • Be careful to make sure children do not put their hands or any objects into the *speaker duct. *Speaker duct: A hall for plentiful bass sound on speaker cabinet(enclosure). •...
-
Page 8: Led Indicator Of Wireless Transmitter
HE903PAW-AP_BUSALLK 2/1/08 7:54 PM Page 8 LED indicator of Wireless Transmitter Operation LED color BLUE The main set is turned on, everything is connected and transmitting. The wireless transmitter is in standby mode. OFF (No display) The DC cable is disconnected to the unit. LED indicator of Wireless Receiver Operation... -
Page 9: Hooking Up The Unit
HE903PAW-AP_BUSALLK 2/1/08 7:54 PM Page 9 Hooking up the unit a Connect jacks on the unit and your TV (DVD player or Digital Device etc.) using the cables. Video Out connection Connect the VIDEO OUT- PUT jack on the unit to the corresponding input jack on your TV using a Video cable. - Page 10 HE903PAW-AP_BUSALLK 2/1/08 7:54 PM Page 10 Hooking up the unit HDMI In connection Connect the HDMI INPUT jack on the unit to the HDMI output jack on your Set-Top box (or Digital Device etc.) using an HDMI cable. Set the external source to HDMI IN by pressing INPUT.
-
Page 11: Remote Control
HE903PAW-AP_BUSALLK 2/1/08 7:54 PM Page 11 Remote control INPUT : Changes the input source ( AUX, AUX OPT, PORTABLE, HDMI IN, USB, OSD IPOD, IPOD) SLEEP : Sets the System to turn off automatically at a specified time. (Dimmer : Dims the LED (Light-emitting diode) of front panel by half in power-on status.) POWER: Switches the unit ON or OFF. -
Page 12: Main Unit
HE903PAW-AP_BUSALLK 2/1/08 7:54 PM Page 12 Main Unit DVD/CD Disc Drawer USB port The USB port allows you can connect a memory device to your DVD player. Power Turn the unit on and off. PORT. IN port The PORT. In port means you can connect an audio device to play trough the surround sound speakers. -
Page 13: Osd Initial Language Settings
HE903PAW-AP_BUSALLK 2/1/08 7:54 PM Page 13 OSD Initial language settings Before using the unit for the first time, you have to adjust OSD initial language 1 Turn the power on: Appear the language list display window 2 Select the language: 3 Press: 4 To confirm press: Initial Setting the Area Code... -
Page 14: Speaker Setup
HE903PAW-AP_BUSALLK 2/1/08 7:54 PM Page 14 Adjust the display settings TV Aspect – Select which screen aspect to use based on the shape of your TV screen. [4:3]: Select when a standard 4:3 TV is connected. [16:9]: Select when a 16:9 wide TV is connected. Display Mode –... -
Page 15: Setting The Sound Mode
HE903PAW-AP_BUSALLK 2/1/08 7:54 PM Page 15 Adjust the audio settings DRC (Dynamic Range Control) – Make the sound clear when the volume is turned down (Dolby Digital only). Set to [On] for this effect. Vocal – Select [On] to mix karaoke channels into normal stereo. This function is effective for multi-channel karaoke DVDs only. -
Page 16: Displaying Disc Information
HE903PAW-AP_BUSALLK 2/1/08 7:54 PM Page 16 Displaying Disc Information 1 Press DISPLAY: 2 Select a item: 3 Adjust the Display menu settings: 4 To return the exit: Displaying Disc Information - more you can do You can select an item by pressing vV and change or select the setting by pressing b B. - Page 17 HE903PAW-AP_BUSALLK 2/1/08 7:54 PM Page 17 Frame-by-Frame playback DivX Press PAUSE/STEP (X) repeatedly to play title Frame-by-Frame. Playing repeatedly Press REPEAT repeatedly to select an item to be repeated. The current title, chapter or track will be played back repeatedly. To return to normal playback, press REPEAT repeatedly to select [OFF].
-
Page 18: Viewing Photo Files
HE903PAW-AP_BUSALLK 2/4/08 11:02 AM Page 18 Hearing a different audio DivX During playback, press AUDIO ( ) repeatedly to switch between the available audio languages or encoding methods. Creating your own program You can play the contents of a disc in the order you want by arranging the order of the music files on the disc. -
Page 19: Listening To The Radio
HE903PAW-AP_BUSALLK 2/1/08 7:54 PM Page 19 Listening to the radio Be sure that both FM and AM aerials are connected. 1 Turn the power on: 2 Select either FM or AM: 3 Select a radio station: 4 To ‘save’ a radio station: A preset number will show in the display. -
Page 20: Listening To Music From Your Portable Player
HE903PAW-AP_BUSALLK 2/1/08 7:54 PM Page 20 Listening to music from your portable player The player can be used to play the music from many types of portable player 1 Connect the portable player by plugging the unit into PORT. IN on the front of the player.: 2 Turn the power on: 3 Select the PORTABLE function: 4 Turn the portable player on and start it... -
Page 21: Listening To Music From Your Usb Device
HE903PAW-AP_BUSALLK 2/1/08 7:54 PM Page 21 Listening to music from your USB device The advantage of connecting your portable USB player through the sys- tem’s USB port is that the USB device can be controlled from the system. 1 Connect the USB device to the unit using a USB cable (not supplied).: 2 Select the USB function: 3 Select a file from the menu:... -
Page 22: Listening To Music From Your Ipod
HE903PAW-AP_BUSALLK 2/1/08 7:54 PM Page 22 Listening to music from your iPod iPod mode: You can operate your iPod by using the supplied remote control and controls on your iPod. TV screen is turned off. iPod will not be charged when selecting the iPod mode. But you can enjoy better sound quality. -
Page 23: Controlling Your Tv With The Supplied Remote Control23
Controlling your TV with the supplied Remote Control You can control the sound level, input source, TV’s channel and power switch of your LG TV with the supplied remote control. Controlling other TV’s with the remote con- trol You can control the sound level, input source, TV’s channel and power switch of non-LG TVs as well. -
Page 24: Language Codes
HE903PAW-AP_BUSALLK 2/1/08 7:54 PM Page 24 Language Codes Use this list to input your desired language for the following initial settings: Disc Audio, Disc Subtitle, Disc Menu. Language Code Language Code Afar 6565 Croatian 7282 Afrikaans 6570 Czech 6783 Albanian 8381 Danish 6865... -
Page 25: Troubleshooting
HE903PAW-AP_BUSALLK 2/1/08 7:54 PM Page 25 Troubleshooting PROBLEM CAUSE No power The power cord is disconnected. No picture The TV is not set to receive the DVD signal. The video cables are not connected securely. There is little or no sound Equipment connected via the audio cable is not set to receive DVD signal output. -
Page 26: Types Of Playable Discs
You have to set the disc format option to [Mastered] in order to make the discs compatible with the LG players when formatting rewritable discs. When setting the option to Live File System, you cannot use it on LG players. (Mastered/Live File System : Disc format system for Windows Vista) -
Page 27: Specifications
HE903PAW-AP_BUSALLK 2/1/08 7:54 PM Page 27 Specifications General Power supply Refer to main label. Power consumption Refer to main label. Net Weight 5.4 kg External dimensions (W x H x D) 430 x 89 x 347 mm Operating conditions Temperature 5°C to 35°C, Operation status: Horizontal Operating humidity... - Page 28 Page 28 This LG Electronics product, will be repaired or replaced, at LG’s option, if it proves to be defective in material or workmanship, under normal use, during the war- ranty period (“Warranty Period”) listed below, effective from the date (“Date of Purchase”) of original consumer purchase of the product. This warranty is good only to the original purchaser of the product and effective only when used in the United States, excluding U.S.