Advertisement
Quick Links
Tools needed
● 7/16" and ¾"Socket or Adjustable Wrench
● ⅛" , 5/32 "Allen Wrench
● Flathead or Phillips Screwdriver
Instructions
Step
Description
1
Unscrew all the bolts and setscrews.
A. If shield and the arm are attached do not
unassemble.
B. If the Inner Rod is within the Outer Rod
do not unassemble.
2
Clear all obstructions in pipes.
3
Place caster wheels into base. This process can be
done by placing the base upside down and then
pushing the caster wheels shaft into the holes at
the end of each beam.
4)a)
Place hand tight nut onto filler. Place the curved
side onto the inner rod and slide whole assembly
with rod into opening of the outer rod.
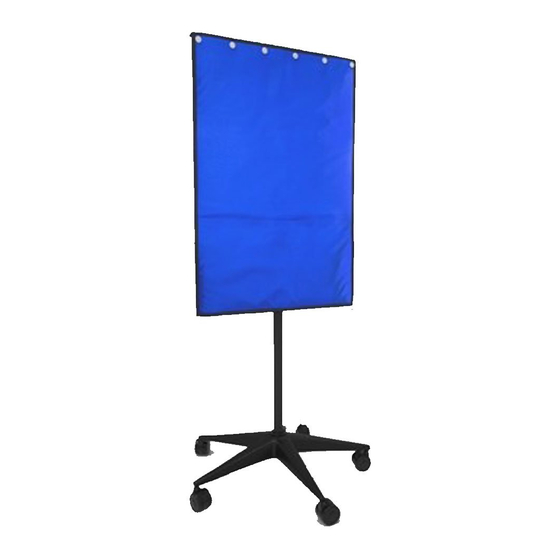
Mobile Lead Porta-Shield,
LB-MB2424, LB-MB2436, LB-MB2448
Image
1
Advertisement

Related Manuals for Philips LB-MB2424


Summary of Contents for Philips LB-MB2424
- Page 1 Mobile Lead Porta-Shield, LB-MB2424, LB-MB2436, LB-MB2448 Tools needed ● 7/16” and ¾”Socket or Adjustable Wrench ● ⅛” , 5/32 ”Allen Wrench ● Flathead or Phillips Screwdriver Instructions Step Description Image Unscrew all the bolts and setscrews. A. If shield and the arm are attached do not unassemble.
- Page 2 Mobile Lead Porta-Shield, LB-MB2424, LB-MB2436, LB-MB2448 4)b) One the inner rod is within the cavity of the outer rod, slide push pin into the opening of the inner rod. Move the inner down until the push pin is resting on the out rod.
- Page 3 Mobile Lead Porta-Shield, LB-MB2424, LB-MB2436, LB-MB2448 Place Lead Shield on Arm. This will require the removal of the six bolts. A. Place the shield on a level surface with the Arm on top of the shield. B. Then, place the bolt through the holes.