
Summary of Contents for Suzuki SWACE
- Page 1 AUDIO SYSTEM OWNER’S MANUAL Keep With Vehicle At All Times. Contains Important Information On Safety, Operation & Maintenance.
- Page 2 Quick guide • Basic system overview • Information to be read before operation Basic function • Setting initial settings before operation ® • Connecting the Bluetooth device Audio/visual • Listening to the radio system • Enjoying music and video Speech command •...
-
Page 3: Table Of Contents
TABLE OF CONTENTS Introduction........Audio/visual system Reading this manual......Quick guide 3-1. Basic operation Quick reference ....1-1. Basic function Some basics ......Buttons overview ....3-2. Radio operation Menu screen ......AM/FM/DAB radio....Status icon ......3-3. Media operation “Setup”... - Page 4 TABLE OF CONTENTS Things you should know ..103 Phone 6-1. Phone operation (Hands-free system for cellular phones) Quick reference ....106 Some basics .......107 Placing a call using the ® Bluetooth hands-free system ..........111 Receiving a call using the ® Bluetooth hands-free system ..........114 ®...
-
Page 5: Introduction
The company names and product names appearing on this manual are trademarks and registered trademarks of their respective com- panies. SUZUKI MOTOR CORPORATION COROLLA_HV(TMUK)_OEM_MM_(EE) -
Page 6: Reading This Manual
Reading this manual Symbols in illustrations Explains symbols used in this manual Symbols in this manual Symbols Meanings WARNING: Explains something that, if not obeyed, could Symbols Meanings cause death or serious Indicates the action injury to people. (pushing, turning, etc.) NOTICE: used to operate switches Explains something that,... - Page 7 Safety instruction To use this system in the safest possible manner, follow all the safety tips shown below. Do not use any feature of this sys- tem to the extent it becomes a dis- traction and prevents safe driving. The first priority while driving should always be the safe opera- tion of the vehicle.
-
Page 8: Quick Guide
Quick guide 1-1. Basic function Buttons overview ....Menu screen ....... Status icon......“Setup” screen ....COROLLA_HV(TMUK)_OEM_MM_(EE) -
Page 9: Basic Function Buttons Overview
1-1. Basic function 1-1.Basic function Buttons overview Operations of each part By touching the screen with your finger, you can control the selected functions. (P.17, 18) Press to seek up or down for a radio station or to access a desired track/file. - Page 10 1-1. Basic function Press to display the “Menu” screen. (P.10) Press to display the home screen. (P.19) : This function is not available in some countries or areas. : For details about Apple CarPlay/Android Auto: P.41 COROLLA_HV(TMUK)_OEM_MM_(EE)
-
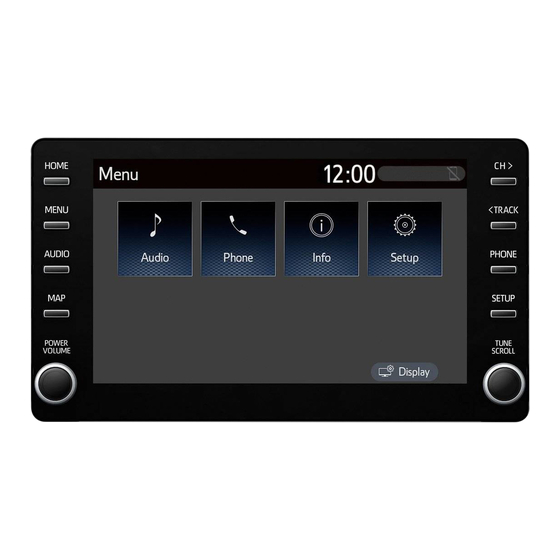
Page 11: Menu Screen
1-1. Basic function Menu screen Menu screen operation Press the “MENU” button to display the “Menu” screen. Displays the clock. Select to display the clock settings screen. (P.49) Select to display the audio control screen. (P.56) Select to display the hands-free operation screen. (P.106) When an Apple CarPlay connection is established, select to display the Phone app screen. -
Page 12: Status Icon
1-1. Basic function Status icon Reception level display The level of reception does not Status icons are displayed at always correspond with the level the top of the screen. displayed on the cellular phone. The level of reception may not be Status icon explanation displayed depending on the phone you have. - Page 13 1-1. Basic function Remaining battery charge ® Bluetooth connection con- display dition display The amount displayed does not ® An antenna for the Bluetooth con- always correspond with the amount nection is built into the instrument ® displayed on the Bluetooth device.
-
Page 14: Setup" Screen
1-1. Basic function “Setup” screen Select to set vehicle information. (P.52) ® “Setup” screen Select to set Wi-Fi connection settings. (P.38) Press the “SETUP” button, or press the “MENU” button, then select “Setup” to display the “Setup” screen. The items shown on the “Setup”... - Page 15 1-1. Basic function COROLLA_HV(TMUK)_OEM_MM_(EE)
- Page 16 Basic function 2-1. Basic information before operation Initial screen ....... Touch screen ...... Home screen operation ..Entering letters and num- bers/list screen operation ......... Screen adjustment....Linking multi-information dis- play and the system..2-2. Connectivity settings Registering/Connecting a ® Bluetooth device.....
-
Page 17: Basic Information Before Oper- Ation Initial Screen
2-1. Basic information before operation 2-1.Basic information before operation Initial screen When the power switch is turned to ACC or ON, the initial screen will be displayed and the system will begin operat- ing. Caution screen After a few seconds, the caution screen will be displayed. -
Page 18: Touch Screen
2-1. Basic information before operation Touch screen Touch screen gestures Operations are performed by touching the touch screen directly with your finger. Operation method Outline Main use Touch Selecting an item Quickly touch and on the screen release once. ... - Page 19 2-1. Basic information before operation ● Flick operations may not be performed smoothly at high altitudes. the screen settings on the display set- Touch screen operation tings screen or take off your sun- glasses. This system is operated mainly ● When is displayed on the by the buttons on the screen.
-
Page 20: Home Screen Operation
2-1. Basic information before operation aging of a cigarette box Home screen operation • Metallic wallets or bags • Coins On the home screen, multiple • Discs, such as a CD or DVD screens, such as the If the operable part of a capaci- audio/visual system screen, tive touch screen button is hands-free screen and clock... -
Page 21: Entering Letters And Numbers/List Screen Operation
2-1. Basic information before operation Entering letters and Customizing the home numbers/list screen screen operation The display information/area on the home screen can be changed. Entering letters and num- Press the “SETUP” button. bers When searching by an address, name, etc., or entering data, letters and numbers can be entered via the screen. - Page 22 2-1. Basic information before operation Select to change character Changing character type types and keyboard layout. Select “Change type”. Select to make a space on cur- sor. : These functions are not available in some languages. ● When is displayed, selecting it will move the cursor to the text field.
- Page 23 2-1. Basic information before operation Displaying predictive text List screen candidates The list screen may be displayed When text is input, the system pre- after entering characters. When a list is displayed, use the appropri- dicts the text that may complete the currently unconfirmed text and dis- ate screen button to scroll through plays predictive replacement candi-...
- Page 24 2-1. Basic information before operation the name. The list is displayed. ● Matching items from the database are listed even if the entered address or name is incomplete. ● The list will be displayed automatically if the maximum number of characters is entered or matching items can be displayed on a single list screen.
-
Page 25: Screen Adjustment
2-1. Basic information before operation turn it on, press any button. Screen adjustment Select to turn day mode on/off. (P.24) The contrast and brightness of the screen display and the Select to adjust the screen dis- image of the camera display play. -
Page 26: Linking Multi-Information Display And The System
2-1. Basic information before operation desired display. Linking multi-informa- tion display and the sys- • “Contrast” “+”: Select to strengthen the contrast of the screen. “-”: Select to weaken the contrast of the The following functions of the screen. system are linked with the •... -
Page 27: Connectivity Settings
2-2. Connectivity settings 2-2.Connectivity settings Registering/Connecting ® Registering a Bluetooth ® a Bluetooth device phone for the first time ■ Registering from the system To use the hands-free system, ® Turn the Bluetooth connection it is necessary to register a setting of your cellular phone on. - Page 28 2-2. Connectivity settings ® the confirmation message. Select the desired Bluetooth device. Check that the following screen is displayed, indicating pairing was successful. ® If the desired Bluetooth device is not on the list, select “If you The system is connecting to the cannot find...”...
- Page 29 2-2. Connectivity settings ■ Registering from phone ® Bluetooth device being con- Select “If you cannot find...”. nected, a message confirming registration may be displayed on ® the Bluetooth device’s screen. Respond and operate the ® Bluetooth device according to the confirmation message.
- Page 30 2-2. Connectivity settings Press the “AUDIO” button. Profiles This system supports the following services. ® ■ Bluetooth Core Specification Ver. 2.0 (Recommended: Ver. 4.2) ■ Profiles: HFP (Hands Free Profile) Ver. Select “Source” on the audio 1.0 (Recommended: Ver. 1.7) screen or press “AUDIO”...
-
Page 31: Setting Bluetooth ® Details
2-2. Connectivity settings trol the A/V equipment. ® Setting Bluetooth details ● This system is not guaranteed to ® operate with all Bluetooth devices. When an Apple CarPlay con- ● If your cellular phone does not support ® HFP, registering the Bluetooth phone nection is established, this or using OPP, PBAP or MAP profiles... - Page 32 2-2. Connectivity settings ® ® Bluetooth setup screen Connecting a Bluetooth device ® Up to 5 Bluetooth devices (Phones (HFP) and audio players (AVP)) can be registered. ® If more than 1 Bluetooth device has been registered, select which device to connect to. ®...
- Page 33 2-2. Connectivity settings played in colour. on the device. ® ● Selecting a profile icon which is When disconnecting a Bluetooth device, it is recommended to discon- not currently connected will nect using this system. switch the connection to the function.
- Page 34 2-2. Connectivity settings available, the system will auto- ® Registering a Bluetooth matically connect to the device ® Bluetooth phone with the high- est priority. (P.36) ® Up to 5 Bluetooth devices can be registered. ■ Connecting manually ® When the auto connection has Bluetooth compatible phones failed or “Bluetooth power”...
- Page 35 2-2. Connectivity settings ® ® Deleting a Bluetooth Editing the Bluetooth device device information This operation cannot be performed ® The Bluetooth device’s informa- while driving. tion can be displayed on the ® screen. The displayed information Display the Bluetooth settings can be edited.
- Page 36 2-2. Connectivity settings Confirm and change the name, the devices can be distin- guished by referring to the device ® Bluetooth device information. addresses. ® ● Depending on the type of Bluetooth phone, some information may not be displayed. Changing a device name Select “Device name”.
- Page 37 2-2. Connectivity settings nected, and the system will not con- “Detailed settings” screen nect to it next time. ® The Bluetooth settings can be ● While driving, the auto connection confirmed and changed. state can be changed from off to on, ®...
- Page 38 2-2. Connectivity settings ® ■ Changing Bluetooth device Editing the system informa- automatic connection priority tion Select “Preferred phones” or Select “System information”. “Preferred audio players”. Select the desired item to be ® Select the desired Bluetooth set. device and select “Move up” or “Move down”...
-
Page 39: Connecting To Miracast ® Via Wi-Fi
2-2. Connectivity settings ® Connecting to Miracast Select to reset all setup items. ® via Wi-Fi ■ Editing the system name Select “System name”. ® Using the Wi-Fi function, this Enter a name and select “OK”. system can connect to ®... - Page 40 2-2. Connectivity settings ® ® Wi-Fi settings screen Wi-Fi function operating hints ● If the vehicle is near a radio antenna, radio station or other source of strong radio waves and electrical noise, com- munication may be slow or impossi- ble.
- Page 41 2-2. Connectivity settings Conditions displayed with ® Wi-Fi icon Reception level appears on the right upper side of the screen. (P.11) Specifications Communication standards IEEE 802.11b IEEE 802.11g IEEE 802.11n (2.4GHz) Security WPA™ WPA2™ • WPA™, WPA2™ are trademarks of ®...
-
Page 42: Apple Carplay/Android Auto Tm
2-3. Apple CarPlay/Android Auto 2-3.Apple CarPlay/Android Auto Apple CarPlay/Android Establishing an Apple CarPlay connection Auto Enable Siri on the device to be : This function is not available in some connected. countries or areas. Connect the device to the USB Apple CarPlay/Android Auto port. - Page 43 2-3. Apple CarPlay/Android Auto Check that home screen of Establishing an Android Apple CarPlay is displayed. Auto connection Check that the Android Auto application is installed to the device to be connected. Connect the device to the USB port. (P.58) Select “On”...
- Page 44 2-3. Apple CarPlay/Android Auto ● ● When an Apple CarPlay/Android Auto Depending on the application, certain connection is established, some sys- functions, such as music playback, tem functions, such as the following, may be restricted. will be replaced by similar Apple ●...
- Page 45 2-3. Apple CarPlay/Android Auto ● Android and Android Auto are trade- marks of Google LLC. WARNING ● Do not connect smartphone or operate the controls while driving. NOTICE ● Do not leave your smartphone in the vehicle. In particular, high tem- peratures inside the vehicle may damage the smartphone.
- Page 46 2-3. Apple CarPlay/Android Auto Troubleshooting If you are experiencing difficulties with Apple CarPlay/Android Auto, check the following table. Symptom Solution Check if the device supports Apple CarPlay/Android Auto. Check if Apple CarPlay/Android Auto is enabled on the connected device. Check if that the Android Auto application is installed to the device to be connected.
- Page 47 2-3. Apple CarPlay/Android Auto Symptom Solution Although an Apple CarPlay/ Android Auto connection is The system may be muted or the volume may be established, audio is not out- low. Increase the system volume. put through the system. Check if the USB cable being used to connect the device to the system is damaged.
- Page 48 2-3. Apple CarPlay/Android Auto Symptom Solution After interrupt audio (such as This operation is performed according to the specifi- navigation route guidance) is cation of the onboard device, this is not a malfunc- played from an application tion. that is not compatible with Manually change the audio source by yourself.
-
Page 49: Other Settings General Settings
2-4. Other settings 2-4.Other settings General settings General settings screen “Clock” Settings are available for Select to change the time zone and clock, operation sounds, etc. select “On” or “Off” for daylight saving time, automatic adjustment of the clock, Displaying the general set- etc. - Page 50 Select to delete personal data. (P.50) Select the desired items to be “Software update” set. Select to update software versions. For details, contact a SUZUKI dealer or a qualified workshop. “Gracenote database update” ® Select to update Gracenote database versions.
- Page 51 2-4. Other settings Manual clock setting Deleting personal data When “Auto adjust by GPS” is Registered or changed personal turned off, the clock can be manu- settings will be deleted or returned ally adjusted. to their default conditions. Select “Auto adjust by GPS” to Display the general settings set to off.
-
Page 52: Voice Settings
2-4. Other settings Voice settings Voice settings screen Voice volume, etc. can be set. Displaying the voice set- tings screen Press the “SETUP” button. Select to adjust the volume of voice guidance. Select to set the voice recogni- tion prompts on/off. Select to reset all setup items. -
Page 53: Vehicle Settings
2-4. Other settings Vehicle settings Vehicle settings screen Settings are available for vehi- cle customization and valet mode. Displaying the vehicle set- tings screen Press the “SETUP” button. Select to set vehicle customization. Select to set valet mode. (P.53) : Refer to the “Owner’s Manual”. Select “Vehicle”. - Page 54 When valet mode activates, the system stops and a security code (4-digit number) standby screen is displayed. (P.53) ● If the 4-digit personal code is forgot- ten, please contact a SUZUKI dealer or a qualified workshop. COROLLA_HV(TMUK)_OEM_MM_(EE)
- Page 55 2-4. Other settings COROLLA_HV(TMUK)_OEM_MM_(EE)
-
Page 56: Audio/Visual System
Audio/visual system 3-1. Basic operation Quick reference ....Some basics ....... 3-2. Radio operation AM/FM/DAB radio....3-3. Media operation USB memory ...... iPod/iPhone (Apple CarPlay) ....Android Auto ....... ® Bluetooth audio....® Miracast ......3-4. Audio/visual remote controls Steering switches ....3-5. -
Page 57: Basic Operation Quick Reference
3-1. Basic operation 3-1.Basic operation Quick reference Functional overview The audio control screen can be reached by the following methods: From the “AUDIO” button Press the “AUDIO” button. From the “MENU” button Press the “MENU” button, then select “Audio”. ... -
Page 58: Some Basics
3-1. Basic operation Some basics Selecting an audio source Press the “AUDIO” button. This section describes some of the basic features of the audio/visual system. Some information may not pertain to your system. Your audio/visual system works when the power switch is in ACC or ON. - Page 59 3-1. Basic operation Reordering the audio source Sound settings Display the audio source Display the audio control selection screen. (P.57) screen. (P.57) Select “Reorder”. Select “Sound”. Select the desired audio source Select the desired item to be set. then to reorder. USB port Connect a device.
- Page 60 3-1. Basic operation Select the desired screen but- Select the desired screen but- ton. ton. Select “+” or “-” to adjust Select to adjust the sound bal- high-pitched tones. ance between the front and rear speakers. Select “+” or “-” to adjust mid-pitched tones.
- Page 61 3-1. Basic operation Follow the steps in “From the Audio screen adjustment audio settings screen” from step 5. (P.60) ■ Screen format settings The screen adjustment can be ■ Colour, tone, contrast and selected for USB video and brightness adjustment ®...
- Page 62 3-1. Basic operation ® From the Miracast control Speech command system screen Press the talk switch to operate ® Display the Miracast control the speech command system. screen. (P.75) Select “Display”. Follow the steps in “From the audio settings screen” from step 5.
-
Page 63: Radio Operation
3-2. Radio operation 3-2.Radio operation AM/FM/DAB radio Overview The radio control screen can be reached by the following methods: P.57 Control screen AM/FM Select to display the audio source selection screen. Select to display the audio Select to display the favourites source selection screen. - Page 64 3-2. Radio operation to move up/down the ser- Control panel vice/station. Manual screen: Turn to seek for service. DAB time shift screen: Turn to jump forward/backwards. ● The radio automatically changes to stereo reception when a stereo broad- cast is received. ●...
- Page 65 3-2. Radio operation Manual tuning Radio options AM/FM Select “Options”. Select “Manual”. Select the desired item. Tune the desired station. Select to seek up/down for a Select to set the listing order of station. the station list between “Broad- caster”...
- Page 66 3-2. Radio operation Time shift operation The service you are currently listen- ing to can be re-listened to at any time. Select “Time shift”. Select the desired operation button. Select on/off to set L-band in the tune range. When “Off” is selected, the physical channel range for tuning operations is limited to Band III, excluding for...
- Page 67 3-2. Radio operation RDS (Radio data system) This feature allows your radio to receive station and programme information from radio stations which broadcast this information. Depending on the availability of RDS infrastructure, the service may not function properly. AF (Alternative frequency) function (FM/DAB) A station providing good reception is automatically selected if current...
-
Page 68: Media Operation
3-3. Media operation (P.68) 3-3.Media operation USB memory Select to change the file/track. Select and hold to fast rewind. Overview Select to play/pause. The USB memory operation screen Select to change the file/track. can be reached by the following Select and hold to fast forward. methods: P.57 Select to set random playback. - Page 69 3-3. Media operation Select to play/pause. ● Each time is selected, the mode Select to change the file. changes as follows: Select and hold to fast forward. When random playback is off • file/track repeat folder/album Select to display a full screen repeat ...
-
Page 70: Ipod/Iphone
3-3. Media operation An Apple CarPlay connection is iPod/iPhone established (Apple CarPlay : This function is not available in some countries or areas. Overview The iPod/iPhone (Apple CarPlay) operation screen can be reached by the following methods: P.57 Select to display the audio source selection screen. - Page 71 3-3. Media operation connected to the system, certain func- Control panel tions may not be available. ● Tracks selected by operating a con- nected iPod/iPhone may not be recog- nized or displayed properly. ● The system may not function properly if a conversion adapter is used to con- nect a device.
-
Page 72: Android Auto
3-3. Media operation Android Auto NOTICE ● Do not leave your portable player in the vehicle. In particular, high tem- : This function is not available in some peratures inside the vehicle may countries or areas. damage the portable player. ●... -
Page 73: Bluetooth ® Audio
3-3. Media operation Select to play/pause. ® Bluetooth audio Select to change the track. ® Displays cover art The Bluetooth audio system enables users to enjoy listen- ing to music that is played on a Control panel portable player on the vehicle speakers via wireless commu- nication. - Page 74 3-3. Media operation Control screen Control panel Select to display the audio Press to change the track. source selection screen. Press and hold to fast for- Select to return to the top ward/rewind. screen. Turn to change the track. Select to display a song list Turn to move up/down the list.
- Page 75 3-3. Media operation changes as follows: ® the vehicle, remove the Bluetooth • random (1 album random) album audio information from the system. random (all album random) off (P.50) ● In some situations, sound output via ® ® the Bluetooth audio system may be ●...
-
Page 76: Miracast
3-3. Media operation ®* Registering/Connecting a Miracast ® Bluetooth device ® : Miracast is a registered trademark ® To use the Bluetooth audio sys- ® of Wi-Fi Alliance tem, it is necessary to register a ® Miracast is a function that ®... - Page 77 3-3. Media operation ® ● The Miracast screen displays the Overview same image that is sent from the external device. If the external device ® The Miracast control screen can screen is vertically-oriented, the be reached by the following meth- screen may also display a vertical image.
- Page 78 3-3. Media operation Select “YES”. ® Connecting a Miracast device ® Miracast is available when the ® Wi-Fi function is enabled. (P.39) ® Turn the Miracast function of your smartphone on. Select “Miracast™” on the audio ® Check that Miracast operation source selection screen.
-
Page 79: Audio/Visual Remote Controls
3-4. Audio/visual remote controls 3-4.Audio/visual remote controls Steering switches Seek switch Mode Operation/function Steering switch operation Press: Preset stations up/down (Favourites Some parts of the audio/visual sys- screen) tem can be adjusted using the Station up/down (Station switches on the steering wheel. list screen) Seek up/down (Manual AM/FM... -
Page 80: Setup
3-5. Setup 3-5.Setup Audio settings Common settings Display the audio settings Detailed audio settings can be screen. (P.79) programmed. Select “Common”. Select the desired items to be Displaying the audio set- set. tings screen Press the “SETUP” button. Select to set the cover art dis- play on/off. - Page 81 3-6. Tips for operating the audio/visual system about 40 km (25 miles). Once out- 3-6.Tips for operating the audio/visual system Operating information side this range, you may notice fad- ing and drifting, which increase with ● The use of a cellular phone inside or the distance from the radio trans- near the vehicle may cause a noise mitter.
- Page 82 3-6. Tips for operating the audio/visual system quency, they can interfere with • iPhone X each other, making it difficult to • iPhone 8 hear the broadcast. • iPhone 8 Plus • iPhone 7 Static: AM is easily affected by •...
- Page 83 3-6. Tips for operating the audio/visual system File information File type Frequency (kHz) WMA files: 32/44.1/48 Ver. 7, 8, 9 Compatible USB devices (9.1/9.2) USB communica- USB 2.0 HS (480 11.025/12/16/ AAC files: tion formats Mbps) 22.05/24/32/ MPEG4/AAC-LC 44.1/48 File formats FAT 16/32 8/11.025/12/16/ Correspondence...
- Page 84 3-6. Tips for operating the audio/visual system memory. File type Bit rate (kbps) MP4, WMV and AVI files can use WMA files: CBR 48 - 320 the following resolutions: Ver. 9 (9.1/9.2) 128x96, 160x120, 176x144 AAC files: (QCIF), 320x240 (QVGA), 8 - 320 MPEG4/AAC-LC 352x240 (SIF), 352x288 (CIF),...
- Page 85 3-6. Tips for operating the audio/visual system m3u playlists are not compatible with the audio player. MP3i (MP3 interactive) and MP3PRO formats are not com- patible with the audio player. The player is compatible with VBR (Variable Bit Rate). ...
- Page 86 3-6. Tips for operating the audio/visual system Compatible video format Format Codec Video codec: Format Codec H.264/MPEG-4 Video codec: MPEG4 H.264/MPEG-4 WMV9 WMV9 MPEG4 Advanced profile Audio codec: AAC Audio codec: AAC ...
- Page 87 3-6. Tips for operating the audio/visual system than that of MP3 files. The Terms decoding formats for WMA files ■ ID3 tag are Ver. 7, 8 and 9. This is a method of embedding This product is protected by cer- track-related information in an tain intellectual property rights of MP3 file.
- Page 88 “USB error” USB memory or its connection. ● If the malfunction is not rectified, take your vehicle to a SUZUKI dealer or a This indicates that qualified workshop. “No music files no compatible files found.” are included in the USB memory.
- Page 89 3-6. Tips for operating the audio/visual system COROLLA_HV(TMUK)_OEM_MM_(EE)
-
Page 90: Speech Command System
Speech command system 4-1. Speech command system operation Speech command system .. Command list...... COROLLA_HV(TMUK)_OEM_MM_(EE) -
Page 91: Speech Command System
4-1. Speech command system operation 4-1.Speech command system operation Speech command sys- Using the speech command system ■ Steering switch The speech command system enables the radio, phone dial- ing, etc. to be operated using speech commands. ● Voice recognition language can be changed. - Page 92 4-1. Speech command system operation directly into the microphone cancels voice recognition mode. when giving a command. After a beep sounds, say the desired command or select the ● Speech commands may not be recog- desired command. nized if: • Spoken too quickly. •...
-
Page 93: Command List
4-1. Speech command system operation Command list Command list overview Recognizable speech commands and their actions are shown below. Frequently used commands are listed in the following tables. For devices that are not installed to the vehicle, commands relating to that device may not function. - Page 94 4-1. Speech command system operation ■ Phone Command Action “Dial <phone number>” Call the selected phone number Call the phone number of the latest outgoing “Redial” call “Call <contacts>” Call the selected phone contact Call the selected phone contact on its “Call <contacts>...
- Page 95 4-1. Speech command system operation COROLLA_HV(TMUK)_OEM_MM_(EE)
-
Page 96: Peripheral Monitoring System
Peripheral monitoring system 5-1. Rear view monitor system Rear view monitor system .. Rear view monitor system pre- cautions ......Things you should know ...103 COROLLA_HV(TMUK)_OEM_MM_(EE) -
Page 97: Rear View Monitor System
5-1. Rear view monitor system 5-1.Rear view monitor system Rear view monitor sys- ● Be sure to back up slowly, depress- ing the brake pedal to control vehi- cle speed. ● The instructions given are only The rear view monitor system guide lines. - Page 98 5-1. Rear view monitor system Screen description Canceling rear view monitor system The rear view monitor system The rear view monitor system is screen will be displayed if the shift canceled when the shift lever is lever is shifted to the “R” position shifted into any position other than while the power switch is in ON.
-
Page 99: Rear View Monitor System Pre- Cautions
5-1. Rear view monitor system distance of the image that appears on Rear view monitor sys- the screen differs from the actual dis- tem precautions tance. ● Items which are located higher than the camera may not be displayed on Area displayed on screen the monitor. - Page 100 If this happens, have the tance/course on the road. vehicle inspected by a SUZUKI dealer or a qualified workshop as soon as possible. COROLLA_HV(TMUK)_OEM_MM_(EE)
- Page 101 5-1. Rear view monitor system ■ When the ground behind the ■ When the ground behind the vehicle slopes up sharply vehicle slopes down sharply The distance guide lines will appear The distance guide lines will appear to be closer to the vehicle than the to be farther from the vehicle than actual distance.
- Page 102 5-1. Rear view monitor system ■ When any part of the vehicle When approaching sags three-dimensional objects When any part of the vehicle sags The distance guide lines are dis- due to the number of passengers or played according to flat surfaced the distribution of the load, there is objects (such as the road).
- Page 103 5-1. Rear view monitor system ■ Vehicle width guide lines ■ Distance guide lines Visually check the surroundings Visually check the surroundings and the area behind the vehicle. In and the area behind the vehicle. On the case shown below, the truck the screen, it appears that a truck is appears to be outside of the vehicle parking at point...
-
Page 104: Things You Should Know
If you notice any of the following symptoms, refer to the likely cause and the solution, and re-check. If the symptom is not resolved by the solution, have the vehicle inspected by a SUZUKI dealer or a qualified workshop. Symptom Likely cause Solution ... - Page 105 5-1. Rear view monitor system Symptom Likely cause Solution Have the vehicle inspected The camera position is out by a SUZUKI dealer or a of alignment. qualified workshop. The vehicle is tilted If this happens due to these The fixed guide lines are...
-
Page 106: Phone
Phone 6-1. Phone operation (Hands-free system for cellular phones) Quick reference ....106 Some basics .....107 Placing a call using the ® Bluetooth hands-free system ........111 Receiving a call using the ® Bluetooth hands-free system ........114 ® Talking on the Bluetooth hands-free system ..115 ®... -
Page 107: Quick Reference
6-1. Phone operation (Hands-free system for cellular phones) 6-1.Phone operation (Hands-free system for cellular phones) Quick reference Message function The following function can be used Phone screen operation on message function: The phone screen can be reached ® Using the Bluetooth phone by the following methods: message function (P.117) -
Page 108: Some Basics
6-1. Phone operation (Hands-free system for cellular phones) cut. Some basics • Noise may be heard on the ® Bluetooth audio playback. The hands-free system ena- • A noise may be heard during phone calls. bles calls to be made and ®... - Page 109 6-1. Phone operation (Hands-free system for cellular phones) select “Yes”. WARNING ® Up to 5 Bluetooth devices can ® ● Before using Bluetooth devices, be registered to the system. If users of any electrical medical device other than implantable car- the maximum number of devices diac pacemakers, cardiac are registered, registration can-...
- Page 110 6-1. Phone operation (Hands-free system for cellular phones) ■ Microphone Using the phone The microphone is used when talk- switch/microphone ing on the phone. ■ Steering switch By pressing the phone switch, a call can be received or ended without taking your hands off the steering wheel.
- Page 111 6-1. Phone operation (Hands-free system for cellular phones) When selling or disposing of NOTICE the vehicle ● Do not touch and put a sharp object to the microphone. It may cause A lot of personal data is registered failure. when the hands-free system is used.
-
Page 112: Placing A Call Using The Bluetooth Hands-Free System
6-1. Phone operation (Hands-free system for cellular phones) Placing a call using the By call history ® Bluetooth hands-free Up to 45 of the latest call history system items (missed, incoming and outgo- ing) can be selected. ® After a Bluetooth phone has Display the phone top screen. - Page 113 6-1. Phone operation (Hands-free system for cellular phones) “E-mail addresses”: Select to display all By favourites list registered e-mail addresses for the contact. Calls can be made using registered contacts which can be selected Check that the dialing screen is from a contact list.
- Page 114 6-1. Phone operation (Hands-free system for cellular phones) Check that a confirmation list may not transfer depending on the ® type of Bluetooth phone connected. screen is displayed when the operation is complete. By keypad ■ For PBAP incompatible but ®...
-
Page 115: Receiving A Call Using The Bluetooth Hands-Free System
6-1. Phone operation (Hands-free system for cellular phones) ● The ringtone that has been set in the Receiving a call using sound settings screen can be heard ® the Bluetooth when there is an incoming call. ® hands-free system Depending on the type of Bluetooth phone, both the system and ®... -
Page 116: Talking On The Bluetooth Hands-Free System
6-1. Phone operation (Hands-free system for cellular phones) Talking on the Select to hang up the phone. ® Bluetooth hands-free ● When cellular phone call is changed system to hands-free call, the hands-free screen will be displayed and its func- tions can be operated on the screen. - Page 117 6-1. Phone operation (Hands-free system for cellular phones) machine or bank phone service is Incoming call waiting desired. A phone number with contin- uous tone signals can be registered in When a call is interrupted by a third the contact list. party while talking, the incoming screen is displayed.
-
Page 118: Bluetooth ® Phone Message Function
6-1. Phone operation (Hands-free system for cellular phones) used on message function: ® Bluetooth phone mes- • Receiving a message (P.117) sage function • Checking received messages (P.118) Received messages can be for- • Checking sent messages (P.119) warded from the connected •... - Page 119 6-1. Phone operation (Hands-free system for cellular phones) E-mail: will be automatically read out. • “Incoming E-mail display” is set to (P.129) “Full screen”. (P.123) Select to display the previous or • “E-mail notification pop-up” is set to on. (P.123) next message.
- Page 120 6-1. Phone operation (Hands-free system for cellular phones) Select corresponding to the Checking sent messages desired number. Display the message screen. Select “New”. (P.117) Enter the message and then Select the desired outbox from select “OK”. the list displayed on the left side of the screen.
- Page 121 6-1. Phone operation (Hands-free system for cellular phones) Select corresponding to the Replying to a message desired message to edit. (quick reply) Select “OK” when editing is 15 messages have already been completed. stored. Display the message screen. ● To reset the edit quick reply mes- (P.117) sages, select “Default”.
- Page 122 6-1. Phone operation (Hands-free system for cellular phones) Display the message screen. (P.117) Select a desired account name that is displayed on the left side of screen. Select the desired message. Select the text area. Identified phone numbers con- tained in the message are dis- played in blue text.
-
Page 123: Setup
6-2. Setup 6-2.Setup Phone settings Sounds settings screen The call and ringtone volume can Displaying the phone set- be adjusted. A ringtone can be tings screen selected. Display the phone settings Press the “SETUP” button. screen. (P.122) Select “Sounds”. Select the desired item to be set. - Page 124 6-2. Setup call display. Select “-” or “+” to adjust the incoming SMS/MMS tone vol- “Full screen”: When a call is received, ume. the incoming call screen is displayed and can be operated on the screen. Select “-” or “+” to adjust the “Drop-down”: A message is displayed incoming e-mail tone volume.
- Page 125 6-2. Setup phone, these functions may not be Select to sort contacts by the available. first name or last name field. Select to add contacts to the Contact/Call history set- favourites list. (P.128) tings screen Select to delete favourites from Contacts can be transferred from a the favourites list.
- Page 126 6-2. Setup ® Bluetooth phone. Setting automatic con- tact/history transfer ® If another Bluetooth device is connected when transferring The automatic contact/history func- contact data, depending on the tion is available for PBAP compati- phone, the connected ® ble Bluetooth phones only.
- Page 127 6-2. Setup “Replace contacts”: Select to transfer Transferring contacts from the contact from the connected cellular device phone and replace the current one. “Add contact”: Select to transfer the When an Android Auto connection desired contact data from the con- is established, this function will be nected cellular phone to add to the cur- rent one.
- Page 128 6-2. Setup transfer the contact from the Registering a new contact to connected USB device or the contact list ® Bluetooth phone and replace New contact data can be regis- the current one. tered. “Add contact”: Select to transfer Up to 4 numbers per person can be the desired contact data from registered.
- Page 129 6-2. Setup Editing the contact data Favourites list setting Up to 15 contacts (maximum of 4 ® For PBAP compatible Bluetooth numbers per contact) can be regis- phones, this function is available tered in the favourites list. when “Automatic transfer” is set to off.
- Page 130 6-2. Setup Check that a confirmation Message settings screen screen is displayed when the Display the phone settings operation is complete. screen. (P.122) ■ Deleting favourites from the Select “Messaging”. favourites list Select “Remove favourite”. Select the desired item to be set.
- Page 131 6-2. Setup Vehicle signature settings Select “Vehicle signature”. Select the desired item to be set. Select to set adding the vehicle signature to outgoing mes- sages on/off. Select to edit the vehicle signa- ture. (P.130) Select to reset all setup items. ■...
-
Page 132: What To Do If
For a list of specific devices which information from both this system operation has been confirmed on and the cellular phone, then regis- this system, check with a SUZUKI ter the cellular phone you wish to dealer or a qualified workshop. connect to this system. (P.33) ®... - Page 133 6-3. What to do if... ® ■ Automatic Bluetooth connec- When making/receiving a call tion on this system is set to off. A call cannot be made/received. ® Set automatic Bluetooth connec- ■ Your vehicle is in a area. tion on this system to on when the power switch is in ACC or ON.
- Page 134 6-3. What to do if... In other situations ® When using the Bluetooth message function ® The Bluetooth connection status Messages cannot be viewed. is displayed at the top of the screen each time the system is ■ Message transfer is not ena- activated.
- Page 135 6-3. What to do if... ■ The cellular phone is the most likely cause of the symptom. Turn the cellular phone off, remove and reinstall the battery pack, and then restart the cellular phone. Enable the cellular phone’s ® Bluetooth connection.
-
Page 136: Index
Index Alphabetical Index ....136 COROLLA_HV(TMUK)_OEM_MM_(EE) -
Page 137: Alphabetical Index
Alphabetical Index Alphabetical Index ® Bluetooth phone message function ............. 117 AM............ 62 Calling the message sender..120 Android Auto........71 Checking received messages ..118 Android Auto button (Menu screen) Checking sent messages ... 119 ............10 Create new message ....119 Apple CarPlay button (Menu screen) Displaying the message screen . - Page 138 Alphabetical Index Message settings .......129 Notifications/display settings ..123 Hands-free system ....... 106 Sounds settings......122 ® Home screen operation....19 Placing a call using the Bluetooth hands-free system...... 111 By call history ......111 By contacts list ......112 Info button (Menu screen) ..... 10 By favourites list ......
- Page 139 Alphabetical Index ® Using the speech command system Wi-Fi button (Setup screen)..13 ........... 90 Status icon ........11 Status icon explanation....11 Steering switch ......78, 90 Audio switch......... 78 For more information about Talk switch (Steering switch)..90 the following items, see the “Owner’s Manual”.
- Page 140 Alphabetical Index COROLLA_HV(TMUK)_OEM_MM_(EE)
- Page 141 Certification COROLLA_HV(TMUK)_OEM_MM_(EE)
- Page 142 COROLLA_HV(TMUK)_OEM_MM_(EE)
- Page 143 COROLLA_HV(TMUK)_OEM_MM_(EE)
- Page 144 COROLLA_HV(TMUK)_OEM_MM_(EE)
- Page 145 COROLLA_HV(TMUK)_OEM_MM_(EE)
- Page 146 COROLLA_HV(TMUK)_OEM_MM_(EE)
- Page 147 MPEG LA COROLLA_HV(TMUK)_OEM_MM_(EE)
- Page 148 COROLLA_HV(TMUK)_OEM_MM_(EE)
- Page 149 COROLLA_HV(TMUK)_OEM_MM_(EE)
- Page 150 9 9 0 1 6 - 5 4 Z M 0 - 0 1 E Part No. 99016-54ZM0-01E October, 2020...