Logitech C310 Getting Started
Hide thumbs
Also See for C310:
- User manual ,
- Getting started manual (134 pages) ,
- Getting started (94 pages)
Advertisement
Available languages
Available languages
Quick Links
Advertisement

Related Manuals for Logitech C310


Summary of Contents for Logitech C310
- Page 1 Getting started with Logitech HD Webcam C310 ®...
- Page 2 Česká verze 156 www logitech com/support 167...
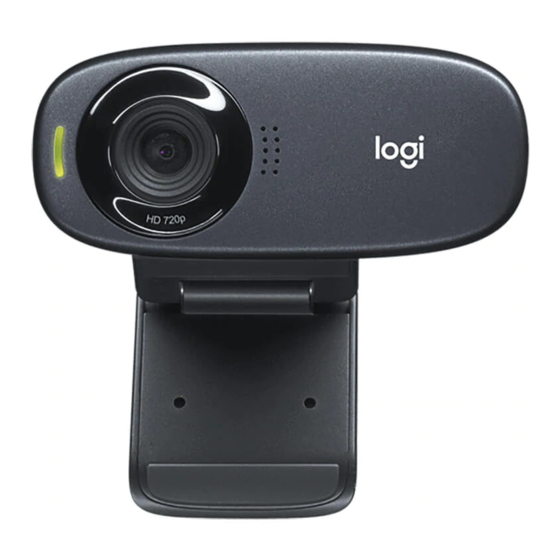
- Page 3 Logitech HD Webcam C310 ® 1. Microphone 2. Lens 3. Activity light 4. Flexible clip/base 5. Product documentation Getting started with Logitech HD Webcam C310 ® Thank you for buying a Logitech webcam! Use this guide to set up and begin using your Logitech webcam If you have questions before you start, or if you just want to learn more about your Logitech webcam, please visit logitech.com/support English 3...
-
Page 4: Install Software
Getting started with Setting up your webcam Place your webcam Connect your webcam Install software If you’re using your webcam with Windows® 8, the software required is downloaded automatically when you connect your webcam for the first time, and installed silently in the background Important: Make sure you’re connected to the Internet, so the software can be downloaded If you’re using your webcam with Windows® 7 or Windows Vista®, you must install the Logitech® Webcam Software, available from: logitech.com/downloads 4 English ... - Page 5 Logitech HD Webcam C310 ® Getting started with video calling Your Logitech HD Webcam c310 provides HD 720p video calling. To take advantage of video calling both you and the person you call must install Skype™, or use a different video-calling application such as Yahoo!® Messenger, Windows Live® Messenger or Gmail Learn more: skype.com As well as a webcam and video calling application, both callers need: • A computer with speakers • A broadband Internet connection (or a headset) and a microphone; (e g , DSL, T1, or cable) your Logitech HD Webcam c310 has a built-in microphone English 5...
- Page 6 Getting started with Using your webcam with Windows 8 Use the Camera app, available from the Windows 8 Start screen, to operate and control your webcam Understanding the Camera app 1. Preview window Click or tap to capture 5. Turn Video Mode on (to record videos) photos or videos (depending on whether or off (to take photos) Video Mode is selected) 6. Click or tap on the arrows to scroll 2. Change webcams (when you have more through the photos and videos you have than one) The face of your Logitech captured webcam illuminates when selected Videos are denoted by a timer and play 3. Adjust your camera settings button in the bottom right-hand corner: 4. Activate or deactivate the Timer feature When activated, there is a three second countdown to capturing a photo or video 6 English ...
- Page 7 Logitech HD Webcam C310 ® Tip: The Camera app lets you use your webcam’s most popular features quickly and easily If you want to take advantage of the enhanced features your webcam offers, such as motion detection, use the Logitech Webcam Software available from logitech.com/downloads Adjusting your Camera settings The Logitech software optimizes the settings for your environment automatically To adjust any of your settings choose Camera options This is available from the Camera app (see the previous page) and from within Metro apps that support webcams 1. Choose your required resolution for photo capture, or video capture when in Video Mode 2. Choose the microphone you want to use to record sound in your videos, if you have more than one available 3. Access More Options, to benefit from enhanced features such as digital Zoom and Move If the More Options pane doesn’t show the Logitech logo and offer enhanced options, it is likely that the Logitech software didn’t install correctly when you first connected your camera To reinstall it, go to the Windows Store and look for Logitech Camera Controller 4. Zoom in or out to include/exclude your surroundings 5. Having zoomed in, drag the white box to pan (adjust the focus area of your webcam) 6. Use Follow my face so you’re always in the picture 7. Enjoy clear conversations without annoying background noise Depending on the features available with your camera, you can access further advanced settings by scrolling English 7...
- Page 8 Getting started with Sharing your photos and videos You can share your photos and videos via e-mail, Twitter, Facebook®, YouTube®, or Microsoft SkyDrive® Follow these steps: 1. In the Camera app, scroll to the photo or video you want to share 2. Select Share in the Charms bar (or press - H): 3. Choose the media through which you want to share the photo or video 8 English ...
- Page 9 Logitech HD Webcam C310 ® Using your webcam with Windows 7 and Windows Vista The Logitech Webcam Software provides everything you need to use and control your webcam Launch the software from the Windows Start® menu, or by right-clicking on the camera icon in the Windows taskbar Understanding the Logitech Webcam Software 1. Capture pictures and videos 5. Change webcams (when you have more than one) 2. View captured images and share via 6. Open Logitech Webcam e-mail, Facebook, or YouTube Software settings 3. Capture videos triggered by detected motion 7. Open help dashboard 4. Control your webcam while on a video call English 9...
- Page 10 Getting started with Capturing video and snapping pictures Quick Capture allows you to take photos and record videos easily You have quick access to webcam controls and settings: 1. Preview window 5. Photo thumbnails 2. Capture mode: 6. Video thumbnails photo/video 7. Click a thumbnail 3. Capture button to enter the gallery 4. Webcam controls The gallery: viewing and sharing Clicking on an image thumbnail in the webcam gallery (1) opens the video or photo in the review window (2) You can then: • Attach the video or picture file to an e-mail (3) • Edit the photo or splice together video (4) • Upload the picture or video to Facebook (5) • Upload the video to Twitter or YouTube (6) You can also drag and drop a gallery image onto one of the function tiles (items 3-6) to launch an editing application or to attach or upload 10 English ...
- Page 11 Logitech HD Webcam C310 ® Using motion detection • Set up your webcam to record video when it detects movement • Adjust captured video duration and detection sensitivity • Captured video is automatically saved to your computer • View content in the Gallery or upload it using the One-touch Upload window Fine tuning your webcam during a video call 1. Launch the webcam controller when on a video call 2. Use pan and tilt to find the best angle 3. Zoom in or out to include/exclude your surroundings 4. Use Follow my face so you’re always in the picture 5. Enjoy clear conversations without annoying background noise 6. Correct for poor lighting environments using RightLight 7. Access advanced webcam settings English 11...
- Page 12 Logitech HD Webcam C310 ® Благодарим вас за приобретение веб-камеры Logitech. Для подготовки веб-камеры Logitech к работе и началу работы с ней следуйте инструкциям из данного руководства. При наличии вопросов до начала работы или желании узнать больше о веб-камере Logitech посетите веб-сайт...
- Page 13 автоматически загружается при первом подключении веб-камеры и устанавливается в фоновом режиме. Важно! Убедитесь в наличии подключения к Интернету для возможности загрузки программного обеспечения. Если веб-камера используется с Windows® 7 или Windows Vista®, то необходимо установить ПО Logitech® Webcam Software, доступное по адресу: logitech.com/downloads По-русски...
- Page 14 Начало работы Начало использования видеовызовов Веб-камера Logitech HD Webcam c310 позволяет выполнять видеовызовы в формате высокой четкости (720p). Чтобы воспользоваться преимуществами видеообщения, и вам, и вашему собеседнику нужно будет установить Skype™ или какое-либо другое приложение для видеовызовов, такое как Yahoo!® Messenger, Windows Live® Messenger или Gmail.
- Page 15 2. Смена веб-камеры (если установлено Видеозаписи отмечены значком таймера несколько веб-камер). При выборе веб- и кнопкой воспроизведения в правом углу: камеры Logitech загорается подсветка на ее передней панели. 3. Настройка параметров камеры. 4. Активация и деактивация функции «Таймер». При активации начинается трехсекундный...
- Page 16 Начало работы Совет. Приложение «Камера» позволяет быстро и легко пользоваться наиболее популярными функциями веб-камеры. Чтобы воспользоваться преимуществами расширенных функций веб-камеры, таких как обнаружение движения, воспользуйтесь ПО Logitech Webcam Software, доступным по адресу logitech.com/downloads. Настройка параметров приложения «Камера» ПО Logitech позволяет автоматически оптимизировать настройки. Для изменения каких- либо...
- Page 17 Logitech HD Webcam C310 ® Публикация фотографий и видео Поделиться фотографиями и видео можно с помощью электронной почты, Twitter, Facebook®, YouTube® или Microsoft SkyDrive®. Выполните следующие действия. 1. В приложении «Камера» перейдите к нужной фотографии или видеозаписи. 2. На панели Charms выберите команду «Опубликовать» (или нажмите клавиши...
- Page 18 Начало работы Использование веб-камеры с Windows 7 и Windows Vista ПО Logitech Webcam Software предоставляет пользователям все необходимое для работы с веб- камерой и управления ею Запустите программу с помощью меню Start (Пуск) Windows® или щелкнув правой кнопкой мыши значок камеры на панели задач Windows Знакомство...
- Page 19 Logitech HD Webcam C310 ® Съемка видео и фотографий Quick Capture позволяет с легкостью снимать фотографии и видео. Имеется быстрый доступ к элементам управления и настройкам веб-камеры. 1. Окно предварительного просмотра 2. Режим съемки: фото/видео 3. Кнопка съемки 4. Элементы управления веб-камерой...
- Page 20 Начало работы Использование обнаружения движения • Настройте свою веб-камеру для выполнения записи видео при обнаружении движения. • Отрегулируйте длительность снимаемого видео и чувствительность датчика. • Снятое видео автоматически сохраняется на жесткий диск компьютера. • Материалы можно просмотреть в галерее или загрузить...
- Page 21 Getting started with Logitech HD Webcam C310 ® Vă mulţumim că aţi achiziţionat o cameră web Logitech! Utilizaţi acest ghid pentru a configura şi a începe să utilizaţi camera web Logitech. Dacă aveţi întrebări înainte de a începe sau dacă doriţi doar să...
- Page 22 şi se instalează silenţios în fundal. Important: Pentru ca software-ul să se poată descărca, asiguraţi-vă că sunteţi conectat la Internet. Dacă utilizaţi camera web cu Windows® 7 sau Windows Vista®, trebuie să instalaţi software-ul Logitech® pentru camera web disponibil de la: logitech.com/downloads Română...
- Page 23 Noţiuni de bază pentru Noţiuni de bază pentru apelurile video Camera web Logitech HD Webcam c310 oferă posibilitatea de efectuare a apelurilor video HD pe 720 p. Pentru a beneficia la maximum de apelurile video, atât dvs., cât şi persoana pe care o apelaţi trebuie să...
- Page 24 2. Schimbarea camerelor web (când aveţi mai 6. Faceţi clic sau atingeţi săgeţile multe). Când este selectată, partea frontală pentru a derula prin fotografiile a camerei web Logitech se iluminează. şi videoclipurile realizate. 3. Ajustarea setărilor camerei. Videoclipurile sunt indicate de un cronometru şi de un buton de redare...
- Page 25 Ajustarea setărilor aplicaţiei Cameră Software-ul Logitech optimizează automat setările în funcţie de mediul în care vă aflaţi. Pentru a ajusta oricare dintre setări, alegeţi Camera Options (Opţiuni cameră). Puteţi efectua acest lucru din aplicaţia Cameră (consultaţi pagina anterioară) şi din aplicaţiile Metro care acceptă camere web.
- Page 26 Logitech HD Webcam C310 ® Partajarea fotografiilor şi a videoclipurilor Puteţi partaja fotografiile şi videoclipurile prin e-mail, Twitter, Facebook®, YouTube® sau Microsoft SkyDrive®. Parcurgeţi aceşti paşi: 1. În aplicaţia Cameră, derulaţi la fotografia sau la videoclipul pe care doriţi să-l partajaţi. 2. Selectaţi Share (Partajare) din bara de butoane (sau apăsaţi - H): 3. Alegeţi mediul prin care doriţi să...
- Page 27 Noţiuni de bază pentru Utilizarea camerei web cu Windows 7 şi Windows Vista Software-ul Logitech pentru camera web oferă toate elementele necesare pentru utilizarea şi controlul camerei web Lansaţi software-ul din meniul Windows Start® sau făcând clic dreapta pe pictograma cameră din bara de activităţi Windows Înţelegerea software-ului Logitech pentru camera web...
- Page 28 Logitech HD Webcam C310 ® Realizarea videoclipurilor şi a fotografiilor Quick Capture (Captură rapidă) vă permite să realizaţi fotografii şi să înregistraţi videoclipuri cu uşurinţă. Puteţi accesa rapid controalele şi setările camerei web: 1. Fereastra de examinare 2. Mod captură: foto/video 3. Butonul de captură...
- Page 29 Noţiuni de bază pentru Utilizarea detecţiei mişcării • Configuraţi camera web să înregistreze un videoclip când detectează mişcare. • Ajustaţi durata şi sensibilitatea detecţiei videoclipului realizat. • Videoclipul realizat este salvat automat pe computer. • Vizualizaţi conţinut în Gallery (Galerie) sau încărcaţi-l utilizând fereastra One-touch Upload (Încărcare cu o atingere).