Table of Contents
Advertisement
Quick Links
Advertisement
Table of Contents

Related Manuals for Asus H97M-E


Summary of Contents for Asus H97M-E
- Page 1 H97M-E...
- Page 2 INCIDENTAL, OR CONSEQUENTIAL DAMAGES (INCLUDING DAMAGES FOR LOSS OF PROFITS, LOSS OF BUSINESS, LOSS OF USE OR DATA, INTERRUPTION OF BUSINESS AND THE LIKE), EVEN IF ASUS HAS BEEN ADVISED OF THE POSSIBILITY OF SUCH DAMAGES ARISING FROM ANY DEFECT OR ERROR IN THIS MANUAL OR PRODUCT.
-
Page 3: Table Of Contents
Contents Contents Safety information ...................... iv About this guide ......................iv Package contents ....................... vi H97M-E specifications summary ................vi Product introduction Before you proceed ..................1-1 Motherboard overview ................. 1-1 Central Processing Unit (CPU) ..............1-3 System memory .................... 1-6 Expansion slots .................... -
Page 4: Safety Information
Safety information Electrical safety before relocating the system. When adding or removing devices to or from the system, ensure that the power cables for the devices are unplugged before the signal cables are connected. If possible, disconnect all power cables from the existing system before you add a device. Before connecting or removing signal cables from the motherboard, ensure that all power cables are unplugged. - Page 5 Refer to the following sources for additional information and for product and software updates. ASUS websites The ASUS website provides updated information on ASUS hardware and software products. Refer to the ASUS contact information. Optional documentation that may have been added by your dealer. These documents are not part of the standard package.
-
Page 6: Package Contents
DDR3 1600 MHz and higher memory modules on XMP mode will run at the maximum transfer rate of DDR3 1600 MHz. ** Refer to www.asus.com for the Memory QVL (Qualified Vendors List). Expansion slots 1 x PCI Express 3.0/2.0 x16 slot (at x16 mode) 3 x PCI Express 2.0 x1 slots... - Page 7 - ASUS Enhanced DRAM Overcurrent Protection - Short circuit damage prevention - ASUS ESD Guards - Enhanced ESD protection - ASUS High-Quality 5K-Hour Solid Capacitors - 2.5x long lifespan with excellent durability - ASUS Stainless Steel Back I/O - 3x more durable corrosion-resistant...
- Page 8 - Monitor your PC status with smart devices in real time UEFI BIOS EZ Mode - featuring friendly graphics user interface - ASUS O.C. Tuner - ASUS CrashFree BIOS 3 - ASUS EZ Flash 2 ASUS Q-Design - ASUS DIMM...
- Page 9 1 x Clear CMOS jumper BIOS features 64 Mb Flash ROM, UEFI AMI BIOS, PnP, DMI2.7, WfM2.0, SM BIOS 2.8, ACPI 5.0, Multi-language BIOS, ASUS EZ Flash 2, ASUS CrashFree F3 Shortcut functions and ASUS DRAM SPD (Serial Presence Detect) memory information Manageability WfM 2.0, DMI 2.7, WOR by PME, PXE...
-
Page 11: Product Introduction
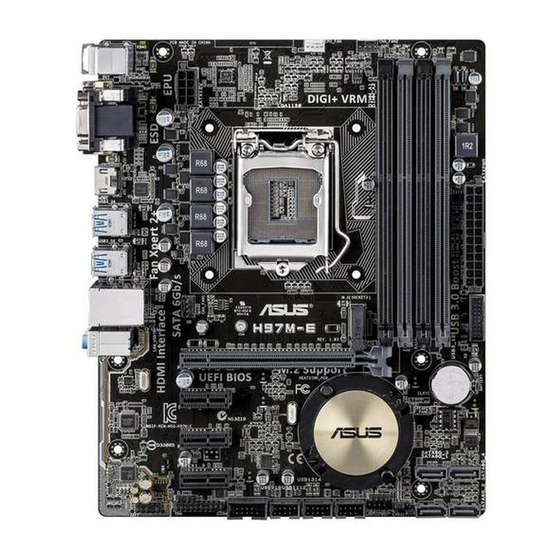
1.2.1 Placement direction with external ports goes to the rear part of the chassis as indicated in the image. 1.2.2 Screw holes Place six screws into the holes indicated by circles to secure the motherboard to the chassis. ASUS H97M-E... - Page 12 Place this side towards the rear of the chassis H97M-E 1.2.3 Motherboard layout 19.8cm(7.8in) KBMS CHA_FAN2 CPU_FAN DIGI +VRM EATX12V HDMI 1442K USB3_34 USB3_56 CHA_FAN1 LAN_USB78 H97M-E AUDIO PCIEX16 Realtek 8111GR BATTERY PCIEX1_1 64Mb Super Intel ® BIOS PCIEX1_2 SATA6G_3...
-
Page 13: Central Processing Unit (Cpu)
1.2.4 Layout contents Connectors/Jumpers/Slots/LED Page 1-13 1-16 1-16 ® 1-17 1-13 1-17 Central Processing Unit (CPU) ® ® ® processors. H97M-E H97M-E CPU socket LGA1150 ASUS H97M-E... - Page 14 socket. transit-related. cap. 1.3.1 Installing the CPU Chapter 1: Product introduction...
- Page 15 1.3.2 CPU heatsink and fan assembly installation before you install the heatsink and fan if necessary. To install the CPU heatsink and fan assembly ASUS H97M-E...
-
Page 16: System Memory
To uninstall the CPU heatsink and fan assembly System memory 1.4.1 Overview Channel Sockets H97M-E H97M-E 240-pin DDR3 DIMM sockets Chapter 1: Product introduction... - Page 17 1.4.2 Memory configurations sockets. operation. ® ® ® motherboard. ® www.asus.com ASUS H97M-E...
- Page 18 1.4.3 Installing a DIMM To install a DIMM To remove a DIMM Chapter 1: Product introduction...
-
Page 19: Expansion Slots
Installing an expansion card To install an expansion card: make the necessary hardware settings for the card. use. seated on the slot. 1.5.2 Configuring an expansion card 1.5.3 PCI Express 2.0 x1 slots 1.5.4 PCI Express 3.0/2.0 x16 slot ASUS H97M-E... -
Page 20: Jumpers
– – – – – – – shared – – – – Jumpers Clear RTC RAM (3-pin CLRTC) CLRTC H97M-E Normal Clear RTC (Default) H97M-E Clear RTC RAM To erase the RTC RAM: enter data. Chapter 1: Product introduction... -
Page 21: Connectors
LAN port LED indications Activity/Link LED Speed LED Status Description Status Description Linked LAN port connection 1Gbps connection Line In port (light blue). audio sources. Line Out port (lime). Microphone port (pink). This port connects to a microphone. ASUS H97M-E 1-11... - Page 22 Audio 2.1, 4.1, 5.1, or 7.1-channel configuration Headset Port 4.1-channel 5.1-channel 7.1-channel 2.1-channel – – – To configure an 7.1-channel audio output: audio output. USB 2.0 ports 7 and 8. USB 3.0 ports 3, 4, 5 and 6. ® operating system. ®...
- Page 23 Internal connectors Serial port connector (10-1 pin COM) PIN 1 H97M-E H97M-E Serial port (COM) connector CPU and chassis fan connectors (4-pin CPU_FAN, and 4-pin CHA_FAN1/2) black wire of each cable matches the ground pin of the connector. CPU_FAN CHA_FAN2...
- Page 24 H97 Serial ATA 6.0Gb/s connectors (7-pin SATA6G_1~4) ® ® chipset. SATA6G_3 SATA6G_4 SATA6G_1 SATA6G_2 H97M-E H97M-E SATA 6.0Gb/s connectors SATA Mode Selection Digital audio connector (4-1 pin SPDIF_OUT) opening at the back of the system chassis. H97M-E SPDIF_OUT H97M-E Digital audio connector Chapter 1: Product introduction...
- Page 25 Front panel audio connector (10-1 pin AAFP) AAFP PIN 1 H97M-E HD-audio-compliant Legacy AC’97 pin definition compliant definition H97M-E Front panel audio connector AC97 USB 3.0 connector (20-1 pin USB3_12) USB3_12 PIN 1 USB3+5V USB3+5V IntA_P1_SSRX- IntA_P2_SSRX- IntA_P1_SSRX+ IntA_P2_SSRX+ IntA_P1_SSTX-...
- Page 26 +5 Volts H97M-E +5 Volts PSON# +3 Volts -12 Volts +3 Volts +3 Volts PIN 1 H97M-E ATX power connectors system will not boot. for details. M.2 Socket 3 M.2 (SOCKET3) H97M-E H97M-E M.2 Socket 1-16 Chapter 1: Product introduction...
- Page 27 USB 2.0 connectors (10-1 pin USB910, USB1112, USB1314) USB910 USB1112 USB1314 H97M-E PIN 1 PIN 1 PIN 1 H97M-E USB2.0 connectors TPM connector (20-1 pin TPM) PIN 1 H97M-E H97M-E TPM Connector ASUS H97M-E 1-17...
- Page 28 PWR_BTN PIN 1 H97M-E +HDD_LED- RESET H97M-E System panel connector This connector is for the system power button. This 2-pin connector is for the chassis-mounted reset button for system reboot without turning off the system power. Speaker connector (4-pin SPEAKER) allows you hear system beeps and warnings.
-
Page 29: Onboard Leds
Chassis intrusion connector (4-1 pin CHASSIS) one end of the chassis intrusion sensor or switch cable to this connector. The chassis detection feature. CHASSIS H97M-E PIN 1 H97M-E Chassis intrusion connector Onboard LEDs Standby Power LED H97M-E SB_PWR H97M-E Onboard LED... -
Page 30: Software Support
Software support 1.9.1 Installing an operating system ® ® ® detailed information. 1.9.2 Support DVD information To run the Support DVD The following screen is for reference only. Click an icon to display Support DVD/motherboard information Click an item to install Chapter 1: Product introduction... -
Page 31: Bios Information
BIOS information Managing and updating your BIOS 2.1.1 EZ Update EZ Update Model Name: H97M-E Version: 0301 Release Date: 03/08/2014 Click to automatically update your motherboard’s driver, software and firmware Click to find and Click to select a Click to update... - Page 32 2.1.2 ASUS EZ Flash 2 To update the BIOS using EZ Flash 2: Advanced Mode Tool ASUS EZ Flash 2 Utility Drive Folder Info 2.1.3 ASUS CrashFree BIOS 3 utility H97ME.CAP Chapter 2: Getting started...
- Page 33 Recovering the BIOS To recover the BIOS: 2.1.4 ASUS BIOS Updater Before updating BIOS Booting the system in DOS environment ASUS H97M-E...
- Page 34 ENTER to select boot device ESC to boot using defaults P2: ST3808110AS (76319MB) aigo miniking (250MB) UEFI: (FAT) ASUS DRW-2014L1T(4458MB) P1: ASUS DRW-2014L1T(4458MB) UEFI: (FAT) aigo miniking (250MB) Enter Setup ISOLINUX 3.20 2006-08-26 Copyright (C) 1994-2005 H. Peter Anvin A Bootable DVD/CD is detected.
- Page 35 FORMAN~1 <DIR> H97ME.CAP 8390626 2014-02-10 21:14:34 Drives panel Files panel Note [Enter] Select or Load [Tab] Switch [V] Drive Info [Up/Down/Home/End] Move [Esc] Exit Are you sure you want to update the BIOS? the Load Optimized Defaults Exit ASUS H97M-E...
-
Page 36: Bios Setup Program
BIOS setup program Entering BIOS Setup at startup To enter BIOS Setup at startup: Entering BIOS Setup after POST To enter BIOS Setup after POST: www.asus.com Load Optimized Defaults 1.6 Jumpers for information BIOS menu screen EZ Mode and Advanced Mode... - Page 37 IRST support Loads Save Displays the Fan Tuning setting optimized changes Advanced mode manually default and exit the menus BIOS setup program Displays the CPU/ Displays the X.M.P. chassis fan speed status Boot Menu (F8) Advanced Mode Advanced Mode ASUS H97M-E...
- Page 38 Quick settings bar Configuration fields Hardware information Menu bar Back button General help Menu items Drop-down list Submenu item Last modified Enters EZ settings mode Menu bar My Favorites Main Ai Tweaker Advanced Monitor Boot Tool Exit Chapter 2: Getting started...
- Page 39 Menu items Main Back button Submenu items Drop-down list Scroll bar Navigation keys General help Configuration fields Last Modified button Hardware Monitor ASUS H97M-E...
-
Page 40: My Favorites
My Favorites Adding items to My Favorites 2-10 Chapter 2: Getting started... -
Page 41: Main Menu
Main menu 1.6 Jumpers Administrator or User Password Not Installed Installed Ai Tweaker menu ASUS H97M-E 2-11... - Page 42 2-12 Chapter 2: Getting started...
-
Page 43: Advanced Menu
Advanced menu ASUS H97M-E... -
Page 44: Monitor Menu
Monitor menu 2-14 Chapter 2: Getting started... -
Page 45: Boot Menu
Boot menu ASUS H97M-E 2-15... -
Page 46: Tools Menu
Tools menu 2.10 Exit menu 2-16 Chapter 2: Getting started... -
Page 47: Appendices
Cet appareil est conforme aux normes CNR exemptes de licence d’Industrie Canada. Le fonctionnement est soumis aux deux conditions suivantes : (1) cet appareil ne doit pas provoquer d’interférences et (2) cet appareil doit accepter toute interférence, y compris celles susceptibles de provoquer un fonctionnement non souhaité de l’appareil. H97M-E... - Page 48 ASUS Recycling/Takeback Services ASUS recycling and takeback programs come from our commitment to the highest standards for protecting our environment. We believe in providing solutions for you to be able to responsibly recycle our products, batteries, other components as well as the packaging materials.
-
Page 49: Asus Contact Information
+1-510-739-3777 +1-510-608-4555 Web site http://www.asus.com/us/ Technical Support Support fax +1-812-284-0883 Telephone +1-812-282-2787 Online support http://www.service.asus.com/ ASUS COMPUTER GmbH (Germany and Austria) Address Harkort Str. 21-23, D-40880 Ratingen, Germany +49-2102-959911 Web site http://www.asus.com/de Online contact http://eu-rma.asus.com/sales Technical Support Telephone +49-1805-010923* Support Fax... - Page 50 Appendices...