Table of Contents
Advertisement
Quick Links
Advertisement
Table of Contents

Related Manuals for Asus A78M-A


Summary of Contents for Asus A78M-A
- Page 1 A78M-A...
- Page 2 INCIDENTAL, OR CONSEQUENTIAL DAMAGES (INCLUDING DAMAGES FOR LOSS OF PROFITS, LOSS OF BUSINESS, LOSS OF USE OR DATA, INTERRUPTION OF BUSINESS AND THE LIKE), EVEN IF ASUS HAS BEEN ADVISED OF THE POSSIBILITY OF SUCH DAMAGES ARISING FROM ANY DEFECT OR ERROR IN THIS MANUAL OR PRODUCT.
-
Page 3: Table Of Contents
My Favorites ................. 2-9 Main menu .................. 2-10 Ai Tweaker menu ................ 2-12 Advanced menu ................. 2-16 Monitor menu ................2-22 Boot menu .................. 2-25 Tools menu ................. 2-32 2.10 Exit menu ..................2-33 Appendices Notices .......................A-1 ASUS contact information ...............A-3... -
Page 4: Safety Information
Safety information Electrical safety • before relocating the system. • When adding or removing devices to or from the system, ensure that the power cables for the devices are unplugged before the signal cables are connected. If possible, disconnect all power cables from the existing system before you add a device. •... - Page 5 Refer to the following sources for additional information and for product and software updates. ASUS websites The ASUS website provides updated information on ASUS hardware and software products. Refer to the ASUS contact information. Optional documentation that may have been added by your dealer. These documents are not part of the standard package.
-
Page 6: Package Contents
APUs. • The maximum 64GB memory capacity can be supported with 16GB or above DIMMs. ASUS will update the memory QVL once the DIMMs are available in the market. • When you install a total memory of 4GB capacity or more, Windows ®... - Page 7 - ASUS AI Charger - ASUS Disk Unlocker - ASUS AI Suite 3 - ASUS Anti Surge - ASUS UEFI BIOS EZ Mode featuring friendly graphics user interface ASUS Quiet Thermal Solution - ASUS Fan Xpert - Stylish Fanless Design Heat-sink solution...
- Page 8 BIOS features 64 Mb Flash ROM, UEFI AMI BIOS, PnP, DMI 2.0, WfM 2.0, SM BIOS 2.7, ACPI 2.0a, Multi-language BIOS, ASUS EZ Flash 2, ASUS CrashFreen BIOS 3, F12 Printscreen function, F3 Shortcut function and ASUS DRAM SPD (Serial Presence Detect) memory information...
-
Page 9: Product Introduction
ON, in sleep mode, or in soft-off mode. This is a reminder that you should shut down the system and unplug the power cable before removing or plugging in any motherboard component. The illustration below shows the location of the onboard LED. SB_PWR Standby Power Powered Off ASUS A78M-A... -
Page 10: Motherboard Overview
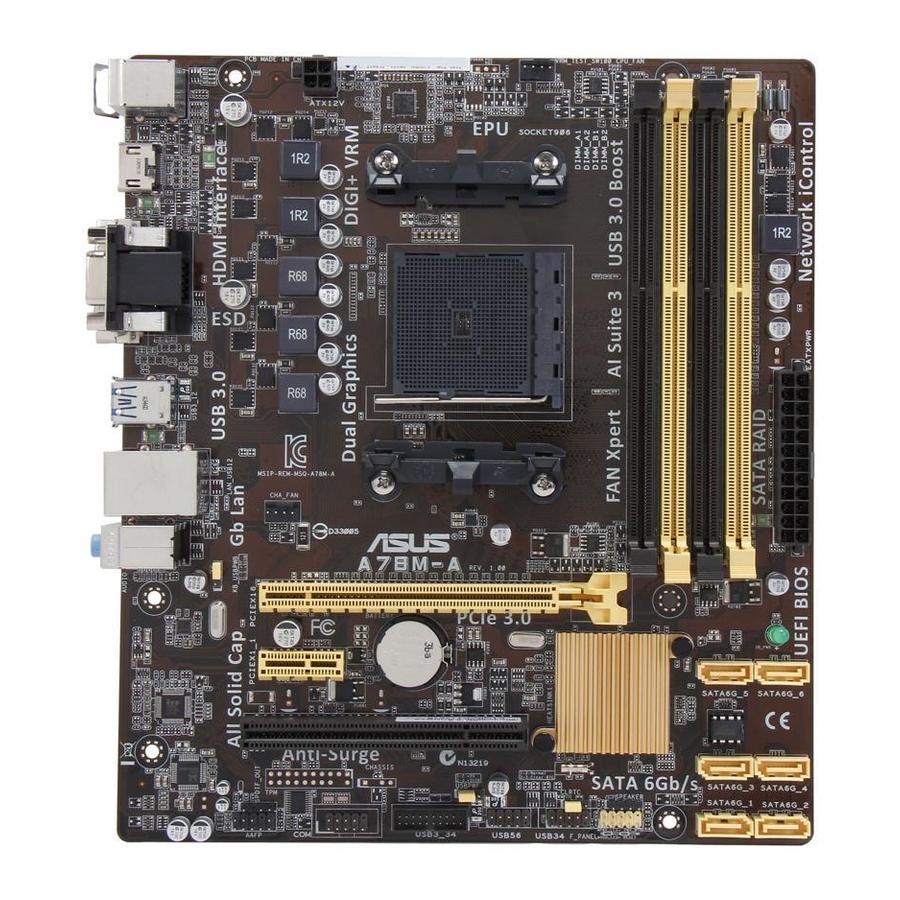
Motherboard overview Unplug the power cord before installing or removing the motherboard. Failure to do so can cause you physical injury and damage to motherboard components. 1.2.1 Placement direction When installing the motherboard, place it into the chassis in the correct orientation. The edge with external ports goes to the rear part of the chassis as indicated in the image. - Page 11 Motherboard layout 20.8cm(8.2in) CPU_FAN KBMS DIGI ATX12V +VRM HDMI USB3_12 LAN_USB12 CHA_FAN AUDIO A78M-A PCIEX16 SB_PWR 8111GR BATTERY PCIEX1_1 ® SATA6G_5 SATA6G_6 Super 64Mb PCI1 BIOS SATA6G_3 SATA6G_4 SPEAKER SPDIF_OUT USB3_34 SATA6G_1 SATA6G_2 AAFP USB56 USB34 F_PANEL 12 11 ASUS A78M-A...
-
Page 12: Accelerated Processing Unit (Apu)
1.2.4 Layout contents Connectors/Jumpers/Slots/LED Page 1. CPU and chassis fan connectors (4-pin CPU_FAN, and 4-pin CHA_FAN) 1-16 2. ATX power connectors (24-pin EATXPWR, 4-pin ATX12V) 1-17 3. AMD FM2+ socket 4. DDR3 DIMM slots 5. Clear RTC RAM (3-pin CLRTC) 1-12 6. - Page 13 1.3.1 APU installation ASUS A78M-A...
- Page 14 1.3.2 APU heatsink and fan assembly installation Apply the Thermal Interface Material to the APU heatsink and APU before you install the heatsink and fan if necessary. To install the APU heatsink and fan assembly Chapter 1: Product introduction...
- Page 15 To uninstall the APU heatsink and fan assembly ASUS A78M-A...
-
Page 16: System Memory
System memory 1.4.1 Overview This motherboard comes with four Double Data Rate 3 (DDR3) Dual Inline Memory Modules (DIMM) sockets. A DDR3 module has the same physical dimensions as a DDR2 DIMM but is notched differently to prevent installation on a DDR2 DIMM socket. DDR3 modules are developed for better performance with less power consumption. - Page 17 2.5 Ai Tweaker menu for manual memory frequency adjustment. memory load (4 DIMMs) or overclocking condition. • Visit the ASUS website at: www.asus.com for the latest QVL. 1.4.3 Installing a DIMM ASUS A78M-A...
-
Page 18: Expansion Slots
To remove a DIMM Expansion slots In the future, you may need to install expansion cards. The following sub-sections describe the slots and the expansion cards that they support. Unplug the power cord before adding or removing expansion cards. Failure to do so may cause you physical injury and damage motherboard components. - Page 19 – – – OnChip XHCI controller2 – shared – – – – – – OnChip USB EHCI 1/2/3 – shared – – – – – – OnChip USB OHCI – – shared – – – – – ASUS A78M-A 1-11...
-
Page 20: Jumpers
Jumpers Clear RTC RAM (3-pin CLRTC) This jumper allows you to clear the Real Time Clock (RTC) RAM in CMOS. You can clear the CMOS memory of date, time, and system setup parameters by erasing the CMOS RTC RAM data. The onboard button cell battery powers the RAM data in CMOS, which include system setup information such as system passwords. - Page 21 (Default) • The USB device wake-up feature requires a power supply that can provide 500mA on • The total current consumed must NOT exceed the power supply capability (+5VSB) whether under normal condition or in sleep mode. ASUS A78M-A 1-13...